blaseDS 的helloworld
这里采用的两个工程的形式
就是单独一个flex工程,单独一个java web工程
下载blaseDS(选择bin的就好)
解压zip文件的blaseDS.war
1.建java web工程 blaseDS_java
要点:a)复制blaseDS.war包下的WEB-INF 覆盖工程下文件夹(作用:引入blaseDS使项目具有远程对象调用功能)
b)建立类, 修改 在WEB-INF/flex/remoting-config的文件添加
<destination id="Hello">
       <properties>
         <source>test.Hello</source>
       </properties>
 </destination>
test.Hello 是我们建的类
package test;

public class Hello {

	public String say(String name){
		System.out.println("be doit");
		return name+" says!";
	}
}
完成收工
2 flex工程
a)新建一个flex工程,Server techonlogy 选择j2EE ,lcds
Server location 设置下
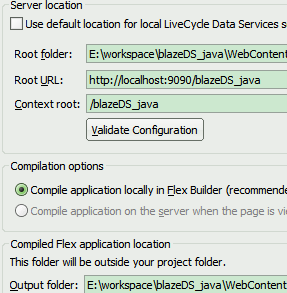
记得Output folder指向web服务器的地址
b)鼠标右击flex项目名》属性,
修改Flex Compiler 改为Use default SDK
3.测试
新建一个mxml页面
<?xml version="1.0" encoding="utf-8"?>
<mx:Application xmlns:mx="http://www.adobe.com/2006/mxml" layout="absolute">

	<mx:Script>
		<![CDATA[
			import mx.controls.Alert;
			import mx.rpc.events.FaultEvent;
			import mx.rpc.events.ResultEvent;
			private function doit():void{
				ro.say(tvalue.text);

			}

			private function resultHandler(event:ResultEvent):void{
				result.text=event.result.toString();
				//Alert.show(event.message.toString(),"sucess");
			}
			private function faultHandler(event:FaultEvent):void{
				Alert.show(event.message.toString(),"fault");
			}
		]]>
	</mx:Script>

	<mx:TextInput x="101" y="48" id="tvalue"/>
	<mx:Button x="292" y="48" label="Button" click="doit()"/>
	<mx:Label x="148" y="102"   width="131" id="result"/>
	<mx:RemoteObject id="ro" destination="Hello" result="resultHandler(event)" fault="faultHandler(event)"/>
</mx:Application>
然后右击run就可以了
<mx:RemoteObject/> destination 跟remote-config.xml里定义的一致