android 卷轴视图(ScrollView)
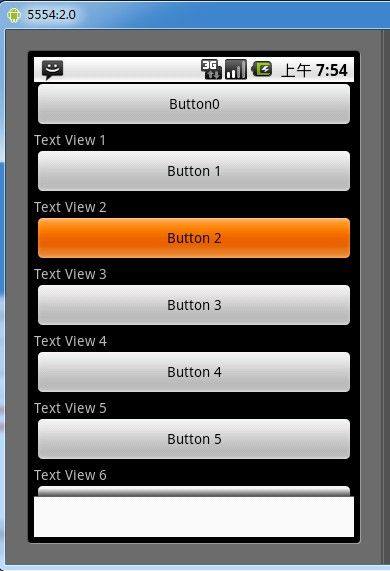
卷轴视图是指当拥有很多内容,一屏显示不完时,需要通过滚动来显示视图。比如在做一个阅读器的时候,文章很长,一页显示不完,那么就需要使用卷轴视图来滚动显示下一页。我们下面先来看看运行效果

Activity01
布局文件
<ScrollView xmlns:android="http://schemas.android.com/apk/res/android"
android:id="@+id/ScrollView01"
android:layout_width="fill_parent"
android:layout_height="wrap_content"
android:scrollbars="none">
<LinearLayout
android:id="@+id/layout"
android:orientation="vertical"
android:layout_width="fill_parent"
android:layout_height="wrap_content">
<TextView
android:layout_width="fill_parent"
android:layout_height="wrap_content"
android:text="TextView0"/>
<Button
android:id="@+id/Button01"
android:layout_width="fill_parent"
android:layout_height="wrap_content"
android:text="Button0"/>
</LinearLayout>
</ScrollView>
图片效果 源码见附件

Activity01
package com.yarin.android.Examples_04_20;

import android.app.Activity;
import android.os.Bundle;
import android.os.Handler;
import android.view.KeyEvent;
import android.view.View;
import android.widget.Button;
import android.widget.LinearLayout;
import android.widget.ScrollView;
import android.widget.TextView;

public class Activity01 extends Activity
{
    private LinearLayout mLayout;
    private ScrollView 	mScrollView;
    private final Handler mHandler = new Handler();

	/** Called when the activity is first created. */
	@Override
	public void onCreate(Bundle savedInstanceState)
	{
		super.onCreate(savedInstanceState);
		setContentView(R.layout.main);

		//创建一个线性布局
        mLayout = (LinearLayout) findViewById(R.id.layout);
        //创建一个ScrollView对象
        mScrollView = (ScrollView) findViewById(R.id.ScrollView01);

        Button button = (Button) findViewById(R.id.Button01);

        button.setOnClickListener(mClickListener);
        //改变默认焦点切换
        button.setOnKeyListener(mAddButtonKeyListener);
	}

	//Button事件监听
	//当点击按钮时,增加一个TextView和Button
	private Button.OnClickListener mClickListener = new Button.OnClickListener()
	{
        private int mIndex = 1;
        public void onClick(View arg0)
        {
            // TODO Auto-generated method stub
            TextView textView = new TextView(Activity01.this);
            textView.setText("Text View " + mIndex);
            //这里请不要困惑这里是设置 这个textView的布局 FILL_PARENT WRAP_CONTENT 和在xml文件里边设置是一样的
            LinearLayout.LayoutParams p = new LinearLayout.LayoutParams(
                    LinearLayout.LayoutParams.FILL_PARENT,
                    LinearLayout.LayoutParams.WRAP_CONTENT
            );
            //增加一个TextView到线性布局中
            mLayout.addView(textView, p);

            Button buttonView = new Button(Activity01.this);
            buttonView.setText("Button " + mIndex++);

          //增加一个Button到线性布局中
            mLayout.addView(buttonView, p);
            //改变默认焦点切换
            buttonView.setOnKeyListener(mNewButtonKeyListener);
            //投递一个消息进行滚动
            mHandler.post(mScrollToBottom);
        }
    };


    private Runnable mScrollToBottom = new Runnable()
    {
        public void run()
        {
            // TODO Auto-generated method stub

            int off = mLayout.getMeasuredHeight() - mScrollView.getHeight();
            if (off > 0)
            {
                mScrollView.scrollTo(0, off);
            }
        }
    };

    //事件监听
    private View.OnKeyListener mNewButtonKeyListener = new View.OnKeyListener()
    {
        public boolean onKey(View v, int keyCode, KeyEvent event)
        {
            if (keyCode == KeyEvent.KEYCODE_DPAD_DOWN &&
                    event.getAction() == KeyEvent.ACTION_DOWN &&
                    v == mLayout.getChildAt(mLayout.getChildCount() - 1))
            {
                findViewById(R.id.Button01).requestFocus();
                return true;
            }
            return false;
        }
    };

  //事件监听
    private View.OnKeyListener mAddButtonKeyListener = new Button.OnKeyListener()
    {

        public boolean onKey(View v, int keyCode, KeyEvent event)
        {
            // TODO Auto-generated method stub
            View viewToFoucus = null;
            if (event.getAction() == KeyEvent.ACTION_DOWN)
            {
            	int iCount = mLayout.getChildCount();
                switch (keyCode)
                {
                case KeyEvent.KEYCODE_DPAD_UP:
                    if ( iCount > 0)
                    {
                        viewToFoucus = mLayout.getChildAt(iCount - 1);
                    }
                    break;
                case KeyEvent.KEYCODE_DPAD_DOWN:
                    if (iCount < mLayout.getWeightSum())
                    {
                        viewToFoucus = mLayout.getChildAt(iCount + 1);
                    }
                    break;
                default:
                    break;
                }
            }
            if (viewToFoucus != null)
            {
                viewToFoucus.requestFocus();
                return true;
            }
            else
            {
                return false;
            }
        }
    };
}
布局文件
<ScrollView xmlns:android="http://schemas.android.com/apk/res/android"
android:id="@+id/ScrollView01"
android:layout_width="fill_parent"
android:layout_height="wrap_content"
android:scrollbars="none">
<LinearLayout
android:id="@+id/layout"
android:orientation="vertical"
android:layout_width="fill_parent"
android:layout_height="wrap_content">
<TextView
android:layout_width="fill_parent"
android:layout_height="wrap_content"
android:text="TextView0"/>
<Button
android:id="@+id/Button01"
android:layout_width="fill_parent"
android:layout_height="wrap_content"
android:text="Button0"/>
</LinearLayout>
</ScrollView>
图片效果 源码见附件