osgi学习笔记(一)
初步了解OSGI就被这种思想吸引了。谁叫我是普通人呢,只能一步一步的跟着前辈们学习。
开发工具:eclipse-jee-galileo-SR2-win32.zip
启动工具后找到Run Configurations,你会发现这么一个东西的存在。

这是我第一次与之见面的印象。仿佛变得模糊了,难道是我功底不够深厚........
于是找了两本武功秘笈进行修炼。
OSGI实战.rar ,OSGI进阶.rar ,你别说还真有效果。秘笈上讲的登录设计很不错。
看了之后根据自己的理解先写上一个简单的WebOSGIDemo:
第一步:创建Plug-in Project工程:
点Next:
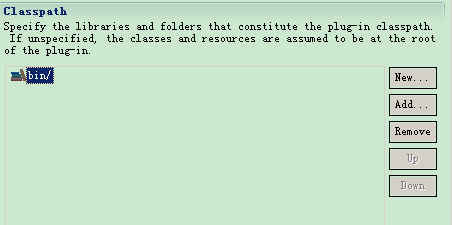
第二步,打开MANIFEST.MF文件:
第三步,创建以下文件:
package org.forever.webosgi;

import java.util.ArrayList;
import java.util.List;

import org.forever.webosgi.action.AbstractAction;
import org.forever.webosgi.action.UserAction;
import org.osgi.framework.BundleActivator;
import org.osgi.framework.BundleContext;
import org.osgi.framework.ServiceEvent;
import org.osgi.framework.ServiceListener;
import org.osgi.framework.ServiceReference;
import org.osgi.service.http.HttpService;

public class Activator implements BundleActivator, ServiceListener {
	private BundleContext bundleContext;
	private ServiceReference serviceRef;
	private List<AbstractAction> servletList = new ArrayList<AbstractAction>();

	public BundleContext getBundleContext() {
		return bundleContext;
	}

	public void setBundleContext(BundleContext bundleContext) {
		this.bundleContext = bundleContext;
	}

	public ServiceReference getServiceRef() {
		if (null == serviceRef) {
			synchronized (this) {
				if (null == serviceRef) {
					serviceRef = bundleContext.getServiceReference(HttpService.class.getName());
				}
			}
		}
		return serviceRef;
	}

	public HttpService getService(){
		return (HttpService) bundleContext.getService(getServiceRef());
	}

	public void setServiceRef(ServiceReference serviceRef) {
		this.serviceRef = serviceRef;
	}

	@Override
	public void start(BundleContext bundleContext) throws Exception {
		System.out.println("************Activator.start()**************");
		this.bundleContext = bundleContext;
		UserAction userAction = new UserAction(this);
		servletList.add(userAction);
	}

	@Override
	public void stop(BundleContext bundleContext) throws Exception {
		System.out.println("************Activator.stop()*****************");
		for (AbstractAction item : servletList) {
			item.unregisterServlet();
		}
	}

	@Override
	public void serviceChanged(ServiceEvent event) {
		System.out.println("Activator.serviceChanged()");
		System.out.println("event.getType()=" + event.getType());

	}

}
AbstractAction类:
package org.forever.webosgi.action;

import javax.servlet.http.HttpServlet;

import org.forever.webosgi.Activator;

public abstract class AbstractAction extends HttpServlet {

	private static final long serialVersionUID = -4607634443833513971L;
	protected Activator activator;

	protected AbstractAction(){

	}

	public AbstractAction(Activator activator) {
		this.activator = activator;
		registerServlet();
	}

	public Activator getActivator() {
		return activator;
	}

	public void setActivator(Activator activator) {
		this.activator = activator;
	}

	public abstract void registerServlet();

	public abstract void unregisterServlet();
}
UserAction类:
package org.forever.webosgi.action;

import java.io.IOException;

import javax.servlet.ServletException;
import javax.servlet.http.HttpServletRequest;
import javax.servlet.http.HttpServletResponse;

import org.forever.webosgi.Activator;
import org.osgi.service.http.HttpService;

public class UserAction extends AbstractAction {

	private static final long serialVersionUID = 605084525972358889L;

	public UserAction(Activator activator) {
		super(activator);

	}

	public void registerServlet() {
		HttpService http = activator.getService();
		try {
			http.registerServlet("/WebOSGI/user/login.action",this,null, null);
			http.registerResources("/WebOSGI/page/user", "org/forever/page/user", null);
			System.out.println("注册UserAction成功!");
		} catch (Exception e) {
			e.printStackTrace();
		}
	}

	@Override
	public void unregisterServlet() {
		HttpService http = activator.getService();
		http.unregister("/WebOSGI/user/login.action");
		http.unregister("/WebOSGI/page/user");
		System.out.println("卸载UserActoin成功!");
	}

	@Override
	protected void doGet(HttpServletRequest req, HttpServletResponse resp)
			throws ServletException, IOException {
		System.out.println("userName=" + req.getParameter("userName"));
		resp.sendRedirect("/WebOSGI/page/user/Login.html");
	}

	@Override
	protected void doPost(HttpServletRequest req, HttpServletResponse resp)
			throws ServletException, IOException {
		doGet(req, resp);
	}


}
Login.html:
<!DOCTYPE html PUBLIC "-//W3C//DTD HTML 4.01 Transitional//EN" "http://www.w3.org/TR/html4/loose.dtd">
<html>
<head>
<meta http-equiv="Content-Type" content="text/html; charset=UTF-8">
<title>登陆页面</title>
</head>
<body>
	<form action="/WebOSGI/user/login.action">
		userName:<input type="text" id="userName" name="userName"/><br/>
		<input type="submit" value="提交"/>
	</form>
</body>
</html>
第四步:
进入Run Configurations,勾上WebOSGIBundel插件。点击Add Required Bundles,运行:

开发完了,哎,发现项目名字写错了le写成了el,无所谓了,打开IE输入:
http://localhost/WebOSGI/page/user/Login.html 当然端口可以修改的。
体验一把吧。找点点感觉没有。没有?,那下次我们在继续。呵呵。


