flume地址:
0) 官网地址: http://flume.apache.org/
1)官网学习:
http://flume.apache.org/documentation.html 点击 User Guide ---> http://flume.apache.org/FlumeUserGuide.html
2) 下载地址:
http://flume.apache.org/download.html
flume简介:
a) flume是一个分布式的数据收集系统,具有高可靠、高可用、事务管理、失败重启等功能。数据处理速度快,完全可以用于生产环境。
b) flume是分布式的日志收集系统(这里的日志是一个范范统称,可以是日志 可以是命令行输出 可以是数据文件),把收集来的数据传送到目的地去。
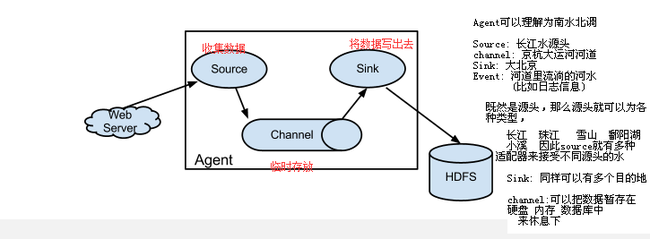
c) flume的核心是agent。agent是一个java进程,运行在日志收集端,通过agent接收日志,然后暂存起来,再发送到目的地
d) agent包含三个核心组件: source, channel,sink;
d.1) source:
source组件把数据收集到之后,临时存放在channel中
source组件可以处理各种格式的日志数据,eg:avro Sources、thrift Sources、exec、jms、spooling directory、netcat、sequence generator、syslog、http、legacy、自定义。
支持的这些格式都可以通过http://flume.apache.org/documentation.html 点击 User Guide ---> http://flume.apache.org/FlumeUserGuide.html查询到
d.2) channel:
用于临时存数据,相当于一个中转站,其存放的数据只有在sink发送成功后才会被删除,
临时存放的数据存放在memory Channel、jdbc Channel、file Channel、自定义。
d.3) sink组件:
用于把数据发送到目的地的组件。
目的地包括hdfs、logger、avro、thrift、ipc、file、null、hbase、solr、自定义。
4.在整个数据传输过程中,流动的是event。事务保证是在event级别
event:你可以理解为 日志如果为10行日志消息,那么每一行就是一个event
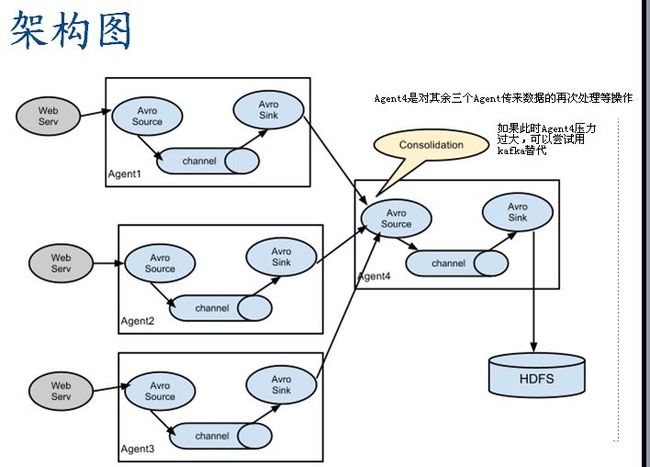
5.flume可以支持多级flume的agent,(即多个flume可以连成串,上一个flume可以把数据写到下一个flume上)
支持扇入(fan-in)、扇出(fan-out)
扇入(fan-in): source可以接受多个输入,
扇出(fan-out): sink可以输出到多个目的地
flume安装方式1:
// 解压如下两个包
[root@master local]# tar -zxvf apache-flume-1.4.0-bin.tar.gz
[root@master local]# tar -zxvf apache-flume-1.4.0-src.tar.gz
// 拷贝src下所有到bin下 并覆盖bin文件夹下同名的文件
[root@master local]# cp -ri apache-flume-1.4.0-src/* apache-flume-1.4.0-bin/
cp: overwrite `apache-flume-1.4.0-bin/bin/flume-ng'? y
cp: overwrite `apache-flume-1.4.0-bin/CHANGELOG'? y
cp: overwrite `apache-flume-1.4.0-bin/conf/log4j.properties'? y
cp: overwrite `apache-flume-1.4.0-bin/conf/flume-env.sh.template'? y
cp: overwrite `apache-flume-1.4.0-bin/conf/flume-conf.properties.template'? y
cp: overwrite `apache-flume-1.4.0-bin/DEVNOTES'? y
cp: overwrite `apache-flume-1.4.0-bin/LICENSE'? y
cp: overwrite `apache-flume-1.4.0-bin/NOTICE'? y
cp: overwrite `apache-flume-1.4.0-bin/README'? y
cp: overwrite `apache-flume-1.4.0-bin/RELEASE-NOTES'? y
// 删除src文件夹
[root@master local]# rm -rf apache-flume-1.4.0-src
// 重命名
[root@master local]# mv apache-flume-1.4.0-bin flume
flume安装方式2,这里我采用第二种方式:
解压:
[root@h2sliver112 conf]# tar -zxvf apache-flume-1.5.2-bin.tar.gz
重命名:
[root@h2sliver112 local]# mv apache-flume-1.5.2-bin flume1.5.2-bin
增加配置文件
[root@h2sliver112 flume1.5.2-bin]# cd conf
[root@h2sliver112 conf]# cp flume-env.sh.template flume-env.sh
[root@h2sliver112 conf]# cp flume-conf.properties.template flume-conf.properties
flume简单案例: 使用avro方式监听一个文件 并将文件通过log4j样式输出到console
0 目的:写一个简单案例(通过avro方式,从客户端上读取一个文件,然后提交到avro服务端的source获取,通过内存channel最后将数据输送到目的地logger 并在控制台输出)
1 对应agent配置文件写法为:
这里我将文件写在目录:
# pwd
/usr/local/flume1.5.2-bin/conf内

[root@h2sliver112 conf]# vi agent1.conf

内容如下:
agent1.sources=source1
agent1.channels=channel1
agent1.sinks=sink1


agent1.sources.source1.type=avro
agent1.sources.source1.bind=0.0.0.0
agent1.sources.source1.port=41414
agent1.sources.source1.channels=channel1

agent1.channels.channel1.type=memory

agent1.sinks.sink1.type=logger
agent1.sinks.sink1.channel=channel1


2 根据上面配置好的agent.conf配置信息,启动flume agent。
[root@h2sliver112 bin]# flume-ng agent  --conf ../conf/ -Dflume.root.logger=DEBUG,console -n agent1  -f ../conf/agent1.conf

--conf ../conf/ 表示指定flume配置文件目录位置
-Dflume.root.logger=DEBUG,console 表示在控制台输出
-n agent1 表示定义此agent名称
-f ../conf/agent1.conf 表示指定要参考的具体agent配置文件

3 本地文件如下:
[root@h2sliver112 local]# cat testflume
1
2
3
4
5

3 启动avro client,读取本地文件,在看上面启动的服务端是否有数据输出:
启动avro client命令如下:
[root@h2sliver112 bin]# flume-ng avro-client --conf ../conf/ -H localhost -p 41414 -F /usr/local/testflume
-H localhost 指定运行机器
-p 41414 指定端口
-F /usr/local/testflume 指定外部数据源文件

可以看到监听到的服务端打印结果如下:见截图,可见将文件数据监听并打印出来,

flume使用案例2,使用 avro将log4j不断产生的日志数据写到hdfs中:
需要准备的:
a) hadoop2环境,并事先创建好hdfs目录: /flume/events
b) 包flume-ng-log4jappender-1.5.0-cdh5.1.3-jar-with-dependencies.jar 用于将log4j的信息和flume关联,附件可下载此工程和对应包
开工:
0 如果使用maven 需要下载 flume slf4j的依赖:
<!-- flume -->
		<dependency>
			<groupId>org.apache.flume</groupId>
			<artifactId>flume-ng-core</artifactId>
			<version>1.5.2</version>
			<exclusions>
				<exclusion>
					<groupId>org.slf4j</groupId>
					<artifactId>slf4j-api</artifactId>
				</exclusion>
				<exclusion>
					<groupId>org.slf4j</groupId>
					<artifactId>slf4j-log4j12</artifactId>
				</exclusion>
				<exclusion>
					<groupId>log4j</groupId>
					<artifactId>log4j</artifactId>
				</exclusion>
			</exclusions>
		</dependency>
1 Java端:
1 java

不断产生日志,模拟web系统不停运行产生日志效果
public class GenerateLog4j {

	/**
	 * @param args
	 * @throws InterruptedException
	 */
	public static void main(String[] args) throws InterruptedException {
		// TODO Auto-generated method stub
		while(true){
			Logger logger = org.apache.log4j.Logger.getLogger(GenerateLog4j.class);
			logger.error("日期时间" + System.currentTimeMillis());
			Thread.sleep(1000);
		}

	}


2 Java端的log4j.properties

log4j.rootLogger=INFO,flume
log4j.appender.flume = org.apache.flume.clients.log4jappender.Log4jAppender
log4j.appender.flume.Hostname = 192.168.1.112 // 对应flume 安装的位置机器地址
log4j.appender.flume.Port = 44444  // 对应flume启动的监听端口 这个端口在flume 定义的conf中会写好
log4j.appender.flume.UnsafeMode = true


3 flume:
flume conf/创建 agent2.conf 内容如下
agent2.sources=source1
agent2.channels=channel1
agent2.sinks=sink1

agent2.sources.source1.type=avro
agent2.sources.source1.bind=0.0.0.0
agent2.sources.source1.port=44444    // 指定监听端口
agent2.sources.source1.channels=channel1

agent2.sources.source1.interceptors = i1 i2   指定使用flume的两个拦截器,一个是时间的 一个是IP的
agent2.sources.source1.interceptors.i1.type = org.apache.flume.interceptor.HostInterceptor$Builder
agent2.sources.source1.interceptors.i1.preserveExisting = true
agent2.sources.source1.interceptors.i1.useIP = true
agent2.sources.source1.interceptors.i2.type = org.apache.flume.interceptor.TimestampInterceptor$Builder

agent2.channels.channel1.type=memory
agent2.channels.channel1.capacity=10000
agent2.channels.channel1.transactionCapacity=1000
agent2.channels.channel1.keep-alive=30

agent2.sinks.sink1.type=hdfs
agent2.sinks.sink1.channel=channel1
agent2.sinks.sink1.hdfs.path=hdfs://h2single:9000/flume/events/%{host}/%y-%m-%d   指定写到目标hadoop2集群的hdfs某个目录下 可以用hive创建分区表加载并继续做MR操作
agent2.sinks.sink1.hdfs.fileType=DataStream
agent2.sinks.sink1.hdfs.writeFormat=Text
agent2.sinks.sink1.hdfs.rollInterval=0
agent2.sinks.sink1.hdfs.rollSize=10000
agent2.sinks.sink1.hdfs.rollCount=0
agent2.sinks.sink1.hdfs.idleTimeout=5


4 flume目录下启动如下命令:
bin/flume-ng agent --conf ./conf/  -Dflume.monitoring.type=http -Dflume.monitoring.port=34343 -n agent2 -f conf/agent2.conf
// flume应用参数监控 -Dflume.monitoring.port=34343 可以通过http://ip:34343/metrics访问
5 运行Java端GenerateLog4j.java

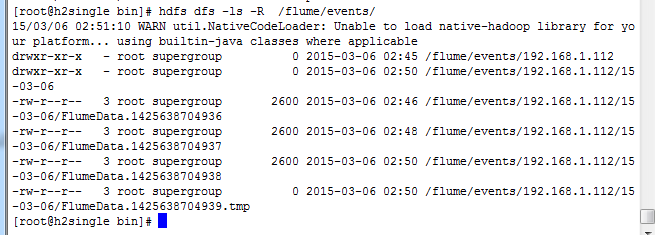
6 查看h2single hdfs被写入的数据  数据截图如下:
flume架构图:
多Agent并联下的架构图:
flume学习5点:
agent, source,channel,sink,event, 他们的概念类比记忆见上图右侧
flume和kafka的区别:
kafka强调的是吞吐量。数据来源单一,
flume强调的是多种适配器。source sink有很多种。
如何判断agent压力大不大呢:主要看channel的大小,只要数据不丢,那么久没有太大问题。


