【嵌入式开发】 嵌入式开发工具简介 (裸板调试示例 | 交叉工具链 | Makefile | 链接器脚本 | eclipse JLink 调试环境)
作者 : 韩曙亮
博客地址 :http://blog.csdn.net/shulianghan/article/details/42239705
参考博客 :【嵌入式开发】嵌入式 开发环境 (远程登录 | 文件共享 | NFS TFTP 服务器 | 串口连接 | Win8.1 + RedHat Enterprise 6.3 + Vmware11)
开发环境 :
-- 操作系统 : Vmware11 + RedHat6.3 企业版 + Win8.1;
-- 硬件 : OK-6410-A 开发板, JLink;
一. 编译并烧写裸板程序示例
1. 设置交叉编译工具
OK-6410-A 使用 4.3.2 的交叉编译工具链, 将交叉编译工具链设置成 Ubuntu 的默认交叉编译工具链;
安装交叉编译工具链 : 解压arm-linux-gcc-4.3.2.tgz 文件
-- 安装命令 : 使用命令 tar -xvzfarm-linux-gcc-4.3.2.tgz -C /, 由于 tgz 压缩文件内也是存在目录结构, 解压后, 交叉编译工具链直接解压到了/usr/local/arm/4.3.2 目录;
-- 配置环境变量 : 环境变量在 /etc/profile 中配置, 在该文件中添加如下代码 :
ARM_LINUX="/usr/local/arm/4.3.2/bin"
export PATH=$PATH:$ARM_LINUX
-- 使配置文件生效 : 执行 source /etc/profile 命令, 该配置即可生效, 执行 arm-linux 按 tab 键 :
octopus@octopus:~$ arm-linux-
arm-linux-addr2line  arm-linux-c++filt    arm-linux-gcc-4.3.2  arm-linux-gprof      arm-linux-objdump    arm-linux-sprite
arm-linux-ar         arm-linux-cpp        arm-linux-gcov       arm-linux-ld         arm-linux-ranlib     arm-linux-strings
arm-linux-as         arm-linux-g++        arm-linux-gdb        arm-linux-nm         arm-linux-readelf    arm-linux-strip
arm-linux-c++        arm-linux-gcc        arm-linux-gdbtui     arm-linux-objcopy    arm-linux-size
2. 编译代码
(1) 代码示例
代码直接是开发板的示例代码:
-- led.S :
octopus@octopus:~/arm/01_code$ more led.S
.text
.globl _start
#define VIC0_INT	0x71200000
#define VIC1_INT	0x71300000

_start: bl reset
		ldr	pc, _undefined_instruction
		ldr	pc, _software_interrupt
		ldr	pc, _prefetch_abort
		ldr	pc, _data_abort
		ldr	pc, _not_used
		ldr	pc, _irq
		ldr	pc, _fiq
_undefined_instruction:b .
_software_interrupt:b .
_prefetch_abort:b .
_data_abort:b .
_not_used:b .
_irq:b .
_fiq:b .
reset:
		mrs	r0,cpsr
		bic	r0,r0,#0x1f
		orr	r0,r0,#0xd3
		msr	cpsr,r0

		bl set_peri_port
		bl disable_watchdog
		bl disable_irq
		bl init_led
		bl light_led

halt:
		bl halt

set_peri_port:
@告诉cpu外设的地址
	    ldr r0, =0x70000000
	    orr r0, r0, #0x13
	    mcr p15,0,r0,c15,c2,4
		mov	pc, lr

disable_watchdog:
@关闭看门狗
		ldr r0, =0x7E004000
		mov r1, #0
		str r1, [r0] @ str, store,
		mov	pc, lr

disable_irq:
@屏蔽中断
		ldr	r1, =0x0
		ldr	r0, =VIC0_INT
		str	r1, [r0]

		ldr	r1, =0x0
		ldr	r0, =VIC1_INT
		str	r1, [r0]
		mov	pc, lr

init_led:
@设置GPN为输出模式
		ldr r1, =0x7F008820
		ldr r0, =0x1111
		str r0, [r1]
		mov	pc, lr

light_led:
@点亮LED1
		ldr r1, =0x7F008824
		mov r0, #0xf
		str r0, [r1]
	    mov r0,#0xe
	    str r0,[r1]
	    mov	pc, lr
-- led.lds :
octopus@octopus:~/arm/01_code$ more led.lds


OUTPUT_FORMAT("elf32-littlearm", "elf32-littlearm", "elf32-littlearm")
OUTPUT_ARCH(arm)
ENTRY(_start)
SECTIONS
{
	. = 0x50008000;

	. = ALIGN(4);
	.text :
	{
		led.o	(.text)
		*(.text)
	}

	. = ALIGN(4);
	.rodata : { *(SORT_BY_ALIGNMENT(SORT_BY_NAME(.rodata*))) }

	. = ALIGN(4);
	.data : { *(.data) }


	. = ALIGN(4);
	__bss_start = .;
	.bss (NOLOAD) : { *(.bss) . = ALIGN(4); }
	_end = .;
}
-- Makefile :
octopus@octopus:~/arm/01_code$ more Makefile
all: led.o
	arm-linux-ld -Tled.lds -o led.elf led.o
	arm-linux-objcopy -O binary led.elf led.bin

led.o : led.S
	arm-linux-gcc -g -o led.o -c led.S

.PHONY: clean
clean:
	rm *.o led.elf led.bin
(2) 编译
编译 : 在该目录执行 make 命令, 编译后多了 led.o, led.elf, led.bin 三个文件, 其中 led.bin 是要烧写到 nand flash 中的可执行二进制程序;
-- 编译前 :
octopus@octopus:~/arm/01_code$ ls
led.lds  led.S  Makefile
-- 编译后 :
octopus@octopus:~/arm/01_code$ make
arm-linux-gcc -g -o led.o -c led.S
arm-linux-ld -Tled.lds -o led.elf led.o
arm-linux-objcopy -O binary led.elf led.bin
octopus@octopus:~/arm/01_code$ ls
led.bin  led.elf  led.lds  led.o  led.S  Makefile
3. 烧写 led.bin
(1) 启动方式切换
sd 卡启动 : (1~8) 位置 : 0, 0, 0, 1, 1, 1, 1, 1;
nand flash 启动 : (1~8) 位置 :x, x, x, 1, 1, 0, 0, 1;
nor flash 启动 :(1~8) 位置 :x, x, x, 1, 0, 1, 0, x;
(2) 制作SD卡启动盘
详细过程参照 :http://blog.csdn.net/shulianghan/article/details/42254237#t42
(3) 串口操作
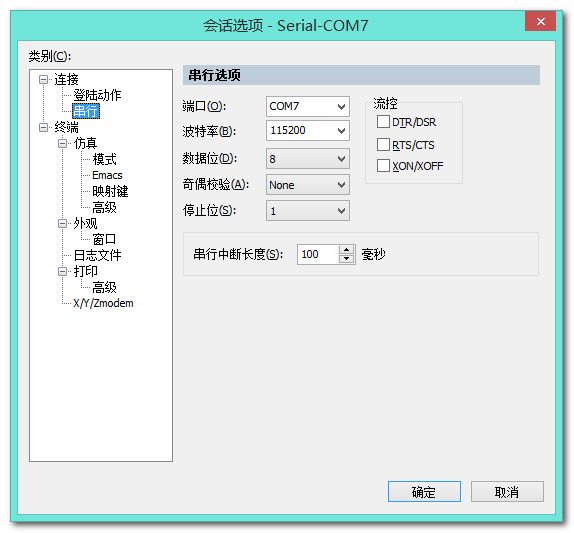
开发板串口方案一 -- 使用SecureCRT 串口连接 :
-- 设备管理器中查看串口端口 : COM7;
-- 串口连接属性 :
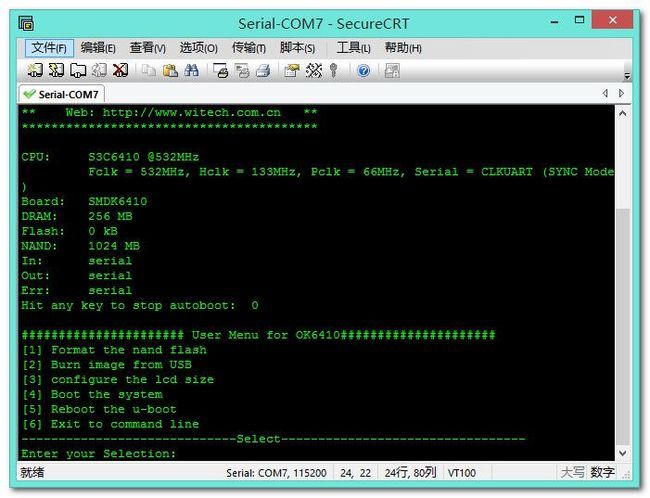
-- 连接串口 :
开发板串口方案二 --打开 minicom 工具 : minicom 串口调试工具;
-- 注意 : 使用 root 用户打开, sudo minicom;
sd 卡启动 :
-- 启动方式 : 插入 sd 卡, 将启动模式设置为 sd 卡启动, 即将 屏幕右侧的 8个开关设置成 (1~8) 位置 : 0, 0, 0, 1, 1, 1, 1, 1,打开电源;
-- 注意 : 打开电源时 不停按 空格键;
-- 串口终端显示 :
U-Boot 1.1.6 (Oct  9 2012 - 13:20:58) for SMDK6410

****************************************
**    u-boot 1.1.6                    **
**    Updated for OK6410  TE6410 Board  **
**    Version (2012-09-23)          **
**    OEM: Forlinx Embedded           **
**    Web: http://www.witech.com.cn   **
****************************************

CPU:     S3C6410 @532MHz
         Fclk = 532MHz, Hclk = 133MHz, Pclk = 66MHz, Serial = CLKUART (SYNC Mode)
Board:   SMDK6410
DRAM:    256 MB
Flash:   0 kB
NandFlash Information:
Nandflash:ChipType= SLC  ChipName=MT29F16G08ABACAWP
No  No Calc pagesize, blocksize, erasesize,  use ids table .............
NandFlash:name=NAND 2GiB 1,8V 8-bit,id=38, pagesize=4096 ,chipsize=1024 MB,erasesize=524288 oobsize=128
NandFlash Size is 1024 MB
SD/MMC:  SD 2.0 / Manufacturer: 0x1B,OEM: "SM/00000",REV: 1.0,S/N: -1320320343,DATE: 2008/3
         MMC/SD size: 971 MiB
         Freq = 25MHz
In:      serial
Out:     lcd
Err:     lcd
Hit any key to stop autoboot:  0

###################### User Menu for OK6410#####################
[1] Format the nand flash
[2] Burn image from SD card
[3] Burn image from USB
[4] Reboot the u-boot
[5] Exit to command line
-----------------------------Select---------------------------------
Enter your Selection:
格式化 nand flash : 在上面的 minicom 命令行, 选择 1([1] Format the nand flash -- 格式化 nand Flash), 弹出Really scrub this NAND flash? <y/N> 时 选择 y;
-----------------------------Select---------------------------------
Enter your Selection:1

NAND scrub: device 0 whole chip
Warning: scrub option will erase all factory set bad blocks!
         There is no reliable way to recover them.
         Use this command only for testing purposes if you
         are sure of what you are doing!

Really scrub this NAND flash? <y/N>
Erasing at 0x3ff80000 -- 100% complete.
Scanning device for bad blocks
OK

###################### User Menu for OK6410#####################
[1] Format the nand flash
[2] Burn image from SD card
[3] Burn image from USB
[4] Reboot the u-boot
[5] Exit to command line
-----------------------------Select---------------------------------
Enter your Selection:
选择从 usb 烧写映像 : 选择 3 ([3] Burn image from USB -- 从usb烧写映像);
-----------------------------Select---------------------------------
Enter your Selection:3

##### Select the fuction #####
[1] Flash u-boot
[2] Flash kernel
[3] Flash system
[4] Exit
Enter your Selection:
选择 烧写 u-boot 类型程序 : 裸板程序都属于 u-boot 类型的;
##### Select the fuction #####
[1] Flash u-boot
[2] Flash kernel
[3] Flash system
[4] Exit
Enter your Selection:1

NAND erase: device 0 offset 0x0, size 0x200000
Erasing at 0x180000 -- 100% complete.
OK
Insert a OTG cable into the connector!
设置虚拟机的 USB 接口 : 之前写过, 详情见http://blog.csdn.net/shulianghan/article/details/42254237#t45;
(3) Linux 操作
编译 led 源码 :
-- 进入 led 源码目录 : 执行 make 命令, 将编译后的文件 拷贝到 dnw 所在目录;
烧写 led.bin :
-- 加载 dnw 驱动 : 使用insmod dnw_usb.ko 命令;
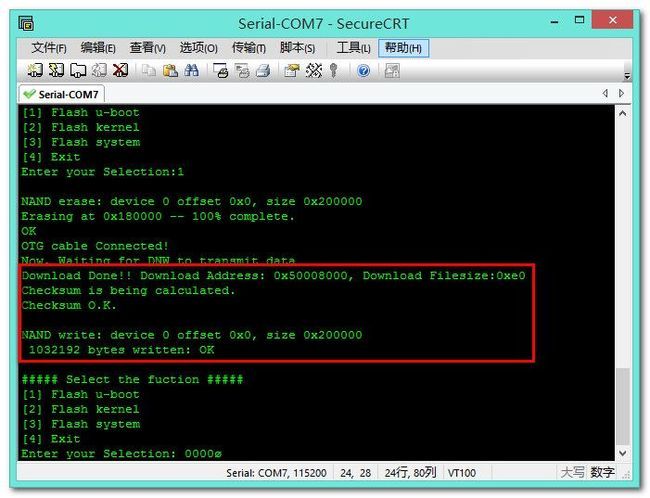
-- 烧写 led.bin : 使用./dnw led.bin 50008000 命令;
-- 串口终端显示 : 如下显示, 烧写成功;
-- 关闭开发板使用nand flash 启动 : 可以看到 LED1 点亮;
二. 交叉工具链
1. 交叉编译器
(1) 普通编译
编译下面的代码 :
/*************************************************************************
    > File Name: main.c
    > Author: octopus
    > Mail: octopus_work.163.com
    > Created Time: 2015年01月03日 星期六 14时25分11秒
 ************************************************************************/

#include<stdio.h>
int main(int argc, char** argv)
{
	printf("Hello World!\n");
	return 0;
}
--
编译执行代码 :
[root@localhost 02_gcc_demo]# gcc main.c
[root@localhost 02_gcc_demo]# ./a.out
Hello World!
(2) 交叉编译并在开发板运行
交叉编译 : 使用arm-linux-gcc main.c 命令交叉编译, 经过交叉编译的 a.out 不能再 x86 平台执行;
使用 U 盘将程序拷贝到开发板 : 将 a.out 拷贝到 U 盘, 然后将 U 盘拷贝到开发板上;
-- 拷贝命令 :cp a.out /media/UUI/, UUI 是 U 盘名称;
-- 开发板插入 U 盘 : 将 U 盘插入开发板(已安装 Linux 操作系统) USB 口, 根目录下出现 udisk 目录, 该目录就是 U 盘;
-- 执行交叉编译后的程序 : 执行 a.out 程序, 执行成功;
(3) 交叉|普通编译结果对比
对比交叉编译 和 普通编译 的可执行文件 : 通过 file 命令对比可执行文件;
-- 交叉编译 : 使用arm-linux-gcc main.c -o hello-arm 命令交叉编译结果 hello-arm, 使用file hello-arm 命令查看文件属性;
root@localhost 02_gcc_demo]# file hello-arm
hello-arm: ELF 32-bit LSB executable, ARM, version 1 (SYSV), dynamically linked (uses shared libs), for GNU/Linux 2.6.14, not stripped
-- 普通编译 : 使用gcc main.c -o hello-x86 命令普通编译结果 hello-x86, 使用file hello-x86 命令查看文件属性;
[root@localhost 02_gcc_demo]# file hello-x86
hello-x86: ELF 32-bit LSB executable, Intel 80386, version 1 (SYSV), dynamically linked (uses shared libs), for GNU/Linux 2.6.18, not stripped

(4) 查找目录
查看查找目录 : 使用arm-linux-gcc -print-search-dirs 命令查看;
[root@localhost ~]# arm-linux-gcc -print-search-dirs
install: /usr/local/arm/4.3.2/bin/../lib/gcc/arm-none-linux-gnueabi/4.3.2/
programs: =/usr/local/arm/4.3.2/bin/../libexec/gcc/arm-none-linux-gnueabi/4.3.2/:/usr/local/arm/4.3.2/bin/../libexec/gcc/:/usr/local/arm/4.3.2/bin/../lib/gcc/arm-none-linux-gnueabi/4.3.2/../../../../arm-none-linux-gnueabi/bin/arm-none-linux-gnueabi/4.3.2/:/usr/local/arm/4.3.2/bin/../lib/gcc/arm-none-linux-gnueabi/4.3.2/../../../../arm-none-linux-gnueabi/bin/
libraries: =/usr/local/arm/4.3.2/bin/../lib/gcc/arm-none-linux-gnueabi/4.3.2/armv4t/:/usr/local/arm/4.3.2/bin/../lib/gcc/armv4t/:/usr/local/arm/4.3.2/bin/../lib/gcc/arm-none-linux-gnueabi/4.3.2/../../../../arm-none-linux-gnueabi/lib/arm-none-linux-gnueabi/4.3.2/armv4t/:/usr/local/arm/4.3.2/bin/../lib/gcc/arm-none-linux-gnueabi/4.3.2/../../../../arm-none-linux-gnueabi/lib/armv4t/:/usr/local/arm/4.3.2/bin/../arm-none-linux-gnueabi/libc/armv4t/lib/arm-none-linux-gnueabi/4.3.2/armv4t/:/usr/local/arm/4.3.2/bin/../arm-none-linux-gnueabi/libc/armv4t/lib/armv4t/:/usr/local/arm/4.3.2/bin/../arm-none-linux-gnueabi/libc/armv4t/usr/lib/arm-none-linux-gnueabi/4.3.2/armv4t/:/usr/local/arm/4.3.2/bin/../arm-none-linux-gnueabi/libc/armv4t/usr/lib/armv4t/:/usr/local/arm/4.3.2/bin/../lib/gcc/arm-none-linux-gnueabi/4.3.2/:/usr/local/arm/4.3.2/bin/../lib/gcc/:/usr/local/arm/4.3.2/bin/../lib/gcc/arm-none-linux-gnueabi/4.3.2/../../../../arm-none-linux-gnueabi/lib/arm-none-linux-gnueabi/4.3.2/:/usr/local/arm/4.3.2/bin/../lib/gcc/arm-none-linux-gnueabi/4.3.2/../../../../arm-none-linux-gnueabi/lib/:/usr/local/arm/4.3.2/bin/../arm-none-linux-gnueabi/libc/armv4t/lib/arm-none-linux-gnueabi/4.3.2/:/usr/local/arm/4.3.2/bin/../arm-none-linux-gnueabi/libc/armv4t/lib/:/usr/local/arm/4.3.2/bin/../arm-none-linux-gnueabi/libc/armv4t/usr/lib/arm-none-linux-gnueabi/4.3.2/:/usr/local/arm/4.3.2/bin/../arm-none-linux-gnueabi/libc/armv4t/usr/lib/
[root@localhost ~]#
2. 交叉链接器
(1) Makefile 示例
查看 led Makefile: 查看上面的 led 程序的 Makefile文件;
all: led.o
	arm-linux-ld -Tled.lds -o led.elf led.o
	arm-linux-objcopy -O binary led.elf led.bin

led.o : led.S
	arm-linux-gcc -g -o led.o -c led.S

.PHONY: clean
clean:
	rm *.o led.elf led.bin
(2) 交叉链接器链接过程
链接过程 :
-- 交叉编译 : 使用arm-linux-gcc -g -o led.o -c led.S 命令, 获取 led.o 文件, 交叉编译结果是 生成 led.o 文件;
-- 链接 : 链接 led.o 生成 led.elf 文件, 使用arm-linux-ld -Tled.lds -o led.elf led.o 命令;
-- 链接器命令格式 : -T 后面跟着链接器脚本, 这里 链接器脚本是 led.lds, -o 是链接器的生成结果名称;
3. arm-linux-readelf 工具
(1) arm-linux-readelf 解读 .elf 文件
arm-linux-readelf 使用示例 : 执行arm-linux-readelf -a led.elf 命令, 解读 led.elf 文件;
-- 小端处理器运行 : "Data: 2's complement, little endian" 表示在小端 CPU 上执行, 如果程序大小端 与 CPU 不一致, 便不能执行;
-- 运行平台 : "Machine: ARM" 表示该程序在 ARM 平台运行;
[root@localhost 01_led]# arm-linux-readelf -a led.elf
ELF Header:
  Magic:   7f 45 4c 46 01 01 01 00 00 00 00 00 00 00 00 00
  Class:                             ELF32
  Data:                              2's complement, little endian
  Version:                           1 (current)
  OS/ABI:                            UNIX - System V
  ABI Version:                       0
  Type:                              EXEC (Executable file)
  Machine:                           ARM
  Version:                           0x1
  Entry point address:               0x50008000
  Start of program headers:          52 (bytes into file)
  Start of section headers:          33344 (bytes into file)
  Flags:                             0x5000002, has entry point, Version5 EABI
  Size of this header:               52 (bytes)
  Size of program headers:           32 (bytes)
  Number of program headers:         1
  Size of section headers:           40 (bytes)
  Number of section headers:         10
  Section header string table index: 7

Section Headers:
  [Nr] Name              Type            Addr     Off    Size   ES Flg Lk Inf Al
  [ 0]                   NULL            00000000 000000 000000 00      0   0  0
  [ 1] .text             PROGBITS        50008000 008000 0000e0 00  AX  0   0  4
  [ 2] .ARM.attributes   ARM_ATTRIBUTES  00000000 0080e0 000018 00      0   0  1
  [ 3] .debug_line       PROGBITS        00000000 0080f8 000064 00      0   0  1
  [ 4] .debug_info       PROGBITS        00000000 00815c 000045 00      0   0  1
  [ 5] .debug_abbrev     PROGBITS        00000000 0081a1 000014 00      0   0  1
  [ 6] .debug_aranges    PROGBITS        00000000 0081b8 000020 00      0   0  8
  [ 7] .shstrtab         STRTAB          00000000 0081d8 000066 00      0   0  1
  [ 8] .symtab           SYMTAB          00000000 0083d0 0001a0 10      9  23  4
  [ 9] .strtab           STRTAB          00000000 008570 0000c3 00      0   0  1
Key to Flags:
  W (write), A (alloc), X (execute), M (merge), S (strings)
  I (info), L (link order), G (group), x (unknown)
  O (extra OS processing required) o (OS specific), p (processor specific)

There are no section groups in this file.

Program Headers:
  Type           Offset   VirtAddr   PhysAddr   FileSiz MemSiz  Flg Align
  LOAD           0x008000 0x50008000 0x50008000 0x000e0 0x000e0 R E 0x8000

 Section to Segment mapping:
  Segment Sections...
   00     .text

There is no dynamic section in this file.

There are no relocations in this file.

There are no unwind sections in this file.

Symbol table '.symtab' contains 26 entries:
   Num:    Value  Size Type    Bind   Vis      Ndx Name
     0: 00000000     0 NOTYPE  LOCAL  DEFAULT  UND
     1: 50008000     0 SECTION LOCAL  DEFAULT    1
     2: 00000000     0 SECTION LOCAL  DEFAULT    2
     3: 00000000     0 SECTION LOCAL  DEFAULT    3
     4: 00000000     0 SECTION LOCAL  DEFAULT    4
     5: 00000000     0 SECTION LOCAL  DEFAULT    5
     6: 00000000     0 SECTION LOCAL  DEFAULT    6
     7: 50008000     0 NOTYPE  LOCAL  DEFAULT    1 $a
     8: 5000803c     0 NOTYPE  LOCAL  DEFAULT    1 reset
     9: 50008020     0 NOTYPE  LOCAL  DEFAULT    1 _undefined_instruction
    10: 50008024     0 NOTYPE  LOCAL  DEFAULT    1 _software_interrupt
    11: 50008028     0 NOTYPE  LOCAL  DEFAULT    1 _prefetch_abort
    12: 5000802c     0 NOTYPE  LOCAL  DEFAULT    1 _data_abort
    13: 50008030     0 NOTYPE  LOCAL  DEFAULT    1 _not_used
    14: 50008034     0 NOTYPE  LOCAL  DEFAULT    1 _irq
    15: 50008038     0 NOTYPE  LOCAL  DEFAULT    1 _fiq
    16: 50008064     0 NOTYPE  LOCAL  DEFAULT    1 set_peri_port
    17: 50008074     0 NOTYPE  LOCAL  DEFAULT    1 disable_watchdog
    18: 50008084     0 NOTYPE  LOCAL  DEFAULT    1 disable_irq
    19: 500080a0     0 NOTYPE  LOCAL  DEFAULT    1 init_led
    20: 500080b0     0 NOTYPE  LOCAL  DEFAULT    1 light_led
    21: 50008060     0 NOTYPE  LOCAL  DEFAULT    1 halt
    22: 500080c8     0 NOTYPE  LOCAL  DEFAULT    1 $d
    23: 50008000     0 NOTYPE  GLOBAL DEFAULT    1 _start
    24: 500080e0     0 NOTYPE  GLOBAL DEFAULT  ABS __bss_start
    25: 500080e0     0 NOTYPE  GLOBAL DEFAULT  ABS _end

No version information found in this file.
Attribute Section: aeabi
File Attributes
  Tag_CPU_name: "4T"
  Tag_CPU_arch: v4T
  Tag_ARM_ISA_use: Yes
[root@localhost 01_led]#
(2) arm-linux-readelf 解读 可执行程序需要的库文件
程序无法运行排错方法:
-- 运行平台不对 : ARM 平台 和 x86 平台之间的程序不能互相运行;
-- CPU 大小端不对 : 大端格式的程序不能运行在小端 CPU 上;
-- 库不对 : 使用arm-linux-readelf -d hello-arm 查看程序运行需要的库, "0x00000001 (NEEDED) Shared library: [libc.so.6]", 表示需要有libc.so.6 库;
[root@localhost 02_gcc_demo]# arm-linux-readelf -d hello-arm

Dynamic section at offset 0x460 contains 24 entries:
  Tag        Type                         Name/Value
 0x00000001 (NEEDED)                     Shared library: [libc.so.6]
 0x0000000c (INIT)                       0x8274
 0x0000000d (FINI)                       0x8428
 0x00000019 (INIT_ARRAY)                 0x10454
 0x0000001b (INIT_ARRAYSZ)               4 (bytes)
 0x0000001a (FINI_ARRAY)                 0x10458
 0x0000001c (FINI_ARRAYSZ)               4 (bytes)
 0x00000004 (HASH)                       0x8168
 0x00000005 (STRTAB)                     0x81e0
 0x00000006 (SYMTAB)                     0x8190
 0x0000000a (STRSZ)                      65 (bytes)
 0x0000000b (SYMENT)                     16 (bytes)
 0x00000015 (DEBUG)                      0x0
 0x00000003 (PLTGOT)                     0x10548
 0x00000002 (PLTRELSZ)                   32 (bytes)
 0x00000014 (PLTREL)                     REL
 0x00000017 (JMPREL)                     0x8254
 0x00000011 (REL)                        0x824c
 0x00000012 (RELSZ)                      8 (bytes)
 0x00000013 (RELENT)                     8 (bytes)
 0x6ffffffe (VERNEED)                    0x822c
 0x6fffffff (VERNEEDNUM)                 1
 0x6ffffff0 (VERSYM)                     0x8222
 0x00000000 (NULL)                       0x0
[root@localhost 02_gcc_demo]#
4. 反汇编器(arm-linux-objdump)
(1) 反汇编
反汇编示例 :arm-linux-objdump -D -S hello-arm, 太多, 省略后面几百行;
[root@localhost 02_gcc_demo]# arm-linux-objdump -D -S hello-arm

hello-arm:     file format elf32-littlearm

Disassembly of section .interp:

00008134 <.interp>:
    8134:	62696c2f 	rsbvs	r6, r9, #12032	; 0x2f00
    8138:	2d646c2f 	stclcs	12, cr6, [r4, #-188]!
    813c:	756e696c 	strbvc	r6, [lr, #-2412]!
    8140:	6f732e78 	svcvs	0x00732e78
    8144:	Address 0x00008144 is out of bounds.

Disassembly of section .note.ABI-tag:... ...
(2) 编译附加调试信息
带调试信息的反编译 :
-- 交叉编译带调试信息 :arm-linux-gcc -g main.c 命令, 进行交叉编译, 结果 a.out;
-- 反编译 :arm-linux-objdump -S -D a.out 命令, 反编译结果 每行 C 代码都对应 汇编代码;
... ...

#include<stdio.h>
int main(int argc, char** argv)
{
    837c:	e92d4800 	push	{fp, lr}
    8380:	e28db004 	add	fp, sp, #4	; 0x4
    8384:	e24dd008 	sub	sp, sp, #8	; 0x8
    8388:	e50b0008 	str	r0, [fp, #-8]
    838c:	e50b100c 	str	r1, [fp, #-12]
	printf("Hello World!\n");
    8390:	e59f0014 	ldr	r0, [pc, #20]	; 83ac <main+0x30>
    8394:	ebffffc8 	bl	82bc <_init+0x48>
	return 0;
    8398:	e3a03000 	mov	r3, #0	; 0x0
}

... ...
5. 文件格式转换器(arm-linux-objcopy)
文件格式转换 :
-- 转换原因 : elf 格式文件不能再 arm 处理器执行;
-- 转换命令 : 进入 led 目录, 继续上面的 led 编译, 链接 生成了 led.elf 文件, 执行arm-linux-objcopy -O binary led.elf led.bin 命令, 将 elf 文件转换为 bin 文件;
-- 命令解析 : -O 表示输出格式, -O binary 表示输出二进制格式;
三. Makefile 文件
Makefile 示例 :
all: led.o
	arm-linux-ld -Tled.lds -o led.elf led.o
	arm-linux-objcopy -O binary led.elf led.bin

led.o : led.S
	arm-linux-gcc -g -o led.o -c led.S

.PHONY: clean
clean:
	rm *.o led.elf led.bin
1. Makefile 规则
(1) 普通规则
规则 : 用于说明文件生成过程;
-- 规则语法 :
target(目标) :prerequisites(依赖)
command(命令)
led.o : led.S
	arm-linux-gcc -g -o led.o -c led.S
-- 语法解析 : led.o 是目标, led.S 是依赖, arm-linux-gcc -g -o led.o -c led.S 是命令;
(2) 通用规则
通用规则示例 :
%.o : %.c
arm-linux-gcc -o %.o %.c
-- 解析 : 编译 main.c 生成 main.o;
2. Makefile 目标
(1) 伪目标
Makefile 中的伪目标示例 : 伪目标 只有命令, 没有依赖;
.PHONY: clean
clean:
	rm *.o led.elf led.bin
-- 伪目标标示 : ".PHONY: clean" 将 clean 声明为 伪目标;
(2) 最终目标
最终目标 : Makefile 默认执行 第一个目标, 第一个目标就是最终目标;
3. Makefile 变量
(1) 自定义变量
变量使用示例 :
-- 使用标量前 :
app1: app1.o func1.o func2.o
gcc app1.o func1.o func2.o -o app1
app2: app2.o func1.o func2.o
gcc app2.o func1.o func2.o -o app2
-- 定义变量 :obj=func1.o func2.o, 将该定义的变量应用于 Makefile;
obj=func1.o func2.o
app1: app1.o $(obj)
gcc app1.o $(obj) -o app1
app2: app2.o $(obj)
gcc app2.o $(obj) -o app2
(2) 系统定义变量
系统定义变量 :
-- $^ : 代表依赖的文件;
-- $@ : 代表目标;
-- $< : 代表第一个依赖文件;
-- 使用系统变量前 :
all: led.o
	arm-linux-ld -Tled.lds -o led.elf led.o
	arm-linux-objcopy -O binary led.elf led.bin

led.o : led.S
	arm-linux-gcc -g -o led.o -c led.S

.PHONY: clean
clean:
	rm *.o led.elf led.bin
-- 使用系统变量后 :
all: led.o
	arm-linux-ld -Tled.lds -o led.elf $^
	arm-linux-objcopy -O binary led.elf led.bin

led.o : led.S
	arm-linux-gcc -g -o $@ -c $^

.PHONY: clean
clean:
	rm *.o led.elf led.bin
-- 编译运行 : 编译结果与 不使用系统变量时的规则相同;
4. Makefile 技巧
(1) Makefile 去回显
Makefile 去回显 :
-- 回显 : 执行编译时, 会将命令打印到命令行中;
-- 去回显 : 在命令前添加 "@" 符号;
all: led.o
	@arm-linux-ld -Tled.lds -o led.elf $^
	@arm-linux-objcopy -O binary led.elf led.bin

led.o : led.S
	arm-linux-gcc -g -o $@ -c $^

.PHONY: clean
clean:
	rm *.o led.elf led.bin
-- 执行结果 : 此时就没有上面两条显示了;

(2) Makefile 文件名称修改
Makefile 文件名称 :
-- 默认名称 : make 工具默认寻找 "Makefile" 或者 "makefile" 文件, 如果没有回报错;
-- 指明 Makefile 文件 :make -f Makefile-ARM 命令;
四. 链接器脚本
1. 链接器脚本示例
可执行程序组成 : 代码段, 数据段, bss 段; 链接器脚本就是配置这些段信息;
简单的链接器脚本示例:
-- 代码段 : .text 表示代码段, * 表示所有文件, *(.text) 表示所有文件的代码;
-- 数据段 : .data 表示数据段, * 表示所有文件, *(.data) 表示所有文件的数据段;
-- bss 段 :.bss表示 bss 段, * 表示所有文件, *(.bss) 表示所有文件的 bss 段;
SECTIONS{
	.text :
	{
	*(.text)
	}

	.data :
	{
	*(.data)
	}

	.bss :
	{
	*(.bss)
	}
}
2. 设置起始链接器地址
设置链接器起始地址 :
-- 语法 : ". = 地址";
-- lds 脚本示例 :
SECTIONS{
	. =0x0;

	.text :
	{
	*(.text)
	}

	.data :
	{
	*(.data)
	}

	.bss :
	{
	*(.bss)
	}
}
--
反编译编译后的 elf 文件 : "00000000 <_start>:" 表示从 0 地址开始;
[root@localhost 01_led]# arm-linux-objdump -D -S led.elf

led.elf:     file format elf32-littlearm

Disassembly of section .text:

00000000 <_start>:
.text
.globl _start
#define VIC0_INT	0x71200000
#define VIC1_INT	0x71300000
-- 修改首地址后的脚本: 将起始地址修改为 0x30008000;
SECTIONS{
	. =0x30008000;

	.text :
	{
	*(.text)
	}

	.data :
	{
	*(.data)
	}

	.bss :
	{
	*(.bss)
	}
}
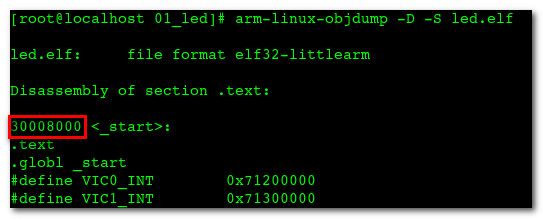
-- 反编译elf : 执行arm-linux-objdump -D -S led.elf 命令, "30008000 <_start>:" 起始地址是 0x30008000;
[root@localhost 01_led]# arm-linux-objdump -D -S led.elf

led.elf:     file format elf32-littlearm

Disassembly of section .text:

30008000 <_start>:
.text
.globl _start
#define VIC0_INT	0x71200000
#define VIC1_INT	0x71300000 ... ...
地址对比 :
-- 链接器起始地址 0x000000 :
-- 链接器起始地址 0x30008000 :
3. 对齐设置
对齐范例 :. = ALIGN(4); 表示从当前开始 4 字节对齐;
SECTIONS{
	. =0x30008000;
	. = ALIGN(4);
	.text :
	{
	*(.text)
	}

	. = ALIGN(4);
	.data :
	{
	*(.data)
	}

	. = ALIGN(4);
	.bss :
	{
	*(.bss)
	}
}
4. 变量
变量示例 : 变量保存之后, 可以再程序中用到变量;
-- 示例 :
SECTIONS{
	. =0x30008000;
	. = ALIGN(4);
	.text :
	{
	*(.text)
	}

	. = ALIGN(4);
	.data :
	{
	*(.data)
	}

	. = ALIGN(4);
	bss_start = . ;
	.bss :
	{
	*(.bss)
	}
	bss_end = . ;
}
5. 设置代码段首文件
设置首文件 :
-- 语法 :start.o(.text);
-- 示例 :
SECTIONS{
	. =0x30008000;
	. = ALIGN(4);
	.text :
	{
	start.o(.text)
	*(.text)
	}

	. = ALIGN(4);
	.data :
	{
	*(.data)
	}

	. = ALIGN(4);
	bss_start = . ;
	.bss :
	{
	*(.bss)
	}
	bss_end = . ;
}
五. eclipse 在线调试
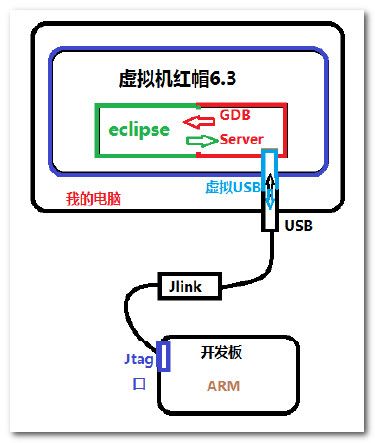
1. eclipse 集成开发环境示意图
eclipse 集成开发环境示意图 :
-- 硬件 : 开发板, JLink;
-- 软件 : eclipse, GDB Server, JLink 软件;
2. 准备工作
(1) 格式化 nand flash
格式化 nand flash : 注意必须格式化 NandFlash 否则会出现不可预知错误;
(2) 硬件连接
硬件连接 : JLink 连接, 串口连接, 电源连接, 开发板 nand flash 启动;
(3) 安装 JLink Windows 驱动
JLink Windows 驱动安装 : 买 JLink 时会带着这个安装盘, 安装 JLink Windows 驱动 才可以调试成功, 否则会在 Windows 这一关被挡下 导致连接不成功;
(3) 安装 gdb server
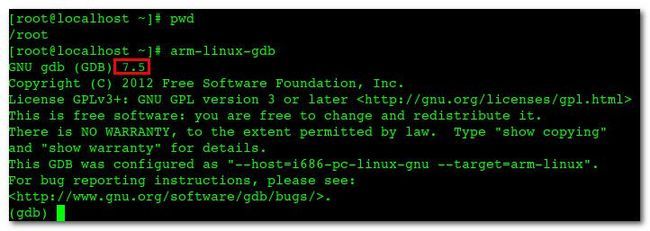
安装arm-linux-gdb-7.5.tar.gz :
-- 解压 : tar -xvzfarm-linux-gdb-7.5.tar.gz 命令;
-- 查看 build-all 脚本: 可以看到脚本执行流程是 解压gdb-7.5.tar.gz, 然后生成 Makefile文件, 之后进编译安装到 /opt/arm-linux-gdb 目录下;
[root@localhost arm-linux-gdb-7.5]# cat build-all
#/bin/sh

rm -fr gdb-7.5
rm -r /opt/arm-linux-gdb/

tar xvzf gdb-7.5.tar.gz
cd gdb-7.5

./configure --target=arm-linux --prefix=/opt/arm-linux-gdb/ -v

make && make install

cd /opt/arm-linux-gdb/
-- 进入 ddb 安装目录, 查看路径 :
-- 配置环境变量 : 将 /etc/profile 中的环境变量删除, 只在 ~/.bashrc 中配置;
export PATH=$PATH:/opt/arm-linux-gdb/bin/
export PATH=$PATH:/usr/local/arm/4.3.2/bin/
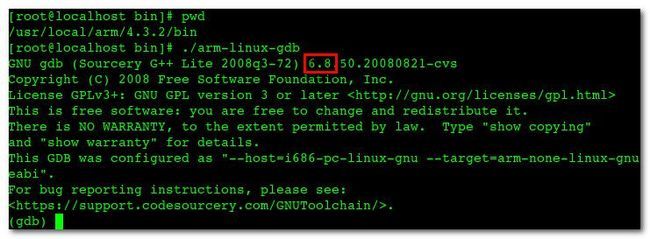
-- 环境变量顺序 : 注意前面的环境变量覆盖后面的, 交叉工具链中也有 arm-linu-gdb, 但是 /opt 下面的先配置, 因此事这个先生效;
-- 默认的 arm-linu-gdb : 是 7.5 版本的;
-- 交叉工具链中的 gdb : 6.8版本的, 无法进行 在线调试;
(4) 安装 JLink
安装流程 :
-- 解压文件 :JLink_Linux_V434a.tgz;
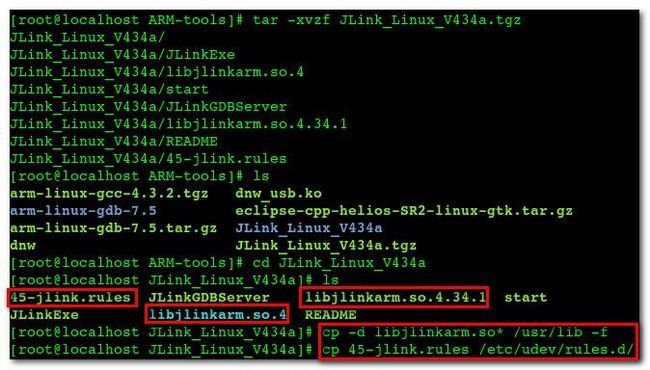
-- 进入cd JLink_Linux_V434a 目录, 拷贝文件 : 拷贝libjlinkarm.so.4 和libjlinkarm.so.4.34.1 到/usr/lib 目录下 命令 cp -d libjlinkarm.so* /usr/lib -f, 拷贝45-jlink.rules 到/etc/udev/rules.d/ 下 命令 cp 45-jlink.rules /etc/udev/rules.d/;
[root@localhost ARM-tools]# tar -xvzf JLink_Linux_V434a.tgz
JLink_Linux_V434a/
JLink_Linux_V434a/JLinkExe
JLink_Linux_V434a/libjlinkarm.so.4
JLink_Linux_V434a/start
JLink_Linux_V434a/JLinkGDBServer
JLink_Linux_V434a/libjlinkarm.so.4.34.1
JLink_Linux_V434a/README
JLink_Linux_V434a/45-jlink.rules
[root@localhost ARM-tools]# ls
arm-linux-gcc-4.3.2.tgz   dnw_usb.ko
arm-linux-gdb-7.5         eclipse-cpp-helios-SR2-linux-gtk.tar.gz
arm-linux-gdb-7.5.tar.gz  JLink_Linux_V434a
dnw                       JLink_Linux_V434a.tgz
[root@localhost ARM-tools]# cd JLink_Linux_V434a
[root@localhost JLink_Linux_V434a]# ls
45-jlink.rules  JLinkGDBServer    libjlinkarm.so.4.34.1  start
JLinkExe        libjlinkarm.so.4  README
[root@localhost JLink_Linux_V434a]# cp -d libjlinkarm.so* /usr/lib -f
[root@localhost JLink_Linux_V434a]# cp 45-jlink.rules /etc/udev/rules.d/
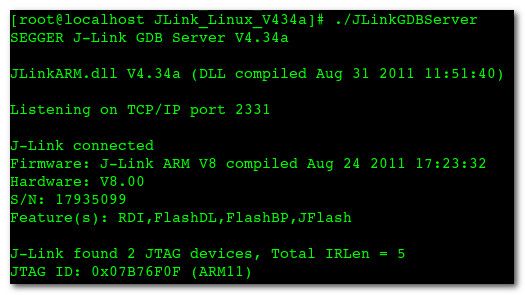
执行 JLinkGDBServer:
[root@localhost JLink_Linux_V434a]# ./JLinkGDBServer
SEGGER J-Link GDB Server V4.34a

JLinkARM.dll V4.34a (DLL compiled Aug 31 2011 11:51:40)

Listening on TCP/IP port 2331

J-Link connected
Firmware: J-Link ARM V8 compiled Aug 24 2011 17:23:32
Hardware: V8.00
S/N: 17935099
Feature(s): RDI,FlashDL,FlashBP,JFlash

J-Link found 2 JTAG devices, Total IRLen = 5
JTAG ID: 0x07B76F0F (ARM11)
(5) 安装 eclipse
安装流程 :
-- 取消 默认 eclipse : 红帽6.3中默认安装了eclipse, 进入 /usr/bin 目录, 将 eclipse 快捷方式改为 eclipse.bak, 如果需要使用这个 eclipse, 执行 eclipse.bak即可;
[root@localhost ~]# cd /usr/bin/
[root@localhost bin]# mv eclipse eclipse.bak
-- 开始启动时会出错 : 不用管, 在此启动 eclipse 就会启动成功;
[root@localhost eclipse]# ./eclipse
#
# A fatal error has been detected by the Java Runtime Environment:
#
#  SIGSEGV (0xb) at pc=0x00b8f8c1, pid=11165, tid=3077863104
#
# JRE version: 6.0_24-b24
# Java VM: OpenJDK Client VM (20.0-b12 mixed mode linux-x86 )
# Derivative: IcedTea6 1.11.1
# Distribution: Red Hat Enterprise Linux Server release 6.2 (Santiago), package rhel-1.45.1.11.1.el6-i386
# Problematic frame:
# C  [UTF-16.so+0x8c1]  gconv+0x3c1
#
# An error report file with more information is saved as:
# /root/arm/ARM-tools/eclipse/hs_err_pid11165.log
#
# If you would like to submit a bug report, please include
# instructions how to reproduce the bug and visit:
#   http://icedtea.classpath.org/bugzilla
# The crash happened outside the Java Virtual Machine in native code.
# See problematic frame for where to report the bug.
#
已放弃 (core dumped)
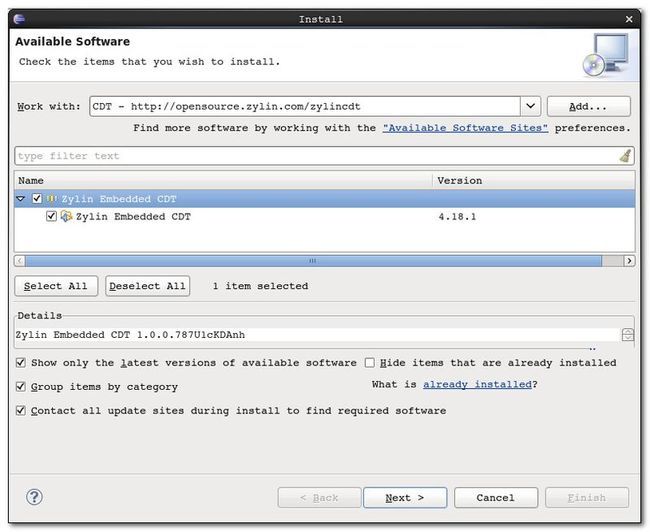
-- 安装 CDT 插件 : 地址 http://opensource.zylin.com/zylincdt , 注意 三个都选择;
(6) 工程配置
配置工程 :
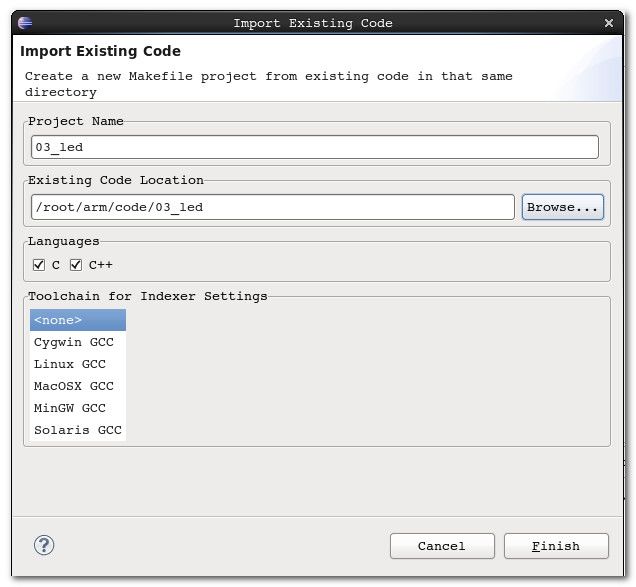
-- 导入工程 : 选择 菜单 "File" --> "New" --> "Makefile Project with Existing Code"
-- 取消自动编译 : 菜单 "Project" --> "Build Automatically" 选项;
-- 清除编译文件 : 选择 "Project" --> "Clean ...", 就会清除 .o .elf .bin 文件;
-- 编译文件 : "Project" --> "Build All" 选项, 同时 Console 中会有命令行输出;
(7) Debug配置
Debug 配置 :
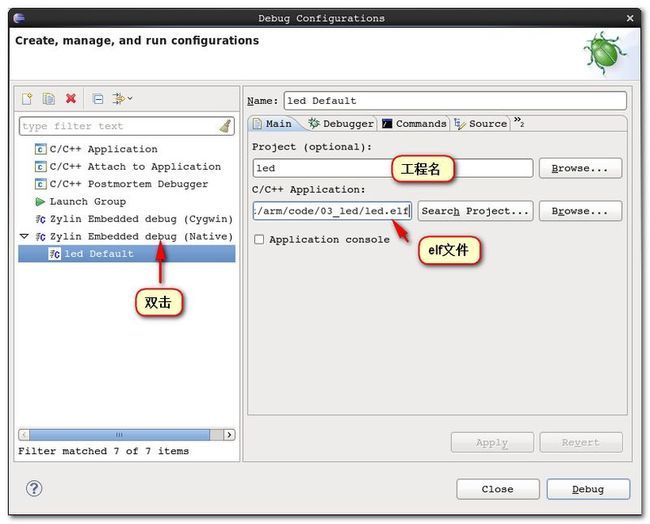
-- 设置Main 选项卡 : 双击 Zylin Embedded debug (Native), 创建 Degug, 设置工程名, 设置调试程序, 注意选择 elf 格式的文件;
-- 设置 Debugger 选项卡 : 取消 Stop on startup at : main 选项, GDB debugger 程序选择为 arm-linux-gdb;
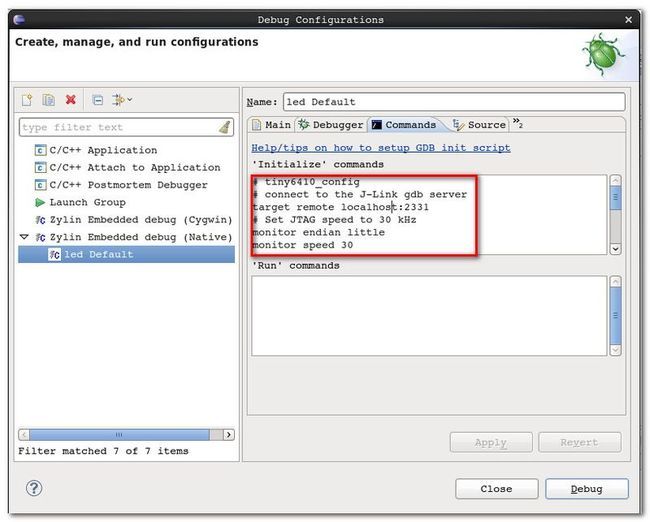
-- 设置初始化脚本 : 在 Commands 选项卡中设置 初始化脚本 , 注意下面的脚本是 ok6410 开发板的脚本, 其它开发板无法使用;
# tiny6410_config
# connect to the J-Link gdb server
target remote localhost:2331
# Set JTAG speed to 30 kHz
monitor endian little
monitor speed 30
# Reset the target
monitor reset
monitor sleep 10
#
# CPU core initialization (to be done by user)
#
# Set the processor mode
monitor reg cpsr = 0xd3
#config MMU
#flush v3/v4 cache
monitor cp15 7, 7, 0, 0 = 0x0
#/* flush v4 TLB */
monitor cp15 8, 7, 0, 0 = 0x0
#disable MMU stuff and caches
monitor cp15 1, 0, 0, 0 =0x1002
#Peri port setup
monitor cp15 15, 2, 0, 4 = 0x70000013
#disable watchdog
monitor MemU32 0x7e004000  =  0x00000000
monitor sleep 10
#disable interrupt
monitor MemU32 0x71200014  =  0x00000000
monitor MemU32 0x71300014  =  0x00000000
monitor MemU32 0x7120000C  =  0x00000000
monitor MemU32 0x7130000C  =  0x00000000
monitor MemU32 0x71200F00  =  0x00000000
monitor MemU32 0x71300F00  =  0x00000000
#set clock
monitor MemU32 0x7e00f900  =  0x0000801e
monitor MemU32 0x7e00f000  =  0x0000ffff
monitor MemU32 0x7e00f004  =  0x0000ffff
monitor MemU32 0x7e00f020  =  0x01043310
monitor MemU32 0x7e00f00C  =  0xc2150601
monitor MemU32 0x7e00f010  =  0xc2150601
monitor MemU32 0x7e00f024  =  0x00000003
monitor MemU32 0x7e00f014  =  0x00200102
monitor MemU32 0x7e00f018  =  0x00000000
monitor MemU32 0x7e00f01C  =  0x14000007
#config sdram
monitor MemU32 0x7e00f120  =  0x00000008
monitor MemU32 0x7e001004  =  0x00000004
monitor MemU32 0x7e001010  =  0x0000040f
monitor MemU32 0x7e001014  =  0x00000006
monitor MemU32 0x7e001018  =  0x00000001
monitor MemU32 0x7e00101c  =  0x00000002
monitor MemU32 0x7e001020  =  0x00000006
monitor MemU32 0x7e001024  =  0x0000000a
monitor MemU32 0x7e001028  =  0x0000000c
monitor MemU32 0x7e00102c  =  0x0000018f
monitor MemU32 0x7e001030  =  0x0000000c
monitor MemU32 0x7e001034  =  0x00000002
monitor MemU32 0x7e001038  =  0x00000002
monitor MemU32 0x7e00103c  =  0x00000002
monitor MemU32 0x7e001040  =  0x00000002
monitor MemU32 0x7e001044  =  0x00000013
monitor MemU32 0x7e001048  =  0x00000013
monitor MemU32 0x7e00100C  =  0x00010012
monitor MemU32 0x7e00104C  =  0x00000b45
monitor MemU32 0x7e001200  =  0x000150f8
monitor MemU32 0x7e001304  =  0x00000000
monitor MemU32 0x7e001008  =  0x000c0000
monitor MemU32 0x7e001008  =  0x00000000
monitor MemU32 0x7e001008  =  0x00040000
monitor MemU32 0x7e001008  =  0x00040000
monitor MemU32 0x7e001008  =  0x000a0000
monitor MemU32 0x7e001008  =  0x00080032
monitor MemU32 0x7e001004  =  0x00000000
# Setup GDB for faster downloads
#set remote memory-write-packet-size 1024
set remote memory-write-packet-size 4096
set remote memory-write-packet-size fixed
monitor speed 12000
break _start
load
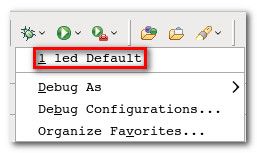
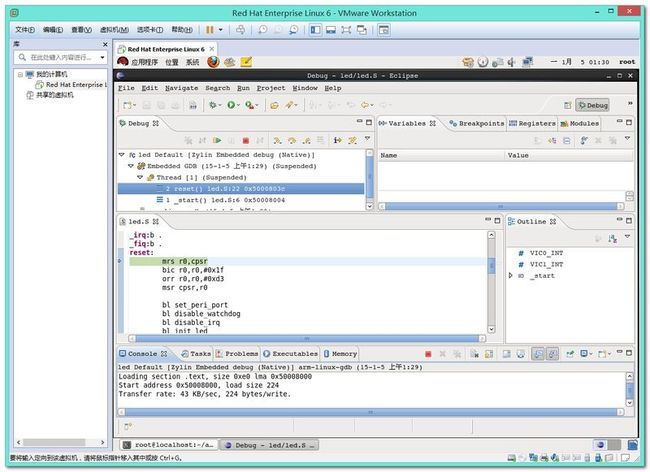
-- Debug 调试 : 执行 debug 调试, 再弹出的对话框中点击 yes;
-- 此时可以单步调试 :
.
作者: 韩曙亮
博客地址:http://blog.csdn.net/shulianghan/article/details/42239705
参考博客:【嵌入式开发】嵌入式 开发环境 (远程登录 | 文件共享 | NFS TFTP 服务器 | 串口连接 | Win8.1 + RedHat Enterprise 6.3 + Vmware11)

