玩转Android---UI篇---ListView之SampleAdapter(列表)---1
ListView是列表组件,这个ListView是我接触的目前所有Android UI控件中最为麻烦的控件,之所以麻烦就是因为它的各种的适配器Adapter特别麻烦,Adapter的组织结构图如下

在ListView中,以内不同的Adapter不同,所以也会有不同的效果,其中比较常用的是SampleAdapter,SimpleCursorAdapter,ArrayAdapter,BaseAdapter等,
万事开头难,还是从最简单的SimpleAdapter说起,以后再一点点学习
simpleAdapter的扩展性最好,可以定义各种各样的布局出来,可以放上ImageView(图片),还可以放上Button(按钮),CheckBox(复选框)等等。下面的代码都直接继承了ListActivity,ListActivity和普通的Activity没有太大的差别,不同就是对显示ListView做了许多优化,方面显示而已。
先看看一个实例,是由SimpleAdapter与ListView绑定后的一个小例子。
ListViewone.java文件
package org.hualang.simpleadapter;

import java.util.ArrayList;
import java.util.HashMap;

import android.app.ListActivity;
import android.os.Bundle;
import android.view.View;
import android.widget.ListView;
import android.widget.SimpleAdapter;
import android.widget.Toast;

public class ListViewone extends ListActivity {
    /** Called when the activity is first created. */
	private Toast toast;
    @Override
    public void onCreate(Bundle savedInstanceState) {
        super.onCreate(savedInstanceState);
        setContentView(R.layout.main);
        ArrayList<HashMap<String,String>> list=new ArrayList<HashMap<String,String>>();
        HashMap<String,String> map1=new HashMap<String,String>();
        HashMap<String,String> map2=new HashMap<String,String>();
        HashMap<String,String> map3=new HashMap<String,String>();
        map1.put("name", "凝墨");
        map1.put("phone", "13699452790");
        map2.put("name", "小棕");
        map2.put("phone", "15827980910");
        map3.put("name", "花郎");
        map3.put("phone", "18678091166");

        list.add(map1);
        list.add(map2);
        list.add(map3);
        SimpleAdapter listAdapter=new SimpleAdapter(this,
        		list,
        		R.layout.info,
        		new String[] {"name","phone"},
        		new int[] {R.id.name,R.id.phone});
        setListAdapter(listAdapter);
    }
    protected void onListItemClick(ListView l,View v,int position,long id)
    {
    	super.onListItemClick(l,v,position,id);
    	if(l.getItemIdAtPosition(position)==0)
    	{
    		toast.makeText(getApplicationContext(), "我是凝墨", Toast.LENGTH_SHORT).show();
    	}else if(l.getItemIdAtPosition(position)==1)
    	{
    		toast.makeText(getApplicationContext(), "我是小棕", Toast.LENGTH_SHORT).show();
    	}else if(l.getItemIdAtPosition(position)==2)
    	{
    		toast.makeText(getApplicationContext(), "我是花郎", Toast.LENGTH_SHORT).show();
    	}

    }

}
main.xml文件
<?xml version="1.0" encoding="utf-8"?>
<LinearLayout xmlns:android="http://schemas.android.com/apk/res/android"
    android:orientation="vertical"
    android:layout_width="fill_parent"
    android:layout_height="fill_parent"
    >
    <LinearLayout
    	android:layout_width="fill_parent"
    	android:layout_height="wrap_content"
    	android:id="@+id/linearlayout"
    	android:orientation="vertical"
    >
    	<ListView
    		android:id="@id/android:list"
    		android:layout_width="fill_parent"
    		android:layout_height="wrap_content"
    		android:drawSelectorOnTop="false"
    		android:scrollbars="vertical"
    	/>
    </LinearLayout>
</LinearLayout>
info.xml
<?xml version="1.0" encoding="utf-8"?>
<LinearLayout
  xmlns:android="http://schemas.android.com/apk/res/android"
  android:layout_width="wrap_content"
  android:layout_height="wrap_content"
  android:paddingLeft="10dip"
  android:paddingRight="10dip"
  android:paddingTop="1dip"
  android:paddingBottom="1dip"
  >
  <TextView
  	android:id="@+id/name"
  	android:layout_width="180dip"
  	android:layout_height="30dip"
  	android:textSize="10pt"
  	android:singleLine="true"
  />
  <TextView
  	android:id="@+id/phone"
  	android:layout_width="fill_parent"
  	android:layout_height="fill_parent"
  	android:gravity="right"
  	android:textSize="10pt"
  />
</LinearLayout>
使用simpleAdapter的数据用一般都是HashMap构成的List,list的每一节对应ListView的每一行。HashMap的每个键值数据映射到布局文件中对应id的组件上。因为系统没有对应的布局文件可用,我们可以自己定义一个布局info.xml。下面做适配,new一个SimpleAdapter参数一次是:this,布局文件(info.xml)。布局文件的组件name,phone。布局文件的各组件分别映射到HashMap的各元素上,完成适配。
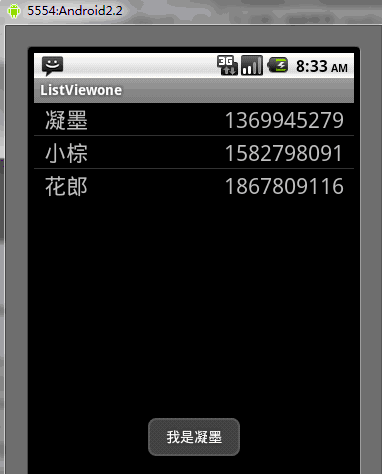
运行结果如下:
当点击了第一行
实例2:显示一个带图片的ListView,使用适配器SampleAdapter
ListViewone.java
package org.hualang.simpleadapter;
import java.util.ArrayList;
import java.util.HashMap;
import java.util.List;
import java.util.Map;

import android.app.ListActivity;
import android.os.Bundle;
import android.widget.SimpleAdapter;
public class ListViewone extends ListActivity {

	@Override
	public void onCreate(Bundle savedInstanceState) {
		super.onCreate(savedInstanceState);

		SimpleAdapter adapter = new SimpleAdapter(this,getData(),R.layout.info,
				new String[]{"name","phone","img"},
				new int[]{R.id.name,R.id.phone,R.id.img});
		setListAdapter(adapter);
	}

	private List<Map<String, Object>> getData() {
		List<Map<String, Object>> list = new ArrayList<Map<String, Object>>();

		Map<String, Object> map = new HashMap<String, Object>();
		map.put("name", "凝墨");
		map.put("phone", "13699782346");
		map.put("img", R.drawable.pic1);
		list.add(map);

		map = new HashMap<String, Object>();
		map.put("name", "小棕");
		map.put("phone", "15899034671");
		map.put("img", R.drawable.pic2);
		list.add(map);

		map = new HashMap<String, Object>();
		map.put("name", "花郎");
		map.put("phone", "18677656526");
		map.put("img", R.drawable.pic3);
		list.add(map);

		return list;
	}
}
info.xml
<?xml version="1.0" encoding="utf-8"?>
<LinearLayout xmlns:android="http://schemas.android.com/apk/res/android"
	android:orientation="horizontal" android:layout_width="fill_parent"
	android:layout_height="fill_parent">
	<ImageView android:id="@+id/img"
		android:layout_width="wrap_content"
		android:layout_height="wrap_content"
		android:layout_margin="5px"/>
	<LinearLayout android:orientation="vertical"
		android:layout_width="wrap_content"
		android:layout_height="wrap_content">

		<TextView android:id="@+id/name"
			android:layout_width="wrap_content"
			android:layout_height="wrap_content"
			android:textColor="#FFFFFFFF"
			android:textSize="22px" />
		<TextView android:id="@+id/phone"
			android:layout_width="wrap_content"
			android:layout_height="wrap_content"
			android:textColor="#FFFFFFFF"
			android:textSize="13px" />
	</LinearLayout>
</LinearLayout>
这里,就不做事件处理了,运行结果如下:


