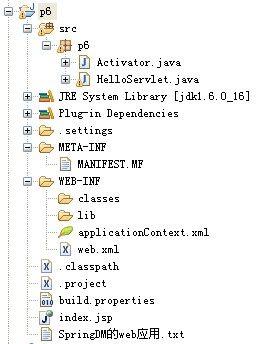
Spring-DM在web中的应用
在web中使用Spring-DM时,需要用到spring-osgi-web-extender-x.x.x.jar Bundle,该Bundle的启动级别要比其它的大。
一、开发步骤如下:
2、添加WEB-INF目录,并在该目录下加入web.xml文件。
3、引入相关的Bundle和包,最终MANIFEST.MF文件的内容如下:
Manifest-Version: 1.0
Bundle-ManifestVersion: 2
Bundle-Name: P6 Plug-in
Bundle-SymbolicName: p6;singleton:=true
Bundle-Version: 1.0.0
Bundle-Activator: p6.Activator
Import-Package: javax.servlet,
 javax.servlet.http,
 javax.servlet.resources;version="2.4.0",
 org.osgi.framework;version="1.3.0",
 org.springframework.osgi.web.context.support;version="1.1.3",
 org.springframework.web.context;version="2.5.5",
 org.springframework.web.context.support;version="2.5.5",
 p3.service;version="1.0.0"
Require-Bundle: org.springframework.bundle.osgi.core,
 org.springframework.bundle.osgi.io,
 org.springframework.bundle.spring.beans,
 org.springframework.bundle.spring.context,
 org.springframework.bundle.spring.core,
 org.springframework.osgi.catalina.osgi,
 org.apache.jasper
4、创建HelloServlet,其源码如下:
public class HelloServlet extends HttpServlet{
	@Override
	protected void doGet(HttpServletRequest req, HttpServletResponse resp)
			throws ServletException, IOException {
		doPost(req, resp);
	}

	@Override
	protected void doPost(HttpServletRequest req, HttpServletResponse resp)
			throws ServletException, IOException {
		resp.setContentType("text/html;charset=GBK");

		WebApplicationContext ctx = WebApplicationContextUtils.
			getWebApplicationContext(req.getSession().getServletContext());
		PersonManager pm = (PersonManager)ctx.getBean("osgiPersonManager");
		if(pm!=null){
			pm.savePerson("cjm", "123");
			resp.getWriter().print("调用成功!");
		}
	}
}
5、编辑web.xml文件,其内容如下:
<?xml version="1.0" encoding="UTF-8"?>
<web-app  xmlns="http://java.sun.com/xml/ns/j2ee"
xmlns:xsi="http://www.w3.org/2001/XMLSchema-instance"
xsi:schemaLocation="http://java.sun.com/xml/ns/j2ee http://java.sun.com/xml/ns/j2ee/web-app_2_4.xsd">
	<context-param>
    	<param-name>contextClass</param-name>
    	<param-value>org.springframework.osgi.web.context.support.OsgiBundleXmlWebApplicationContext</param-value>
 	</context-param>

	<listener>
		<listener-class>org.springframework.web.context.ContextLoaderListener</listener-class>
	</listener>

	<servlet>
		<servlet-name>HelloServlet</servlet-name>
		<servlet-class>p6.HelloServlet</servlet-class>
	</servlet>

	<servlet-mapping>
		<servlet-name>HelloServlet</servlet-name>
		<url-pattern>/hello</url-pattern>
	</servlet-mapping>
</web-app>
6、在WEB-INF目录下加入applicationContext.xml文件,其内容如下:
<?xml version="1.0" encoding="UTF-8"?>
<beans xmlns="http://www.springframework.org/schema/beans"
	xmlns:xsi="http://www.w3.org/2001/XMLSchema-instance"
	xmlns:osgi="http://www.springframework.org/schema/osgi"
	xsi:schemaLocation="
    http://www.springframework.org/schema/beans http://www.springframework.org/schema/beans/spring-beans-2.5.xsd
    http://www.springframework.org/schema/osgi http://www.springframework.org/schema/osgi/spring-osgi.xsd">

 	<osgi:reference id="osgiPersonManager" interface="p3.service.PersonManager" />

</beans>
