Ubuntu12下编译csipsimple
教你如何在虚拟机Ubuntu下编译csipsimple
转载请注明出处:http://blog.csdn.net/jingyuansuifeng/article/details/8120523
首先是官方文档:http://code.google.com/p/csipsimple/wiki/HowToBuild
1.安装好VMware
2.下载CSipSimple-CompilerVM.vmdk,这是官方编译好的环境,可以直接导入至虚拟机。下载地址:https://docs.google.com/file/d/0ByFooYVveHXdYVV6eVhaUElWaGM/edit?pli=1
3.启动VMware导入以上vmdk文件
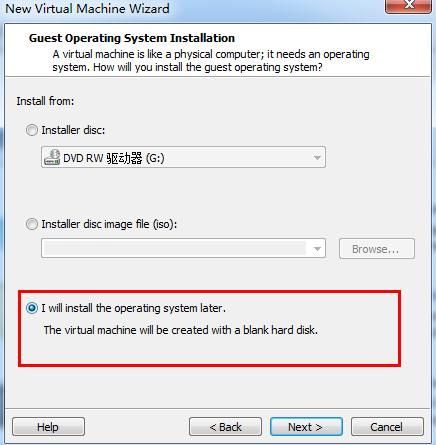
3.1新建虚拟机
注意:上图第一个是你虚拟机的名字,第二个是虚拟机存放的位置,你都可以随便设这,但是一定要自己记得。
上图分配内存一般根据自己机器情况设定,我选的是默认
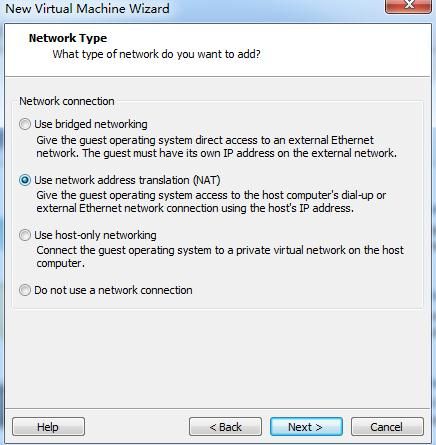
上图是网略配置,我选的是默认
上图选择已经存在的虚拟机,也就你前面下载好的CSipSimple-CompilerVM.vmdk。
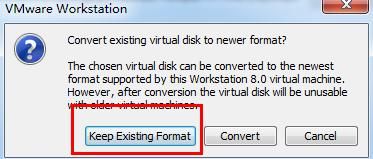
选择你下载好的虚拟机。使用已存在的格式
好了,至此虚拟环境就准备好了,下面我们看看里面都有哪些东西。
4.编译Csipsimple
看到桌面有一个文件Before doing anything else PLEASE read this document first!.txt
原文如下:
Welcometo the Virtual Machine v0.1 for compiling cSipSimple.
#Disclaimer:We do not guarantee that this machine does everything correctly.
#Description
Thismachine can compile cSipSimple incl. the native libaries.
It isbased upon the description http://code.google.com/p/csipsimple/wiki/HowToBuild
#Get started
1. Read the HowToBuild-Pagehttp://code.google.com/p/csipsimple/wiki/HowToBuild
2. The project source is checkout to the desktop(/home/user/Desktop).
3. Before compile get the latest version from the repository:"svn up" for ActionBarSherlock and cSipSimple)
4. Check Eclipse plugins for updates: OpenEclipse->Help->Check for Updates and install all updates
5. Update NDK and SDK: Open Eclipse DDMS and download latestandroid version, latest NDK and SDK
6. Rebuild the native libraries: make update
7. Open Eclipse and check that you are compiling against thecorrect Android API (often the latest)
8. Try to run cSipSimple in emulator
9. Congratulation!
#Ifsomething compilation fails>
1. Checkthat the setup of the virtual machine is similar as descripted byhttp://code.google.com/p/csipsimple/wiki/HowToBuild
2. Checkthat you did nothing wrong.
3. Checkagain.
4. Check thegoogle developer group: http://groups.google.com/group/csipsimple-dev/
5. Checkthe google developer group carefully again
6.Compile a USEFUL, i.e. descriptive and complete report, and send it to thedeveloper group incl. a useful and descriptive title
7.(Optional) Post the solution if found
Technicaldetails:
* Ubuntu12.04 32bit
* AndroidNDK 8
* AndroidSDK 20
* Eclipsewith subclipse
* Use sudo to get root; password is identical to theusername
所以我们就按照他的步骤来,这时候要淡定
注意:这里我没有进行更新
然后就是:make (我也没有用 make update),这边更慢,大家一定要淡定。。。63M的东西要下载90分钟真心伤不起,下面有惊喜!
所以这里建议大家事先下载好SILK_SDK_SRC_v1.0.8.zip把文件放在CSipSimple/jni/silk下
下载地址:http://developer.skype.com/silk/SILK_SDK_SRC_v1.0.8.zip
然后修改CSipSimple/jni/silk下的makefile去掉
@wgethttp://developer.skype.com/silk/SILK_SDK_SRC_v1.0.8.zip;\
然后再运行make ,就会看到下面的画面
如果这边还是嫌慢的话,直接把解压好的SILK_SDK_SRC_v1.0.8复制到jni/opus目录下。
然后你就开始慢慢等吧。。。。。。
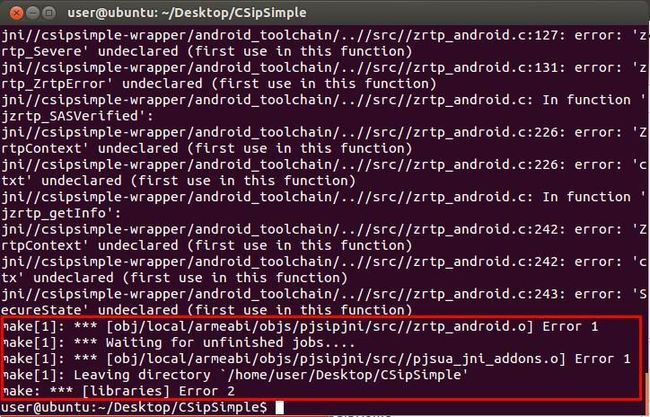
最后会出现
不过有两个错误,不知道为什么,先记着不去管它
打开eclipse
编译的时候有点慢,要淡定。。。
这时候要刷新下工程,然后clean下
现在就没有错误了
然后run一下,就看到效果了,这里我实在真机上测试的
OK,到此结束,由于我没有搭建服务器,所以通话怎么样就看你们了,基本的编译就那么多。至于以上两个error问题,有兴趣的人可以按照Before doing anything else PLEASE read this document first!.txt这个文档来,看看还有没有错误。
附录:
1.解決Linux下Android开发真机调试设备不被识别问题
http://my.oschina.net/u/591065/blog/68888
2.VMware虚拟机下使linux全屏的方法
1、点击“view”——然后将Autofit window这个选项勾选。(一般版本高的VMware虚拟机都会默认该设置)
2、该步骤是关键,具体的操作为:点击“VM”——选中“installvmware-tools”这个选项即可。
接下来的操作都是在虚拟机中的linux中进行
(1)打开linux的cdrom看是否有VMware Tools 的文件,如果有则说明“install VMware tools”成功了
(2)挂载cdrom到/mnt/cdrom目录下,具体命令为:mkdir /mnt/cdrom
mount /dev/cdrom /mnt/cdrom www.2cto.com
(3)解压cdrom中的文件: tar zxpf /mnt/cdrom/VMwareTools-<x.x.x>-<yyyy>.tar.gz
(4)进入tmp目录找到解压后的文件夹并进入:cd vmware-tools-distrib
(5)执行命令:./vmware-install.pl
然后根据系统提示,选择相关的选项即可。大概5分钟左右即可加载成功。
加载成功之后还须执行以下命令:
/etc/init.d/network stop
rmmod vmxnet
modprobe vmxnet
/etc/init.d/network start
一切操作做完后重启系统即可:reboot
下次开机即可看到自己的linux系统可以全屏了


