实现ListView的条目下自动隐藏显示的布局
这个想法是我在看了sina微博的塞班客户端的微博显示效果而想移植到Android平台上,因为它的体验很好,而我们做的效果就是要方便,要用户有很好的体验,但是可惜的是在sina官方的Android客户端没有实现这种效果!
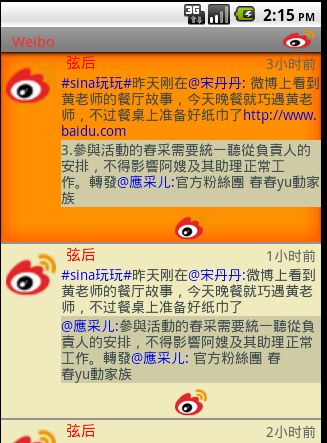
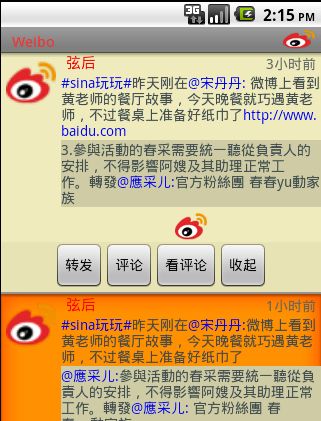
废话少说先贴图,看效果:
1。没有点击ListView之前
2。点击之后弹出四个Button
当然这个只是刚做出来的效果,界面还没有具体的美化,所以看起来还勉强,呵呵!
追求完美,还需要很多的工作,废话少说,代码+讲解如下:
我之前从来没有做过这种的效果,出发点也不知道,跟大多数的人一样,沉思!
但是之后baidu+google,一遍不行再来,反复的找,但是也没找到解决的办法,目前还没有做这种的效果
莫得办法,自谋出路!ok
第一步:找高人博客(就看关于ListView的介绍)
我们看的不是别人怎么写出来的代码,看的是思想,人家是怎么考虑的,我看过的如下:
http://blog.csdn.net/flowingflying/archive/2011/03/28/6283942.aspx
http://blog.csdn.net/flowingflying/archive/2011/03/29/6286767.aspx
http://blog.csdn.net/flowingflying/archive/2011/03/31/6292017.aspx
这位对ListView的研究很深啊!上面三篇都是,逐步深入,对于初学者绝对是推荐
看了你就爱上他吧!总之一句话!我的神啊!哈哈哈
好了看到这儿,我想你的第一步就是因该马上收藏哥的这篇博客,赶紧看他的吧!他才是哥的灵感,然后再看我的blog
我想这才会理解,我为什么会这么做!ok!just do it!
下面是我看了后的感觉:吸取到的精华就是:
1.MVC模式:初学者不知者无罪,但是要知道M V C 三个代表什么,那部分代码因该是那部分的实现。
2.设计自己的ListView的关键是什么:我告诉你,是ListView和数据的桥梁Adapter,不管是什么BaseAdapter,SimpleAdapter一样,莫得区别了。
3.你需要知道Adapter的每个函数是怎么工作的,譬如说在调用getView之前你知道它会干什么吗?调用getCount?为什么会调用getCount呢?我说为什么不呢?因为偶去测试了,它就去先去调用了getCount,不会又神来告诉你了!需要你自己去do!不如你去试试吧,把它的返回值设为0,你放心你的getView不灵光了!呵呵
4.在Adapter中最重要的是什么?想想吧!告诉你是getView,然后它是怎么工作的?调用的机制是什么?怎么调用的?
它是一行行绘制,还是一下子搞完?ok?do it!
好了,还有许多就不一一列举,希望你看了这些也能获得这些知识,一个字悟道吧!就是这么出来的!不知道的可以交流,呵呵
第二步:编码
1.布局文件list.xml
- <?xmlversion="1.0"encoding="utf-8"?>
- <RelativeLayoutxmlns:android="http://schemas.android.com/apk/res/android"
- android:orientation="horizontal"
- android:layout_width="fill_parent"
- android:layout_height="fill_parent"
- >
- <LinearLayout
- android:id="@+id/mainlayout"
- android:orientation="horizontal"
- android:layout_width="fill_parent"
- android:layout_height="wrap_content">
- <LinearLayout
- android:id="@+id/layout1"
- android:orientation="horizontal"
- android:layout_width="wrap_content"
- android:layout_height="wrap_content">
- <ImageView
- android:id="@+id/wbIcon"
- android:src="@drawable/sina"
- android:layout_width="50dip"
- android:layout_height="50dip"
- android:layout_marginLeft="5dip"
- android:layout_marginTop="5dip"
- android:layout_marginRight="5dip"
- android:adjustViewBounds="true">
- </ImageView>
- </LinearLayout>
- <LinearLayout
- android:id="@+id/layout2"
- android:orientation="vertical"
- android:layout_width="wrap_content"
- android:layout_height="wrap_content"
- android:layout_toRightOf="@+id/layout1"
- android:layout_alignParentRight="true">
- <RelativeLayout
- android:layout_width="wrap_content"
- android:layout_height="wrap_content"
- android:layout_alignParentRight="true">
- <TextView
- android:id="@+id/wbUser"
- android:text="username"
- android:textColor="#FF0000"
- android:textSize="15dip"
- android:layout_width="wrap_content"
- android:layout_height="wrap_content"
- android:paddingLeft="5dip">
- </TextView>
- <TextView
- android:id="@+id/wbTime"
- android:text="updatetime"
- android:textColor="#FF666666"
- android:textSize="14dip"
- android:layout_width="wrap_content"
- android:layout_height="wrap_content"
- android:paddingRight="5dip"
- android:layout_alignBottom="@+id/wbUser"
- android:layout_alignParentRight="true">
- </TextView>
- <TextView
- android:id="@+id/wbText"
- android:layout_height="wrap_content"
- android:layout_width="fill_parent"
- android:textSize="14dip"
- android:text="thecommentfillwithitiii\niiiiiiiiiiiiiijkkkkkkkkkkkkkkkkkkkkkkkkk"
- android:textColor="#424952"
- android:layout_below="@+id/wbUser"
- android:layout_alignParentLeft="true">
- </TextView>
- <LinearLayout
- android:orientation="vertical"
- android:layout_below="@+id/wbText"
- android:layout_width="fill_parent"
- android:layout_height="wrap_content">
- <TextView
- android:id="@+id/wbCommentText"
- android:layout_height="wrap_content"
- android:layout_width="fill_parent"
- android:textSize="14dip"
- android:textColor="#424952"
- android:background="#CDC9A5"
- android:text="uuuuuuuuuuuuuuuuuuuuuuuuuuuuuuuuuuuuuuuuuuuuuuuuuuuuuuuuu">
- </TextView>
- <ImageView
- android:id="@+id/wbImage"
- android:src="@drawable/sina"
- android:adjustViewBounds="true"
- android:layout_gravity="center_horizontal"
- android:layout_height="wrap_content"
- android:layout_width="wrap_content"
- android:layout_marginTop="3dip">
- </ImageView>
- </LinearLayout>
- </RelativeLayout>
- </LinearLayout>
- </LinearLayout>
- </RelativeLayout>
当然我这个布局做的不好,效率比较低,由于时间仓促没有修改,希望大家自己完成,代码优化是很重要的,原则就一个,尽量有少的layout实现该有的效果!
不知道发现没有:如果直接想的话,我们可能直接会说:那四个键直接写在List中嘛!当然我也试过,但是效果很差,而且一旦list条数过多就出现你都想吐的感觉!my god!怎么会这样!但是事实就是这样!不过你也可以尝试,只要去尝试总会成功的!相信自己,只不过我想到了一个更好的方法去做!效果更好而已!
我曾尝试过三个个方案
第一:折中方案,不在每个List的下面显示,而是都显示在最下面,但是可能会覆盖下面的菜单栏,故而舍弃,不过比上面简单的多,贴上xml
list.xml
- <?xmlversion="1.0"encoding="utf-8"?>
- <RelativeLayoutxmlns:android="http://schemas.android.com/apk/res/android"
- android:orientation="vertical"
- android:layout_width="fill_parent"
- android:layout_height="fill_parent"
- >
- <!--
- <LinearLayout
- android:id="@+id/buttonlayout"
- android:orientation="horizontal"
- android:paddingLeft="12dip"
- android:background="#EED8AE"
- android:layout_alignParentBottom="true"
- android:layout_width="fill_parent"
- android:layout_height="wrap_content"
- style="@android:style/ButtonBar">
- <Button
- android:id="@+id/wbTransmit"
- android:layout_width="wrap_content"
- android:layout_height="wrap_content"
- android:layout_weight="1"
- android:layout_alignParentBottom="true"
- android:visibility="gone"
- android:text="转发">
- </Button>
- <Button
- android:id="@+id/wbComment"
- android:layout_width="wrap_content"
- android:layout_height="wrap_content"
- android:layout_weight="1"
- android:layout_alignParentBottom="true"
- android:visibility="gone"
- android:text="评论">
- </Button>
- <Button
- android:id="@+id/wbRetract"
- android:layout_width="wrap_content"
- android:layout_height="wrap_content"
- android:layout_weight="1"
- android:layout_alignParentBottom="true"
- android:visibility="gone"
- android:text="收起">
- </Button>
- <Button
- android:id="@+id/wbWatchComment"
- android:layout_width="wrap_content"
- android:layout_height="wrap_content"
- android:layout_weight="1"
- android:layout_alignParentBottom="true"
- android:visibility="gone"
- android:text="看评论">
- </Button>
- </LinearLayout>
- -->
- <ListView
- android:id="@id/android:list"
- android:divider="#EEB422"
- android:dividerHeight="3dip"
- android:fadeScrollbars="true"
- android:fastScrollEnabled="true"
- android:background="@layout/list_corner"
- android:layout_width="fill_parent"
- android:layout_height="fill_parent">
- </ListView>
- </RelativeLayout>
注:在代码中的注释部分即是,他能够做出这种效果,但是在其中有许多的细节需要注意的,最外层需要RelativeLayout,其次list需要在Button之上,不能覆盖list,但是我做出来之后出现了一件诡异的事,list条目乱跳,很纠结。
方案二:直接将button放在list.xml中,作为list的一部分,并且隐藏,当点击list的时候显示list.xml如下:
list.xml
- <?xmlversion="1.0"encoding="utf-8"?>
- <LinearLayoutxmlns:android="http://schemas.android.com/apk/res/android"
- android:orientation="vertical"
- android:layout_width="fill_parent"
- android:layout_height="fill_parent">
- <LinearLayout
- android:id="@+id/layout01"
- android:layout_width="fill_parent"
- android:layout_height="wrap_content">
- <RelativeLayout
- android:id="@+id/relativelayout"
- android:orientation="vertical"
- android:layout_width="wrap_content"
- android:layout_height="wrap_content"
- android:paddingLeft="12dip"
- android:paddingBottom="4dip"
- >
- <ImageView
- android:id="@+id/itemImage"
- android:layout_margin="5dip"
- android:src="@drawable/icon"
- android:layout_width="wrap_content"
- android:layout_height="wrap_content"/>
- <LinearLayout
- android:id="@+id/layout2"
- android:orientation="vertical"
- android:layout_toRightOf="@+id/itemImage"
- android:layout_width="wrap_content"
- android:layout_height="wrap_content">
- <TextView
- android:id="@+id/itemTitle"
- android:layout_width="fill_parent"
- android:layout_height="wrap_content"
- android:text="1111111111"
- android:textSize="20dip"/>
- <TextView
- android:id="@+id/itemText"
- android:layout_width="fill_parent"
- android:layout_height="wrap_content"
- android:text="2222222222"
- android:textSize="17dip"/>
- </LinearLayout>
- </RelativeLayout>
- </LinearLayout>
- <!--
- <RelativeLayout
- android:layout_below="@+id/layout01"
- android:orientation="vertical"
- android:paddingLeft="12dip"
- android:background="#EED8AE"
- android:layout_width="wrap_content"
- android:layout_height="wrap_content">
- <Button
- android:id="@+id/wbTransmit"
- android:focusable="false"
- android:focusableInTouchMode="false"
- android:clickable="false"
- android:layout_marginLeft="5dip"
- android:layout_width="wrap_content"
- android:layout_height="wrap_content"
- android:visibility="gone"
- android:text="转发">
- </Button>
- <Button
- android:id="@+id/wbComment"
- android:focusable="false"
- android:focusableInTouchMode="false"
- android:clickable="false"
- android:layout_width="wrap_content"
- android:layout_height="wrap_content"
- android:layout_marginLeft="28dip"
- android:layout_toRightOf="@+id/wbTransmit"
- android:layout_alignTop="@+id/wbTransmit"
- android:visibility="gone"
- android:text="评论">
- </Button>
- <Button
- android:id="@+id/wbRetract"
- android:focusable="false"
- android:focusableInTouchMode="false"
- android:clickable="false"
- android:layout_width="wrap_content"
- android:layout_height="wrap_content"
- android:layout_marginLeft="28dip"
- android:layout_toRightOf="@+id/wbComment"
- android:layout_alignTop="@+id/wbTransmit"
- android:visibility="gone"
- android:text="收起">
- </Button>
- <Button
- android:id="@+id/wbWatchComment"
- android:focusable="false"
- android:focusableInTouchMode="false"
- android:clickable="false"
- android:layout_width="wrap_content"
- android:layout_height="wrap_content"
- android:layout_alignParentRight="true"
- android:layout_alignTop="@+id/wbTransmit"
- android:visibility="gone"
- android:text="看评论">
- </Button>
- </RelativeLayout>
- -->
- </LinearLayout>
注:android:focusableInTouchMode="false" android:focusable="false" android:clickable="false"这三个是关键,一开始它是不显示的,
当点击list的时候显示,需要在点击事件中去做。但是结果是,点击后效果是出来了,但是每次四个button都出现在最后,而不是
list的下面,最后我分析,是由于getview,我们需要重写这个方法。其关键就是需要理解getView的工作机制。
第三步:重写BaseAdapter函数
这个是最关键的东西,代码如下:
BaseAdapter.java
- packagecom.woclub.utils;
- importjava.util.List;
- importandroid.content.Context;
- importandroid.graphics.Color;
- importandroid.graphics.drawable.Drawable;
- importandroid.text.Spannable;
- importandroid.text.SpannableStringBuilder;
- importandroid.text.style.ForegroundColorSpan;
- importandroid.view.Gravity;
- importandroid.view.LayoutInflater;
- importandroid.view.View;
- importandroid.view.ViewGroup;
- importandroid.view.View.OnClickListener;
- importandroid.widget.BaseAdapter;
- importandroid.widget.Button;
- importandroid.widget.ImageView;
- importandroid.widget.LinearLayout;
- importandroid.widget.TextView;
- importcom.woclub.beans.WeiboHolder;
- importcom.woclub.beans.WeiboInfo;
- importcom.woclub.utils.AsyncImageLoader.ImageCallback;
- importcom.woclub.weibo.R;
- publicclassMyBaseAdapterextendsBaseAdapter{
- privateList<WeiboInfo>wbList;
- privateLayoutInflatermInflater;
- privateAsyncImageLoaderasyncImageLoader;
- privateContextmContext;
- privateWeiboHolderholder=null;
- privateintSelectListItem=0;
- publicMyBaseAdapter(Contextcontext,List<WeiboInfo>mData)
- {
- this.mInflater=(LayoutInflater)context.getSystemService(Context.LAYOUT_INFLATER_SERVICE);
- this.wbList=mData;
- mContext=context;
- }
- //privateAsyncImageLoaderasyncImageLoader;
- @Override
- publicintgetCount(){
- //TODOAuto-generatedmethodstub
- returnwbList.size();
- }
- @Override
- publicObjectgetItem(intposition){
- //TODOAuto-generatedmethodstub
- returnwbList.get(position);
- }
- @Override
- publiclonggetItemId(intposition){
- //TODOAuto-generatedmethodstub
- returnposition;
- }
- @Override
- publicViewgetView(intposition,ViewconvertView,ViewGroupparent){
- //TODOAuto-generatedmethodstub
- if(position<0||wbList.size()<=0)
- returnnull;
- Viewrow=convertView;
- LinearLayoutlayout=newLinearLayout(mContext);
- layout.setOrientation(LinearLayout.VERTICAL);
- if(convertView==null)
- {
- //一行行的加载list
- layout.addView(addListView(position,row));
- }
- else
- {
- holder=(WeiboHolder)row.getTag();
- //这是增加四个Button控件
- layout.addView(addListView(position,row));
- intID=this.getSelectListItem();
- //如果选择的行是当前正重新刷新(即当前载入的行)时,我们在下面加入四个button
- if(ID==position){
- layout.addView(addButtonView());
- }
- }
- returnlayout;
- }
- /**
- *设置text中显示的格式
- *@paramwbTextTextView
- *@paramstring开始的字符
- *@paramstring2结束字符
- */
- privatevoidtextHighlight(TextViewtextView,Stringstart,Stringend){
- Spannablesp=(Spannable)textView.getText();
- Stringtext=textView.getText().toString();
- intn=0;
- ints=-1;
- inte=-1;
- while(n<text.length()){
- s=text.indexOf(start,n);
- if(s!=-1){
- e=text.indexOf(end,s+start.length());
- if(e!=-1){
- e=e+end.length();
- }else{
- e=text.length();
- }
- n=e;
- sp.setSpan(newForegroundColorSpan(Color.BLUE),s,e,
- Spannable.SPAN_EXCLUSIVE_EXCLUSIVE);
- s=e=-1;
- }else{
- n=text.length();
- }
- }
- }
- publicvoidsetSelectListItem(intposition)
- {
- this.SelectListItem=position;
- }
- publicintgetSelectListItem()
- {
- returnthis.SelectListItem;
- }
- /**
- *这个函数的作用是加载整个List列表
- *是一行行的加载整个list
- *@paramposition行list的位置
- *@return
- */
- privateViewaddListView(intposition,Viewrow)
- {
- asyncImageLoader=newAsyncImageLoader();
- row=mInflater.inflate(R.layout.list,null);
- //先取的控件
- holder=newWeiboHolder();
- //下面是获取xml中的实例化控件对象
- holder.wbIcon=(ImageView)row.findViewById(R.id.wbIcon);
- holder.wbUser=(TextView)row.findViewById(R.id.wbUser);
- holder.wbTime=(TextView)row.findViewById(R.id.wbTime);
- holder.wbText=(TextView)row.findViewById(R.id.wbText);
- holder.wbCommentText=(TextView)row.findViewById(R.id.wbCommentText);
- holder.wbImage=(ImageView)row.findViewById(R.id.wbImage);
- //Setsthetagassociatedwiththisview.这个tags是包含了view里面的控件,但不一定是唯一的
- //即相当于这个view重新获得了一个完整的实例化控件集合(实例由上面四步完成)
- WeiboInfowb=wbList.get(position);
- if(wb!=null)
- {
- row.setTag(wb.getId());
- holder.wbUser.setText(wb.getUserName());
- holder.wbTime.setText(wb.getTime());
- //vw.setText("Italic,highlighted,bold.",TextView.BufferType.SPANNABLE);
- //toforceittouseSpannablestoragesostylescanbeattached.
- //OrwecouldspecifythatintheXML.
- holder.wbText.setText(wb.getText(),TextView.BufferType.SPANNABLE);
- //设置微博内容的显示格式
- textHighlight(holder.wbText,"#","#");
- textHighlight(holder.wbText,"@",":");
- textHighlight(holder.wbText,"http://","");
- holder.wbCommentText.setText(wb.getCommentText(),TextView.BufferType.SPANNABLE);
- textHighlight(holder.wbCommentText,"#","#");
- textHighlight(holder.wbCommentText,"@",":");
- //textHighlight2(holder.wbCommentText,newchar[]{'#'},newchar[]{'#'});
- //textHighlight2(holder.wbCommentText,newchar[]{'@'},newchar[]{':',''});
- //载入头像
- DrawablecachedIcon=asyncImageLoader.loadDrawable(wb.getUserIcon(),holder.wbIcon,newImageCallback(){
- @Override
- publicvoidimageLoaded(DrawableimageDrawable,ImageViewimageView,
- StringimageUrl){
- //TODOAuto-generatedmethodstub
- imageView.setImageDrawable(imageDrawable);
- }
- });
- if(cachedIcon==null)
- {
- holder.wbIcon.setImageResource(R.drawable.sina);
- }
- else
- {
- holder.wbIcon.setImageDrawable(cachedIcon);
- }
- //载入图片
- if(wb.getImage()!=null)
- {
- DrawablecachedImage=asyncImageLoader.loadDrawable(wb.getImage(),holder.wbImage,newImageCallback(){
- @Override
- publicvoidimageLoaded(DrawableimageDrawable,ImageViewimageView,
- StringimageUrl){
- //TODOAuto-generatedmethodstub
- imageView.setImageDrawable(imageDrawable);
- }
- });
- if(cachedImage==null)
- {
- holder.wbImage.setImageResource(R.drawable.sina);
- }
- else
- {
- holder.wbImage.setImageDrawable(cachedImage);
- }
- }
- }
- row.setTag(holder);
- returnrow;
- }
- /*
- *这个函数的作用是显示List下面的四个Button
- */
- privateViewaddButtonView()
- {
- //流式布局放四个button
- LinearLayoutlayout=newLinearLayout(mContext);
- layout.setOrientation(LinearLayout.HORIZONTAL);
- layout.setPadding(12,1,12,1);
- layout.setBackgroundColor(android.R.color.darker_gray);
- layout.setGravity(Gravity.CENTER);
- finalButtonbt1=newButton(mContext);
- bt1.setText("转发");
- bt1.setFocusable(false);
- bt1.setFocusableInTouchMode(false);
- bt1.setClickable(true);
- bt1.setOnClickListener(newOnClickListener(){
- @Override
- publicvoidonClick(Viewv){
- //TODOAuto-generatedmethodstub
- System.out.println("wbTransmit");
- }
- });
- layout.addView(bt1,
- newLinearLayout.LayoutParams(LinearLayout.LayoutParams.WRAP_CONTENT,LinearLayout.LayoutParams.WRAP_CONTENT));
- finalButtonbt2=newButton(mContext);
- bt2.setText("评论");
- bt2.setFocusable(false);
- bt2.setFocusableInTouchMode(false);
- bt2.setClickable(true);
- bt2.setOnClickListener(newOnClickListener(){
- @Override
- publicvoidonClick(Viewv){
- //TODOAuto-generatedmethodstub
- System.out.println("wbComment");
- }
- });
- layout.addView(bt2,
- newLinearLayout.LayoutParams(LinearLayout.LayoutParams.WRAP_CONTENT,LinearLayout.LayoutParams.WRAP_CONTENT));
- finalButtonbt3=newButton(mContext);
- bt3.setText("看评论");
- bt3.setFocusable(false);
- bt3.setFocusableInTouchMode(false);
- bt3.setClickable(true);
- bt3.setOnClickListener(newOnClickListener(){
- @Override
- publicvoidonClick(Viewv){
- //TODOAuto-generatedmethodstub
- System.out.println("wbWatchComment");
- }
- });
- layout.addView(bt3,
- newLinearLayout.LayoutParams(LinearLayout.LayoutParams.WRAP_CONTENT,LinearLayout.LayoutParams.WRAP_CONTENT));
- finalButtonbt4=newButton(mContext);
- bt4.setText("收起");
- bt4.setFocusable(false);
- bt4.setFocusableInTouchMode(false);
- bt4.setClickable(true);
- bt4.setOnClickListener(newOnClickListener(){
- @Override
- publicvoidonClick(Viewv){
- //TODOAuto-generatedmethodstub


评论