SDCard 和File文件操作总结---仿照安卓优化大师文件管理器
最近SDCard和File操作较多,称周末做了个dome总结下,希望对大家有帮助
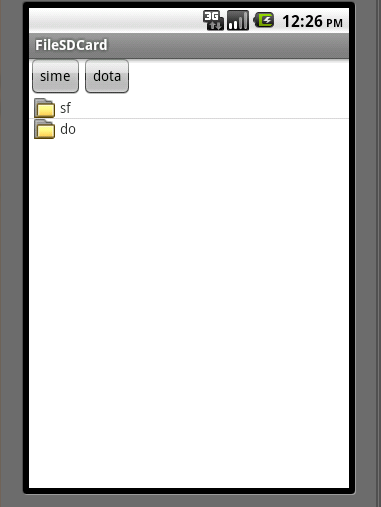
功能模仿安卓优化大师的文件管理器,有些功能还没有完善,希望有时间的朋友帮忙完善下 先看效果图
我单击sime目录下的dota
界面如上,上面的两个按钮都是动态生成的单击它们可以回到对应的目录
来看下实现思路吧
首先,要获得这样一个文件目录的列表就用使用ListView
先看 UI的布局文件
<RelativeLayout xmlns:android="http://schemas.android.com/apk/res/android"
    xmlns:tools="http://schemas.android.com/tools"
    android:layout_width="match_parent"
    android:layout_height="match_parent"
    >
<LinearLayout android:id="@+id/layout1"
    android:layout_width="fill_parent"
    android:layout_height="40dp"
    android:layout_alignParentLeft="true"
    android:layout_alignParentTop="true">

</LinearLayout>

<ListView
    android:id="@+id/listView1"
    android:layout_width="match_parent"
    android:layout_height="wrap_content"
    android:layout_alignParentLeft="true"
    android:layout_below="@id/layout1">
</ListView>

</RelativeLayout>
上面的LinearLayout是区域是用来存放动态添加的Button的
下面是ListView每个Item的UI布局
<?xml version="1.0" encoding="utf-8"?>
<RelativeLayout xmlns:android="http://schemas.android.com/apk/res/android"
    android:layout_width="match_parent"
    android:layout_height="match_parent" >
    <ImageView
        android:id="@+id/imgview"
        android:layout_width="wrap_content"
        android:layout_height="wrap_content"
        android:layout_alignParentLeft="true"
        android:layout_marginLeft="5dp"/>
    <TextView
        android:id="@+id/txview"
        android:layout_width="wrap_content"
        android:layout_height="wrap_content"
        android:layout_toRightOf="@id/imgview"
        android:layout_marginLeft="5dp"
        />
    <TextView
        android:id="@+id/txpath"
          android:layout_width="wrap_content"
        android:layout_height="wrap_content"
        android:layout_toRightOf="@id/txview"
        android:visibility="gone"/>"

</RelativeLayout>
布局文件写好了,现在重点就是在于如何填充ListView了,这本次dome中为了弄清楚适配器的原理在朋友的协助下自定义了一个适配器代码如下
package com.sime.tools;

import java.util.List;
import java.util.Map;

import android.content.Context;
import android.view.LayoutInflater;
import android.view.View;
import android.view.ViewGroup;
import android.widget.BaseAdapter;
import android.widget.ImageView;
import android.widget.TextView;

import com.sime.filedome.R;

public class SimeAdapter extends BaseAdapter {

	private  List<Map<String,Object>> listDate;
	private Context context;
	  class holder{
			 ImageView imgview;
			TextView txview;
		 TextView txpath;

		}


 public SimeAdapter( List<Map<String,Object>> listDate,Context context)
{
	 this.listDate = listDate;
	 this.context = context;
}
	@Override
	public int getCount() {
		// TODO Auto-generated method stub
		return  listDate.size();
	}

	@Override
	public Object getItem(int position) {
		// TODO Auto-generated method stub
		return  listDate.get(position);
	}

	@Override
	public long getItemId(int position) {
		// TODO Auto-generated method stub
		return  position;
	}

	@Override
	public View getView(int position, View convertView, ViewGroup parent) {
		holder hl=null;
		if(convertView == null ){
			convertView=LayoutInflater.from(context).inflate(R.layout.items, null);
			 hl=new holder();
			hl.imgview=(ImageView)convertView.findViewById(R.id.imgview);
			hl.txview=(TextView)convertView.findViewById(R.id.txview);
			hl.txpath=(TextView)convertView.findViewById(R.id.txpath);
			convertView.setTag(hl);
			}else{
				        hl =(holder)convertView.getTag();
			}
		hl.imgview.setImageDrawable(context.getResources().getDrawable(R.drawable.folder));
		hl.txview.setText(listDate.get(position).get("txview").toString());
		hl.txpath.setText(listDate.get(position).get("txpath").toString());

		return convertView;
	}

}
重点在于getView的方法,相当于去给每个ListView的每一行填充数据(开始时候我很是不理解)
首先获取到items的布局,接着获取到每个我们要用到的控件,并填充它们(这里少了些判断就是,不管是文件夹还是图片,文本我都用的一个图标表示的,有需要的朋友可以写一些方法判断)最后别忘了return convertView 我是个初学者,这段代码有些地方也不是很理解比如说那个 setTag()和 getTag(),如果懂的朋友下面说说。
接着就是要去遍历SDCard了,首先为了方便我写个方法去获取SDCard的根目录
public static String getSDcardPath() {
		String state = Environment.getExternalStorageState();//获取SDCard的状态值是否可以用
		if (Environment.MEDIA_MOUNTED.equals(state)) {//与静态变量对比
			String rootpath = Environment.getExternalStorageDirectory()//获得SDCard根目录
					.toString();
			return rootpath;
		}
		else{
			return null;
		}
	}
接着写获取目录的方法
public static List<Map<String ,Object>> getDateList(String rootpath,Context context)
	{
		List<Map<String ,Object>> list=new ArrayList<Map<String ,Object>>();
		File file=new File(rootpath);
		File [] files=null;
		if(file!=null && file.exists() && file.isDirectory())
		{
			files=file.listFiles();
			if(files.length!=0&& files!=null)
			{
				files=getOrderlist(files);
				for(int i=0;i<files.length;i++)
				{	Map<String ,Object> map=new HashMap<String, Object>();

					map.put("txview", files[i].getName());
					map.put("txpath", files[i].getAbsolutePath());
					list.add(map);

				}
			}


		}

		return list;

	}
但文件不可以是无序的显示,所有又写了个排序的方法
public static File[] getOrderlist(File[] files)
	{
		File file=null;
		for(int i=0;i<files.length-1;i++)
		{
			for(int j=i+1;j<files.length;j++)
			{

				if(files[i].getName().compareTo(files[i].getName())>0)
				{
					file=files[i];
					files[i]=files[j];
					files[j]=file;
				}
			}
		}

		return files;

	}
数据得到了,接下来就是填充了,这里思考了一下,应为我的listView是要不断的刷新的所以就写了个方法好调用
private void refeshListView(String itempath) {

		if (itempath != null && !"".equals(itempath)) {
			listDate = SDcardtools.getDateList(itempath, FileSDCard.this);
			if (listDate.size() > 0 && listDate != null) {
				SimeAdapter adapter = new SimeAdapter(listDate, FileSDCard.this);
				listview.setAdapter(adapter);
				listview.setOnItemClickListener(ListViewItemListener);
			}
			else if(listDate.size()==0)
			{

					Toast.makeText(FileSDCard.this, "不能运行", Toast.LENGTH_SHORT).show();

			}


		}
	}
这样一来SDCard根目录下的文件都能显示了
接下来就是写每个listView 的Item的单击事件,写之前,这里我思考了好久,我不但要更新listView还要动态的更新Button和绑定事件。用List来控制Button的变化,抱着试试的想法
Items的监听事件
public OnItemClickListener ListViewItemListener = new OnItemClickListener() {

		@Override
		public void onItemClick(AdapterView<?> adapter, View v, int pos, long id) {
			Map<String ,Object> map=(Map<String, Object>) adapter.getItemAtPosition(pos);
			String path=(String) map.get("txpath");
			File file=new File(path);
			if(file.isDirectory()&&file.listFiles().length>0)
			FileParent.add(file);
			if(path!=null &&! "".equals(path) )
			{

				refeshListView(path);
				ButtonRefesh(FileSDCard.this);

			}
		}
	};
Button刷新的监听事件
public void ButtonRefesh(final Context context)
	{
		//  mnt/sdcard/sime
			View v=LayoutInflater.from(context).inflate(R.layout.activity_file, null);
			LinearLayout layout1=(LinearLayout)findViewById(R.id.layout1);
			layout1.removeAllViews();
			for(int i=0;i<FileParent.size();i++)
			{
			final String parentpath=FileParent.get(i).getParent();
			final String path=FileParent.get(i).getPath();
			Button bt=new Button(context);
			String  text=  path.substring( path.lastIndexOf("/")+1);
			bt.setText(text);
			bt.setOnClickListener(new OnClickListener() {

				@Override
				public void onClick(View v) {
					// TODO Auto-generated method stub
				refeshListView(parentpath);
				removeButton(path);
				ButtonRefesh(context);
				}
			});
					layout1.addView(bt);
			}
	}
然后每次都要把不需要的按钮删除,需要一个删除的方法
	private ListView listview;
	private String Filepath=null;
	private List<Map<String, Object>> listDate = null;
	private List<File> FileParent=new ArrayList<File>();


	@Override
	protected void onCreate(Bundle savedInstanceState) {
		// TODO Auto-generated method stub
		super.onCreate(savedInstanceState);
		setContentView(R.layout.activity_file);
		listview = (ListView) findViewById(R.id.listView1);
		refeshListView(SDcardtools.getSDcardPath());
	}

	/*
	 * 当点击 每个子项的时候刷新布局
	 *
	 */
	private void refeshListView(String itempath) {

		if (itempath != null && !"".equals(itempath)) {
			listDate = SDcardtools.getDateList(itempath, FileSDCard.this);
			if (listDate.size() > 0 && listDate != null) {
				SimeAdapter adapter = new SimeAdapter(listDate, FileSDCard.this);
				listview.setAdapter(adapter);
				listview.setOnItemClickListener(ListViewItemListener);
			}
			else if(listDate.size()==0)
			{

					Toast.makeText(FileSDCard.this, "不能运行", Toast.LENGTH_SHORT).show();

			}


		}
	}

	public OnItemClickListener ListViewItemListener = new OnItemClickListener() {

		@Override
		public void onItemClick(AdapterView<?> adapter, View v, int pos, long id) {
			Map<String ,Object> map=(Map<String, Object>) adapter.getItemAtPosition(pos);
			String path=(String) map.get("txpath");
			File file=new File(path);
			if(file.isDirectory()&&file.listFiles().length>0)
			FileParent.add(file);
			if(path!=null &&! "".equals(path) )
			{

				refeshListView(path);
				ButtonRefesh(FileSDCard.this);

			}
		}
	};

	public void ButtonRefesh(final Context context)
	{
		//  mnt/sdcard/sime
			View v=LayoutInflater.from(context).inflate(R.layout.activity_file, null);
			LinearLayout layout1=(LinearLayout)findViewById(R.id.layout1);
			layout1.removeAllViews();
			for(int i=0;i<FileParent.size();i++)
			{
			final String parentpath=FileParent.get(i).getParent();
			final String path=FileParent.get(i).getPath();
			Button bt=new Button(context);
			String  text=  path.substring( path.lastIndexOf("/")+1);
			bt.setText(text);
			bt.setOnClickListener(new OnClickListener() {

				@Override
				public void onClick(View v) {
					// TODO Auto-generated method stub
				refeshListView(parentpath);
				removeButton(path);
				ButtonRefesh(context);
				}
			});
					layout1.addView(bt);
			}
	}
	// mnt/sdcard    mnt/sdcard/sime    mnt /sdcard/sime/lol
	public void removeButton(String path)
	{
		int pos=0;
		for(int i=0;i<FileParent.size();i++)
		{
			Log.v("show",path);
			if(path.equalsIgnoreCase(FileParent.get(i).getPath()))
			{
				pos=i;
			}
		}

		for(int j=pos;j<FileParent.size();)
		{
			if(j==0)
			{
				FileParent.clear();
			}
			else
			FileParent.remove(j);
		}
	}
讲的比较粗,详细的见代码吧,再次谢谢我的朋友大鹏对我的帮助,代码如果看不懂的可以问我,如果你把功能完善的更好可以发我邮箱 [email protected]

