CKEditor 3开启文件上传功能(Servlet实现)
本文在
http://sarin.iteye.com/blog/599056介绍的基础之上进行进一步的研究。
在CKEditor中把上传配置给打开,很简单,脚本段改为如下设置:
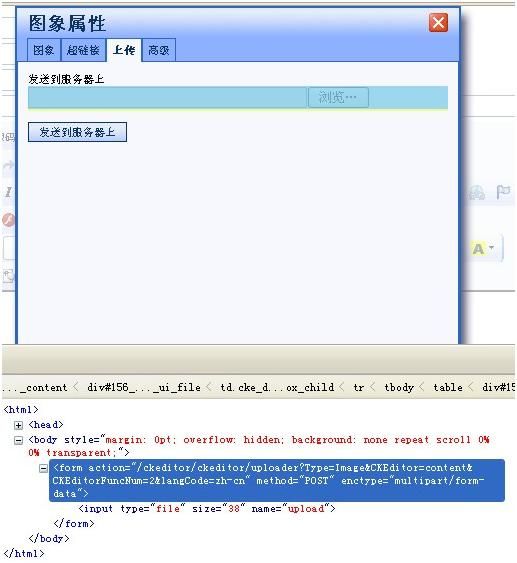
这里参数我们可以自己设置,加个Type为了区分文件类型,因为都使用同一个Servlet处理。事情没有这么简单,CKEditor毕竟是个复杂的组件,我们这么配置,看看它给我们还原成什么了吧,在FireFox中使用FireBug查看,看到了这些:

看到了吧,在Type后面它为我们又挂接了几个参数,其中我们需要的是CKEditorFuncNum和file域的name值upload,CKEditorFuncNum这个参数是用来回调页面的,就是上传成功后,页面自动切换到“图像”选项卡。upload参数是servlet获取上传文件用的参数名。其余参数就根据需要进行了。
这些参数的名称都是查看源码获得的,不能想当然。有了这些东西后面就好办了,就是文件上传了么。很简单了。这里我们使用apache commons组件中的fileupload和io。
先看web.xml,我们做些设置。
主要是Servlet的初始化参数,规定了文件上传的扩展名规则,就是允许上传的类型和阻止上传的类型。分为File,Image和FLASH三种,这个上传参数的设置是对应的。Debug是设置servlet知否进行debug,默认是关闭的。enabled是设置该servlet是否有效,如果禁止上传,就打成false。还有一个baseDir是设定CKEditor上传文件的存放位置。
下面就是实现类了,比较长,但是有详细的注释:
只要在页面中的script中设置了上传属性,我们打开图片时就能看到上传选项卡了,选择图片后,点击上传到服务器,上传成功就会自动跳到图像选项卡,可以看到源文件已经存在服务器的目标目录中了,此时,我们就可以在编辑器中编辑上传的图片了,非常方便。

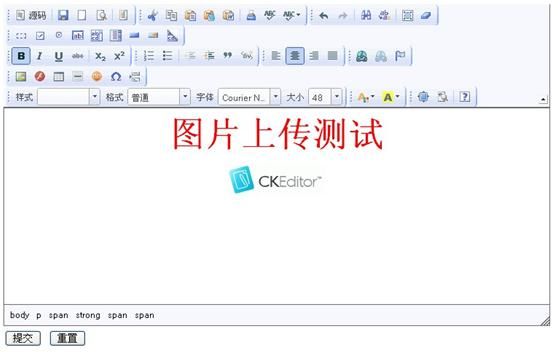
下面我们进行图片上传测试,可以看到如下效果。

提交后可以看到,数据获得效果,是完全一致的,这样使用CKEditor上传文件就已经成功了。

我们查看源文件,得到如下结果。
在服务器目录中,上传的文件已经存在其中了。

欢迎交流,希望对使用者有用。附件中新增本项目的源码下载。
在CKEditor中把上传配置给打开,很简单,脚本段改为如下设置:
<script type="text/javascript">
      	CKEDITOR.replace('content',{filebrowserUploadUrl : '/ckeditor/ckeditor/uploader?Type=File',
filebrowserImageUploadUrl : '/ckeditor/ckeditor/uploader?Type=Image',
filebrowserFlashUploadUrl : '/ckeditor/ckeditor/uploader?Type=Flash'
      	});
</script>
这里参数我们可以自己设置,加个Type为了区分文件类型,因为都使用同一个Servlet处理。事情没有这么简单,CKEditor毕竟是个复杂的组件,我们这么配置,看看它给我们还原成什么了吧,在FireFox中使用FireBug查看,看到了这些:

看到了吧,在Type后面它为我们又挂接了几个参数,其中我们需要的是CKEditorFuncNum和file域的name值upload,CKEditorFuncNum这个参数是用来回调页面的,就是上传成功后,页面自动切换到“图像”选项卡。upload参数是servlet获取上传文件用的参数名。其余参数就根据需要进行了。
这些参数的名称都是查看源码获得的,不能想当然。有了这些东西后面就好办了,就是文件上传了么。很简单了。这里我们使用apache commons组件中的fileupload和io。
先看web.xml,我们做些设置。
<?xml version="1.0" encoding="UTF-8"?>
<web-app version="2.5" xmlns="http://java.sun.com/xml/ns/javaee"
	xmlns:xsi="http://www.w3.org/2001/XMLSchema-instance"
	xsi:schemaLocation="http://java.sun.com/xml/ns/javaee
	http://java.sun.com/xml/ns/javaee/web-app_2_5.xsd">

	<servlet>
		<servlet-name>SimpleUploader</servlet-name>
		<servlet-class>ckeditor.CKEditorUploadServlet</servlet-class>
		<init-param>
			<param-name>baseDir</param-name>
			<param-value>/UserFiles/</param-value>
		</init-param>
		<init-param>
			<param-name>debug</param-name>
			<param-value>false</param-value>
		</init-param>
		<init-param>
			<param-name>enabled</param-name>
			<param-value>true</param-value>
		</init-param>
		<init-param>
			<param-name>AllowedExtensionsFile</param-name>
			<param-value></param-value>
		</init-param>
		<init-param>
			<param-name>DeniedExtensionsFile</param-name>
			<param-value>
				html|htm|php|php2|php3|php4|php5|phtml|pwml|inc|asp|aspx|ascx|jsp|cfm|cfc|pl|bat|exe|com|dll|vbs|js|reg|cgi|htaccess|asis|ftl
			</param-value>
		</init-param>
		<init-param>
			<param-name>AllowedExtensionsImage</param-name>
			<param-value>jpg|gif|jpeg|png|bmp</param-value>
		</init-param>
		<init-param>
			<param-name>DeniedExtensionsImage</param-name>
			<param-value></param-value>
		</init-param>
		<init-param>
			<param-name>AllowedExtensionsFlash</param-name>
			<param-value>swf|fla</param-value>
		</init-param>
		<init-param>
			<param-name>DeniedExtensionsFlash</param-name>
			<param-value></param-value>
		</init-param>
		<load-on-startup>0</load-on-startup>
	</servlet>

	<servlet-mapping>
		<servlet-name>SimpleUploader</servlet-name>
		<url-pattern>/ckeditor/uploader</url-pattern>
	</servlet-mapping>

	<welcome-file-list>
		<welcome-file>index.html</welcome-file>
	</welcome-file-list>
</web-app>
主要是Servlet的初始化参数,规定了文件上传的扩展名规则,就是允许上传的类型和阻止上传的类型。分为File,Image和FLASH三种,这个上传参数的设置是对应的。Debug是设置servlet知否进行debug,默认是关闭的。enabled是设置该servlet是否有效,如果禁止上传,就打成false。还有一个baseDir是设定CKEditor上传文件的存放位置。
下面就是实现类了,比较长,但是有详细的注释:
package ckeditor;
import java.io.*;
import java.text.SimpleDateFormat;
import java.util.*;
import javax.servlet.ServletException;
import javax.servlet.http.*;
import org.apache.commons.fileupload.FileItem;
import org.apache.commons.fileupload.FileItemFactory;
import org.apache.commons.fileupload.disk.DiskFileItemFactory;
import org.apache.commons.fileupload.servlet.ServletFileUpload;
public class CKEditorUploadServlet extends HttpServlet {
	private static String baseDir;// CKEditor的根目录
	private static boolean debug = false;// 是否debug模式
	private static boolean enabled = false;// 是否开启CKEditor上传
	private static Hashtable allowedExtensions;// 允许的上传文件扩展名
	private static Hashtable deniedExtensions;// 阻止的上传文件扩展名
	private static SimpleDateFormat dirFormatter;// 目录命名格式:yyyyMM
	private static SimpleDateFormat fileFormatter;// 文件命名格式:yyyyMMddHHmmssSSS
	/**
	 * Servlet初始化方法
	 */
	public void init() throws ServletException {
		// 从web.xml中读取debug模式
		debug = (new Boolean(getInitParameter("debug"))).booleanValue();
		if (debug)
			System.out
					.println("\r\n---- SimpleUploaderServlet initialization started ----");
		// 格式化目录和文件命名方式
		dirFormatter = new SimpleDateFormat("yyyyMM");
		fileFormatter = new SimpleDateFormat("yyyyMMddHHmmssSSS");
		// 从web.xml中获取根目录名称
		baseDir = getInitParameter("baseDir");
		// 从web.xml中获取是否可以进行文件上传
		enabled = (new Boolean(getInitParameter("enabled"))).booleanValue();
		if (baseDir == null)
			baseDir = "/UserFiles/";
		String realBaseDir = getServletContext().getRealPath(baseDir);
		File baseFile = new File(realBaseDir);
		if (!baseFile.exists()) {
			baseFile.mkdirs();
		}
		// 实例化允许的扩展名和阻止的扩展名
		allowedExtensions = new Hashtable(3);
		deniedExtensions = new Hashtable(3);
		// 从web.xml中读取配置信息
		allowedExtensions.put("File",
		stringToArrayList(getInitParameter("AllowedExtensionsFile")));
		deniedExtensions.put("File",
		stringToArrayList(getInitParameter("DeniedExtensionsFile")));
		allowedExtensions.put("Image",
	stringToArrayList(getInitParameter("AllowedExtensionsImage")));
		deniedExtensions.put("Image",			stringToArrayList(getInitParameter("DeniedExtensionsImage")));
		allowedExtensions.put("Flash",			stringToArrayList(getInitParameter("AllowedExtensionsFlash")));
		deniedExtensions.put("Flash",			stringToArrayList(getInitParameter("DeniedExtensionsFlash")));
		if (debug)
			System.out
					.println("---- SimpleUploaderServlet initialization completed ----\r\n");
	}
	public void doGet(HttpServletRequest request, HttpServletResponse response)
			throws ServletException, IOException {
		doPost(request, response);
	}
	public void doPost(HttpServletRequest request, HttpServletResponse response)
			throws ServletException, IOException {
		if (debug)
			System.out.println("--- BEGIN DOPOST ---");
		response.setContentType("text/html; charset=UTF-8");
		response.setHeader("Cache-Control", "no-cache");
		PrintWriter out = response.getWriter();
		// 从请求参数中获取上传文件的类型:File/Image/Flash
		String typeStr = request.getParameter("Type");
		if (typeStr == null) {
			typeStr = "File";
		}
		if (debug)
			System.out.println(typeStr);
		// 实例化dNow对象,获取当前时间
		Date dNow = new Date();
		// 设定上传文件路径
		String currentPath = baseDir + typeStr + "/"
				+ dirFormatter.format(dNow);
		// 获得web应用的上传路径
		String currentDirPath = getServletContext().getRealPath(currentPath);
		// 判断文件夹是否存在,不存在则创建
		File dirTest = new File(currentDirPath);
		if (!dirTest.exists()) {
			dirTest.mkdirs();
		}
		// 将路径前加上web应用名
		currentPath = request.getContextPath() + currentPath;
		if (debug)
			System.out.println(currentDirPath);
		// 文件名和文件真实路径
		String newName = "";
		String fileUrl = "";
		if (enabled) {
			// 使用Apache Common组件中的fileupload进行文件上传
			FileItemFactory factory = new DiskFileItemFactory();
			ServletFileUpload upload = new ServletFileUpload(factory);
			try {
				List items = upload.parseRequest(request);
				Map fields = new HashMap();
				Iterator iter = items.iterator();
				while (iter.hasNext()) {
					FileItem item = (FileItem) iter.next();
					if (item.isFormField())
						fields.put(item.getFieldName(), item.getString());
					else
						fields.put(item.getFieldName(), item);
				}
				// CEKditor中file域的name值是upload
				FileItem uplFile = (FileItem) fields.get("upload");
				// 获取文件名并做处理
				String fileNameLong = uplFile.getName();
				fileNameLong = fileNameLong.replace('\\', '/');
				String[] pathParts = fileNameLong.split("/");
				String fileName = pathParts[pathParts.length - 1];
				// 获取文件扩展名
				String ext = getExtension(fileName);
				// 设置上传文件名
				fileName = fileFormatter.format(dNow) + "." + ext;
				// 获取文件名(无扩展名)
				String nameWithoutExt = getNameWithoutExtension(fileName);
				File pathToSave = new File(currentDirPath, fileName);
				fileUrl = currentPath + "/" + fileName;
				if (extIsAllowed(typeStr, ext)) {
					int counter = 1;
					while (pathToSave.exists()) {
						newName = nameWithoutExt + "_" + counter + "." + ext;
						fileUrl = currentPath + "/" + newName;
						pathToSave = new File(currentDirPath, newName);
						counter++;
					}
					uplFile.write(pathToSave);
				} else {
					if (debug)
						System.out.println("无效的文件类型: " + ext);
				}
			} catch (Exception ex) {
				if (debug)
					ex.printStackTrace();
			}
		} else {
			if (debug)
				System.out.println("未开启CKEditor上传功能");
		}
		// CKEditorFuncNum是回调时显示的位置,这个参数必须有
		String callback = request.getParameter("CKEditorFuncNum");
		out.println("<script type=\"text/javascript\">");
		out.println("window.parent.CKEDITOR.tools.callFunction(" + callback
				+ ",'" + fileUrl + "',''" + ")");
		out.println("</script>");
		out.flush();
		out.close();
		if (debug)
			System.out.println("--- END DOPOST ---");
	}
	/**
	 * 获取文件名的方法
	 */
	private static String getNameWithoutExtension(String fileName) {
		return fileName.substring(0, fileName.lastIndexOf("."));
	}
	/**
	 * 获取扩展名的方法
	 */
	private String getExtension(String fileName) {
		return fileName.substring(fileName.lastIndexOf(".") + 1);
	}
	/**
	 * 字符串像ArrayList转化的方法
	 */
	private ArrayList stringToArrayList(String str) {
		if (debug)
			System.out.println(str);
		String[] strArr = str.split("\\|");
		ArrayList tmp = new ArrayList();
		if (str.length() > 0) {
			for (int i = 0; i < strArr.length; ++i) {
				if (debug)
					System.out.println(i + " - " + strArr[i]);
				tmp.add(strArr[i].toLowerCase());
			}
		}
		return tmp;
	}
	/**
	 * 判断扩展名是否允许的方法
	 */
	private boolean extIsAllowed(String fileType, String ext) {
		ext = ext.toLowerCase();
		ArrayList allowList = (ArrayList) allowedExtensions.get(fileType);
		ArrayList denyList = (ArrayList) deniedExtensions.get(fileType);
		if (allowList.size() == 0) {
			if (denyList.contains(ext)) {
				return false;
			} else {
				return true;
			}
		}
		if (denyList.size() == 0) {
			if (allowList.contains(ext)) {
				return true;
			} else {
				return false;
			}
		}
		return false;
	}
}
只要在页面中的script中设置了上传属性,我们打开图片时就能看到上传选项卡了,选择图片后,点击上传到服务器,上传成功就会自动跳到图像选项卡,可以看到源文件已经存在服务器的目标目录中了,此时,我们就可以在编辑器中编辑上传的图片了,非常方便。

下面我们进行图片上传测试,可以看到如下效果。

提交后可以看到,数据获得效果,是完全一致的,这样使用CKEditor上传文件就已经成功了。

我们查看源文件,得到如下结果。
<html>
<head>
<meta http-equiv="Content-Type" content="text/html; charset=UTF-8">
<title>Display Content</title>
</head>
<body>
<center>
<table width="600" border="0" bordercolor="000000"
	style="table-layout: fixed;">
	<tbody>
		<tr>
			<td width="100" bordercolor="ffffff">主题:</td>
			<td width="500" bordercolor="ffffff">图片上传测试</td>
		</tr>
		<tr>
			<td valign="top" bordercolor="ffffff">内容:</td>
			<td valign="top" bordercolor="ffffff">
			<p style="text-align: center;"><span style="color: #f00;"><strong><span
				style="font-family: courier new, courier, monospace;"><span
				style="font-size: 48px;">图片上传测试</span></span></strong></span></p>
			<p style="text-align: center;"><img alt=""
				src="/ckeditor/UserFiles/Image/201002/20100217232748000.gif"
				style="width: 133px; height: 41px;"></p>
			<p style="text-align: center;"><span
				style="font-family: courier new, courier, monospace;"><br>
			</span></p>
			</td>
		</tr>
	</tbody>
</table>
</center>
</body>
</html>
在服务器目录中,上传的文件已经存在其中了。

欢迎交流,希望对使用者有用。附件中新增本项目的源码下载。