mysql proxy读写分离
操作系统:CentOS 5.3、Mysql 5.1.39
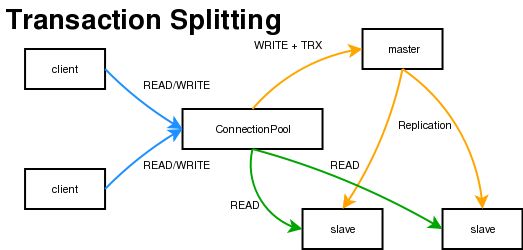
简单原理图:

1、编译安装必备软件:
libevent 1.x or higher (1.3b or later is preferred)
lua 5.1.x or higher
glib2 2.6.0 or higher
pkg-config
libtool 1.5 or higher
MySQL 5.0.x or higher developer files
2、安装
可以直接去官方下载二进制,或源码编译安装。
我用的是编译好的二进制: http://mysql.cdpa.nsysu.edu.tw/Downloads/MySQL-Proxy/
mysql服务器安装与 mysql主从备份省略。
3、测试机器
MySQL Proxy 地址:192.168.0.1(代号P)
MySQL 服务器地址:192.168.0.11(Mater)、192.168.0.22(Slave)
4、mysql proxy配置
帮助查看:
帮助信息:
proxy启动:
参数说明:
--proxy-read-only-backend-addresses -- remote slave-server(只读服务器)
--proxy-backend-addresses -- master-server(写服务器)
--proxy-lua-script -- lua script(读写分离脚本)
--keepalive -- restart the proxy if it crashed(mysql-proxy宕掉重启)
注意:官方的rw-splitting.lua有bug,很无语~~
我碰到的是:
2009-10-29 22:21:02: (critical) proxy-plugin.c:259: read_query_result() in /usr/local/web/mysql/mysql-proxy/share/doc/mysql-proxy/rw-splitting.lua tries to modify the resultset, but hasn't asked to buffer it in proxy.query:append(..., { resultset_is_needed = true }). We ignore the change to the result-set.
2009-10-29 22:21:02: (critical) proxy-plugin.c:1238: proxy.queries:append() in /usr/local/web/mysql/mysql-proxy/share/doc/mysql-proxy/rw-splitting.lua can only have one injected query without { resultset_is_needed = true } set. We close the client connection now.
有网友推荐0.7.*下这个rw-splitting.lua不错。
http://bazaar.launchpad.net/~mysql-proxy-developers/mysql-proxy/0.7/annotate/head:/lib/rw-splitting.lua
测试准备:
1、在Master建立一个数据库test,建立一个用户:name密码:123456对该数据库有你要使用的权限。
2、实现Mster和Slave对test数据库的replication(主从备份)。
3、在Slave建立一个与第一步Master同样的帐户密码,并且对test从数据库有你需要的权限。
测试读写分离与结果:
连接mysql proxy
注意:默认要开启4个以上连接才能读写分离,不然读写都在Master。
也可以更改rw-splitting.lua脚本中相关参数
min_idle_connections = 4,
max_idle_connections = 8,
测试数据库的表tb
插入数据
稍等片刻(待数据同步)查看结果
查看进程
在Master和Slave执行show processlist;可以查看读写,同步等的进程情况。可以看到,mysql proxy每次查询都会建立一个长久的连接。
其他
mysql proxy还可以实现连接池的功能。
rw-splitting.lua脚本中相关参数:
相关网站:
http://dev.mysql.com/doc/refman/5.1/en/mysql-proxy.html
http://www.infoq.com/cn/news/2007/10/mysqlproxyrwsplitting
简单原理图:

1、编译安装必备软件:
libevent 1.x or higher (1.3b or later is preferred)
lua 5.1.x or higher
glib2 2.6.0 or higher
pkg-config
libtool 1.5 or higher
MySQL 5.0.x or higher developer files
2、安装
可以直接去官方下载二进制,或源码编译安装。
我用的是编译好的二进制: http://mysql.cdpa.nsysu.edu.tw/Downloads/MySQL-Proxy/
tar zxvf mysql-proxy-0.7.2-linux-rhel5-x86-64bit.tar.gz -C /usr/local/web/mysql/
mv /usr/local/web/mysql/mysql-proxy-0.7.2-linux-rhel5-x86-64bit /usr/local/web/mysql/mysql-proxy
vi /etc/profile
加入以下:
export PATH=$PATH:/usr/local/web/mysql/mysql-proxy/sbin/
mysql服务器安装与 mysql主从备份省略。
3、测试机器
MySQL Proxy 地址:192.168.0.1(代号P)
MySQL 服务器地址:192.168.0.11(Mater)、192.168.0.22(Slave)
4、mysql proxy配置
帮助查看:
mysql-proxy --help-all
帮助信息:
Usage:
  /usr/local/web/mysql/mysql-proxy/libexec/mysql-proxy [OPTION...] - MySQL App Shell

Help Options:
  -?, --help                                          Show help options
  --help-all                                          Show all help options
  --help-admin                                        Show options for the admin-module
  --help-proxy                                        Show options for the proxy-module

admin-module
  --admin-address=<host:port>                         listening address:port of the admin-server (default: :4041)
  --admin-username=<string>                           username to allow to log in (default: root)
  --admin-password=<string>                           password to allow to log in (default: )
  --admin-lua-script=<filename>                       script to execute by the admin plugin

proxy-module
  --proxy-address=<host:port>                         listening address:port of the proxy-server (default: :4040)
  --proxy-read-only-backend-addresses=<host:port>     address:port of the remote slave-server (default: not set)
  --proxy-backend-addresses=<host:port>               address:port of the remote backend-servers (default: 127.0.0.1:3306)
  --proxy-skip-profiling                              disables profiling of queries (default: enabled)
  --proxy-fix-bug-25371                               fix bug #25371 (mysqld > 5.1.12) for older libmysql versions
  --proxy-lua-script=<file>                           filename of the lua script (default: not set)
  --no-proxy                                          don't start the proxy-module (default: enabled)
  --proxy-pool-no-change-user                         don't use CHANGE_USER to reset the connection coming from the pool (default: enabled)

Application Options:
  -V, --version                                       Show version
  --defaults-file=<file>                              configuration file
  --daemon                                            Start in daemon-mode
  --user=<user>                                       Run mysql-proxy as user
  --basedir=<absolute path>                           Base directory to prepend to relative paths in the config
  --pid-file=<file>                                   PID file in case we are started as daemon
  --plugin-dir=<path>                                 path to the plugins
  --plugins=<name>                                    plugins to load
  --log-level=(error|warning|info|message|debug)      log all messages of level ... or higer
  --log-file=<file>                                   log all messages in a file
  --log-use-syslog                                    log all messages to syslog
  --log-backtrace-on-crash                            try to invoke debugger on crash
  --keepalive                                         try to restart the proxy if it crashed
  --max-open-files                                    maximum number of open files (ulimit -n)
proxy启动:
mysql-proxy --proxy-read-only-backend-addresses=192.168.0.22:3306 --proxy-backend-addresses=192.168.0.11:3306 --proxy-lua-script=/usr/local/web/mysql/mysql-proxy/share/doc/mysql-proxy/rw-splitting.lua --keepalive >> /var/log/mysql-proxy.log &
参数说明:
--proxy-read-only-backend-addresses -- remote slave-server(只读服务器)
--proxy-backend-addresses -- master-server(写服务器)
--proxy-lua-script -- lua script(读写分离脚本)
--keepalive -- restart the proxy if it crashed(mysql-proxy宕掉重启)
注意:官方的rw-splitting.lua有bug,很无语~~
我碰到的是:
2009-10-29 22:21:02: (critical) proxy-plugin.c:259: read_query_result() in /usr/local/web/mysql/mysql-proxy/share/doc/mysql-proxy/rw-splitting.lua tries to modify the resultset, but hasn't asked to buffer it in proxy.query:append(..., { resultset_is_needed = true }). We ignore the change to the result-set.
2009-10-29 22:21:02: (critical) proxy-plugin.c:1238: proxy.queries:append() in /usr/local/web/mysql/mysql-proxy/share/doc/mysql-proxy/rw-splitting.lua can only have one injected query without { resultset_is_needed = true } set. We close the client connection now.
有网友推荐0.7.*下这个rw-splitting.lua不错。
http://bazaar.launchpad.net/~mysql-proxy-developers/mysql-proxy/0.7/annotate/head:/lib/rw-splitting.lua
测试准备:
1、在Master建立一个数据库test,建立一个用户:name密码:123456对该数据库有你要使用的权限。
2、实现Mster和Slave对test数据库的replication(主从备份)。
3、在Slave建立一个与第一步Master同样的帐户密码,并且对test从数据库有你需要的权限。
测试读写分离与结果:
连接mysql proxy
mysql -h192.168.0.1 -P4040 -uname -p123456
注意:默认要开启4个以上连接才能读写分离,不然读写都在Master。
也可以更改rw-splitting.lua脚本中相关参数
min_idle_connections = 4,
max_idle_connections = 8,
测试数据库的表tb
mysql> desc tb;
+-------+-------------+------+-----+---------+----------------+
| Field | Type        | Null | Key | Default | Extra          |
+-------+-------------+------+-----+---------+----------------+
| id    | int(11)     | NO   | PRI | NULL    | auto_increment |
| name  | varchar(11) | NO   |     | NULL    |                |
+-------+-------------+------+-----+---------+----------------+
2 rows in set (0.01 sec)
插入数据
insert into tb(name) value('test');
insert into tb(name) value('hello');
稍等片刻(待数据同步)查看结果
select * from tb;
+----+---------+
| id | name    |
+----+---------+
|  1 | test    |
|  2 | hello   |
+----+---------+
2 rows in set (0.00 sec)
查看进程
在Master和Slave执行show processlist;可以查看读写,同步等的进程情况。可以看到,mysql proxy每次查询都会建立一个长久的连接。
其他
mysql proxy还可以实现连接池的功能。
rw-splitting.lua脚本中相关参数:
                min_idle_connections = 4,
                max_idle_connections = 8,
相关网站:
http://dev.mysql.com/doc/refman/5.1/en/mysql-proxy.html
http://www.infoq.com/cn/news/2007/10/mysqlproxyrwsplitting