Android窗体自定义标题栏
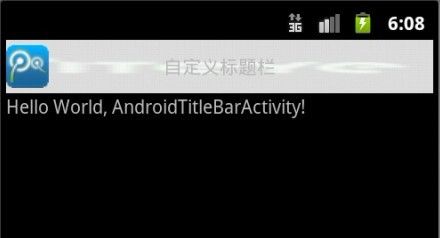
自定义实现功能图片如下:
package com.easyway.titlebar;

import android.app.Activity;
import android.os.Bundle;
import android.view.Window;
/**
 * 自定义窗体标签的样式表格式的使用
 * 1.设置window标题信息
 *       requestWindowFeature(Window.FEATURE_CUSTOM_TITLE); //声明使用自定义标题
 *      setContentView(R.layout.main);
 *       //设置窗体样式
 *      getWindow().setFeatureInt(Window.FEATURE_CUSTOM_TITLE, R.layout.title);//自定义布局赋值
 * 2.在对应的Activity中添加相关的 android:theme="@style/test"管理对应的样式
 *
 * 	  <activity android:name=".MainActivity"
 * 	          android:theme="@style/test">
 * 	    <intent-filter>
 * 	         <action android:name="android.intent.action.MAIN" />
 * 	         <category android:name="android.intent.category.LAUNCHER" />
 * 	    </intent-filter>
 * 	 </activity>
 *
 * @author longgangbai
 *
 */
public class AndroidTitleBarActivity extends Activity {
    /** Called when the activity is first created. */
    @Override
    public void onCreate(Bundle savedInstanceState) {
        super.onCreate(savedInstanceState);
        requestWindowFeature(Window.FEATURE_CUSTOM_TITLE); //声明使用自定义标题
        setContentView(R.layout.main);
        //设置窗体样式
        getWindow().setFeatureInt(
        		Window.FEATURE_CUSTOM_TITLE,  //设置此样式为自定义样式
        		R.layout.title //设置对应的布局
        		);//自定义布局赋值
   }
}
strings.xml
<?xml version="1.0" encoding="utf-8"?>
<resources>

    <string name="hello">Hello World, AndroidTitleBarActivity!</string>
    <string name="app_name">AndroidTitleBar</string>
	<style name="CustomWindowTitleBackground">
	    <item name="android:background">@drawable/logo</item>
	</style>

	<style name="test" parent="android:Theme" mce_bogus="1">
	    <item name="android:windowTitleSize">40dp</item>
	    <item name="android:windowTitleBackgroundStyle">@style/CustomWindowTitleBackground</item>
	</style>
</resources>
title.xml
<?xml version="1.0" encoding="utf-8"?>
<RelativeLayout xmlns:android="http://schemas.android.com/apk/res/android"
    android:orientation="horizontal"
    android:layout_width="fill_parent"
    android:layout_height="fill_parent">

    <ImageView android:layout_width="wrap_content"
        android:layout_centerVertical="true"
         android:layout_height="wrap_content"
        android:src="@drawable/qq" />
    <TextView android:layout_width="wrap_content"
        android:layout_centerInParent="true"
        android:layout_height="wrap_content"
        android:text="自定义标题栏" />

</RelativeLayout>
<?xml version="1.0" encoding="utf-8"?>
<manifest xmlns:android="http://schemas.android.com/apk/res/android"
    package="com.easyway.titlebar"
    android:versionCode="1"
    android:versionName="1.0" >
    <uses-sdk android:minSdkVersion="10" />
    <application
        android:icon="@drawable/ic_launcher"
        android:label="@string/app_name" >
        <!--
         主题信息定义在values/strings.xml文件中
        android:theme="@style/test"
         -->
        <activity
            android:label="@string/app_name"
            android:theme="@style/test"
            android:name=".AndroidTitleBarActivity" >
            <intent-filter >
                <action android:name="android.intent.action.MAIN" />
                <category android:name="android.intent.category.LAUNCHER" />
            </intent-filter>
        </activity>
    </application>
</manifest>
android布局详解
布局就像容器,里面可以装下很多控件。布局里面还可以套用其他的布局。这样就可以实现界面的多样化以及设计的灵活性。
1、 LinearLayout布局: 线性版面配置,在这个标签中,所有元件都是按由上到下的排队排成的。
在这个界面中,我们应用了一个 LinearLayout的布局,它是垂直向下扩展的 ,所以创建的布局XML文件,以
<LinearLayout xmlns:android="http://schemas.android.com/apk/res/android"
android:orientation="vertical"
android:layout_width="fill_parent"
android:layout_height="fill_parent"
>
节点作为开头。一个布局容器里可以包括0或多个布局容器。
解释一下LinearLayout中的标签:
(1)android:orientation="vertical" 表 示竖直方式对齐
(2)android:orientation="horizontal"表 示水平方式对齐
(3)android:layout_width="fill_parent"定 义当前视图在屏幕上 可以消费的宽 度,fill_parent即填充整个屏幕。
layout_weight默认值是零,用于给一个线性布局中的诸多视图的重要度赋值。比如说我们在 水平方向上有一个文本标签和两个文本编辑元素,该文本标签并无指定layout_weight值,所以它将占据需要提供的最少空间 ;如果两个文本编辑元素每一个的layout_weight值都设置为1, 则两者平分在父视图布局剩余的宽度(因为我们声明这两者的重要度相等)。如果两个文本编辑元素其中第一个的layout_weight值设置为1,而 第二个的设置为2,则剩余空间的三分之一分给第一个,三分之二分给第二个(正比划分)。
(4)android:layout_height="wrap_content": 随着文字栏位的不同 而 改变这个视图的宽度或者高度。有点自动设置框度或者高度的意思
2、 AbsoluteLayout可以让子元素指定准确的x/y坐标值,并显示在屏幕上。(0, 0)为左上角,当向下或向右移动时,坐标值将变大。AbsoluteLayout没有页边框,允许元素之间互相重叠(尽管不推荐)。我们通常不推荐使用 AbsoluteLayout,除非你有正当理由要使用它,因为它使界面代码太过刚性,以至于在不同的设备上可能不能很好地工作。
3、 RelativeLayout就是以相对的方式定位布局,允许子元素指定他们相对于其它元素或父元素的位置(通过ID指定)。因此如果第一个元素在屏幕的中央,那么相对于这个元素的其它元素将以屏幕中央的相对位置来排列。如果使用XML 来指定这个layout,在你定义它之前,被关联的元素必须定义。
相对布局的属性比较多,但用起来比较灵活。
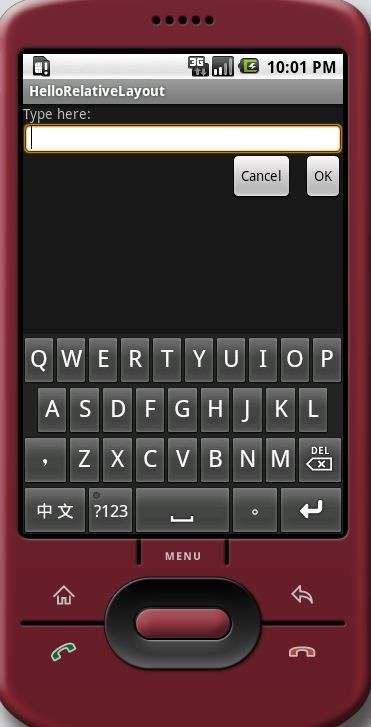
这是很常见的布局内容,讲解如下:
将当前控件放置于id为label 的控件下方。
使当前控件的右端和父控件的右端对齐。这里属性值只能为true或false,默认false。
使当前控件左边空出相应的空间。
使当前控件置于id为ok的控件的左边。
使当前控件与id控件的上端对齐。
效果如下:
至此,我们已经发现,其属性之繁多。下面简单归纳一下:
第一类:属性值为true或false
*android:layout_centerHrizontal
*android:layout_centerVertical
*android:layout_centerInparent
*android:layout_alignParentBottom
*android:layout_alignParentLeft
*android:layout_alignParentRight
*android:layout_alignParentTop
*android:layout_alignWithParentIfMissing
第二类:属性值必须为id的引用名“@id/id-name”
*android:layout_below
*android:layout_above
*android:layout_toLeftOf
*android:layout_toRightOf
*android:layout_alignTop
第三类:属性值为具体的像素值,如30dip,40px
*android:layout_marginBottom
*android:layout_marginLeft
*android:layout_marginRight
*android:layout_marginTop
4、 FrameLayout是最简单的一个布局对象。是一个框架布局样式,可以用include标签载入定义的另一个layout文件,所有的子元素将会固定在屏幕的左上角;你不能为FrameLayout中的一个子元素指定一个位置。后一个子元素将会直接在前 一个子元素之上进行覆盖填充,把它们部份或全部挡住(除非后一个子元素是透明的)。
progressbarlayout.xml内容如下:
<?xml version="1.0" encoding="utf-8"?>
<LinearLayout
xmlns:android="http://schemas.android.com/apk/res/android"
android:layout_width="wrap_content"
android:layout_height="wrap_content"
android:id="@+id/progressbarlayout"
android:visibility="gone">
<ProgressBar
android:layout_gravity="center_vertical"
android:layout_width="wrap_content"
android:layout_height="wrap_content"
style="?android:attr/progressBarStyleSmall"
>
</ProgressBar>
<TextView
android:layout_width="wrap_content"
android:layout_height="wrap_content"
android:layout_marginLeft="5.0dip"
android:text="loading..."
>
</TextView>
</LinearLayout>
可以在myframelayout.xml中将上面的文件include进来,内容如下:
<?xml version="1.0" encoding="utf-8"?>
<FrameLayout
xmlns:android="http://schemas.android.com/apk/res/android"
android:layout_width="fill_parent"
android:layout_height="fill_parent">
<LinearLayout
android:orientation="vertical"
android:visibility="gone"
android:layout_width="fill_parent"
android:layout_height="fill_parent"
>
</LinearLayout>
<include
android:visibility="visible"
android:layout_width="fill_parent"
android:layout_height="fill_parent"
layout="@layout/progressbarlayout"
></include>
</FrameLayout>
主程序:
package test.toshiba;
import android.app.Activity;
import android.os.Bundle;
public class FrameLayoutTest extends Activity {
@Override
protected void onCreate(Bundle savedInstanceState) {
// TODO Auto-generated method stub
super.onCreate(savedInstanceState);
setContentView(R.layout.myframelayout);
}
}
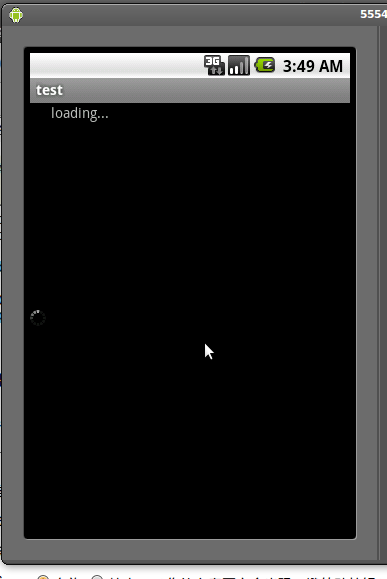
运行结果如下图:
<?xml version="1.0" encoding="utf-8"?>
<RelativeLayout xmlns:android="http://schemas.android.com/apk/res/android"
    android:layout_width="fill_parent"
    android:layout_height="fill_parent">
    <TextView
        android:id="@+id/label"
        android:layout_width="fill_parent"
        android:layout_height="wrap_content"
        android:text="Type here:"/>
    <EditText
        android:id="@+id/entry"
        android:layout_width="fill_parent"
        android:layout_height="wrap_content"
        android:background="@android:drawable/editbox_background"
        android:layout_below="@id/label"/>
    <Button
        android:id="@+id/ok"
        android:layout_width="wrap_content"
        android:layout_height="wrap_content"
        android:layout_below="@id/entry"
        android:layout_alignParentRight="true"
        android:layout_marginLeft="10dip"
        android:text="OK" />
    <Button
        android:layout_width="wrap_content"
        android:layout_height="wrap_content"
        android:layout_toLeftOf="@id/ok"
        android:layout_alignTop="@id/ok"
        android:text="Cancel" />
</RelativeLayout>
android:layout_below="@id/label"/>
android:layout_alignParentRight="true"
android:layout_marginLeft="10dip"
android:layout_toLeftOf="@id/ok"
android:layout_alignTop="@id/ok"
