转 Struts2实现单文件的上传功能实例详解及源代码
Struts2完成文件的上传功能实例
10级学员 郞志课堂笔记
在这里通过一个实例简单写一下struts2实现文件上传的流程。
首先通过手写的方式写一个上传的流程
第一步:创建相应的jsp页面
- <%@ page language="java" import="java.util.*" pageEncoding="utf-8"%>
- <%
- String path = request.getContextPath();
- String basePath = request.getScheme()+"://"+request.getServerName()+":"+request.getServerPort()+path+"/";
- %>
- <!DOCTYPE HTML PUBLIC "-//W3C//DTD HTML 4.01 Transitional//EN">
- <html>
- <head>
- <base href="<%=basePath%>">
- <title>My JSP 'upload.jsp' starting page</title>
- <meta http-equiv="pragma" content="no-cache">
- <meta http-equiv="cache-control" content="no-cache">
- <meta http-equiv="expires" content="0">
- <meta http-equiv="keywords" content="keyword1,keyword2,keyword3">
- <meta http-equiv="description" content="This is my page">
- <!--
- <link rel="stylesheet" type="text/css" href="styles.css">
- -->
- </head>
- <body>
- <div align="center">
- <h1>文件上传</h1>
- <!-- 此处的enctype属性必须要更改,一般此处不需要更改,默认为application/x-www-form-urlencoded,它只处理表单里的value属性传递的是字符串,但是当上传文件时必须要改为:multipart/form-data
- -->
- <form action="${pageContext.request.contextPath }/upFile.action" enctype="multipart/form-data" method="post">
- 上传文件:<input type="file" name="upload"/><br/>
- <input type="submit" value="上传">"
- </form>
- </div>
- </body>
- </html>
<%@ page language="java" import="java.util.*" pageEncoding="utf-8"%>

<%
String path = request.getContextPath();

String basePath = request.getScheme()+"://"+request.getServerName()+":"+request.getServerPort()+path+"/";
%>
<!DOCTYPE HTML PUBLIC "-//W3C//DTD HTML 4.01 Transitional//EN">
<html>
  <head>
    <base href="<%=basePath%>">
    <title>My JSP 'upload.jsp' starting page</title>
    <meta http-equiv="pragma" content="no-cache">
    <meta http-equiv="cache-control" content="no-cache">
    <meta http-equiv="expires" content="0">
    <meta http-equiv="keywords" content="keyword1,keyword2,keyword3">
    <meta http-equiv="description" content="This is my page">
    <!--
    <link rel="stylesheet" type="text/css" href="styles.css">
    -->
  </head>
  <body>
    <div align="center">
    <h1>文件上传</h1>
<!-- 此处的enctype属性必须要更改,一般此处不需要更改,默认为application/x-www-form-urlencoded,它只处理表单里的value属性传递的是字符串,但是当上传文件时必须要改为:multipart/form-data
-->
    <form action="${pageContext.request.contextPath }/upFile.action" enctype="multipart/form-data" method="post">
        上传文件:<input type="file" name="upload"/><br/>
        <input type="submit" value="上传">"
    </form>
    </div>
  </body>
</html>
注意:
Form表单的Enctype属性有以下三个值:
1) application/x-www-form-urlencoded:这是默认编码方式,它只处理表单域里的value属性值,采用这种编码方式的表单会将表单域的值处理成URL编码方式。
2) multipart/form-data:这种编码方式的表单会以二进制流的方式来处理表单数据,这种编码方式会把文件域指定文件的内容也封装到请求参数里。(经常用)
3) text/plain:这种方式主要适用于直接通过表单发送邮件的方式。
文件上传是web应用经常用到的一个知识。原理是,通过为表单元素设置enctype=”multipart/form-data”属性,让表单提交的数据以二进制编码的方式提交,在接收此请求的Servlet中用二进制流来获取内容,就可以取得上传文件的内容,从而实现文件的上传。
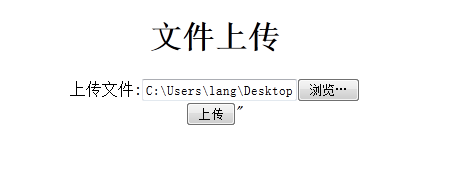
页面效果:
第二步:编写对应的action文件
- package cn.csdn.hr.up.action;
- import java.io.File;
- import org.apache.commons.io.FileUtils;
- import org.apache.struts2.ServletActionContext;
- import com.opensymphony.xwork2.ActionSupport;
- public class UploadAction extends ActionSupport{
- private static final long serialVersionUID = 1L;
- // 以下封装的参数是固定的,为:文件名 文件名+ContentType 文件名+FileName
- //上传文件
- private File upload;
- //上传文件的类型
- private String uploadContentType;
- //上传文件的名称
- private String uploadFileName;
- public File getUpload() {
- return upload;
- }
- public void setUpload(File upload) {
- this.upload = upload;
- }
- public String getUploadContentType() {
- return uploadContentType;
- }
- public void setUploadContentType(String uploadContentType) {
- this.uploadContentType = uploadContentType;
- }
- public String getUploadFileName() {
- return uploadFileName;
- }
- public void setUploadFileName(String uploadFileName) {
- this.uploadFileName = uploadFileName;
- }
- @Override
- public String execute() throws Exception {
- //声明文件上传的路径
- String path = ServletActionContext.getServletContext().getRealPath("/upload");
- //根据路径名创建一个文件
- File file = new File(path);
- //判断file是否存在,如果不存在,则自动创建一个
- if(!file.exists()){
- file.mkdirs();
- }
- //通过调用copyFile()方法将指定的文件copy到指定的路径中
- FileUtils.copyFile(upload, new File(file, uploadFileName));
- return SUCCESS;
- }
- }
package cn.csdn.hr.up.action;

import java.io.File;

import org.apache.commons.io.FileUtils;

import org.apache.struts2.ServletActionContext;

import com.opensymphony.xwork2.ActionSupport;

public class UploadAction extends ActionSupport{

    private static final long serialVersionUID = 1L;

    // 以下封装的参数是固定的,为:文件名 文件名+ContentType 文件名+FileName

    //上传文件

    private File upload;

    //上传文件的类型

    private String uploadContentType;

    //上传文件的名称

    private String uploadFileName;

    public File getUpload() {

       return upload;

    }

    public void setUpload(File upload) {

       this.upload = upload;

    }

    public String getUploadContentType() {

       return uploadContentType;

    }

    public void setUploadContentType(String uploadContentType) {

       this.uploadContentType = uploadContentType;

    }

    public String getUploadFileName() {

       return uploadFileName;

    }

    public void setUploadFileName(String uploadFileName) {

       this.uploadFileName = uploadFileName;

    }

    @Override

    public String execute() throws Exception {

       //声明文件上传的路径

       String path = ServletActionContext.getServletContext().getRealPath("/upload");

       //根据路径名创建一个文件

         File file = new File(path);

         //判断file是否存在,如果不存在,则自动创建一个

         if(!file.exists()){

         file.mkdirs();

         }

        //通过调用copyFile()方法将指定的文件copy到指定的路径中

         FileUtils.copyFile(upload, new File(file, uploadFileName));

       return SUCCESS;

    }
}
第三步:在struts2配置文件中定义UploadAction文件
- <?xml version="1.0" encoding="UTF-8"?>
- <!DOCTYPE struts PUBLIC
- "-//Apache Software Foundation//DTD Struts Configuration 2.3//EN"
- "http://struts.apache.org/dtds/struts-2.3.dtd">
- <struts>
- <package name="upload" extends="struts-default">
- <action name="upFile" class="cn.csdn.hr.up.action.UploadAction">
- <!-- 上传成功后跳转到success.jsp页面 -->
- <result name="success">/sucess.jsp</result>
- <!-- 上传失败后返回到upload.jsp页面 -->
- <result name="input">/upload.jsp</result>
- </action>
- </package>
- </struts>
<?xml version="1.0" encoding="UTF-8"?>

<!DOCTYPE struts PUBLIC

    "-//Apache Software Foundation//DTD Struts Configuration 2.3//EN"

    "http://struts.apache.org/dtds/struts-2.3.dtd">

<struts>

    <package name="upload" extends="struts-default">

       <action name="upFile" class="cn.csdn.hr.up.action.UploadAction">

           <!-- 上传成功后跳转到success.jsp页面 -->

           <result name="success">/sucess.jsp</result>

           <!-- 上传失败后返回到upload.jsp页面 -->

           <result name="input">/upload.jsp</result>

       </action>

    </package>

</struts>
这里就完成了手动上传文件的功能,可以通过Tomcat等服务器测试一下了。成功后会跳转到success.jsp页面:
上面是为了让大家更加了解文件上传的内部处理过程,其实struts2已经通过拦截器封装好了文件上传的功能,我认为封装的还是非常完整的。
上面实现的功能完全可以用以下拦截器去实现:
- <?xml version="1.0" encoding="UTF-8"?>
- <!DOCTYPE struts PUBLIC
- "-//Apache Software Foundation//DTD Struts Configuration 2.3//EN"
- "http://struts.apache.org/dtds/struts-2.3.dtd">
- <struts>
- <!--
- 因为在struts.properties文件中指明了struts文件上传的默认大小为2M <constant
- name="struts.multipart.maxSize" value="1024*1024*2"></constant>
- -->
- <package name="upload" extends="struts-default">
- <!-- 通过全局定义当上传出错时返回到update.jsp页面 -->
- <global-results>
- <result name="input">/update.jsp</result>
- </global-results>
- <action name="upload" class="cn.csdn.upload.action.UploadAction">
- <interceptor-ref name="fileUpload">
- <!-- 限制上传文件的格式 -->
- <param name="allowedTypes">image/JPEG,image/bmp,image/pjpeg,image/gif</param>
- <!--
- 添加一个拦截器的时候虽然在这里设置了文件上传大小的限制,但是由于
- 在struts.properties文件中有struts文件的设置所以在上面必须添加常量设置
- -->
- <param name="maximumSize">10485760</param>
- </interceptor-ref>
- <!-- 当添加一个拦截器的时候,那么默认的拦截器必须手动添加 -->
- <interceptor-ref name="defaultStack"></interceptor-ref>
- <!-- 依赖注入属性 -->
- <!-- 设置上传文件的路径 -->
- <param name="savePath">/upload</param>
- <!-- 文件上传成功后跳转到success.jsp页面 -->
- <result name="success">/test.jsp</result>
- </action>
- </package>
- </struts>

