Hudson, Sonar, Maven, Nexus installation wizard,安装指南
Hudson, Sonar, Maven, Nexus installation wizard
Required Software: In order to make all software work smoothly together, we need download the correct version to avoid confliction.
Installation
Sonar Plug-in for Huson
Copy the sonar.hpi into %HUDSON_HOME%\plugins. And restart the Tomcat server. Then the sonar plug-in will take effective in Hudson.
Sonar1. Create database Save the following script as create_database.sql, and execute it on mysql command line tool.
2. unzip the distribution to C:\
3. If you do not use the default embedded database, edit conf/sonar.properties to configure the database access. Templates are available for every supported database. Just uncomment the lines you want.
4. You can run sonar in standalone model by click C:/sonar-2.12/bin/windows-x86-32/ StartSonar.bat, and it will take port 80, you can use it by this link http://localhost:80/sonar. But we strongly recommend that you deploy it in web container. Let’s see the next step.
5. Add environment variable CATALINA_OPTS with value
-Xmx1024m -Dorg.apache.jasper.runtime.BodyContentImpl.LIMIT_BUFFER=true -XX:MaxPermSize=256m
6. Click C:\sonar-2.12\war\build-war.bat to create a war file. And then copy the sonar.war to C:\apache-tomcat-7.0.23\webapps
Note: do NOT remove C:\sonar-2.12 after you deployed war file. The original folder is still useful.
Prior to Sonar 2.2, the WAR file must be rebuilt each time the configuration is updated (new plugins or new extensions).
From Sonar 2.2 onwards, the WAR file is now linked to the Sonar directory (the directory where the distribution is unzipped). It implies that : •the directory where the distribution is unzipped cannot be removed
•there is no need to rebuild the WAR when installing/uninstalling plugins or rule extensions
•the WAR file must be deployed on the host which contains the Sonar directory
•the WAR file must be rebuilt when the Sonar directory is moved
•the WAR file must be rebuilt when a configuration file is updated (directory conf/)7. Restart the tomcat server. Access sonar by http://localhost:8080/sonar .
Configuration
Maven
Now open the "MAVEN_HOME\conf\setting.xml" and make some changes to make the Nexus take effective in maven.
And make the following changes to make sonar take effective in maven.
- Version: Java SE 6 Update 30
- official web site: http://www.oracle.com/technetwork/java/javase/overview/index.html
- Download Page: http://www.oracle.com/technetwork/java/javase/downloads/jdk-6u30-download-1377139.html
- Note: We strongly recommend you use JDK 6. Because the nexus version 1.9.2 and 1.9.2.4 cannot work well with JDK 7. Because it cannot construct org.codehaus.plexus.util.xml.Xpp3Dom as it does not have a no-args constructor.
JDK:
- Version: apache-tomcat-7.0.23 (32bit)
- official web site: http://tomcat.apache.org/
- Download Page: http://tomcat.apache.org/download-70.cgi
- Note: N/A
Tomcat
- Version: hudson-2.2.0.war
- Official web site: http://hudson-ci.org/
- Download: http://java.net/projects/hudson/downloads/download/war/hudson-2.2.0.war
Hudson
- Version: sonar-2.12.zip
- official web site: http://www.sonarsource.org/
- Download Page: http://dist.sonar.codehaus.org/sonar-2.12.zip
- Note: N/A
Sonar
- Version: sonar 1.6.1
- official web site: http://hudson-ci.org/
- Download Page: http://hudson-ci.org/downloads/plugins/sonar/1.6.1/
- Note: N/A
Sonar Plug-in for Huson
- Version: nexus-webapp-1.9.2.war
- official web site: http://nexus.sonatype.org/
- Download Page: http://nexus.sonatype.org/downloads/all
- Note: We strongly recommend your use war file, as it can be deployed in web server to avoid port confliction. However, you can also download stand alone type nexus-oss-webapp-1.9.2.4-bundle.zip, it will use port 8081.
Nexus
- Version: apache-maven-2.2.1
- official web site: http://maven.apache.org/
- Download Page: http://maven.apache.org/download.html
- Note: I strongly recommend that you use maven 2 rather than maven 3; maven 3 is not yet stable enough when I write this document.
Maven
- Version:
- official web site: http://www.mysql.com/
- Download Page: http://www.mysql.com/downloads/
MySQL
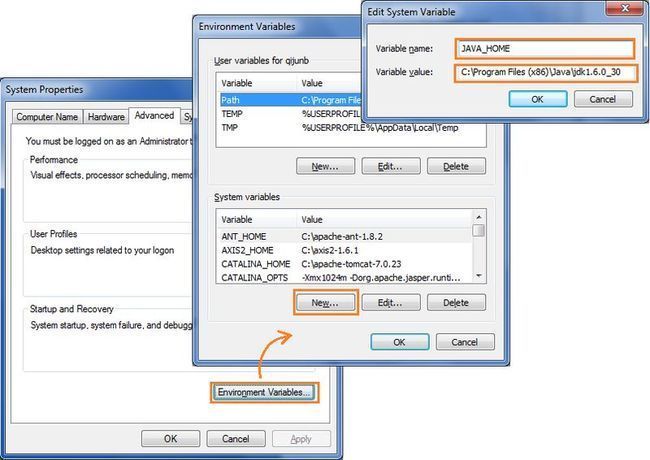
- 1. Press “Winkey + Pause”, and then click the “Advanced system settings” link at left side.
- 2. Click the “Environment variables” button to the bottom of the “System Properties” Dialog.
- 3. Click “New” button to create a variable.
- 4. Input name and value for the fields on the popup dialog. Click OK to apply changes.
- 1. Click the jdk-6u30-windows-i586.exe, and follow the wizard to setup jdk.
- 2. Press “Winkey + Pause”, and then click the “Advanced system settings” link at left side.
- 3. Click the “Environment variables” button to the bottom of the “System Properties” Dialog.
- 4. Click “New” button to create “JAVA_HOME”, add value “C:\Program Files (x86)\Java\jdk1.6.0_30” for it.
- 5. Find the variable “path”, and add “%JAVA_HOME%\bin;” before it.
- 6. Press OK to apply the changes.
Environment Variable
A lot of software needs to setup a environment variable to do some configuration to change the action at runtime. Here are the steps to do this.
JDK
- 1. Unpack the binary distribution into a convenient location so that the distribution resides in its own directory (conventionally named " apache-tomcat-7.0.23"). e.g. C:\apache-tomcat-7.0.23
- 2. Click the “C:\apache-tomcat-7.0.23\bin\startup.bat” to start the server. You can visit the link http://localhost:8080 if nothing is wrong.
Tomcat
- 1. Unzip the distribution archive, i.e. apache-maven-2.2.1-bin.zip to the directory you wish to install Maven 3.0.3. These instructions assume you chose C:\. The subdirectory apache-maven-2.2.1 will be created from the archive.
- 2. Add the M2_HOME environment variable by opening up the system properties (WinKey + Pause), selecting the "Advanced" tab, and the "Environment Variables" button, then adding the M2_HOME variable in the user variables with the value C:\ apache-maven-2.2.1. Be sure to omit any quotation marks around the path even if it contains spaces. Note: For Maven < 2.0.9, also be sure that the M2_HOME doesn't have a '\' as last character.
- 3. In the same dialog, add the M2 environment variable in the user variables with the value %M2_HOME%\bin.
- 4. Optional: In the same dialog, add the MAVEN_OPTS environment variable in the user variables to specify JVM properties, e.g. the value -Xms256m -Xmx512m. This environment variable can be used to supply extra options to Maven.
- 5. In the same dialog, update/create the Path environment variable in the user variables and prepend the value %M2% to add Maven available in the command line.
- 6. In the same dialog, make sure that JAVA_HOME exists in your user variables or in the system variables and it is set to the location of your JDK, e.g. C:\Program Files\Java\jdk1.5.0_02 and that %JAVA_HOME%\bin is in your Path environment variable.
- 7. Open a new command prompt (Winkey + R then type cmd) and run mvn --version to verify that it is correctly installed.
Maven
- Hudson only needs a Java 5 or newer runtime. Stand alone model:
- 1. You can simply run the command line: Java -jar hudson.war
- 2. To see Hudson, simply bring up a web browser and go to URL http://myServer:8080 where myServer is the name of the system running Hudson. Deploy Hudson in web container
- Sometimes, installing the Hudson in web container is a better choice. Hudson also uses the 8080 port. It will cause confliction if you also use tomcat and Hudson seperatelly.
- 1. Copy hudson.war to C:\apache-tomcat-7.0.23\webapps, and startup the tomcat server by clicking C:\apache-tomcat-7.0.23\bin\startup.bat.
- 2. To see Hudson, simply bring up a web browser and go to URL http://myServer:8080/hudson, where myServer is the name of the system running Hudson.
- Note: We’d better add this environment variable for tomcat. CATALINA_OPTS=-Xmx1024m -Dorg.apache.jasper.runtime.BodyContentImpl.LIMIT_BUFFER=true -XX:MaxPermSize=256m
Hudson
Sonar Plug-in for Huson
Copy the sonar.hpi into %HUDSON_HOME%\plugins. And restart the Tomcat server. Then the sonar plug-in will take effective in Hudson.
Sonar
- #
- # Create Sonar database and user.
- #
- # Command: mysql -u root -p < create_database.sql
- #
- CREATE DATABASE sonar CHARACTER SET utf8 COLLATE utf8_general_ci;
- CREATE USER 'sonar' IDENTIFIED BY 'sonar';
- GRANT ALL ON sonar.* TO 'sonar'@'%' IDENTIFIED BY 'sonar';
- GRANT ALL ON sonar.* TO 'sonar'@'localhost' IDENTIFIED BY 'sonar';
- FLUSH PRIVILEGES;
- sonar.jdbc.url: jdbc:mysql://localhost:3306/sonar?useUnicode=true&characterEncoding=utf8
- sonar.jdbc.driverClassName: com.mysql.jdbc.Driver
- sonar.jdbc.validationQuery: select 1
- sonar.jdbc.username: sonar
- sonar.jdbc.password: sonar
•there is no need to rebuild the WAR when installing/uninstalling plugins or rule extensions
•the WAR file must be deployed on the host which contains the Sonar directory
•the WAR file must be rebuilt when the Sonar directory is moved
•the WAR file must be rebuilt when a configuration file is updated (directory conf/)
- 1. Copy the nexus-webapp-1.9.2.war to C:\apache-tomcat-7.0.23\webapps.
- 2. Restart the tomcat server. Access sonar by http://localhost:8080/nexus .
- Note: We strongly recommend you use JDK 6. Because the nexus version 1.9.2 and 1.9.2.4 cannot work well with JDK 7 when I write this document.
Nexus
Configuration
- 1. Hudson needs some disk space to perform builds and keep archives. By default, this is set to windows user folder “ /.hudson”, but you can change this by adding environment variable “HUDSON_HOME".
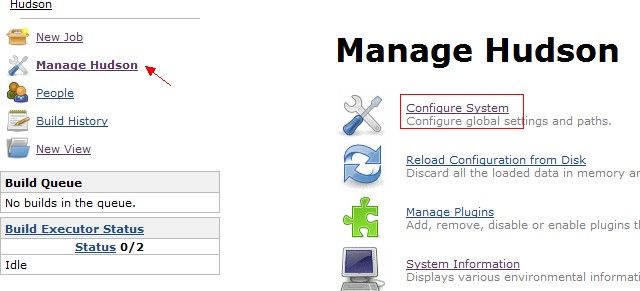
- 2. Open http://localhost:8080/hudson/ , and click “Manage Hudson” at left side, and then click “Configure system” to setup global configurations. Some of the configurations are required; you cannot build successfully if you ignore them.
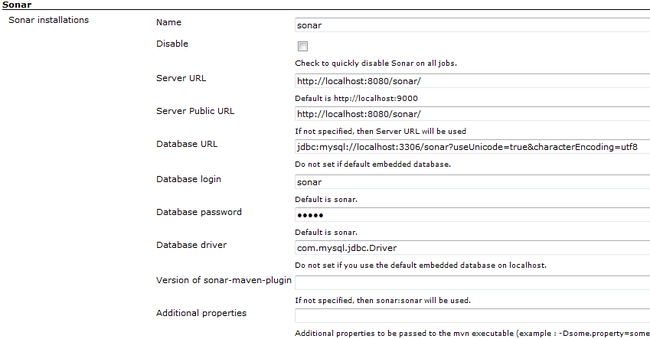
- 3. If you have installed sonar.hpi, you can see the following segment in the “Configure system” page.
- set the following fields:
- Server URL : http://localhost:8080/sonar/
- Database URL: jdbc:mysql://localhost:3306/sonar?useUnicode=true&characterEncoding=utf8
- Database Driver: com.mysql.jdbc.Driver
- Database login: sonar
- Database password: sonar
- 4. At the same page, you can also set value for the “SMTP server”, so that Hudson will send mails to notify you when the build is broken or someone submitted error code to the SVN server.
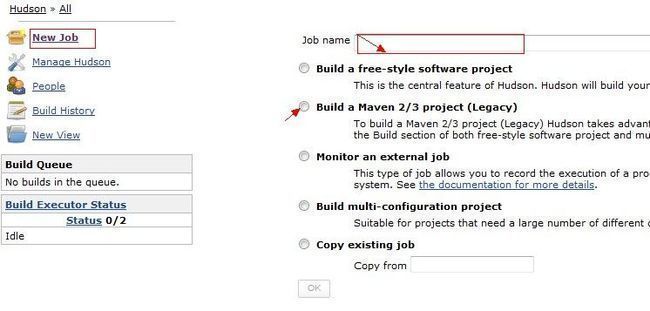
- 5. and click “New Job” at left side. Give a name of the project and choice Build a Maven 2/3 project (Legacy), click “OK” button to navigate to next page.
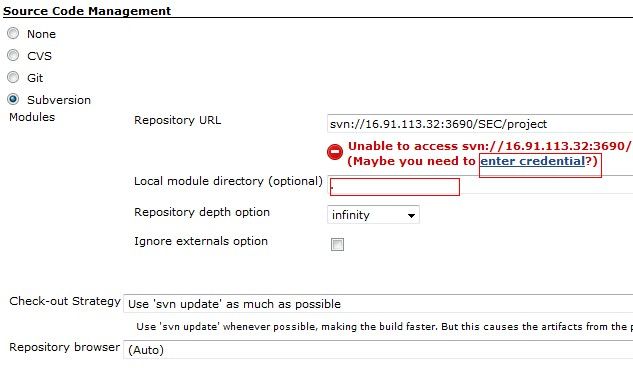
- 6. At the “Source Code Management” choose the “SVN” option, specify value for “Repository URL”, and you will be asked for username and password later. You’d better specify the full path directly point at the project source folder, so that Hudson can find the pom.xml easily without any further configurations.
- e.g. svn://svnserver/SEC/projects/Megafon SNAP PoC/source code/trunk/brtconnector
- 7. If your workspace has the top-level pom.xml in somewhere other than the module root directory, specify the path (relative to the module root) here, such as parent/pom.xml.
- If left empty, defaults to pom.xml
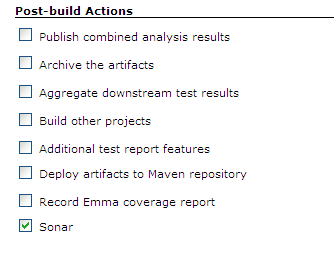
- 8. If you have installed sona.phi plug-in, select the checkbox before “Sonar” at the bottom of the page at “Post build Action” section.
- 9. Click the “Save” button to save all changes.
Hudson
JDK: configure the java_home of java runtime.
Maven: specify the maven home path.
Maven
Now open the "MAVEN_HOME\conf\setting.xml" and make some changes to make the Nexus take effective in maven.
- <mirror>
- <id>nexus</id>
- <mirrorOf>*</mirrorOf>
- <url>http://localhost:8080/nexus/</url>
- </mirror>
And make the following changes to make sonar take effective in maven.
- <profile>
- <id>sonar</id>
- <activation>
- <activeByDefault>true</activeByDefault>
- </activation>
- <properties>
- <!-- EXAMPLE FOR MYSQL -->
- <sonar.jdbc.url>
- jdbc:mysql://localhost:3306/sonar?useUnicode=true&characterEncoding=utf8
- </sonar.jdbc.url>
- <sonar.jdbc.driverClassName>com.mysql.jdbc.Driver</sonar.jdbc.driverClassName>
- <sonar.jdbc.username>sonar</sonar.jdbc.username>
- <sonar.jdbc.password>sonar</sonar.jdbc.password>
- <!-- optional URL to server. Default value is http://localhost:9000 -->
- <sonar.host.url>
- http://localhost:8080/sonar
- </sonar.host.url>
- </properties>
- </profile>
- <activeProfiles>
- <activeProfile>sonar</activeProfile>
- </activeProfiles>