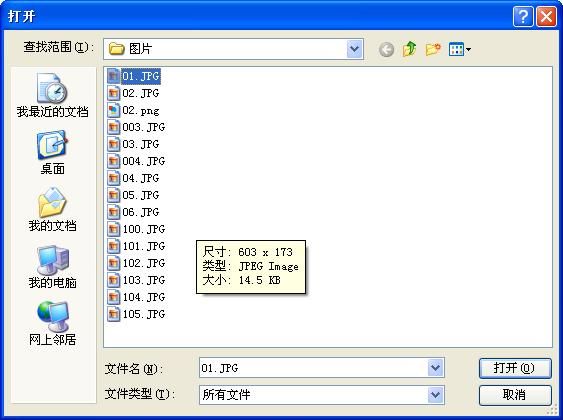
在实际开发中,我们经常需要文件上传功能。一个很棒的例子是BlueImpd的File Upload控件(https://github.com/blueimp/jQuery-File-Upload),它使用了jQuery和jQuery UI(或者Bootstrap)。它们的API都非常简单,这也使指令变得非常简单。
directive.js
angular.module('myApp.directives', [])
  .directive('fileupload', function() {
	  return {
		restrict:'A',
		scope: {
		  	done: '&',
		  	progress: '&'
	  	},
	  	link: function(scope, element, attrs) {
	  		var optionsObj = {
	  			dataType: 'json'
	  		};
	  		if(scope.done) {
	  			optionsObj.done = function(e, data) {
	  				scope.$apply(function() {
	  					scope.done({e: e, data: data});
	  				});
	  			};
	  		}
	  		if(scope.progress) {
	  			optionsObj.progress = function(e, data) {
	  				scope.$apply(function() {
	  					scope.progress({e: e, data: data});
	  				});
	  			};
	  		}
	  		//以上内容可以简单地在一个循环中完成,这里是为了覆盖Fileupload控件所提供的API
	  		element.fileupload(optionsObj);
	  	}
	  };
  });
这段代码允许我们用一种很简单的方式来定义指令,并为onDone和onProgress添加引用。我们使用了函数绑定的方式,这样AngularJS总是能够使用正确的作用域调用正确的方法。
这是通过定义独立的scope来实现的,它上面绑定了两个函数,一个是progress,另一个是done。以上代码会在scope上创建一个函数,这个函数带有一个参数(一个object)。例如,scope.done带有一个object型的参数,该object上有两个key,分别是e和data,它们会被当作参数传递给原来的函数。
index.jsp
<!DOCTYPE html>
<html ng-app="myApp">
	<head lang="en">
		<meta charset="utf-8"></meta>
		<title>File Upload With AngularJS</title>
		<!-- 由于我们在加载AngularJS之前会加载jQuery,所以Angular将会使用jQuery库来代替自已的jQueryLite实现 -->
		<script src="jquery/jquery-1.8.3.js"></script>
		<script src="jQuery-File-Upload/jquery.ui.widget.js"></script>
		<script src="jQuery-File-Upload/jquery.iframe-transport.js"></script>
		<script src="jQuery-File-Upload/jquery.fileupload.js"></script>
		<script src="jQuery-File-Upload/jquery.xdr-transport.js"></script>
		<script src="angular/angular.js"></script>
		<script src="controller.js"></script>
		<script src="directive.js"></script>
	</head>
	<body ng-controller="MainCtrl">
		File Upload:
		<!-- 我们会在MainCtrl中定义uploadFinished,然后把它绑定到作用域上,所以在这里它已经是可用的了 -->
		<input id="testUpload" type="file" fileupload name="files[]" data-url="servlet/Upload" multiple done="uploadFinished(e, data)" progress="uploading(e, data)"></input>
	</body>
</html>
input标签带有以下新增的属性:
a.fileupload
此属性让input标签成为了一个文件上传元素。
b.data-url
FileUpload插件使用此属性来决定把文件上传到哪里。在我们的例子中,我们上传到server API在servlet/Upload路径上等待处理插件所发送的数据。
c.multiple
multiple属性告诉指令(以及fileupload控件)允许一次选择多份文件。我们可以从插件中获得此功能,而且不用编写额外的代码,这是内置插件提供的又一项福利。
d.done
这是当插件文件上传之后需要调用的AngularJS函数。它同时还会指定调用指令时所需要的两个参数。
e.progress
同done
controller.js
var app = angular.module("myApp", ['myApp.directives']);

app.controller('MainCtrl', function($scope) {
	$scope.uploadFinished = function(e, data) {
		console.log('We just finished uploading this baby...');
	};
	$scope.uploading = function(e, data) {
		var progress = parseInt(data.loaded / data.total * 100, 10);
        console.log(progress + '%');
	};
});
运行效果:

我们在服务器的控制台及浏览器的console上能看到上传的信息。也可以到服务器的上传目录下找到刚上传的文件,如下所示:
有了它之后,我们就拥有了一个简单的、可运行的、可复用的文件上传指令。
附:
1.后台应用服务代码
Upload.java
package com.bijian.study;

import java.io.File;
import java.io.IOException;
import java.util.Iterator;
import java.util.List;
import java.util.UUID;

import javax.servlet.ServletException;
import javax.servlet.http.HttpServlet;
import javax.servlet.http.HttpServletRequest;
import javax.servlet.http.HttpServletResponse;

import org.apache.commons.fileupload.FileItem;
import org.apache.commons.fileupload.FileUploadException;
import org.apache.commons.fileupload.disk.DiskFileItemFactory;
import org.apache.commons.fileupload.servlet.ServletFileUpload;

@SuppressWarnings("serial")
public class Upload extends HttpServlet {

    @SuppressWarnings("unchecked")
    public void doPost(HttpServletRequest request, HttpServletResponse response) throws ServletException, IOException {

        String savePath = this.getServletConfig().getServletContext().getRealPath("");
        savePath = savePath + "/uploads/";

        File f1 = new File(savePath);
        System.out.println(savePath);
        if (!f1.exists()) {
            f1.mkdirs();
        }
        DiskFileItemFactory fac = new DiskFileItemFactory();
        ServletFileUpload upload = new ServletFileUpload(fac);
        upload.setHeaderEncoding("utf-8");
        List fileList = null;
        try {
            fileList = upload.parseRequest(request);
        } catch (FileUploadException ex) {
            return;
        }
        Iterator<FileItem> it = fileList.iterator();
        String name = "";
        String extName = "";
        while (it.hasNext()) {
            FileItem item = it.next();
            if (!item.isFormField()) {
                name = item.getName();
                long size = item.getSize();
                String type = item.getContentType();
                System.out.println(size + " " + type);
                if (name == null || name.trim().equals("")) {
                    continue;
                }
                // 扩展名格式:
                if (name.lastIndexOf(".") >= 0) {
                    extName = name.substring(name.lastIndexOf("."));
                }
                File file = null;
                do {
                    // 生成文件名:
                    name = UUID.randomUUID().toString();
                    file = new File(savePath + name + extName);
                } while (file.exists());
                File saveFile = new File(savePath + name + extName);
                try {
                    item.write(saveFile);
                } catch (Exception e) {
                    e.printStackTrace();
                }
            }
        }
        response.getWriter().print(name + extName);
    }
}
web.xml
<?xml version="1.0" encoding="UTF-8"?>
<web-app version="2.4" xmlns="http://java.sun.com/xml/ns/j2ee"
    xmlns:xsi="http://www.w3.org/2001/XMLSchema-instance"
    xsi:schemaLocation="http://java.sun.com/xml/ns/j2ee
    http://java.sun.com/xml/ns/j2ee/web-app_2_4.xsd">

  <servlet>
    <servlet-name>upload</servlet-name>
    <servlet-class>com.bijian.study.Upload</servlet-class>
  </servlet>

  <servlet-mapping>
    <servlet-name>upload</servlet-name>
    <url-pattern>/servlet/Upload</url-pattern>
  </servlet-mapping>

  <welcome-file-list>
    <welcome-file>index.jsp</welcome-file>
  </welcome-file-list>
</web-app>
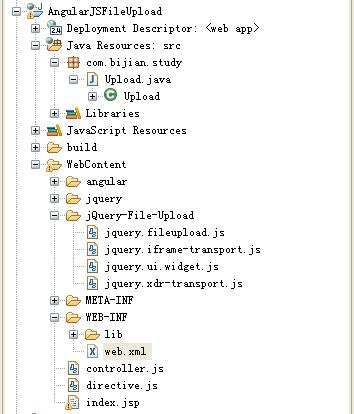
2.工程目录结构
说明:jquery.xdr-transport.js在IE下应载入此文件解决跨域问题。
资料来源:《用AngularJS开发下一代Web应用》
jQuery-File-Upload学习资料:http://avnpc.com/pages/single-file-upload-component-by-jquery-file-upload


