android UI进阶之仿iphone的tab效果(二)
今天把这个仿iphone效果的tab写完,这个例子参考国外rolle3k共享的代码,感谢rolle3k。
上篇博客我们写了一个Itab类,介绍了背景的绘制和简单的一个图的贴图方法。我们继续来完成Itab这个类,同时把他放到MainAcitvity(继承Activity)这个类内部,这样,整个程序只需一个类就可以了。(上篇博客例子运行需要再建一个Activity的子类来作为lanucher)。废话不多说了,看看代码
    <!--

Code highlighting produced by Actipro CodeHighlighter (freeware)
http://www.CodeHighlighter.com/

-->

     1


    public


    static


    class

     iTab

    extends

     View

     2

     {

     3


    private

     Paint mPaint;

    //

    背景画笔


     4


    private

     Paint mActiveTextPaint;

    //

    选中


     5


    private

     Paint mInactiveTextPaint;

    //

    未选中


     6


    private

     ArrayList

    <

    TabMember

    >

     mTabMembers;

    //

    tab成员


     7


    private


    int

     mActiveTab;

     8


    private

     OnTabClickListener mOnTabClickListener

    =


    null

    ;

     9


     10


    public

     iTab( Context context, AttributeSet attrs )

    //

    构造器,在里面初始化画笔


     11


     {

     12


    super

    (context, attrs);

     13


     14

     mTabMembers

    =


    new

     ArrayList

    <

    MainActivity.iTab.TabMember

    >

    ( );

     15


     16

     mPaint

    =


    new

     Paint( );

     17

     mActiveTextPaint

    =


    new

     Paint( );

     18

     mInactiveTextPaint

    =


    new

     Paint( );

     19


     20

     mPaint.setStyle( Paint.Style.FILL );

     21

     mPaint.setColor(

    0xFFFFFF00

     );

     22

     mPaint.setAntiAlias(

    true

    );

     23


     24

     mActiveTextPaint.setTextAlign( Align.CENTER );

     25

     mActiveTextPaint.setTextSize(

    12

     );

     26

     mActiveTextPaint.setColor(

    0xFFFFFFFF

     );

     27

     mActiveTextPaint.setAntiAlias(

    true

    );

     28


     29


     30

     mInactiveTextPaint.setTextAlign( Align.CENTER );

     31

     mInactiveTextPaint.setTextSize(

    12

     );

     32

     mInactiveTextPaint.setColor(

    0xFF999999

     );

     33

     mInactiveTextPaint.setAntiAlias(

    true

    );

     34

     mActiveTab

    =


    0

    ;

     35


     36

     }

     37


     38

     @Override

     39


    protected


    void

     onDraw( Canvas canvas )

     40

     {

     41


    super

    .onDraw( canvas );

     42


     43

     Rect r

    =


    new

     Rect( );

     44


    this

    .getDrawingRect( r );

     45


     46


    //

     计算每个标签能使用多少像素


     47


    int

     singleTabWidth

    =

     r.right

    /

     ( mTabMembers.size( )

    !=


    0


    ?

     mTabMembers.size( ) :

    1

     );

     48


     49


     50


    //

     绘制背景


     51


     canvas.drawColor(

    0xFF000000

     );

     52

     mPaint.setColor(

    0xFF434343

     );

     53

     canvas.drawLine( r.left, r.top

    +


    1

    , r.right, r.top

    +


    1

    , mPaint );

     54


     55


    int

     color

    =


    46

    ;

     56


     57


    for

    (

    int

     i

    =


    0

    ; i

    <


    24

    ; i

    ++

     )

     58

     {

     59

     mPaint.setARGB(

    255

    , color, color, color );

     60

     canvas.drawRect( r.left, r.top

    +

     i

    +


    1

    , r.right, r.top

    +

     i

    +


    2

    , mPaint );

     61

     color

    --

    ;

     62

     }

     63


     64


    //

     绘制每一个tab


     65


    for

    (

    int

     i

    =


    0

    ; i

    <

     mTabMembers.size( ); i

    ++

     )

     66

     {

     67

     TabMember tabMember

    =

     mTabMembers.get( i );

     68


     69

     Bitmap icon

    =

     BitmapFactory.decodeResource( getResources( ), tabMember.getIconResourceId( ) );

     70

     Bitmap iconColored

    =

     Bitmap.createBitmap( icon.getWidth(), icon.getHeight(), Bitmap.Config.ARGB_8888 );

     71

     Paint p

    =


    new

     Paint( Paint.ANTI_ALIAS_FLAG

    |

     Paint.FILTER_BITMAP_FLAG);

     72

     Canvas iconCanvas

    =


    new

     Canvas( );

     73

     iconCanvas.setBitmap( iconColored );

     74


     75


    if

    ( mActiveTab

    ==

     i )

    //

    为已选中的tab绘制一个白蓝的渐变色,未选中的绘制一个白灰的渐变色


     76

     {

     77

     p.setShader(

    new

     LinearGradient(

    0

    ,

    0

    , icon.getWidth(), icon.getHeight(),

     78


    0xFFFFFFFF

    ,

    0xFF54C7E1

    , Shader.TileMode.CLAMP ) );

     79

     }

     80


    else

     {

     81

     p.setShader(

    new

     LinearGradient(

    0

    ,

    0

    , icon.getWidth(), icon.getHeight(),

     82


    0xFFA2A2A2

    ,

    0xFF5F5F5F

    , Shader.TileMode.CLAMP ) );

     83

     }

     84


     85

     iconCanvas.drawRect(

    0

    ,

    0

    , icon.getWidth( ), icon.getHeight( ), p );

     86


     87


    for

    (

    int

     x

    =


    0

    ; x

    <

     icon.getWidth(); x

    ++

     )

     88

     {

     89


    for

    (

    int

     y

    =


    0

    ; y

    <

     icon.getHeight(); y

    ++

     )

     90

     {

     91


    if

    ( ( icon.getPixel(x, y)

    &


    0xFF000000

     )

    ==


    0

     )

     92

     {

     93

     iconColored.setPixel( x, y,

    0x00000000

     );

     94

     }

     95

     }

     96

     }

     97


     98


    //

     计算tab图片的位置


     99


    int

     tabImgX

    =

     singleTabWidth

    *

     i

    +

     ( singleTabWidth

    /


    2


    -

     icon.getWidth( )

    /


    2

     );

    100


    101


    //

     绘制tab图片 选中的和未选中的


    102


    if

    ( mActiveTab

    ==

     i )

    103

     {

    104

     mPaint.setARGB(

    37

    ,

    255

    ,

    255

    ,

    255

     );

    105

     canvas.drawRoundRect(

    new

     RectF( r.left

    +

     singleTabWidth

    *

     i

    +


    3

    , r.top

    +


    3

    ,

    106

     r.left

    +

     singleTabWidth

    *

     ( i

    +


    1

     )

    -


    3

    , r.bottom

    -


    2

     ),

    5

    ,

    5

    , mPaint );

    107

     canvas.drawBitmap( iconColored, tabImgX , r.top

    +


    5

    ,

    null

     );

    108

     canvas.drawText( tabMember.getText( ),

    109

     singleTabWidth

    *

     i

    +

     ( singleTabWidth

    /


    2

    ), r.bottom

    -


    2

    , mActiveTextPaint );

    110

     }

    else


    111

     {

    112

     canvas.drawBitmap( iconColored, tabImgX , r.top

    +


    5

    ,

    null

     );

    113

     canvas.drawText( tabMember.getText( ),

    114

     singleTabWidth

    *

     i

    +

     ( singleTabWidth

    /


    2

    ), r.bottom

    -


    2

    , mInactiveTextPaint );

    115

     }

    116

     }

    117


    118

     }

    119


    /*


    120

     * 触摸事件

    121


    */


    122

     @Override

    123


    public


    boolean

     onTouchEvent( MotionEvent motionEvent )

    124

     {

    125

     Rect r

    =


    new

     Rect( );

    126


    this

    .getDrawingRect( r );

    127


    float

     singleTabWidth

    =

     r.right

    /

     ( mTabMembers.size( )

    !=


    0


    ?

     mTabMembers.size( ) :

    1

     );

    128


    129


    int

     pressedTab

    =

     (

    int

    ) ( ( motionEvent.getX( )

    /

     singleTabWidth )

    -

     ( motionEvent.getX( )

    /

     singleTabWidth )

    %


    1

     );

    130


    131

     mActiveTab

    =

     pressedTab;

    132


    133


    if

    (

    this

    .mOnTabClickListener

    !=


    null

    )

    134

     {

    135


    this

    .mOnTabClickListener.onTabClick( mTabMembers.get( pressedTab ).getId( ) );

    136

     }

    137


    138


    this

    .invalidate();

    139


    140


    return


    super

    .onTouchEvent( motionEvent );

    141

     }

    142


    143


    void

     addTabMember( TabMember tabMember )

    144

     {

    145

     mTabMembers.add( tabMember );

    146

     }

    147


    148


    void

     setOnTabClickListener( OnTabClickListener onTabClickListener )

    149

     {

    150

     mOnTabClickListener

    =

     onTabClickListener;

    151

     }

    152


    153


    public


    static


    class

     TabMember

    //

    处理tab成员


    154

     {

    155


    protected


    int

     mId;

    156


    protected

     String mText;

    157


    protected


    int

     mIconResourceId;

    158


    159

     TabMember(

    int

     Id, String Text,

    int

     iconResourceId )

    160

     {

    161

     mId

    =

     Id;

    162

     mIconResourceId

    =

     iconResourceId;

    163

     mText

    =

     Text;

    164

     }

    165


    166


    public


    int

     getId( )

    167

     {

    168


    return

     mId;

    169

     }

    170


    171


    public

     String getText( )

    172

     {

    173


    return

     mText;

    174

     }

    175


    176


    public


    int

     getIconResourceId( )

    177

     {

    178


    return

     mIconResourceId;

    179

     }

    180


    181


    public


    void

     setText( String Text )

    182

     {

    183

     mText

    =

     Text;

    184

     }

    185


    186


    public


    void

     setIconResourceId(

    int

     iconResourceId )

    187

     {

    188

     mIconResourceId

    =

     iconResourceId;

    189

     }

    190

     }

    191


    192


    public


    static


    interface

     OnTabClickListener

    193

     {

    194


    public


    abstract


    void

     onTabClick(

    int

     tabId );

    195

     }

    196

     }
这是MainActivity这个类里面的两个static类,看我写的注释和上篇博客的内容应该都能理解。其中还定义了触摸事件,实现点击tab出现不同布局的效果。接下来我们只需要在我们的layout上添加就可以了,我们继续写一个内部类
    <!--

Code highlighting produced by Actipro CodeHighlighter (freeware)
http://www.CodeHighlighter.com/

-->

     1

    public


    static


    class

     iRelativeLayout

    extends

     RelativeLayout

    //

    注意,还是声明为静态


     2

     {

     3


    private

     Paint mPaint;

     4


    private

     Rect mRect;

     5


     6


    public

     iRelativeLayout( Context context, AttributeSet attrs )

     7

     {

     8


    super

    (context, attrs);

     9


     10

     mRect

    =


    new

     Rect( );

     11

     mPaint

    =


    new

     Paint( );

     12


     13

     mPaint.setStyle( Paint.Style.FILL_AND_STROKE );

     14

     mPaint.setColor(

    0xFFCBD2D8

     );

     15

     }

     16


     17

     @Override

     18


    protected


    void

     onDraw( Canvas canvas )

     19

     {

     20


    super

    .onDraw( canvas );

     21


     22

     canvas.drawColor(

    0xFFC5CCD4

     );

     23


     24


    this

    .getDrawingRect( mRect );

     25


     26


    for

    (

    int

     i

    =


    0

    ; i

    <

     mRect.right; i

    +=


    7

     )

    //

    绘制屏幕背景的纹理效果


     27

     {

     28

     canvas.drawRect( mRect.left

    +

     i, mRect.top, mRect.left

    +

     i

    +


    2

    , mRect.bottom, mPaint );

     29

     }

     30


     31

     }

     32

     }

     33


     34


     35


    private


    static


    final


    int

     TAB_HIGHLIGHT

    =


    1

    ;

     36


    private


    static


    final


    int

     TAB_CHAT

    =


    2

    ;

     37


    private


    static


    final


    int

     TAB_LOOPBACK

    =


    3

    ;

     38


    private


    static


    final


    int

     TAB_REDO

    =


    4

    ;

     39


    private

     iTab mTabs;

     40


    private

     LinearLayout mTabLayout_One;

     41


    private

     LinearLayout mTabLayout_Two;

     42


    private

     LinearLayout mTabLayout_Three;

     43


    private

     LinearLayout mTabLayout_Four;

     44


    private

     LinearLayout mTabLayout_Five;

     45


     46

     @Override

     47


    public


    void

     onCreate(Bundle savedInstanceState)

     48

     {

     49


    super

    .onCreate(savedInstanceState);

     50

     setContentView(R.layout.main);

     51


     52


     53

     mTabs

    =

     (iTab)

    this

    .findViewById( R.id.Tabs );

     54

     mTabLayout_One

    =

     (LinearLayout)

    this

    .findViewById( R.id.TabLayout_One );

     55

     mTabLayout_Two

    =

     (LinearLayout)

    this

    .findViewById( R.id.TabLayout_Two );

     56

     mTabLayout_Three

    =

     (LinearLayout)

    this

    .findViewById( R.id.TabLayout_Three );

     57

     mTabLayout_Four

    =

     (LinearLayout)

    this

    .findViewById( R.id.TabLayout_Four );

     58

     mTabLayout_Five

    =

     (LinearLayout)

    this

    .findViewById( R.id.TabLayout_Four );

    //

    偷个懒,不写第五个界面啦


     59


     60

     mTabs.addTabMember(

    new

     TabMember( TAB_HIGHLIGHT,

    "

    精选

    "

    , R.drawable.jingxuan ) );

     61

     mTabs.addTabMember(

    new

     TabMember( TAB_CHAT,

    "

    类别

    "

    , R.drawable.cat ) );

     62

     mTabs.addTabMember(

    new

     TabMember( TAB_LOOPBACK,

    "

    25大排行榜

    "

    , R.drawable.rank ) );

     63

     mTabs.addTabMember(

    new

     TabMember( TAB_REDO,

    "

    搜索

    "

    , R.drawable.search ) );

     64

     mTabs.addTabMember(

    new

     TabMember( TAB_REDO,

    "

    更新

    "

    , R.drawable.download ) );

    //

    添加tab


     65


     66


    /*

    初始显示第一个界面

    */


     67

     mTabLayout_One.setVisibility( View.VISIBLE );

     68

     mTabLayout_Two.setVisibility( View.GONE );

     69

     mTabLayout_Three.setVisibility( View.GONE );

     70

     mTabLayout_Four.setVisibility( View.GONE );

     71


     72

     mTabs.setOnTabClickListener(

    new

     OnTabClickListener( ) {

     73

     @Override

     74


    public


    void

     onTabClick(

    int

     tabId )

    //

    实现点击事件


     75

     {

     76


    if

    ( tabId

    ==

     TAB_HIGHLIGHT )

     77

     {

     78

     mTabLayout_One.setVisibility( View.VISIBLE );

     79

     mTabLayout_Two.setVisibility( View.GONE );

     80

     mTabLayout_Three.setVisibility( View.GONE );

     81

     mTabLayout_Four.setVisibility( View.GONE );

     82

     }

    else


    if

    ( tabId

    ==

     TAB_CHAT )

     83

     {

     84

     mTabLayout_One.setVisibility( View.GONE );

     85

     mTabLayout_Two.setVisibility( View.VISIBLE );

     86

     mTabLayout_Three.setVisibility( View.GONE );

     87

     mTabLayout_Four.setVisibility( View.GONE );

     88

     }

    else


    if

    ( tabId

    ==

     TAB_LOOPBACK )

     89

     {

     90

     mTabLayout_One.setVisibility( View.GONE );

     91

     mTabLayout_Two.setVisibility( View.GONE );

     92

     mTabLayout_Three.setVisibility( View.VISIBLE );

     93

     mTabLayout_Four.setVisibility( View.GONE );

     94

     }

    else


    if

    ( tabId

    ==

     TAB_REDO )

     95

     {

     96

     mTabLayout_One.setVisibility( View.GONE );

     97

     mTabLayout_Two.setVisibility( View.GONE );

     98

     mTabLayout_Three.setVisibility( View.GONE );

     99

     mTabLayout_Four.setVisibility( View.VISIBLE );

    100

     }

    101

     }

    102

     });

    103

     }
其中onDraw()方法里面实现了背景的纹理效果,配合xml里面背景色的配置,实现了如下图所示的效果:
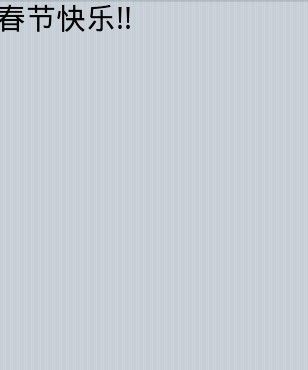
是不是非常漂亮呢。下面就是xml里面的配置了
     <!--

Code highlighting produced by Actipro CodeHighlighter (freeware)
http://www.CodeHighlighter.com/

-->

      1

     <?

     xml version="1.0" encoding="utf-8"

     ?>


      2


      3

     <

     view

     xmlns:android

     ="http://schemas.android.com/apk/res/android"


      4

      class

     ="com.notice520.MainActivity$iRelativeLayout"


      5

      android:orientation

     ="vertical"


      6

      android:layout_width

     ="fill_parent"


      7

      android:layout_height

     ="fill_parent"


      8

      android:background

     = "#C5CCD4FF"


      9


     >


      10


     <

     LinearLayout

      11


     android:id

     = "@+id/TabLayout_One"


      12

      android:layout_width

     = "fill_parent"


      13

      android:layout_height

     = "fill_parent"


      14

      android:layout_above

     = "@+id/Tabs"


      15


     >


      16


     <

     ScrollView

     android:layout_width

     ="fill_parent"

      android:layout_height

     ="wrap_content"

     >


      17


     <

     RelativeLayout

      18


     android:layout_width

     = "fill_parent"


      19

      android:layout_height

     = "fill_parent"


      20

      android:visibility

     = "visible"


      21


     >


      22


     <

     TextView

      23


     android:textColor

     ="@android:color/black"


      24

      android:textSize

     ="30sp"


      25

      android:layout_width

     = "wrap_content"


      26

      android:layout_height

     = "wrap_content"


      27

      android:text

     = "春节快乐!!"


      28


     />


      29


     </

     RelativeLayout

     >


      30


     </

     ScrollView

     >


      31


     </

     LinearLayout

     >


      32


      33


     <

     LinearLayout

      34


     android:id

     = "@+id/TabLayout_Two"


      35

      android:layout_width

     = "fill_parent"


      36

      android:layout_height

     = "fill_parent"


      37

      android:layout_above

     = "@+id/Tabs"


      38


     >


      39


     <

     ScrollView

     android:layout_width

     ="fill_parent"

      android:layout_height

     ="wrap_content"

     >


      40


     <

     RelativeLayout

      41


     android:layout_width

     = "fill_parent"


      42

      android:layout_height

     = "fill_parent"


      43

      android:visibility

     = "visible"


      44

      android:layout_above

     = "@+id/Tabs"


      45


     >


      46


     <

     Button

      47


     android:layout_width

     = "wrap_content"


      48

      android:layout_height

     = "wrap_content"


      49

      android:text

     = "祝大家事业有成!"


      50

      android:textSize

     = "30sp"


      51


     />


      52


     </

     RelativeLayout

     >


      53


     </

     ScrollView

     >


      54


     </

     LinearLayout

     >


      55


     <

     LinearLayout

      56


     android:id

     = "@+id/TabLayout_Three"


      57

      android:layout_width

     = "fill_parent"


      58

      android:layout_height

     = "fill_parent"


      59

      android:layout_above

     = "@+id/Tabs"


      60


     >


      61


     <

     ScrollView

     android:layout_width

     ="fill_parent"

      android:layout_height

     ="wrap_content"

     >


      62


     <

     RelativeLayout

      63


     android:layout_width

     = "fill_parent"


      64

      android:layout_height

     = "fill_parent"


      65

      android:visibility

     = "visible"


      66

      android:layout_above

     = "@+id/Tabs"


      67


     >


      68


     <

     ImageView

      69


      70


     android:layout_width

     = "fill_parent"


      71

      android:layout_height

     = "fill_parent"


      72

      android:src

     ="@drawable/newq"


      73


     />


      74


     </

     RelativeLayout

     >


      75


     </

     ScrollView

     >


      76


     </

     LinearLayout

     >


      77


     <

     LinearLayout

      78


     android:id

     = "@+id/TabLayout_Four"


      79

      android:layout_width

     = "fill_parent"


      80

      android:layout_height

     = "fill_parent"


      81

      android:layout_above

     = "@+id/Tabs"


      82


     >


      83


     <

     ScrollView

     android:layout_width

     ="fill_parent"

      android:layout_height

     ="wrap_content"

     >


      84


     <

     RelativeLayout

      85


     android:id

     = "@+id/TabLayout_Four"


      86

      android:layout_width

     = "fill_parent"


      87

      android:layout_height

     = "fill_parent"


      88

      android:visibility

     = "visible"


      89

      android:layout_above

     = "@+id/Tabs"


      90


     >


      91


     <

     TextView

      92


     android:textColor

     ="@android:color/black"


      93

      android:layout_width

     = "wrap_content"


      94

      android:layout_height

     = "wrap_content"


      95

      android:text

     = "很简单,是么"


      96


     />


      97


     </

     RelativeLayout

     >


      98


     </

     ScrollView

     >


      99


     </

     LinearLayout

     >


     100


     <

     view

     101


     class

     ="com.notice520.MainActivity$iTab"


     102

      android:id

     ="@+id/Tabs"


     103

      android:layout_width

     = "fill_parent"


     104

      android:layout_height

     = "49px"


     105

      android:layout_alignParentBottom

     = "true"


     106


     />


     107

     </

     view

     >


     108
来看看最终的效果吧

是不是还不错呢 希望大家喜欢,有问题可以留言交流。
<script type="text/javascript"></script>