Latex Tutorial
Latex Tutorial
Keywords: Latex, Postscript, PDF, how to, tutorial, guide, primerMotivation
Suppose you're writing a scientific article to be published in a conference proceeding, journal or book. The publisher will demand camera-ready quality, meaning the hardcopy's "look" and page formatting meets the level needed for mass distribution in magazines, journals and books. Desktop wordprocessors like Microsoft Word are ill-suited for this. Furthermore, problems with Word include:
- Math equations involve a slow "select-point-click" process
- Editing math equations are time-consuming
- Poor margin justification e.g.
Word automatically puts spaces between words!
- Difficult changing references to bibliography entries, footnotes, tables and figure numbers
- Resulting .doc file is huge when involving figures
- Slow screen refresh when figures involved - can't enter/edit/scroll text while figure is loading
Latex is a computer language for generating scientific documentation that is camera-ready. This step-by-step tutorial illustrates Latex'ing an article and creating Postscript and PDF camera-ready documents and presented as follows:
This tutorial is not a comprehensive guide to Latex. It does not describe all of Latex's commands - there are good books and on-line references for this. Rather, this tutorial provides a simple .tex template, explains how to both compile it and generate the final Postscript and PDF document.
TEX file Creation
Latex is a computer language - one creates and compiles files having names with a .tex extension. If there are no syntax errors, the resulting output filename extension is .dvi which stands for device independent. This dvi file can be processed into a camera-ready format called a Postscript file, having a .ps extension. Postscript files are viewed with a program called Ghostview which also has a PS to PDF converter.Step 1: Software Download and Install
The following software is needed. They work with Win 95/98/ME and should work on WinNT/2000 too. This tutorial uses the versions downloadable from our PRISM Robotics Lab server. You can download the lastest versions from the original sites. Install the files on your Windows PC.
- Miktex: available on PRISM
Version 2.1
disk 1 filename: miktex-2.0-lvl-1.zip (12.3 MB)
disk 2 filename: miktex-2.0-lvl-2.zip (8.4 MB)
disk 3 filename: miktex-2.0-lvl-3.zip (5.7 MB)
disk 4 filename: miktex-2.0-lvl-4.zip (3.9 MB)
disk 5 filename: miktex-2.0-lvl-5.zip (6.1 MB)Miktex is a DOS/Windows version of Latex. Latest versions and updates can be found on the Miktex web site.
- Ghostscript and GSView: available on PRISM
Ghostview Version 6.5 filename: gs650w32.exe (5.8 MB)
GSView 3.6 filename: gsv36w32.exe (1.5 MB)
GSView 2.6 filename: gsv26550.exe (3.4 MB) may also be necessaryBoth Ghostview and GSView need to be installed to view Postscript files. The Ghostview, Ghostscript and GSView home page provide the latest versions.
- Emacs: available on PRISM
Version 20.6 filename: emacs-20.6-bin-i386.tar.gz (8.9 MB)Latex only requires an ASCII editor (like Windows Notepad or DOS Edit). Emacs is a much more powerful and popular editor. The latest version can be downloaded from the GNU Emacs web site.
Step 2: Download the template.tex file
Right clicking template.tex will save it to your hard drive. This TEX file features common Latex statements like margin and line-spacing to produce an 8.5x11 article. Opening template.tex with an ASCII editor like Windows Notepad.exe or Emacs will look like:
template.tex
 \documentclass[11pt]{article}
 \usepackage{graphicx}    % needed for including graphics e.g. EPS, PS
 \topmargin -1.5cm        % read Lamport p.163
 \oddsidemargin -0.04cm   % read Lamport p.163
 \evensidemargin -0.04cm  % same as oddsidemargin but for left-hand pages
 \textwidth 16.59cm
 \textheight 21.94cm
 %\pagestyle{empty}       % Uncomment if don't want page numbers
 \parskip 7.2pt           % sets spacing between paragraphs
 %\renewcommand{\baselinestretch}{1.5} 	% Uncomment for 1.5 spacing between lines
 \parindent 0pt		  % sets leading space for paragraphs

 \begin{document}
 % Start your text


 % Stop your text
 \end{document}
Much of the text before the \begin{document} line are Latex statements used to create margin and text sizes needed for most generic scientific documents.
Step 3: Create your TEX file
Save template.tex as myFile01.tex. Note: your filename must end in .tex. As an example, let's edit myFile01.tex to create a document that possesses:- Multiple section headings
- Text formating like bold and italic
- A bibliography reference
To be Latex'ed with Miktex
Note: download myFile01.tex rather than cutting and pasting from below.
\documentclass[11pt]{article}
\usepackage{graphicx}    % needed for including graphics e.g. EPS, PS
\topmargin -1.5cm        % read Lamport p.163
\oddsidemargin -0.04cm   % read Lamport p.163
\evensidemargin -0.04cm  % same as oddsidemargin but for left-hand pages
\textwidth 16.59cm
\textheight 21.94cm
%\pagestyle{empty}       % Uncomment if don't want page numbers
\parskip 7.2pt           % sets spacing between paragraphs
%\renewcommand{\baselinestretch}{1.5} % Uncomment for 1.5 spacing between lines
\parindent 0pt		 % sets leading space for paragraphs

\begin{document}
% Start your text
\section{Introduction}
\label{Introduction}

Latex provides several standard class styles.  In the
documentclass statement in top line of this file shows this
will be an article with a 11 point font.  The {\bf article}
style is most suited for {\it conferences}.

\subsection{The Label Statement}
\label{labelStatement}

Section~\ref{Introduction} described the article style.  Notice
how Latex lets you use the label name to refer to a whatever
section or sub-section you desire?  Latex automatically generates
the numbers.

\subsection{Text Formatting}
\label{textFormatting}

Latex provides several standard text formatting modifiers.
For example, to bold a text, you surround the text in french
braces like {\bf this}.  Italics are also {\it possible}.
Lamport's book \cite{lamport} describes additional text formatting
commands.

\begin{thebibliography}{99}
\bibitem{lamport} Lamport, L., {\it LaTeX : A Documentation
 Preparation System User's Guide and Reference Manual}, Addison-Wesley
 Pub Co., 2nd edition, August 1994.
\end{thebibliography}

% Stop your text
\end{document}
Step 4: Latex Your TEX file
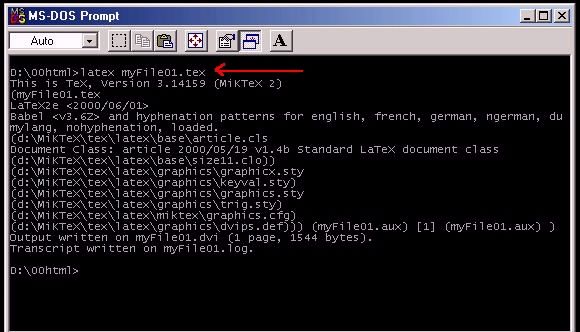
After saving myFile01.tex above, get a DOS prompt and go to the directory containing your myFile01.tex. You latex your file by typing latex myFile01.tex as shown in the following screen shot:

Read what's displayed. Remember, Latex is a programming language; incorrect command spellings or misplaced braces will stop Latex and prompt you to correct syntax errors.
If there are no syntax errors, beyond LaTex Warnings, repeat the latex myFile01.tex two or three more times. This is needed for Latex to generate the proper section numbers, bibliographic citations and references.
Step 5: Create and View the Resulting Postscript File
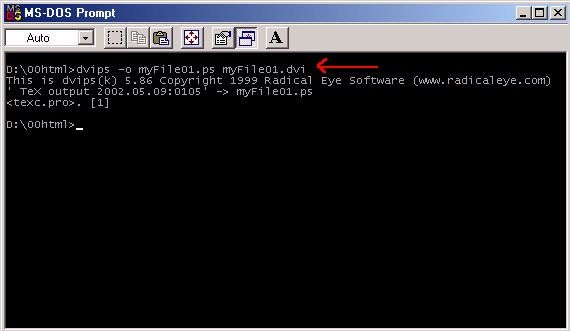
Successful Latex'ing will generate myFile01.dvi. At the DOS prompt typedvips -o myFile01.ps myFile01.dvi as shown in the screen shot below.

dvips is a program that converts DVI files to PS. The option -o is the desired filename (myFile01.ps in this case).
The resulting myFile01.ps is a Postscript (PS) file. Within the scientific community, PS rather than Word DOC files are exchanged. PS files are ASCII and hence can be opened by any computer (Pentium, 286, Sun Sparc) running any operating system (Windows, DOS, Linux, BSD, SunOS).
You view PS files using GSView. If you installed GSView on your Windows PC, launch it and open myFile01.ps. You should see the following screen shot.

Under GSView - click Media. If A4 is checked, then try the following for letter size margins (8.5 by 11 inch paper)
dvips -Ppdf -t letter -o myFile01.ps myFile01.dvi
This prepares myFile01.ps for letter size and PDF-compatiable fonts. Click Media again and click letter size if needed. Under GSView, click FILE - Convert - pdfwrite to create a PDF version of myFile01.
Congratulations! You created a camera-ready document!
Mathematics and Images
Latex's real power lies in its ability to typeset mathematical equations. Unlike Word, Latex does not come equipped with a point-and-click math editor; one needs to learn Latex' typesetting commands. Leslie Lamport's book describes the commands that one learns rather quickly.examplePaper.tex is a 2-page paper in 2-column format. The margins, font and header/footer sizes meet IEEE or ASME paper specifications. Before examining how math and images are handled, try latex'ing the file and generate the PS file. Before you begin, download assemblyWorkcellOverview1_0.eps into the same directory as examplePaper.tex. Next, perform the following 3 to 4 times:
latex examplePaper.tex
Next:
dvips -o examplePaper.ps examplePaper.dvi
Viewing the PS file with GSView should show a 2-page double-column paper with a few math equations a some images.
Images
Latex only handles figures that are PS or EPS. Windows users are typically used to GIF, JPG or BMP file formats. The problem is that resizing diminished image quality. PS or EPS files are vector-scaled meaning that resizing will not decrease image quality - an essential aspect in camera-quality documents.Popular graphics software like Paint Shop Pro allows one to convert/save PS, EPS files. Drawing graphics (like block diagrams or sketches) can be done with Mayura Draw.
Examine examplePaper.tex and you'll see that a EPS image has been included (a picture of an assembly work cell). The latex statements are:
  \begin{figure*}
  \centerline{
    \mbox{\includegraphics[width=3.00in]{assemblyWorkcellOverview1_0.eps}}
    \mbox{\includegraphics[width=3.00in]{assemblyWorkcellOverview1_0.eps}}
  }
  \caption{Replace text here with your desired caption.}
  \label{overView}
  \end{figure*}
The caption command assigns what text is written below the image assemblyWorkcellOverview1_0.eps. The label command is used so that you can reference it within the paper. You'll notice assemblyWorkcellOverview1_0.eps is repeated twice. This was done just to show two pictures can be placed side-by-side. The width variable, set for 3 inches, scales the figures' height automatically.
Equations
Within examplePaper.tex are several equations. For example the very first equation is described in Latex as:
  \begin{equation}
  {\bf X}[k+1]=A{\bf X}[k]+B{\bf u}[k]
  \label{stateSpaceForm1}
  \end{equation}
which describes a typical linear state-space equation. The \bf command for bold was used because vectors are often connoted with darker font than non-vectors.
Once you learn Latex's math commands, you'll be entering equations much faster than a Word-like point-and-click method. Nonetheless, point-and-click does required much of a learning curve and this has motivated several shareware/commercial GUI-based math editors for Latex. These include:
- TeXaide which is free.
- Equation Magic Lite which looks much like Word's math editor. The lite version is free but limits the number of symbols in a equation.
Final Words
Publishing scientific journals, theses, dissertations, articles and conference proceedings demand camera-ready typesetting. Latex, a language for wordprocessing, is the popular tool for such typesetting. Creating Latex files only require an ASCII editor - the resulting file sizes are small, platform-independent and easy to create.Latex has a loyal and wide following supported under the GNU public license. This means Latex tools are free and well-tested. This tutorial guided the reader to these tools, offers a simple Latex template (template.tex), describes how math and images are handled (examplePaper.tex).
 Leslie Lamport's book: LaTeX : A Documentation Preparation System User's Guide and Reference Manual is an excellent resource to apply Latex to your next article - happy publishing!
Click here to email me