对于osgi bundle的集成测试研究
由于OSGI技术优秀的模块化技术分离,在不同的bundle之间进行交互的方式有两种:一是包(package)的导出和导入,二是bundle向外部发布service。第二种方式是osgi中推荐的方式,同时这种方式具有SOA的特点。但是,这种模块化的组织方式,特别是通过服务在不同的bundle间进行交互,使得osgi环境中的测试,必须在osgi container中进行,增加了测试环境搭建的难度。 在spring dm中,提供了一种启动osgi container的方式,通过springdm、osgi container、junit的组合,进行osgi的集成的测试。但是这种方式的设置比较复杂,特别是对于每一个bundle到要在测试程序和pom中设置,容易引起错误。
因此,基于对OSGI container的分析(主要是Felix和Equinox),可以通过在传统的程序中,嵌入(embedded)一个osgi的环境,可以利用Junit象测试普通的java程序一样测试bundle提供的service。
一、建立一个OSGI的嵌入环境
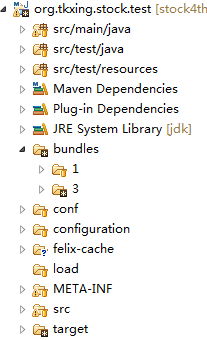
这里以建立Felix的嵌入式环境为例子进行解释,对于Equinox的环境,基本的建立方法相同。在建立Osgi环境过程中,关键的问题有两个:一是对于OSGI 环境配置文件的读取和处理,并把它设置到启动的嵌入式环境中;二是对于自动启动的bundle的读取和启动。工程的目录结构如图所示:
首先是对于Felix配置文件的处理, 读取配置文件config.properties,并把读入的内容加载到Properties中。
    	InputStream input = null;
    	try {
			input = new FileInputStream("conf/config.properties");
		} catch (FileNotFoundException e) {
			// TODO Auto-generated catch block
			e.printStackTrace();
		}

    	Properties props = new Properties();
    	try {
			props.load(input);
		} catch (IOException e) {
			// TODO Auto-generated catch block
			e.printStackTrace();
		}
其次是读取自动启动的bundles,放在工程的bundles目录下,子目录以数字命名,对应于Felix中bundle的启动级别,在Felix中,对于自动启动的bundle的设置属性为:"felix.auto.start",通过程序中读取这个目录下的bundle,设置到properties:
		File dir = new File("bundles");
		String[] list = dir.list();

		for(int i= 0;i< list.length;i++)
		{

			File jarDir = new File("bundles/"+list[i]);


			String runJars =  this.getFileName(" file:", jarDir);

			props.setProperty(AUTO_START_PROP+"."+list[i], runJars);
		}
   private String getFileName(String rootPath,File file)
    {
     String bundlesPath="";

     if(!file.getAbsolutePath().contains(".svn"))
     {
      if(file.isDirectory())
      {
       String[] files = file.list();

       for(int i=0;i<files.length;i++)
       {
        bundlesPath = bundlesPath+getFileName(rootPath,new File(file.getPath()+"/"+files[i]));
       }

      }
      else
      {
       bundlesPath=rootPath+file;
      }
     }
     return bundlesPath;
    }
最终,把完整的属性设置传给Felix,然后以嵌入式方式启动OSGI环境。完整的Felix Host代码如下:
import java.io.File;
import java.io.FileInputStream;
import java.io.FileNotFoundException;
import java.io.IOException;
import java.io.InputStream;
import java.util.HashMap;
import java.util.Map;
import java.util.Properties;

import org.apache.felix.framework.Felix;
import org.apache.felix.main.AutoProcessor;
import org.osgi.framework.Bundle;
import org.osgi.framework.BundleException;


public class FelixHostApplication
{
 //    private HostActivator m_activator = null;

    private static  Felix m_felix = null;
    private final String AUTO_START_PROP ="felix.auto.start";

    public Object getBunndleContext()
    {
    	return m_felix.getBundleContext();
    }

    private String getFileName(String rootPath,File file)
    {
    	String bundlesPath="";

    	if(!file.getAbsolutePath().contains(".svn"))
    	{
	    	if(file.isDirectory())
	    	{
	    		String[] files = file.list();

	    		for(int i=0;i<files.length;i++)
	    		{
	    			bundlesPath = bundlesPath+getFileName(rootPath,new File(file.getPath()+"/"+files[i]));
	    		}

	    	}
	    	else
	    	{
	    		bundlesPath=rootPath+file;
	    	}
    	}
    	return bundlesPath;
    }


    public FelixHostApplication()
    {
    	InputStream input = null;
    	try {
			input = new FileInputStream("conf/config.properties");
		} catch (FileNotFoundException e) {
			// TODO Auto-generated catch block
			e.printStackTrace();
		}

    	Properties props = new Properties();
    	try {
			props.load(input);
		} catch (IOException e) {
			// TODO Auto-generated catch block
			e.printStackTrace();
		}

		File dir = new File("bundles");
		String[] list = dir.list();

		for(int i= 0;i< list.length;i++)
		{

			File jarDir = new File("bundles/"+list[i]);


			String runJars =  this.getFileName(" file:", jarDir);

			props.setProperty(AUTO_START_PROP+"."+list[i], runJars);
		}


        // Create a configuration property map.
        Map config = new HashMap(props);
        // Create host activator;
 /*       m_activator = new HostActivator();
        List list1 = new ArrayList();
        list1.add(m_activator);
        config.put(FelixConstants.SYSTEMBUNDLE_ACTIVATORS_PROP, list1);
*/

       try
        {
            // Now create an instance of the framework with
            // our configuration properties.
            m_felix = new Felix(config);

            m_felix.init();
            AutoProcessor.process(config, m_felix.getBundleContext());

 //          m_felix.getBundleContext().registerService(ShareInterface.class.getName(), new ShareImpl(), null);


           // Now start Felix instance.
            m_felix.start();

            Thread.sleep(10*1000);

            System.out.println("hello");

        }
        catch (Exception ex)
        {
            System.err.println("Could not create framework: " + ex);
            ex.printStackTrace();
        }
    }

  public Bundle[] getInstalledBundles()
    {
        // Use the system bundle activator to gain external
        // access to the set of installed bundles.
        return this.m_felix.getBundleContext().getBundles();
    }

    public void shutdownApplication()
    {
        // Shut down the felix framework when stopping the
        // host application.
        try {
			m_felix.stop();
		       m_felix.waitForStop(0);
		} catch (BundleException e) {
			// TODO Auto-generated catch block
			e.printStackTrace();
		} catch (InterruptedException e) {
			// TODO Auto-generated catch block
			e.printStackTrace();
		}
    }
}
二、在Junit Test Case中启动OSGI 环境
建立一个Junit Test Case,重载它的setup方法,生成一个OSGI环境:
host = new FelixHostApplication();
然后通过反射的方法(见文《在osgi容器外应用osgi bundle提供的服务》),就可以获得注册的服务了。
