RHEL5/Cluster(DR部分)
RHEL5/Cluster(DR 部分)
RHEL5中的Cluster组件是基于章文嵩先生创立的LVS(Linux Virtual Server) 制作而成,
关于lvs的工作原理请参照《Linux 服务器集群系统》
Virtual Server via Direct Routing(VS/DR)
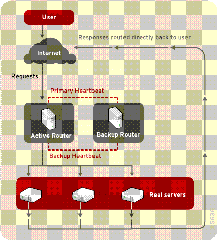
VS/DR 通过改写请求报文的MAC地址,将请求发送到真实服务器,而真实服务器将响应直接返回给客户。同VS/TUN技术一样,VS/DR技术可极大地提高集群系 统的伸缩性。这种方法没有IP隧道的开销,对集群中的真实服务器也没有必须支持IP隧道协议的要求,但是要求调度器与真实服务器都有一块网卡连在同一物理 网段上。
Cluster(DR部分)实验
应为DR使基于MAC改写的,为了使试验简单明了,假设client,router,realserver都在一个网段上,
DR类型的httpd负载均衡集群.网络拓扑为
*当然,实际使用中,还需要考虑网关,路由等
#拓扑图
________
| |
| client |
|________|
10.0.0.10
| eth0 10.0.0.1
| _____________
| | |
VIP(eth0:1)=10.0.0.50 | router |
_ _ _ _ _ |_____________|
| | |
director ---------------+
|_ _ _ _ _ | |
| eth0 10.0.0.2
| ______________
| | |
----------------- | router backup|
| | |______________|
| |
eth0 10.0.0.100 eth0 10.0.0.200
______________ ______________
| | | |
| realserver1 | | realserver2 |
|______________| |______________|
[client]
os
windwows xp
[router]
os
rhel5
hostname
vs
software
ipvsadm piranha httpd php
[router backup]
os
rhel5
hostname
vs_bk
software
ipvsadm piranha httpd php
[real server 1]
os
rhel5
hostname
rs1
software
httpd
[real server B]
os
rhel5
hostname
rs2
software
httpd
[director]
为router或者router backup中的一台虚拟出来
配置如下
[router]
#设置piranha密码
piranha-passwd
#开启服务
service piranha-gui start
#访问配置页面
http://10.0.0.1:3636/
#配置以后的文件
[root@vs ~]# cat /etc/sysconfig/ha/lvs.cf
serial_no = 51
primary = 10.0.0.1
service = lvs
backup_active = 1
backup = 10.0.0.2
heartbeat = 1
heartbeat_port = 539
keepalive = 6
deadtime = 18
network = direct
nat_nmask = 255.255.255.0
debug_level = NONE
monitor_links = 0
virtual HTTP {
active = 1
address = 10.0.0.50 eth0:1
vip_nmask = 255.255.0.0
port = 80
send = "GET / HTTP/1.0\r\n\r\n"
expect = "HTTP"
use_regex = 0
load_monitor = none
scheduler = wlc
protocol = tcp
timeout = 6
reentry = 15
quiesce_server = 0
server rs1.yubo.com {
address = 10.0.0.100
active = 1
weight = 1
}
server rs2.yubo.com {
address = 10.0.0.200
active = 1
weight = 1
}
}
#重启服务
service pulse restart
[router backup]
#设置piranha密码
piranha-passwd
#开启服务
service piranha-gui start
#访问配置页面
http://10.0.0.2:3636/
#配置以后的文件
[root@vs_bk ~]# cat /etc/sysconfig/ha/lvs.cf
serial_no = 46
primary = 10.0.0.2
service = lvs
backup_active = 1
backup = 10.0.0.1
heartbeat = 1
heartbeat_port = 539
keepalive = 6
deadtime = 18
network = direct
nat_nmask = 255.255.0.0
debug_level = NONE
monitor_links = 0
virtual HTTP {
active = 1
address = 10.0.0.50 eth0:1
vip_nmask = 255.255.0.0
port = 80
send = "GET / HTTP/1.0\r\n\r\n"
expect = "HTTP"
use_regex = 0
load_monitor = none
scheduler = wlc
protocol = tcp
timeout = 6
reentry = 15
quiesce_server = 0
server rs1.yubo.com {
address = 10.0.0.100
active = 1
weight = 1
}
server rs2.yubo.com {
address = 10.0.0.200
active = 1
weight = 1
}
}
#重启服务
service pulse restart
[realserver1/realserver2]
修改mac地址,但是到达realserver的包,目的地址使vip的地址,而不是rs的ip地址,如果不做处理,会被拒绝,有arptables_jf/iptables 两种方法,我用的使iptables
2台rs都要做
iptables -t nat -A PREROUTING -p tcp -d 1 --dport 80 -j REDIRECT
之后开启rs1,rs2的httpd服务,为了使得便于观察
[root@rs1 ~]# echo "rs1.yubo.org" > /var/www/html/index.html
[root@rs2 ~]# echo "rs2.yubo.org" > /var/www/html/index.html
client频繁访问http://10.0.0.50时,会发现显示内容在”rs2.yubo.org”和”rs1.yubo.org”之间切换
试验完成以后,不要忘记保存配置,以免启动以后无法使用
[vs/vs_bk]
chkconfig --level 2345 piranha-gui on
chkconfig --level 2345 pulse on
[rs1/rs2]
service iptables save
chkconfig --level 2345 iptables on
[注意]
route 和 route backup 互为备份,没有主次之分(注意每个配置文件的backup和backup_private)
route backup 是route的备份
route 是route backup的备份
10.0.0.50个虚拟ip地址同一时刻只出现在1个router上,当前router当机以后,这个ip地址会被另一台备份机器接管