DirectShow在DirectX9 3D上的纹理播放
DirectShow在DirectX9 3D上的纹理播放
作者:Kagula
日期:2009-3-30
环境:
[1] Microsoft DirectX SDK (November 2008)
[2] Windows SDK_6.0.6001.18000.367
[3]Visual Studio 2005
读者对象:
[1]掌握DirectX 9 GRAPH基础知识
[2]熟悉DXUT和C++语言编程
[3]计算机专业英语基础
[4]了解COM(非必须的)
内容概述:
根据Windows SDK中,DirectShow 3D纹理播放的例子,做一次学习总结。正文部份内容直接copy自Microsoft的英文文档,建议英语不好的人慎入。
这里关注的是DXUT(Direct3D)中使用DirectShow的问题。
现在的DirectShow已经被Microsoft移到了Windows SDK中。
正文:
第一部份:介绍DirectShow
下图是DirectShow播放AVI的原理。
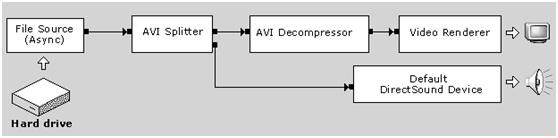
图一DirectShow播放原理图
The Video Renderer filter (即上图中的Video Renderer) draws the frames to the display, using DirectDraw or GDI. The Default DirectSound Device filter plays the audio stream, using DirectSound

图二 DirectShow编程模式图
图二,从左到右是每个DirectShow应用程序都要经历的步骤:
第一步:
建立Filter Graph Manager实例。
第二步:
Building a filter graph。
第三步:
The application uses the Filter Graph Manager to control the filter graph and stream data through the filters. Throughout this process, the application will also respond to events from the Filter Graph Manager。
图二中,从Step2开始底部的那些小框框就是Filter(过滤器)。
数据就像一条水流,经过一个个过滤器处理,最后被还原成Frame交给DirectDraw或GDI。
现在可以看下Microsoft DirectShow 9.0中的例子“How To Play a File”,加深概念上的认识。
第二部份:Prepare, DXUT中封装DirectShow
如果你对上面这个例子已经熟悉,打开下面的文件夹
你的Win SDK安装目录/Microsoft SDKs/Windows/v6.1/
Samples/Multimedia/DirectShow/Players/Texture3D9
现在我们可以看一下Texture3D9这个例子。它把AVI文件的每一帧,放在纹理上,实现在纹理上播放AVI文件。我对它进行了剥离使之能够和我现有的DirectX9(DXUT)融合,事实上证明在DXUT中使用DirectShow来实现纹理播放是很容易的。
在对DirectShow初始化的时候,设置了回调类,使得3D上的纹理坐标和纹理能够被及时刷新。
我把DirectShow的调用封装在了C3DAVIShow这个类中,而回调函数被放在CTextureRender这个Class中,同时使用了CLock类,防止纹理对象的读取冲突。
第三部份:Let’s do it
让我们首先建立C3DAVIShow这个Class.
下面是C3DAVIShow.h的部份代码
C3DAVIShow.h
// 这里省略若干行代码
class C3DAVIShow:public CDX9Obj // CDX9Obj是个抽象类,仅定义接口标准。
{
// 这里省略若干行代码
//应用程序准备退出,时调用,当用户退出程序,OnPrepareAppExit会被调用,其次再调用OnLostDevice,其次再调用OnDestroyDevice
void OnPrepareAppExit();
// UpgradeGeometry用来更新几何体的纹理坐标,我这里的几体体是由两个三角形组成的一个平面。
HRESULT UpgradeGeometry(LONG lActualW, LONG lTextureW,LONG lActualH, LONG lTextureH );
// InitDShowTextureRenderer用来初始化DirectShow
HRESULT InitDShowTextureRenderer();
// 这里省略若干行代码
public:
LPDIRECT3DVERTEXBUFFER9 m_pVB; // Buffer to hold vertices
LPDIRECT3DTEXTURE9 m_pTexture; // Our texture
D3DFORMAT m_TextureFormat;
// 下面是DirectShow用到的对象,这里不是必须得使用static,已经写成这样就懒得改了。
static SmartPtr<IGraphBuilder> m_pGB; // GraphBuilder
static SmartPtr<IMediaControl> m_pMC; // Media Control
static SmartPtr<IMediaPosition> m_pMP; // Media Position
static SmartPtr<IMediaEvent> m_pME; // Media Event
static SmartPtr<IBaseFilter> m_pRenderer; // our custom renderer
static SmartPtr<IBaseFilter> m_pFSrc; // Source Filter
static SmartPtr<IPin> m_pFSrcPinOut; // Source Filter Output Pin
REFTIME m_pTime; // DirectShow当前播放位置
};
看了头文件,你应该已经知道哪些东西,在本文中我们要特别关注。
现在看C3DAVIShow.cpp源码。
// 这里省略若干行代码
//OnCreateDevice中设定m_pTime当前播放位置为最begin。
//当用户缩放窗口时需要重新建立DirectShow对象,程序需要m_pTime来暂时保存当前播放进度,使得
//当设备Reset的时候,让DirectShow能够知道从什么地方开始接着播放。
HRESULT C3DAVIShow::OnCreateDevice( IDirect3DDevice9* pd3dDevice, const D3DSURFACE_DESC* pBackBufferSurfaceDesc,
void* pUserContext )
{
m_pTime = 0.0;
return S_OK;
}
void C3DAVIShow::OnLostDevice( void* pUserContext )
{
// 代码段读取当前播放进度
m_pMC->Stop();
m_pMP->get_CurrentPosition(&m_pTime);
// 释放DirectShow资源、顶点缓存、纹理缓存
Cleanup();
}
//OnResetDevice是C3DAVIShow的核心,它建立顶点缓存、调用InitDShowTextureRenderer初始化//DirectShow
HRESULT C3DAVIShow::OnResetDevice( IDirect3DDevice9* pd3dDevice, const D3DSURFACE_DESC* pBackBufferSurfaceDesc,
void* pUserContext )
{
HRESULT hr=S_OK;
// 下面的代码建立顶点缓存并初始化纹理坐标,它是由两个三角形组成的一个平面。
// Create the vertex buffer.
if( FAILED( pd3dDevice->CreateVertexBuffer( 4 * sizeof( CUSTOMVERTEX ),
0, FVF, D3DPOOL_DEFAULT, &m_pVB, NULL ) ) )
{
return E_FAIL;
}
// Fill the vertex buffer. We are setting the tu and tv texture
// coordinates, which range from 0.0 to 1.0
CUSTOMVERTEX* pVertices;
if( FAILED( m_pVB->Lock( 0, 0, ( void** )&pVertices, 0 ) ) )
return E_FAIL;
int i=0;
//注意v轴的单位,选负数!
//左下角
pVertices[i].position.x = m_v3Position.x ; pVertices[i].position.y = m_v3Position.y + m_fHeight; pVertices[i].position.z = m_v3Position.z;
pVertices[i].color = 0xffffffff;
pVertices[i].tu = 0.0f;
pVertices[i].tv = 1.0f;
i++;
//左上角
pVertices[i].position = m_v3Position;
pVertices[i].color = 0xffffffff;
pVertices[i].tu = 0.0f;
pVertices[i].tv = 0.0f;
i++;
//右下角
pVertices[i].position.x = m_v3Position.x + m_fWidth; pVertices[i].position.y = m_v3Position.y + m_fHeight; pVertices[i].position.z = m_v3Position.z;
pVertices[i].color = 0xffffffff;
pVertices[i].tu = 1.0f;
pVertices[i].tv = 1.0f;
i++;
//右上角
pVertices[i].position.x = m_v3Position.x + m_fWidth; pVertices[i].position.y = m_v3Position.y; pVertices[i].position.z = m_v3Position.z;
pVertices[i].color = 0xffffffff;
pVertices[i].tu = 1.0f;
pVertices[i].tv = 0.0f;
m_pVB->Unlock();
// 上面的代码建立顶点缓存并初始化纹理坐标,它是由两个三角形组成的一个平面。
hr = InitDShowTextureRenderer(); //初始化DirectShow,它会间接建立纹理
return hr;
}
// OnDestroyDevice释放纹理缓存和顶点缓存
void C3DAVIShow::OnDestroyDevice( void* pUserContext )
{
SAFE_RELEASE(m_pTexture);
SAFE_RELEASE(m_pVB);
}
void C3DAVIShow::OnFrameRender( IDirect3DDevice9* pd3dDevice, double fTime, float fElapsedTime, void* pUserContext )
{
// 部份代码略,关于如何设置pd3dDevice以及TextureStage请参考WinSDK中Texture3D9这个例子。
// Setup our texture. Using Textures introduces the texture stage states,
// which govern how Textures get blended together (in the case of multiple
// Textures) and lighting information. In this case, we are modulating
// (blending) our texture with the diffuse color of the vertices.
pd3dDevice->SetTexture( 0, m_pTexture );
// Render the vertex buffer contents
pd3dDevice->SetStreamSource( 0, m_pVB, 0, sizeof( CUSTOMVERTEX ) );
pd3dDevice->SetVertexShader( NULL );
pd3dDevice->SetPixelShader( NULL );
pd3dDevice->SetFVF( FVF );
pd3dDevice->DrawPrimitive( D3DPT_TRIANGLESTRIP, 0, 2 );
}
// UpgradeGeometry用来更新纹理坐标,DirectShow的回调函数会调用这个function
HRESULT C3DAVIShow::UpgradeGeometry(LONG lActualW, LONG lTextureW,LONG lActualH, LONG lTextureH )
{
HRESULT hr = S_OK;
if( 0 == lTextureW || 0 == lTextureH )
{
return E_INVALIDARG;
}
FLOAT tuW = (FLOAT)lActualW / (FLOAT)lTextureW;
FLOAT tvH = (FLOAT)lActualH / (FLOAT)lTextureH;
// Fill the vertex buffer. We are setting the tu and tv texture
// coordinates, which range from 0.0 to 1.0
CUSTOMVERTEX* pVertices;
if ( FAILED( hr = m_pVB->Lock( 0, 0, (void**)&pVertices, 0 ) ) )
{
//Msg(TEXT("Could not lock the vertex buffer! hr=0x%x"), hr);
return E_FAIL;
}
int i=0;
//注意v轴的单位,选负数!
//左下角
pVertices[i].tu = 0.0f;
pVertices[i].tv = 1.0f*tvH;
i++;
//左上角
pVertices[i].tu = 0.0f;
pVertices[i].tv = 0.0f;
i++;
//右下角
pVertices[i].tu = 1.0f*tuW;
pVertices[i].tv = 1.0f*tvH;
i++;
//右上角
pVertices[i].tu = 1.0f*tuW;
pVertices[i].tv = 0.0f;
m_pVB->Unlock();
return S_OK;
}
//-----------------------------------------------------------------------------
// InitDShowTextureRenderer : Create DirectShow filter graph and run the graph
//-----------------------------------------------------------------------------
HRESULT C3DAVIShow::InitDShowTextureRenderer()
{
HRESULT hr = S_OK;
CTextureRenderer *pCTR=0; // DirectShow Texture renderer
// Create the filter graph
hr = CoCreateInstance(CLSID_FilterGraph, NULL, CLSCTX_INPROC_SERVER, IID_IGraphBuilder, (void**)&m_pGB);
if (FAILED(hr))
return E_FAIL;
// Create the Texture Renderer object
pCTR = new CTextureRenderer(NULL, &hr);
pCTR->m_pAVIShow = this;
if (FAILED(hr) || !pCTR)
{
delete pCTR;
//Msg(TEXT("Could not create texture renderer object! hr=0x%x"), hr);
return E_FAIL;
}
// Get a pointer to the IBaseFilter on the TextureRenderer, add it to graph
m_pRenderer = pCTR;
if (FAILED(hr = m_pGB->AddFilter(m_pRenderer, L"TEXTURERENDERER")))
{
//Msg(TEXT("Could not add renderer filter to graph! hr=0x%x"), hr);
return hr;
}
// Determine the file to load based on windows directory
// Use the standard win32 API to do this.
TCHAR strFileName[MAX_PATH] = {L"avi3gp.avi"}; // 别忘记你需要重新设置文件名
WCHAR wFileName[MAX_PATH];
strFileName[MAX_PATH-1] = 0; // NULL-terminate
wFileName[MAX_PATH-1] = 0; // NULL-terminate
(void)StringCchCopyW(wFileName, NUMELMS(wFileName), strFileName);
// Add the source filter to the graph.
hr = m_pGB->AddSourceFilter (wFileName, L"SOURCE", &m_pFSrc);
// If the media file was not found, inform the user.
if (hr == VFW_E_NOT_FOUND)
{
// Msg(TEXT("Could not add source filter to graph! (hr==VFW_E_NOT_FOUND)/r/n/r/n")
// TEXT("This sample reads a media file from your windows directory./r/n")
// TEXT("This file is missing from this machine."));
return hr;
}
else if(FAILED(hr))
{
//Msg(TEXT("Could not add source filter to graph! hr=0x%x"), hr);
return hr;
}
if (FAILED(hr = m_pFSrc->FindPin(L"Output", &m_pFSrcPinOut)))
{
//Msg(TEXT("Could not find output pin! hr=0x%x"), hr);
return hr;
}
// Get the graph's media control, event & position interfaces
m_pGB.QueryInterface(&m_pMC);
m_pGB.QueryInterface(&m_pMP);
m_pGB.QueryInterface(&m_pME);
// Render the source filter's output pin. The Filter Graph Manager
// will connect the video stream to the loaded CTextureRenderer
// and will load and connect an audio renderer (if needed).
if (FAILED(hr = m_pGB->Render(m_pFSrcPinOut)))
{
//Msg(TEXT("Could not render source output pin! hr=0x%x"), hr);
return hr;
}
// Start the graph running;
hr = m_pMP->put_CurrentPosition(m_pTime);
if( S_OK == hr )
{
hr = m_pMC->Run();
}
return S_OK;
}
// CleanupDShow用来释放DirectShow资源
void C3DAVIShow::CleanupDShow()
{
if (!(!m_pMC)) m_pMC->Stop();
if (!(!m_pMC)) m_pMC.Release();
if (!(!m_pME)) m_pME.Release();
if (!(!m_pMP)) m_pMP.Release();
if (!(!m_pGB)) m_pGB.Release();
if (!(!m_pFSrc)) m_pFSrc.Release(); // Source Filter
if (!(!m_pFSrcPinOut)) m_pFSrcPinOut.Release(); // Source Filter Output Pin
if (!(!m_pRenderer)) m_pRenderer.Release();
}
//Cleanup释放全部资源
void C3DAVIShow::Cleanup()
{
CleanupDShow();
SAFE_RELEASE(m_pTexture);
SAFE_RELEASE(m_pVB);
}
上面的代码是核心,剩下的就简单了,让我们来看一下TextureRenderer.h文件的内容
//这里省略若干行代码,具体你可以参考WinSDK中Texture3D9这个例子。
//-----------------------------------------------------------------------------
// CTextureRenderer Class Declarations
//-----------------------------------------------------------------------------
class CTextureRenderer : public CBaseVideoRenderer
{
public:
CTextureRenderer(LPUNKNOWN pUnk,HRESULT *phr);
~CTextureRenderer();
public:
HRESULT CheckMediaType(const CMediaType *pmt ); // Format acceptable?
HRESULT SetMediaType(const CMediaType *pmt ); // Video format notification
HRESULT DoRenderSample(IMediaSample *pMediaSample); // New video sample
BOOL m_bUseDynamicTextures;
LONG m_lVidWidth; // Video width
LONG m_lVidHeight; // Video Height
LONG m_lVidPitch; // Video Pitch
C3DAVIShow *m_pAVIShow; // 这行代码是我新增加的。这是为了能够让回调函数
//访问C3DAVIShow中的m_pTexture(纹理指针位置)、UpdateGeometry(更新纹理坐标)等对象
};
下面是TextureRenderer.cpp文件代码清单
//省略部份代码…
extern CLock g_Lock; //线程锁,防止OnFrameRender、OnLostDevice、OnResetDevice发生时,
//CTextureRenderer还在更新m_pTexture。这会导致DXUT调用3d设备reset失败!
//省略部份代码…
//-----------------------------------------------------------------------------
// SetMediaType: Graph connection has been made.
//-----------------------------------------------------------------------------
HRESULT CTextureRenderer::SetMediaType(const CMediaType *pmt)
{
g_Lock.Lock(); //线程锁定
//省略部份代码…
if( caps.TextureCaps & D3DPTEXTURECAPS_POW2 )
{
//省略部份代码…
m_pAVIShow->UpgradeGeometry( m_lVidWidth, uintWidth, m_lVidHeight, uintHeight);
}
//省略部份代码…
if( m_bUseDynamicTextures )
{
//新建纹理,并把它存放在m_pAVIShow->m_pTexture中。
hr = DXUTGetD3D9Device()->CreateTexture(uintWidth, uintHeight, 1, D3DUSAGE_DYNAMIC,
D3DFMT_X8R8G8B8,D3DPOOL_DEFAULT,
&m_pAVIShow->m_pTexture, NULL);
//省略部份代码…
}
g_Lock.Unlock(); //解除线程锁定
return hr;
}
//SetMeidaType中的线程锁定不是必须的J 即然写了就懒得改了。
// DoRenderSample必须进行线程锁定
//-----------------------------------------------------------------------------
// DoRenderSample: A sample has been delivered. Copy it to the texture.
//-----------------------------------------------------------------------------
HRESULT CTextureRenderer::DoRenderSample( IMediaSample * pSample )
{
g_Lock.Lock(); //锁定
//省略部份代码…
g_Lock.Unlock(); //解除锁定
return hr;
}
第四部份:编译&链接
额外加上这一部份,编译链接上我也碰到了些问题,以下几点或许对你有帮忙。
[1][项目属性]->[链接器]->[清单文件]->[生成清单] 把它设为Yes
[2]如果你把[项目属性]->[链接器]->[输入]->[忽略所有默认库]选项设为Yes 你将不能正常使用STL。如果你只用到STL中的一个容器,比如Vector 最好的解决办法是自己写一个精简版Vector,只让你多花十分钟,但是避免了很多不必要的麻烦。
[3]别忘记 把[你的安装目录]Microsoft SDKs/Windows/v6.1/Samples/Multimedia/DirectShow/Common/中的文件加入到你的项目中。
[4] 编译[你的安装目录]/Windows/v6.1/Samples/Multimedia/DirectShow/BaseClasses项目,分别生成DEBUG版本和RELEASE版本的LIB文件,你项目链接的时候,会用的到它们,具体请参考Win SDK中DirectShow文档。
备注:
[1] 在创建时使用D3DPOOL_DEFAULT标志指定把资源放在默认的池中。在默认的池中的资源在设备从丢失状态到操作状态的转换过程中不持续存在,这些资源必须在调用Reset之前释放,然后重建。
附:
参考资料:
[1]《directx中丢失的设备(lost device)》
http://hi.baidu.com/zxc8/blog/item/c75e12fa538af41ba8d31116.html/cmtid/e285d11f071fe1fce0fe0bcf