Scott Mitchell 的ASP.NET 2.0数据教程之51章:为GridView控件添加Radio Buttons列
第51到53章为优化GridView系列
本章英文原版以及代码下载:
http://www.asp.net/learn/dataaccess/tutorial51cs.aspx?tabid=63
Scott Mitchell 的ASP.NET 2.0数据教程之51章:为GridView控件添加Radio Buttons列
导言:
GridView控件提供了大量的内置功能。它包含了一系列的域(field)来显示诸如text、images、hyperlinks和buttons。另外它支持模板(template)用于用户自定义界面。我们可以构建这样一个GridView控件,用户仅需要点击控件里的一个按钮,每一条记录行都可以选择、编辑、删除。除了控件本身内置的功能外,在某些情况下,我们添加一些额外的、控件没有内置的功能。在本章及接下来的2篇教程里我们将探讨如何优化GridView,以支持额外的功能。
本篇及接下来的教程将主要探讨优化行选择程序(row-selection process),就像在教程《使用 GridView 和DetailView实现的主/从报表》里考察的一样,我们在GridView控件里添加一个包含选择按钮的命令域(CommandField),点击该按钮后产生回传(postback),所选行的index值传给GridView控件的SelectedIndex属性。在那篇教程里我们看到了如何使用该功能显示所选行的详细信息。
除了Select button,我们经常在用户界面包含radio button和checkbox用于选择记录。在某些情况下我们可以对GridView扩充,在每条记录里用radio button或checkbox替换掉Select button。比如,我们只希望选择GridView记录中的一条时,用radio button比用Select button好;再比如,当用户要选择多条记录时——就像在邮箱里同时删除几份邮件一样,用checkbox是最好的。本教程先考察为GridView添加radio buttons,再考察添加checkboxes。
第一步:创建优化GridView的Web页面
在开始之前让我们在网站项目里创建一个本节及后面2节要用到的ASP.NET页面。新建一个名为EnhancedGridView的文件夹,然后,添加如下所示的页面,确保使用Site.master母版。
Default.aspx
RadioButtonField.aspx
CheckBoxField.aspx
InsertThroughFooter.aspx
图1:添加相关页面
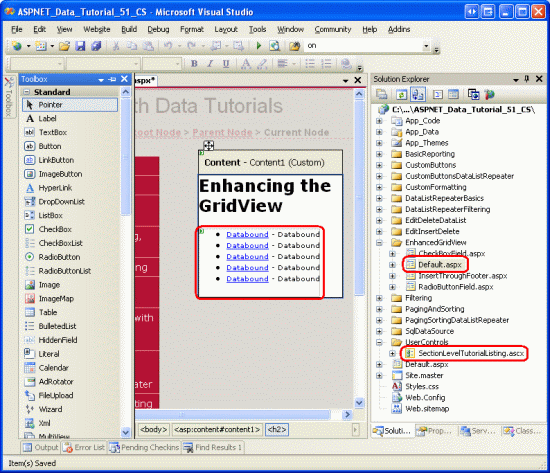
像其它文件夹一样,Default.aspx页面将显示本节的所有教程。记得用户控件SectionLevelTutorialListing.ascx提供该功能,从解决方案管理器里将其拖到Default.aspx页面上。
图2:添加用户控件SectionLevelTutorialListing.ascx
最后,将这4篇教程添加到Web.sitemap文件里,特别的,加在“Using the SqlDataSource Control” <siteMapNode>后:
<siteMapNode
title="Enhancing the GridView"
url="~/EnhancedGridView/Default.aspx"
description="Augment the user experience of the GridView control.">
<siteMapNode
url="~/EnhancedGridView/RadioButtonField.aspx"
title="Selection via a Radio Button Column"
description="Explore how to add a column of radio buttons in the GridView." />
<siteMapNode
url="~/EnhancedGridView/CheckBoxField.aspx"
title="Selection via a Checkbox Column"
description="Select multiple records in the GridView by using a column of
checkboxes." />
<siteMapNode
url="~/EnhancedGridView/InsertThroughFooter.aspx"
title="Add New Records through the Footer"
description="Learn how to allow users to add new records through the
GridView's footer." />
</siteMapNode>
完成后,花几分钟在浏览器查看该系列教程,如图所示:
图3:Site Map里完整地列出了本系列教程
第2步:在GridView控件里显示供应商
让我们创建一个GridView控件,用于显示来自美国的供应商列表,同时每行记录包含一个radio button。当点击radio button后,用户将查看到供应商提供的产品。在开始具体研究如何实现以前,我们先创建一个显示供应商的GridView。
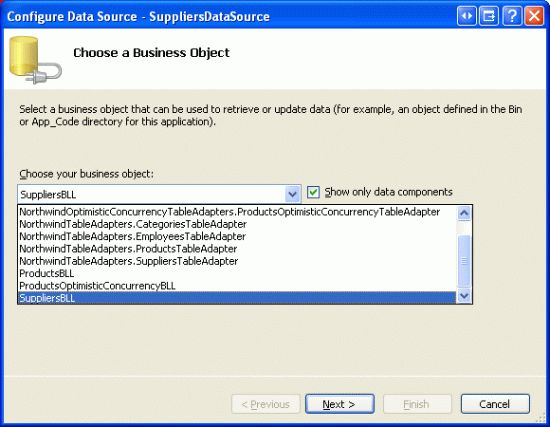
在文件夹EnhancedGridView里打开adioButtonField.aspx页面,进入设计模式,从工具箱拖一个GridView到页面。设其ID为Suppliers,在智能标签里选“创建新数据源”,特别的,我们选用ObjectDataSource,命名为SuppliersDataSource,然后选用SuppliersBLL 。
图4:创建一个名为SuppliersDataSource的ObjectDataSource
图5:设置该ObjectDataSource使用SuppliersBLL类
因为我们只想列出来自美国的供应商,在SELECT选项卡的下拉列表里选择 GetSuppliersByCountry(country)方法。
图6:设置该ObjectDataSource使用SuppliersBLL类(原文如此)
在UPDATE选项卡选择“(None)”,点下一步
图7:设置该ObjectDataSource使用SuppliersBLL类(原文如此)
因为GetSuppliersByCountry(country)方法需要接受一个参数,向导提示我们设置参数源,在这里我们指定一个“硬编码”值(就本例而言,我们指定USA),在数据源下拉列表里选“None”,在指定值文本框输入“USA”。点“完成”结束向导设置。
图8:为参数country使用默认值“USA”
只保留GridView里的CompanyName, City和Country三列(BoundFields),其余的全部删除。同时将CompanyName列的HeaderText属性改为“Supplier”。设置完以后, GridView和ObjectDataSource控件的声明代码看起来和下面的差不多:
<asp:GridView ID="Suppliers" runat="server" AutoGenerateColumns="False"
DataKeyNames="SupplierID" DataSourceID="SuppliersDataSource"
EnableViewState="False">
<Columns>
<asp:BoundField DataField="CompanyName" HeaderText="Supplier"
SortExpression="CompanyName" />
<asp:BoundField DataField="City" HeaderText="City"
SortExpression="City" />
<asp:BoundField DataField="Country" HeaderText="Country"
SortExpression="Country" />
</Columns>
</asp:GridView>
<asp:ObjectDataSource ID="SuppliersDataSource" runat="server"
OldValuesParameterFormatString="original_{0}"
SelectMethod="GetSuppliersByCountry" TypeName="SuppliersBLL">
<SelectParameters>
<asp:Parameter DefaultValue="USA" Name="country" Type="String" />
</SelectParameters>
</asp:ObjectDataSource>
在本篇教程,当点击某个供应商时,将在本业或另一页显示该供应商提供的产品。为达到该目的,我们在页面添加2个Button Web控件。ID分别为ListProducts和
SendToProducts,当点击ListProducts按钮时,发生回传(postback),接着将在本页面显示该供应商的产品,当点击SendToProducts按钮时,将会链接到另一个页面,显示该供应商的产品。
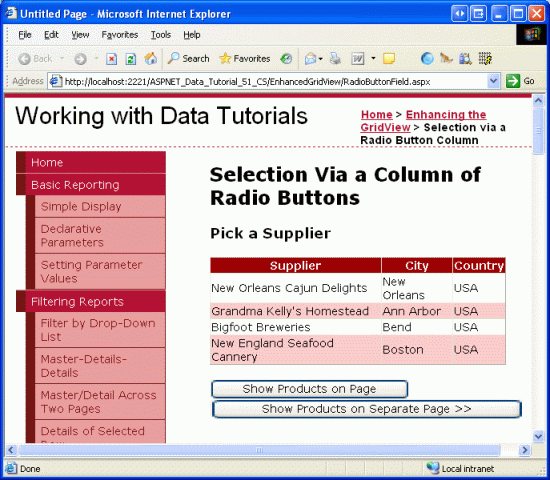
图9显示了GridView控件和添加的两个Button Web控件。
图9:显示供应商的 Name, City和Country信息
第3步:添加Radio Buttons列
至此,GridView里包含company name, city和country三列,但还缺少radio buttons列。不幸的是GridView控件并不包含内置的RadioButtonField,因此只有我们自己手动添加。我们可以添加一个模板(TemplateField)并在其ItemTemplate模板里显示一个radio button。这样的话就为GridView控件的每一行记录添加了一个radio button。
我们首先可能会想到直接在TemplateField的ItemTemplate模版里添加一个RadioButton Web控件。不错,这样将为每一行添加radio button,但是这些radio button不能聚合,因此不能形成互斥关系。造成的后果是,最终用户可以在GridView控件里同时选定多个radio button按钮。
虽然这样做不能到达我们期望的要求,不过还是值得我们花时间来考察一下为什么这些radio button不能聚合。首先,为GridView添加一个TemplateField,放置在最左边,然后智能标签里选“编辑模板”,进入TemplateField的ItemTemplate 模板,从工具箱拖一个Radio Button控件到模板(见图10),设置其ID为RowSelector , GroupName属性为SuppliersGroup。
图10:在ItemTemplate模板添加一个RadioButton控件
完成设置后,GridView的代码看起来应和下面的差不多:
<asp:GridView ID="Suppliers" runat="server" AutoGenerateColumns="False"
DataKeyNames="SupplierID" DataSourceID="SuppliersDataSource"
EnableViewState="False">
<Columns>
<asp:TemplateField>
<ItemTemplate>
<asp:RadioButton ID="RowSelector" runat="server"
GroupName="SuppliersGroup" />
</ItemTemplate>
</asp:TemplateField>
<asp:BoundField DataField="CompanyName" HeaderText="Supplier"
SortExpression="CompanyName" />
<asp:BoundField DataField="City" HeaderText="City"
SortExpression="City" />
<asp:BoundField DataField="Country" HeaderText="Country"
SortExpression="Country" />
</Columns>
</asp:GridView>
RadioButton的GroupName属性的作用在于:具有相同GroupName值的RadioButton控件被认为是一个组,在一个组里面只有一个控件可以被选择(即具有互斥性)。GroupName属性为radio button的名称特征(nameattribute)指定值,浏览器检查radio button的名称特征,再对其分组。
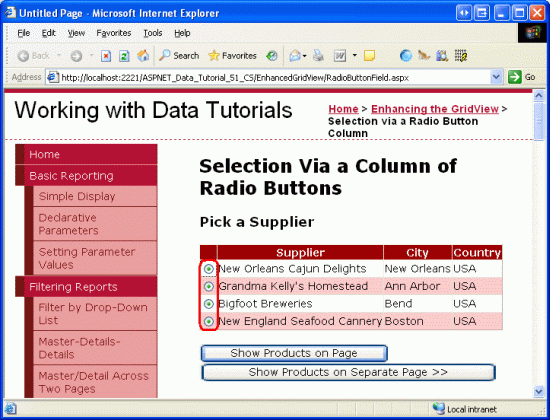
在浏览器里查看页面,选择所有行,可以看出这些radio button并没有聚合(也就是不具有互斥性),如图11所示:
图11:GridView的Radio Buttons没有聚合。
不能聚合的原因在于:尽管将他们的GroupName属性设置为相同的,但提交的名称属性是不同的。在浏览器里点查看/源代码,检查这些radio button的代码:
<input id="ctl00_MainContent_Suppliers_ctl02_RowSelector"
name="ctl00$MainContent$Suppliers$ctl02$SuppliersGroup"
type="radio" value="RowSelector" />
<input id="ctl00_MainContent_Suppliers_ctl03_RowSelector"
name="ctl00$MainContent$Suppliers$ctl03$SuppliersGroup"
type="radio" value="RowSelector" />
<input id="ctl00_MainContent_Suppliers_ctl04_RowSelector"
name="ctl00$MainContent$Suppliers$ctl04$SuppliersGroup"
type="radio" value="RowSelector" />
<input id="ctl00_MainContent_Suppliers_ctl05_RowSelector"
name="ctl00$MainContent$Suppliers$ctl05$SuppliersGroup"
type="radio" value="RowSelector" />
我们注意到,这里的name和id值和在属性窗口指定的准确值(exact values)相比,在开头多了一些其它ID值(比如id="ctl00_MainContent_Suppliers_ctl02_RowSelector" 和ID="RowSelector"相比),这些多出来的IDs值来自于这些 radio buttons的父级控件(parent controls)——GridViewRow、GridView、Content control以及Web Form。加上这些IDs的目的是使GridView控件里的每个rendered Web control(具体到本例就是这些radio button)具有唯一的id值和name值。
这样做的原因在于:在客户端,便于浏览器区分每个rendered control(比如本章的radio button);在网络服务器端,便于服务器区分当页面回传时发生了什么事件或改变。比如,无论何时,当一个 RadioButton的选中状态(checked state)发生改变时,我们希望运行某些服务器端代码。为此,我们可以将RadioButton的AutoPostBack属性设置为true,同时为CheckChanged事件创建一个事件处理器。如果每个radio buttons的name和id值相同的话,当发生页面回转时,我们不能确定到底点击了哪个RadioButton。
这样做的缺点在于,我们不能用RadioButton Web 控件在GridView里创建一个radio button列。因此,我们必须在GridView row里添加适当的代码。
注意:
和RadioButton Web控件一样,当把radio button HTML控件添加到模板时,它也会包含唯一的名称特征。如果你不熟悉HTML控件,没关系,因为很少使用它,尤其在ASP.NET 2.0里。如果有兴趣了解更多,见 K. Scott Allen的博客里的文章Web Controls and HTML Controls.
用Literal控件注入Radio Button代码
为了在GridView控件里对radio buttons进行聚合,我们要在ItemTemplate模板里手动注入radio button代码。每个radio button具有相同的name特性,但id特性必须是唯一的(因为我们可能需要通过客户端脚本访问某个radio button)。因为当用户选择了一个radio button,页面回传后,浏览器将返回该按钮的一个值,所以每个radio button要具备一个唯一值特性(unique value attribute)。最后,当选择一个radio button后,我们应确保为该按钮添加checked属性。另外,用户做了选择并发生回传后,radio button将回到默认状态(可任意指定)。
可以有2种方法在模板里注入代码。其中一种是在代码里调用定义在后台代码类(code-behind class)里的方法,并使用格式化的形式。这个方法我们在教程《在GridView控件中使用TemplateField》里论述过。在本例,代码看起来像这个样子:
<input type="radio" id='<%# GetUniqueRadioButtonID(...) %>'
name='SuppliersGroup' value='<%# GetRadioButtonValue(...) %>' ... />
其中,GetUniqueRadioButton和GetRadioButtonValue是定义在后台代码类里的方法,其作用是返回特定的id和value值。用这种可以对radio button的id属性和 value属性赋值,但不能对checked属性赋值。因为只有当数据第一次绑定到该GridView控件时,数据绑定语法才能成功执行。所以只有当启用GridView的试图状态,并且是第一次登录页面(或者明确的让GridView重新绑定数据源)时这种格式化的方法才能奏效。所以,当页面发生回传时,对checked属性赋值的这个功能是失效的。这个问题有点超出了本教程的范围,所以在这里我将它搁置一边,然而我仍然鼓励你用上面的这个方法。这个练习将使你更深入的理解GridView以及数据绑定的生命周期。
第2种,也是本教程要用的方法是在模板里添加一个Literal控件。在GridView的RowCreated或RowDataBound事件处理器里,我们可以通过编程来访问Literal控件,并设置其Text属性。
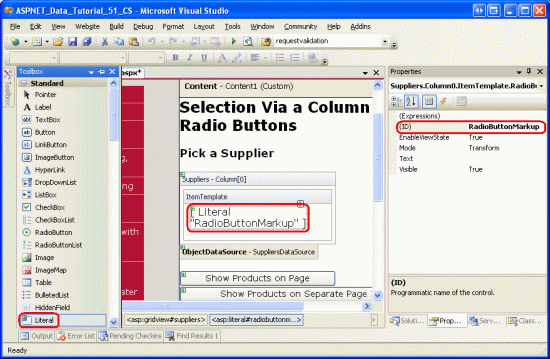
在TemplateField的ItemTemplate模板里,移除RadioButton控件,换成Literal控件,设其ID为RadioButtonMarkup。
图12:在ItemTemplate模板里添加一个Literal控件
然后,为GridView的RowCreated事件创建事件处理器。RowCreated事件是这样的,不管数据是不是重新绑定到GridView,只要在GridView里新增一行记录就将引发RowCreated事件。那意味着,当发生回传事件时,哪怕数据来自视图状态,也会引发RowCreated事件。我们使用RowCreated事件而不使用RowDataBound事件的原因在于,只有当数据明确的绑定到数据Web控件时才会引发RowDataBound事件.
在RowCreated事件处理器里,我们处理的是某一行记录。对每一行记录,我们通过编程引用Literal控件RadioButtonMarkup,然后在其Text属性里声明代码。比如下面的代码,我们创建一个radio button ,设置其name属性为SuppliersGroup,id属性为RowSelectorX,其中X代表 GridView row的index值,将value属性也设置为GridView row的index值。
protected void Suppliers_RowCreated(object sender, GridViewRowEventArgs e)
{
if (e.Row.RowType == DataControlRowType.DataRow)
{
// Grab a reference to the Literal control
Literal output = (Literal)e.Row.FindControl("RadioButtonMarkup");
// Output the markup except for the "checked" attribute
output.Text = string.Format(
@"<input type=""radio"" name=""SuppliersGroup"" " +
@"id=""RowSelector{0}"" value=""{0}"" />", e.Row.RowIndex);
}
}
当选择GridView控件的某条记录时,我们关心的是该供应商的SupplierID值。我们首先会想到让radio button的value属性返回该SupplierID值(而不是该条记录的index值)。然而这样盲目地获取并传递一个SupplierID值是很危险的。以我们的GridView控件为例,它列出了所有的美国供应商,如果我们直接通过radio button来传递SupplierID,我们无法阻止一个带有恶意的用户对回传过来的SupplierID造假。通过将value属性设置为某条记录的index值,当发生页面回传时,从DataKeys集合里获取该供应商的SupplierID值。这样的话,我们就能确保用户只能使用GridView里某个供应商的对应的SupplierID值。
添加完事件处理器代码后,花几分钟在浏览器里测试该页面,首先确保每次只能选择一个radio button。然而,当选择一个radio button并点击下面的按钮,在页面发生回传后,所有的radio button都回到最初的状态(意即,发生回传后,选中的radio button又恢复未选状态)。怎样解决这个问题呢?我们在RowCreated事件处理器里添加代码,先确定发生页面回传后,选中的那个radio button的index值,然后添加checked="checked"属性。
当发生页面回传后,浏览器返回选中的radio button的name和value值.我们可以通过编程来获取值,比如:Request.Form["name"]。Request.Form属性用一个NameValueCollection来表示form变量。在这里,form变量就是发生回转时,浏览器返回的那些names和values值。 因为GridView控件里的radio buttons的name属性是SuppliersGroup,当页面发生回转时,浏览器向网络服务器传回“SuppliersGroup=valueOfSelectedRadioButton”(连同其它form fields一起传回)。我们可以用Request.Form属性访问这些信息:Request.Form["SuppliersGroup"]
我们不仅需要在RowCreated事件处理器中确定所选radio button的index值,在Click事件处理器里同样需要。让我们在后台代码类里创建SuppliersSelectedIndex。如果没有radio button被选定则返回-1,如果有radio button被选定则返回它的index值。如下:
private int SuppliersSelectedIndex
{
get
{
if (string.IsNullOrEmpty(Request.Form["SuppliersGroup"]))
return -1;
else
return Convert.ToInt32(Request.Form["SuppliersGroup"]);
}
}
当SuppliersSelectedIndex的值与e.Row.RowIndex的值相同时,我们应在RowCreated事件处理器里添加checked="checked"代码。修改如下:
protected void Suppliers_RowCreated(object sender, GridViewRowEventArgs e)
{
if (e.Row.RowType == DataControlRowType.DataRow)
{
// Grab a reference to the Literal control
Literal output = (Literal)e.Row.FindControl("RadioButtonMarkup");
// Output the markup except for the "checked" attribute
output.Text = string.Format(
@"<input type=""radio"" name=""SuppliersGroup"" " +
@"id=""RowSelector{0}"" value=""{0}""", e.Row.RowIndex);
// See if we need to add the "checked" attribute
if (SuppliersSelectedIndex == e.Row.RowIndex)
output.Text += @" checked=""checked""";
// Add the closing tag
output.Text += " />";
}
}
经过上述修改后,选中的radio button在页面回传后仍然处于选中状态。现在我们可以指定某个radio button处于选中状态。当第一次登录页面时我们可以指定选中GridView里的第一条记录的radio button按钮(默认状态是没有一个radio button被选中,就像现在一样)。为此,我们只需简单地将
if (SuppliersSelectedIndex == e.Row.RowIndex) 改成
if (SuppliersSelectedIndex == e.Row.RowIndex || (!Page.IsPostBack && e.Row.RowIndex == 0)).
到这一步,我们为GridView创建了一个聚合的radio buttons列。它只允许选中其中的任一条记录,并在页面发生回传后仍处于选中状态。接下来,我们将显示某个选中的供应商提供的产品。在第4步,我们将看如何将用户链接到另一个显示产品的页面,并传递该供应商的SupplierID值;在第5步,我们将探讨如何在相同页面显示供应商的产品。
注意:
与其用TemplateField模板(在第3步讨论的那样),还不如创建一个自定义的DataControlField class类来构建用户界面并提供相关功能。DataControlField class是一个基本类,GridView和DetailsView控件中内置的BoundField、CheckBoxField、TemplateField等都源于它。如果创建自定义DataControlField的话,我们可以在声明代码中添加radio buttons列,复制其它页面的函数及应用程序也要容易些。
如果你在ASP.NET里创建过自定义控件的话,你应该知道那需要了解更多的知识,并且需要小心处理很多问题。因此,我们目前不用自定义DataControlField class类,还是坚持用TemplateField模板。或许我们将在以后的教程里探讨如何使用自定义DataControlField class类。
第4步:在另一个页面显示供应商的产品
在GridView里选中一条记录后,我们需要显示该供应商的产品。有时候下我们想在另一个页面显示产品,而有时候我们想在同一页面显示数据。首先,我们探讨如何在另一个页面显示产品,在第5步,我们将在RadioButtonField.aspx页面添加一个GridView显示产品。
当前,页面上有2个Button Web控件——ListProducts和SendToProducts。当点击SendToProducts时,我们希望将用户链接到位于~/Filtering/ProductsForSupplierDetails.aspx的页面。我们在教程《跨页面的主/从报表》里已经创建了该页面,供应商的SupplierID是由一个名为SupplierID的querystring field传递的。
为提供该功能,我们为SendToProducts的Click事件创建事件处理器。在第3步,我们添加了SuppliersSelectedIndex属性,用于返回所选行记录的index值。在如下代码中,相应的SupplierID可以从GridView控件的DataKeys集合获取,并转到~/Filtering/ProductsForSupplierDetails.aspx?SupplierID=SupplierID using Response.Redirect("url")页面。
protected void SendToProducts_Click(object sender, EventArgs e)
{
// Send the user to ~/Filtering/ProductsForSupplierDetails.aspx
int supplierID =
Convert.ToInt32(Suppliers.DataKeys[SuppliersSelectedIndex].Value);
Response.Redirect(
"~/Filtering/ProductsForSupplierDetails.aspx?SupplierID="
+ supplierID);
}
}
当在GridView控件里选中一个radio button时,以上代码运行正常。但是,如果最开始GridView里没有任何radio buttons被选中,而用户又点击了SendToProducts按钮,SuppliersSelectedIndex就会赋值为-1,这将会抛出一个异常,因为在DataKeys集合里没有index为-1的情况。不过没有关系,就像在第3步中探讨的一样,修改RowCreated事件处理器,使GridView默认选中第一个radio button。
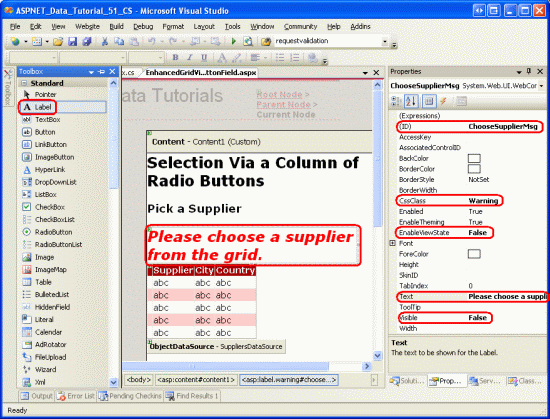
为了应对SuppliersSelectedIndex为-1的情况,我们在GridView上面添加一个Label Web控件,设其ID为ChooseSupplierMsg,CssClass 属性为Warning,EnableViewState和Visible属性为false,Text属性为“Please choose a supplier from the grid.”。定义在Styles.css文件里的CSS class Warning将文本显示为红色、斜体、大号加粗。通过将EnableViewState和Visible属性设置为false,该Label控件将不可见,除非在某些页面回传时,我们有意地通过编程将其Visible属性设置为true。
图13:在GridView控件上添加一个Label Web控件
接着,在Click事件处理器里添加代码,如果SuppliersSelectedIndex的值小于0时Label控件ChooseSupplierMsg将可见,并将用户直接链接到~/Filtering/ProductsForSupplierDetails.aspx?SupplierID=SupplierID页面:
protected void SendToProducts_Click(object sender, EventArgs e)
{
// make sure one of the radio buttons has been selected
if (SuppliersSelectedIndex < 0)
ChooseSupplierMsg.Visible = true;
else
{
// Send the user to ~/Filtering/ProductsForSupplierDetails.aspx
int supplierID =
Convert.ToInt32(Suppliers.DataKeys[SuppliersSelectedIndex].Value);
Response.Redirect(
"~/Filtering/ProductsForSupplierDetails.aspx?SupplierID="
+ supplierID);
}
}
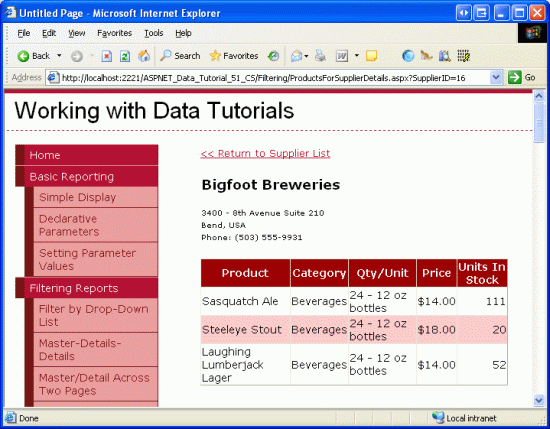
在浏览器里访问该页面,在不选供应商的情况下点击SendToProducts按钮,如图14所示,label控件ChooseSupplierMsg变为可见了。然后,选择一个供应商,再单击SendToProducts按钮,这会将你链接到一个显示该供应商产品的页面。图15显示了当选择供应商Bigfoot Breweries时,ProductsForSupplierDetails.aspx
页面的情况。
图14:未选供应商时,Label控件ChooseSupplierMsg为可见
图15:ProductsForSupplierDetails.aspx页面显示了供应商的产品
第5步:在本页显示所选供应商的产品
在第4步,我们探讨了怎样在另一页面显示供应商的产品,另外我们也可以在本页面显示产品。鉴于此,我们在RadioButtonField.aspx页面添加另一个GridView控件展示所选供应商的产品。
一旦选择一个供应商后,我们只想在GridView里显示该供应商的产品。在名为Suppliers的GridView控件下,添加一个Panel Web控件,设其ID为ProductsBySupplierPanel,将Visible属性设置为false,text属性设置为“Products for the Selected Supplier”, 紧接着添加一个名为ProductsBySupplier的GridView控件。在其智能标签里,将其绑定到一个名为ProductsBySupplierDataSource的ObjectDataSource控件。
图16:将GridView控件ProductsBySupplier绑定到一个新的ObjectDataSource
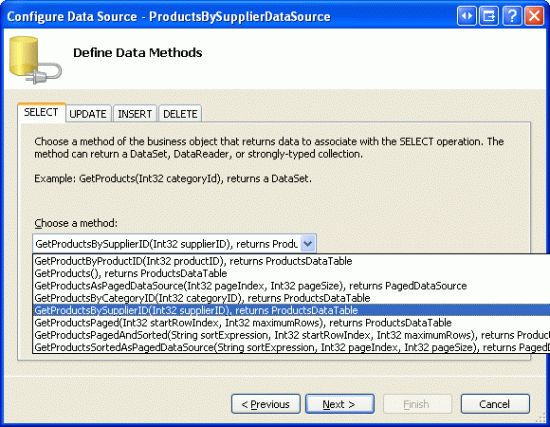
然后,将设置该ObjectDataSource使用ProductsBLL类。由于我们只想获取一个供应商的产品数据,指定该ObjectDataSource控件调用GetProductsBySupplierID(supplierID)方法,同时在UPDATE, INSERT和DELETE选项卡的下拉列表里选“(None)” 。
图17:指定该ObjectDataSource控件调用GetProductsBySupplierID(supplierID)方法
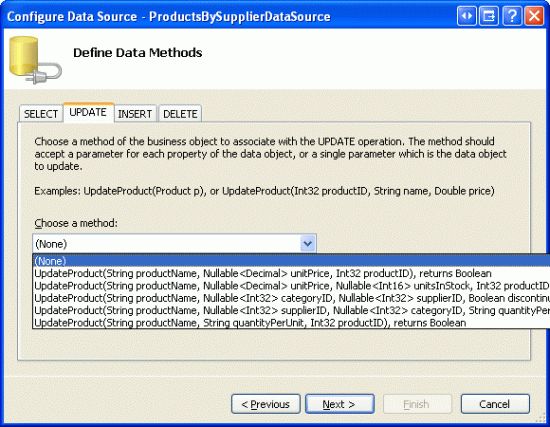
图18:在UPDATE, INSERT和DELETE选项卡的下拉列表里选“(None)”
完成对SELECT, UPDATE, INSERT和DELETE选项卡的设置后,点下一步。因为GetProductsBySupplierID(supplierID)方法需要一个输入参数,因此向导提示我们指定参数值的来源。
我们有几种选择指定参数值来源。我们可以使用默认值,也可以在ObjectDataSource控件的Selecting事件处理器里,通过编程的方式,用SuppliersSelectedIndex属性的值对Parameter的DefaultValue属性赋值。可以在前面的教程《编程设置ObjectDataSource的参数值》里温习相关内容。
此外,我们可以使用一个ControlParameter,它涉及到名为Suppliers的GridView控件的SelectedValue属性(见图19)。GridView控件的SelectedValue属性将返回与SelectedIndex属性相匹配的DataKey值。为此,当点击ListProducts按钮时,我们将编程把GridView控件的SelectedIndex属性设置为选中的那行记录。另外设置了SelectedIndex后,选中的记录将运用定义在DataWebControls主题中的SelectedRowStyle(显示为黄色背景)。
图19:用一个ControlParameter当参数源来指定GridView的SelectedValue值
完成向导后,Visual Studio将自动添加产品的数据域(data fields)。将除了ProductName, CategoryName和UnitPrice外的其它列全部删除,并将HeaderText属性分别设为“Product”, “Category”和“Price”。再将UnitPrice列格式化为货币形式。完成上述修改后,Panel, GridView和ObjectDataSource的声明代码看起来应该像下面的差不多:
<asp:Panel runat="server" ID="ProductsBySupplierPanel" Visible="False">
<h3>
Products for the Selected Supplier</h3>
<p>
<asp:GridView ID="ProductsBySupplier" runat="server"
AutoGenerateColumns="False" DataKeyNames="ProductID"
DataSourceID="ProductsBySupplierDataSource" EnableViewState="False">
<Columns>
<asp:BoundField DataField="ProductName" HeaderText="Product"
SortExpression="ProductName" />
<asp:BoundField DataField="CategoryName" HeaderText="Category"
ReadOnly="True" SortExpression="CategoryName" />
<asp:BoundField DataField="UnitPrice" DataFormatString="{0:c}"
HeaderText="Price" HtmlEncode="False"
SortExpression="UnitPrice" />
</Columns>
</asp:GridView>
<asp:ObjectDataSource ID="ProductsBySupplierDataSource" runat="server"
OldValuesParameterFormatString="original_{0}"
SelectMethod="GetProductsBySupplierID" TypeName="ProductsBLL">
<SelectParameters>
<asp:ControlParameter ControlID="Suppliers" Name="supplierID"
PropertyName="SelectedValue" Type="Int32" />
</SelectParameters>
</asp:ObjectDataSource>
</p>
</asp:Panel>
当点击ListProducts按钮时,我们需要将GridView的SelectedIndex属性设置为SelectedSuppliersIndex,并将Panel控件ProductsBySupplierPanel的Visible属性设置为true。为ListProducts按钮的Click事件创建事件处理器,添加如下代码:
protected void ListProducts_Click(object sender, EventArgs e)
{
// make sure one of the radio buttons has been selected
if (SuppliersSelectedIndex < 0)
{
ChooseSupplierMsg.Visible = true;
ProductsBySupplierPanel.Visible = false;
}
else
{
// Set the GridView's SelectedIndex
Suppliers.SelectedIndex = SuppliersSelectedIndex;
// Show the ProductsBySupplierPanel panel
ProductsBySupplierPanel.Visible = true;
}
}
如果没有从GridView里选择供应商,Label控件ChooseSupplierMsg将显示出来,而Panel控件ProductsBySupplierPanel则不可见。反之,如果选择了一个供应商,ProductsBySupplierPanel将显示出来,并且GridView的SelectedIndex属性将更新。
图20为选择供应商Bigfoot Breweries并单击“Show Products on Page”按钮后的效果图。
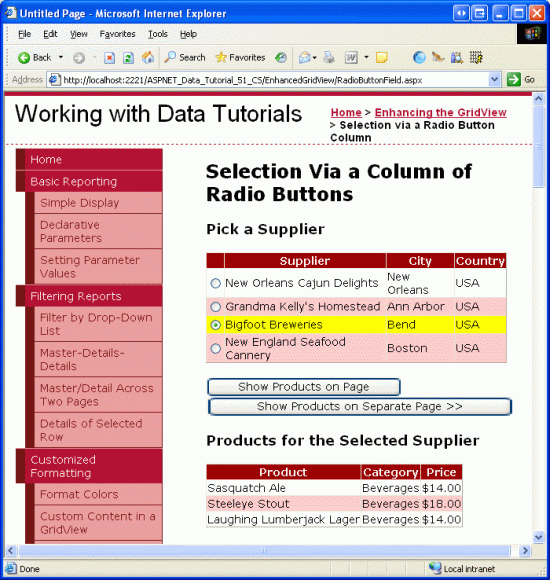
图20:在本页显示供应商Bigfoot Breweries的产品
总结:
就像在教程《使用 GridView 和DetailView实现的主/从报表》里探讨的一样,如果在GridView里使用一个CommandField,并设置其ShowSelectButton属性为true,我们就可以在GridView里选择记录。但是CommandField仅仅将其按钮显示为常规的button, link或image。在一个只能选择一条记录的用户界面里,要为每一个GridView row提供一个radio button或checkbox。本教程探究了如何添加一个radio button列。
然而,添加一个radio button列并没有想像的那么容易。没有内置的RadioButtonField供我们添加;在模板里使用RadioButton Web控件也会引发其它的问题。要创建这种用户界面,我们要么创建自定义的DataControlField类,要么在RowCreated事件里将适当的HTML注入模板。
在探讨了如何添加radio buttons列后,我们将注意力转向添加checkboxes列。使用checkboxes列的话,用户可以选择一条或多条GridView rows并执行相同的操作。(比如在邮箱里,我们同时选择多封邮件并将之删除)。在接下来的教程里我们看如何来实现。
祝编程愉快!
作者简介
Scott Mitchell,著有六本ASP/ASP.NET方面的书,是4GuysFromRolla.com的创始人,自1998年以来一直应用 微软Web技术。Scott是个独立的技术咨询顾问,培训师,作家,最近完成了将由Sams出版社出版的新作,24小时内精通ASP.NET 2.0。他的联系电邮为[email protected],也可以通过他的博客http://ScottOnWriting.NET与他联系。

