使用ThickBox登录过程小实验
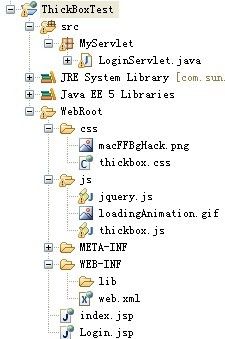
ThickBox是一个基于JQuery的小组件,用于提供像windows关机那样效果的网页的制作,只有20K,下载地址以及Demo在http://jquery.com/demo/thickbox/,使用时共有6个文件需要下载,它们是:
jquery-latest.js
loadingAnimation.gif
macFFBgHack.png
thickbox.css
thickbox.js
thickbox-compressed.js
(其中thickbox.js和thickbox.css里要指定另两个图片的位置)
准备好后,下面开始用Jsp/Servlet编写一个ThickBox的小例子:
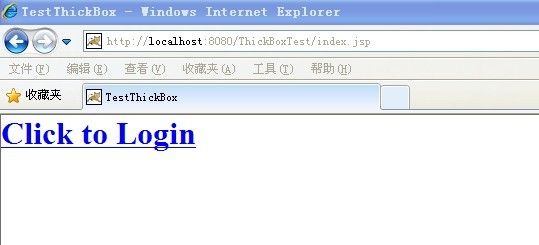
1.欢迎页面 index.jsp
<%@ page language="java" import="java.util.*" pageEncoding="ISO-8859-1"%>
<%
String path = request.getContextPath();
String basePath = request.getScheme()+"://"+request.getServerName()+":"+request.getServerPort()+path+"/";
%>

<!DOCTYPE HTML PUBLIC "-//W3C//DTD HTML 4.01 Transitional//EN">
<html>
  <head>
    <base href="<%=basePath%>">
    <script type="text/javascript" src="js/jquery.js"></script>
	<script type="text/javascript" src="js/thickbox.js"></script>
    <title>TestThickBox</title>
	<link rel="stylesheet" href="css/thickbox.css" type="text/css" media="screen" />
  </head>

  <body>
    <h1><a href="Login.jsp?keepThis=true&TB_iframe=true&height=150&width=300" class="thickbox" title="Login">Click to Login</a></h1>
    <br>
  </body>
</html>
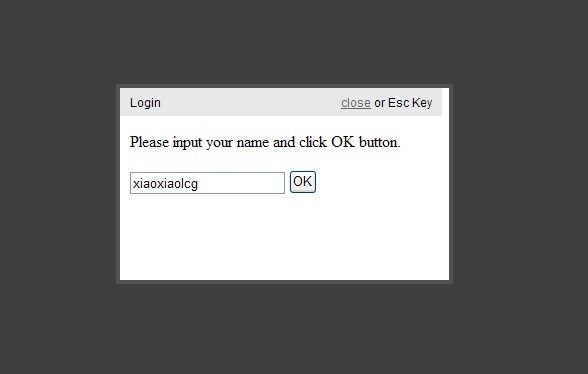
里面重要的是?keepThis=true&TB_iframe=true&height=150&width=300,其效果是上层的box带有标题栏并且点击Box以外的区域时返回原来状态。
(注意<script type="text/javascript" src="path-to-file/jquery.js"></script><script type="text/javascript" src="path-to-file/thickbox.js"></script>以及<link rel="stylesheet" href="path-to-file/thickbox.css" type="text/css" media="screen" />的位置)
2.LoginServlet
package MyServlet;

import java.io.IOException;
import java.io.PrintWriter;
import javax.servlet.ServletException;
import javax.servlet.http.HttpServlet;
import javax.servlet.http.HttpServletRequest;
import javax.servlet.http.HttpServletResponse;

public class LoginServlet extends HttpServlet {

    protected void processRequest(HttpServletRequest request, HttpServletResponse response)
    throws ServletException, IOException {
        response.setContentType("text/html;charset=UTF-8");
        PrintWriter out = response.getWriter();
        try {
            String name = request.getParameter("name");
            out.println("<html>");
            out.println("<head>");
            out.println("<title>Greeting</title>");
            out.println("</head>");
            out.println("<body>");
            out.println("<h1>Hello " + name + "</h1>");
            out.println("</body>");
            out.println("</html>");

        } finally {
            out.close();
        }
    }


    /**
     * Handles the HTTP <code>GET</code> method.
     * @param request servlet request
     * @param response servlet response
     * @throws ServletException if a servlet-specific error occurs
     * @throws IOException if an I/O error occurs
     */
    @Override
    protected void doGet(HttpServletRequest request, HttpServletResponse response)
    throws ServletException, IOException {
        processRequest(request, response);
    }

    /**
     * Handles the HTTP <code>POST</code> method.
     * @param request servlet request
     * @param response servlet response
     * @throws ServletException if a servlet-specific error occurs
     * @throws IOException if an I/O error occurs
     */
    @Override
    protected void doPost(HttpServletRequest request, HttpServletResponse response)
    throws ServletException, IOException {
        processRequest(request, response);
    }

    /**
     * Returns a short description of the servlet.
     * @return a String containing servlet description
     */
    @Override
    public String getServletInfo() {
        return "Short description";
    }// </editor-fold>

}
3.登录页面Login.jsp
<%@ page language="java" import="java.util.*" pageEncoding="ISO-8859-1"%>
<%
String path = request.getContextPath();
String basePath = request.getScheme()+"://"+request.getServerName()+":"+request.getServerPort()+path+"/";
%>

<!DOCTYPE HTML PUBLIC "-//W3C//DTD HTML 4.01 Transitional//EN">
<html>
  <head>
    <base href="<%=basePath%>">

    <title>My JSP 'Login.jsp' starting page</title>


  </head>

  <body>
             <form method="post" action="LoginServlet">
             <p class="STYLE1">Please input your name and click OK button.      </p>
             <p>
               <input type="text" name="name">
               <input name="buttonOk" type="submit" id="buttonOk" value="OK">
                  </p>
           </form>
            <br>
  </body>
</html>
4. 修改web.xml
<?xml version="1.0" encoding="UTF-8"?>
<web-app version="2.5"
	xmlns="http://java.sun.com/xml/ns/javaee"
	xmlns:xsi="http://www.w3.org/2001/XMLSchema-instance"
	xsi:schemaLocation="http://java.sun.com/xml/ns/javaee
	http://java.sun.com/xml/ns/javaee/web-app_2_5.xsd">
  <servlet>
    <description>This is the description of my J2EE component</description>
    <display-name>This is the display name of my J2EE component</display-name>
    <servlet-name>LoginServlet</servlet-name>
    <servlet-class>MyServlet.LoginServlet</servlet-class>
  </servlet>

  <servlet-mapping>
    <servlet-name>LoginServlet</servlet-name>
    <url-pattern>/LoginServlet</url-pattern>
  </servlet-mapping>
  <welcome-file-list>
    <welcome-file>index.jsp</welcome-file>
  </welcome-file-list>
</web-app>
好啦 Tomcat部署下看看吧
ThickBox:


