acts_as_tree 加xtree在ROR下生成动态树形结构
由于最近学习用到这个东西,所以记录下来,供以后参考
主要功能是利用acts_as_tree和XTree来实现动态树状目录结构
1,关于XTREE
下载:你可以在网上搜索一下,或者直接去官方网站下载其最新版本。
怎样应用到你的项目里面去(基于ROR,其它的web项目大同小异吧)
最简单的就是你把xtree.js拷贝到public/javascripts/下面,把xtree.css拷贝到public/stylesheets/下面。这两个文件足够了,还有一个关于检查的js文件自己研究吧。在你的需要的视图页面里面加入一下两句
<script type="text/javascript" src="/javascripts/xtree.js">
<link type="text/css" rel="stylesheet" href="/stylesheets/xtree.css">
然后是这两个文件依赖于xtree/images里面的图片。我的处理方法如下,把xtree/images里面的所有图片拷贝到项目文件夹下的public/images里面去,然后修改xtree.js将images指向了根目录public/
var webFXTreeConfig = {
rootIcon : '/images/foldericon.png', //images前面本来没有斜杆/
openRootIcon : '/images/openfoldericon.png',//images前面本来没有斜杆/
folderIcon : '/images/foldericon.png',//images前面本来没有斜杆/
openFolderIcon : '/images/openfoldericon.png',//images前面本来没有斜杆/
fileIcon : '/images/file.png',//images前面本来没有斜杆/
iIcon : '/images/I.png',//images前面本来没有斜杆/
lIcon : '/images/L.png',//images前面本来没有斜杆/
lMinusIcon : '/images/Lminus.png',//images前面本来没有斜杆/
lPlusIcon : '/images/Lplus.png',//images前面本来没有斜杆/
tIcon : '/images/T.png',//images前面本来没有斜杆/
tMinusIcon : '/images/Tminus.png',//images前面本来没有斜杆/
tPlusIcon : '/images/Tplus.png',//images前面本来没有斜杆/
blankIcon : '/images/blank.png',//images前面本来没有斜杆/
defaultText : 'Tree Item',
defaultAction : 'javascript:void(0);',
defaultBehavior : 'classic',
usePersistence : true
};
以上几步完成后你就可以正常使用xtree了。你可以把下面的代码粘贴到一个视图文件中去,然后测试看能否正常工作。
-------------demo.rhtml--------------------------------
var tree = new WebFXTree('Root');
tree.add(new WebFXTreeItem('Tree Item 1'));
tree.add(new WebFXTreeItem('Tree Item 2'));
tree.add(new WebFXTreeItem('Tree Item 3'));
document.write(tree);
-----------------------------------------------------------
这个是帮助文档里面的例子
图片如下

关于acts_as_tree
把一个简单的acts_as_tree的例子贴在下面
用到的资源:
http://svn.rubyonrails.org/rails/plugins/
把下面的acts_as_tree文件夹整体下下来,待用
1,建立项目aat
2,安装插件
把文件夹acts_as_tree整体拷贝到att/vendor/plugins/目录下(我是直接在控制台下用ruby script/plugin install acts_as_tree实现的)
3,创建 category 表,使用 acts_as_tree
script/generate model category
在migration中class CreateCategories < ActiveRecord::Migration
def self.up
create_table :categories do |t|
t.column :name,:string
t.column :parent_id,:integer
#t.timestamps
end
end
def self.down
drop_table :categories
end
end
4,rake db:migrate 生成 category 表。
5,在model中声明 acts_as_tree:
class Category < ActiveRecord::Base
acts_as_tree
end
6,在数据库上插入示例数据。其中几项的 parent_id 指向表中的其它记录(注:ruby下自动为数据表生成的id就是数据项的id,parent_id将会与id关联)。
7,生成试图文件 test.rhtml
控制器的生成不用介绍了吧)
hello
<% top = Category.find_by_parent_id(nil) %>
<%top.children.each do |child| %>
<%= child.parent.name + " is my parent. I am " + child.name + "<br>"%>
<% end %>
over
8,调试运行
如果你看到something valuable,那么恭喜你,你离成功仅一步之遥了。
动态目录树视图生成
在前面的基础上我们把test.rhtml的代码修改如下:
-------------------test.rhtml-----------------------------
<html>
<head>
<script type="text/javascript" src="/javascripts/xtree.js"></script>
<link type="text/css" rel='stylesheet' href="/stylesheets/xtree.css" />
<script type="text/javascript" language="javascript">
</script>
</head>
<body>
<script>
if (document.getElementById) {
<%
def revTree(node,parent)
tree="var tree#{node.id} = new WebFXTreeItem(\"#{node.name}\");\n"
node.children.each do|child|
tree << revTree(child,"tree#{node.id}")
end
tree << parent + ".add(tree#{node.id});\n"
return tree;
end
%>
var treeroot = new WebFXTree("root");
treeroot.setBehavior('classic');
<%= revTree(Category.find_by_parent_id(nil),"treeroot")%>
document.write(treeroot);
}
</script>
</body>
</html>
------------------------------------------------------------------
注意在数据库中插入几条数据。
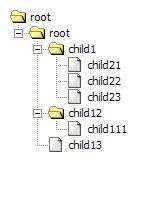
运行上面的文件,你会看到一个动态的目录结构

数据库数据

(完)
主要功能是利用acts_as_tree和XTree来实现动态树状目录结构
1,关于XTREE
下载:你可以在网上搜索一下,或者直接去官方网站下载其最新版本。
怎样应用到你的项目里面去(基于ROR,其它的web项目大同小异吧)
最简单的就是你把xtree.js拷贝到public/javascripts/下面,把xtree.css拷贝到public/stylesheets/下面。这两个文件足够了,还有一个关于检查的js文件自己研究吧。在你的需要的视图页面里面加入一下两句
<script type="text/javascript" src="/javascripts/xtree.js">
<link type="text/css" rel="stylesheet" href="/stylesheets/xtree.css">
然后是这两个文件依赖于xtree/images里面的图片。我的处理方法如下,把xtree/images里面的所有图片拷贝到项目文件夹下的public/images里面去,然后修改xtree.js将images指向了根目录public/
var webFXTreeConfig = {
rootIcon : '/images/foldericon.png', //images前面本来没有斜杆/
openRootIcon : '/images/openfoldericon.png',//images前面本来没有斜杆/
folderIcon : '/images/foldericon.png',//images前面本来没有斜杆/
openFolderIcon : '/images/openfoldericon.png',//images前面本来没有斜杆/
fileIcon : '/images/file.png',//images前面本来没有斜杆/
iIcon : '/images/I.png',//images前面本来没有斜杆/
lIcon : '/images/L.png',//images前面本来没有斜杆/
lMinusIcon : '/images/Lminus.png',//images前面本来没有斜杆/
lPlusIcon : '/images/Lplus.png',//images前面本来没有斜杆/
tIcon : '/images/T.png',//images前面本来没有斜杆/
tMinusIcon : '/images/Tminus.png',//images前面本来没有斜杆/
tPlusIcon : '/images/Tplus.png',//images前面本来没有斜杆/
blankIcon : '/images/blank.png',//images前面本来没有斜杆/
defaultText : 'Tree Item',
defaultAction : 'javascript:void(0);',
defaultBehavior : 'classic',
usePersistence : true
};
以上几步完成后你就可以正常使用xtree了。你可以把下面的代码粘贴到一个视图文件中去,然后测试看能否正常工作。
-------------demo.rhtml--------------------------------
var tree = new WebFXTree('Root');
tree.add(new WebFXTreeItem('Tree Item 1'));
tree.add(new WebFXTreeItem('Tree Item 2'));
tree.add(new WebFXTreeItem('Tree Item 3'));
document.write(tree);
-----------------------------------------------------------
这个是帮助文档里面的例子
图片如下
关于acts_as_tree
把一个简单的acts_as_tree的例子贴在下面
用到的资源:
http://svn.rubyonrails.org/rails/plugins/
把下面的acts_as_tree文件夹整体下下来,待用
1,建立项目aat
2,安装插件
把文件夹acts_as_tree整体拷贝到att/vendor/plugins/目录下(我是直接在控制台下用ruby script/plugin install acts_as_tree实现的)
3,创建 category 表,使用 acts_as_tree
script/generate model category
在migration中class CreateCategories < ActiveRecord::Migration
def self.up
create_table :categories do |t|
t.column :name,:string
t.column :parent_id,:integer
#t.timestamps
end
end
def self.down
drop_table :categories
end
end
4,rake db:migrate 生成 category 表。
5,在model中声明 acts_as_tree:
class Category < ActiveRecord::Base
acts_as_tree
end
6,在数据库上插入示例数据。其中几项的 parent_id 指向表中的其它记录(注:ruby下自动为数据表生成的id就是数据项的id,parent_id将会与id关联)。
7,生成试图文件 test.rhtml
控制器的生成不用介绍了吧)
hello
<% top = Category.find_by_parent_id(nil) %>
<%top.children.each do |child| %>
<%= child.parent.name + " is my parent. I am " + child.name + "<br>"%>
<% end %>
over
8,调试运行
如果你看到something valuable,那么恭喜你,你离成功仅一步之遥了。
动态目录树视图生成
在前面的基础上我们把test.rhtml的代码修改如下:
-------------------test.rhtml-----------------------------
<html>
<head>
<script type="text/javascript" src="/javascripts/xtree.js"></script>
<link type="text/css" rel='stylesheet' href="/stylesheets/xtree.css" />
<script type="text/javascript" language="javascript">
</script>
</head>
<body>
<script>
if (document.getElementById) {
<%
def revTree(node,parent)
tree="var tree#{node.id} = new WebFXTreeItem(\"#{node.name}\");\n"
node.children.each do|child|
tree << revTree(child,"tree#{node.id}")
end
tree << parent + ".add(tree#{node.id});\n"
return tree;
end
%>
var treeroot = new WebFXTree("root");
treeroot.setBehavior('classic');
<%= revTree(Category.find_by_parent_id(nil),"treeroot")%>
document.write(treeroot);
}
</script>
</body>
</html>
------------------------------------------------------------------
注意在数据库中插入几条数据。
运行上面的文件,你会看到一个动态的目录结构

数据库数据

(完)