android开发中的UI控制(四)
android开发中的UI控制(四)
转载自:http://www.android777.com/index.php/tutorial/android-view/androids-ui-control-d.html
列表多值显示是Android中一个常用的功能,像是显示所有联系人、所有信息、文件目录等就需要列表显示控制。列表显示可以分为:纵向列表显示、Grid网格排列、Gallery横向显示。 ListView: ListView主要用来显示纵向的列表。一般我们通过编写一个继承ListActivity的Activity类来做展示界面,因为 ListActivity内置了一个ListView对象。通过调用ListActivity.setListAdpater将需要显示的数据使用一个 Adapter绑定到ListView中。
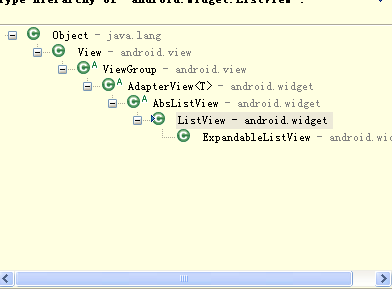
上面可以看到ListView的类层次结构,它是一个ViewGroup,表明它是一个容器,里面可以放View对象,这边的View对象就是ListView里面的一条数据。详细使用方法请看ListView教程 。
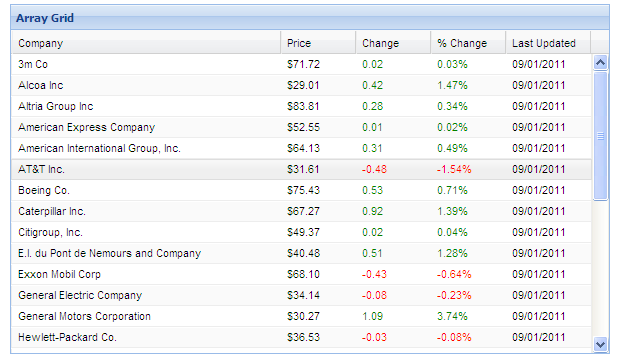
Grid: 很多UI界面都需要使用Grid来显示二维数据,Grid就像是Html中的table用来显示一个表的行列值,Grid也可以被用来显示图标,android系统启动后的菜单列出了所有应用就是用Grid控制。 用Grid显示数据:
这种用Grid显示数据在B/S和C/S中比较常见,在手机由于受到屏幕大小限制用这种方式显示数据很不方便,所有一般Grid用来显示一些图标,如系统的应用图片:
下面我们使用系统应用程序的图标创建一个Grid显示所有可运行的应用程序icon。首先需要获取系统所有应用程序列表,在这边可以通过Intent进行查询
        //使用Intent查询出所有的app启动Activity信息
        Intent mainIntent = new Intent(Intent.ACTION_MAIN, null);
        mainIntent.addCategory(Intent.CATEGORY_LAUNCHER);
        List<ResolveInfo> apps = getPackageManager().queryIntentActivities(mainIntent, 0);
查找出结果后将会存放在一个List<ResolveInfo>中,里面包含了所有应用程序的启动Activity信息。接着编写一个自定义ArrayAdapter 将List<ResolveInfo>显示到GridView中。代码如下:
    /** Called when the activity is first created. */
    @Override
    public void onCreate(Bundle savedInstanceState) {
        super.onCreate(savedInstanceState);
        setContentView(R.layout.gridview);

        GridView gridView = (GridView) findViewById(R.id.dataGrid);

        //使用Intent查询出所有的app启动Activity信息
        Intent mainIntent = new Intent(Intent.ACTION_MAIN, null);
        mainIntent.addCategory(Intent.CATEGORY_LAUNCHER);
        List<ResolveInfo> apps = getPackageManager().queryIntentActivities(mainIntent, 0);

        gridView.setAdapter(new AppAdapter(this, apps));
    }

    class AppAdapter extends ArrayAdapter<ResolveInfo>{
    	Context mContext;

        public AppAdapter(Context context,List<ResolveInfo> apps){
            super(context,0,apps);
            mContext = context;
        }

		@Override
		public View getView(int position, View convertView, ViewGroup parent) {
			ImageView  view ;

            if(convertView == null){
                view = new ImageView(mContext);
                view.setLayoutParams(new GridView.LayoutParams(50, 50));
            }else{
                view = (ImageView) convertView;
            }

            ResolveInfo mResolveInfo = getItem(position);
            view.setImageDrawable(mResolveInfo.activityInfo.loadIcon(getPackageManager()));

            return view;
		}


    }
java代码引用的xml布局文件:res\layout\gridview.xml:
<?xml version="1.0" encoding="utf-8"?>
<GridView xmlns:android="http://schemas.android.com/apk/res/android"
    android:id="@+id/dataGrid"
    android:layout_width="fill_parent"
    android:layout_height="fill_parent"
    android:padding="10px"
    android:verticalSpacing="10px"
    android:horizontalSpacing="10px"
    android:numColumns="auto_fit"
    android:columnWidth="80px"
    android:stretchMode="columnWidth"
    android:gravity="center"
	/>
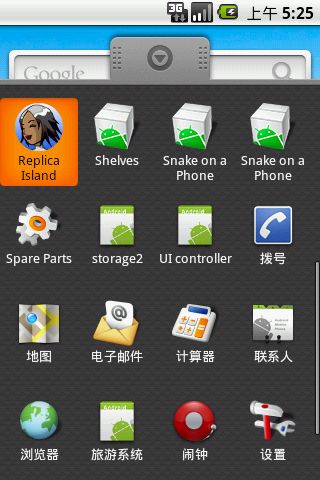
运行效果如下:
上面我们通过代码创建ImageView用来显示启动Activity的icon,将它的大小设置成50×50。在GridView布局中,使用自适应的 列布局,系统将根据GridView中每个Item的大小自动划分为n列,同时再设置每个Item之间的间距大小。
GridView和ListView的 用法很像,他们都继承了AbsListAdapter,不同的是GridView用网格布局可以有多个列,而ListView只是单列多行模式。
日期和事件控制,DatePicker和TimePicker: DatePicker用来选取日期而TimePicker用来选取时间。选择日期和时间,在很多应用程序中经常用到,android由于受到手机屏幕大小 的限制无法像其他GUI框架一样创建复杂的布局来显示日期和时间,所以它们在android中的展现比较简洁。
我们可以通过在xml布局文件中通过声明 DatePicker和TimePicker节点来创建者两个对象: res\layout\datetime.xml:
<?xml version="1.0" encoding="utf-8"?>
<LinearLayout xmlns:android="http://schemas.android.com/apk/res/android"
    android:layout_width="fill_parent"
    android:orientation="vertical"
    android:layout_height="fill_parent"
    >

    <DatePicker
    	android:id="@+id/datePicker"
        android:layout_width="wrap_content"
        android:layout_height="wrap_content"
        />
    <TimePicker
    	android:id="@+id/timePicker"
        android:layout_width="wrap_content"
        android:layout_height="wrap_content"
        />
</LinearLayout>
代码很简单,上面就是显示的效果,看起来是不是太大了点,但是考虑到手机上的特殊国情,如果按钮太小可能用触摸屏就不好操作。如果你要控制具体的日期和时间,可以在程序中动态的修改。
    @Override
    public void onCreate(Bundle savedInstanceState) {
        super.onCreate(savedInstanceState);
        setContentView(R.layout.datetime);

        DatePicker dp = (DatePicker) findViewById(R.id.datePicker);
        TimePicker tp = (TimePicker) findViewById(R.id.timePicker);

        dp.init(2012, //年
                11,   //月 基于0,所以11代表12月
                28,   //日
                null);
        tp.setIs24HourView(true); //使用24小时格式
        tp.setCurrentHour(new Integer(10)); //设置当前小时
        tp.setCurrentMinute(new Integer(10)); //设置分钟
    }
运行效果如下:
上面讲日期设置成2012-12-28,时间是10:10,如果我们没有在代码中修改时间,默认显示的是手机当前的日期和时间。Android还提供了 DatePickerDialog和TimePickerDialog两个对话框让用户可以在对话框中挑选日期和时间,避免这两个控件占用太多的空间。


