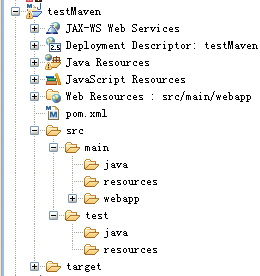
Eclipse中创建Maven的SpringMVC项目
Eclipse for jee下载地址http://mirror.neu.edu.cn/eclipse/technology/epp/downloads/release/indigo/SR1/eclipse-jee-indigo-SR1-win32.zip
Eclipse中下载Maven插件地址:http://m2eclipse.sonatype.org/sites/m2e
Eclipse中在线更新Maven插件网址:http://m2eclipse.codehaus.org/update/
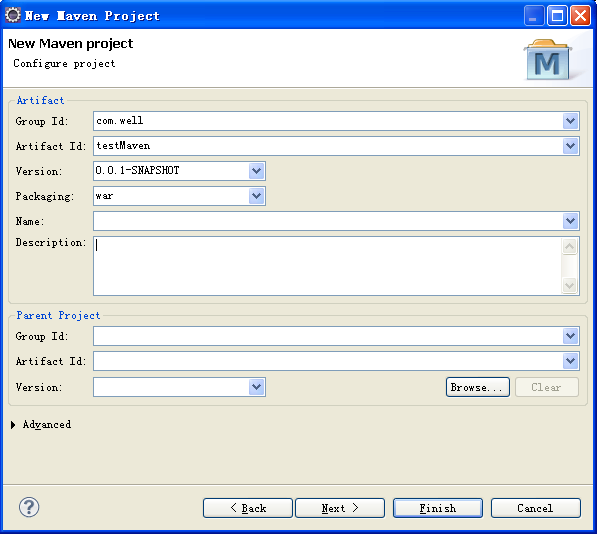
1、建立maven项目:
1.1、Create a Maven Project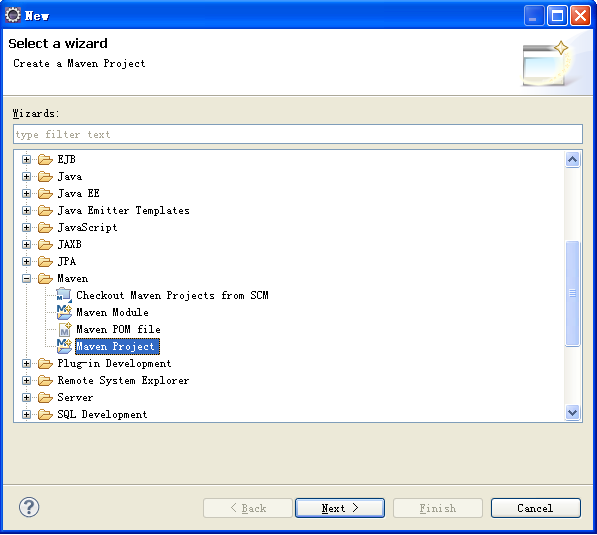
1.2、Select project name and location
选择creat a simple project和Use default workspace location,点击next: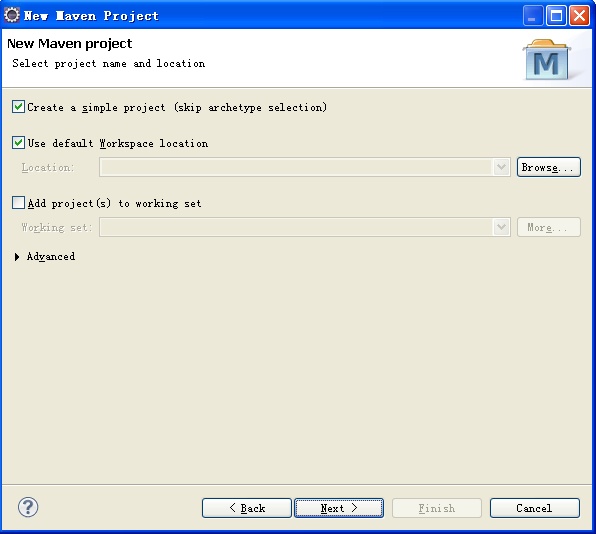
2、向maven项目中添加jar包
2.1 在pom.xml中添加所需要的jar包
打开pom.xml文件,选择Dependencies视图,以添加spring-web的jar包为例,在Dependencies下点击Add,输入spring-web,选择3.0.3版本的spring: 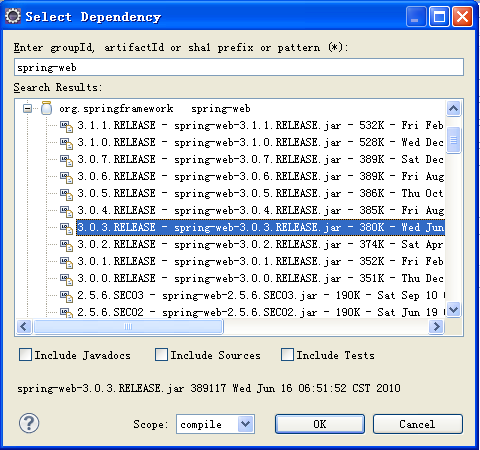
2.2 修改jar包的Dependency Details中的scope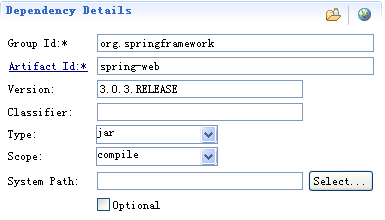
当添加一个jar包时,有些scope属性需要修改:
compile:缺省值,适用于所有阶段,会随项目一起发布。
provided:类似compile,期望JDK、容器或使用者会提供这个依赖。如servlet.jar。
runtime:只在运行时使用,如JDBC驱动,适用运行和测试阶段。
test:只在测试时使用,用于编译和运行测试代码,不会随项目发布。
system:类似provided,需要显式提供包含依赖的jar,Maven不会在 Repository中查找它。
2.3 本项目中添加的jar包如下: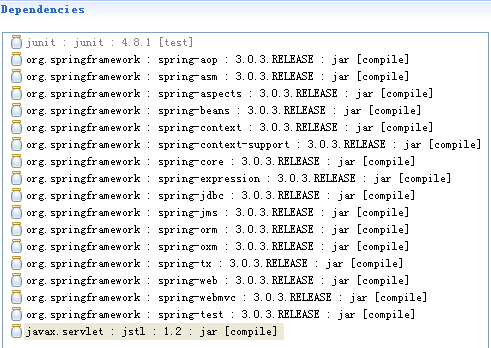
3、编辑配置文件:
3.1、编写web.xml
<?xml version="1.0" encoding="UTF-8"?>
<web-app xmlns="http://java.sun.com/xml/ns/javaee"
         xmlns:xsi="http://www.w3.org/2001/XMLSchema-instance"
	     xsi:schemaLocation="http://java.sun.com/xml/ns/javaee
	                         http://java.sun.com/xml/ns/javaee/web-app_2_5.xsd"
	     version="2.5" >

	<!--Spring的log4j监听器-->
	<listener>
		<listener-class>org.springframework.web.util.Log4jConfigListener</listener-class>
	</listener>

	<!--字符集 过滤器 -->
	<filter>
		<filter-name>CharacterEncodingFilter</filter-name>
		<filter-class>org.springframework.web.filter.CharacterEncodingFilter</filter-class>
		<init-param>
			<param-name>encoding</param-name>
			<param-value>UTF-8</param-value>
		</init-param>
		<init-param>
			<param-name>forceEncoding</param-name>
			<param-value>true</param-value>
		</init-param>
	</filter>
	<filter-mapping>
		<filter-name>CharacterEncodingFilter</filter-name>
		<url-pattern>/*</url-pattern>
	</filter-mapping>

	<!-- Spring控制器 -->
	<servlet>
		<servlet-name>theDispatcher</servlet-name>
		<servlet-class>org.springframework.web.servlet.DispatcherServlet</servlet-class>
		<init-param>
			<param-name>contextConfigLocation</param-name>
			<param-value>/WEB-INF/theDispatcher-servlet.xml</param-value>
		</init-param>
		<load-on-startup>1</load-on-startup>
	</servlet>
	<servlet-mapping>
		<servlet-name>theDispatcher</servlet-name>
		<url-pattern>*.do</url-pattern>
	</servlet-mapping>

</web-app>
3.2、编写Spring配置文件theDispatcher-servlet.xml
<?xml version="1.0" encoding="UTF-8"?>
<beans xmlns="http://www.springframework.org/schema/beans"
	   xmlns:aop="http://www.springframework.org/schema/aop"
	   xmlns:context="http://www.springframework.org/schema/context"
	   xmlns:mvc="http://www.springframework.org/schema/mvc"
	   xmlns:tx="http://www.springframework.org/schema/tx"
	   xmlns:xsi="http://www.w3.org/2001/XMLSchema-instance"
	   xsi:schemaLocation="http://www.springframework.org/schema/aop
		http://www.springframework.org/schema/aop/spring-aop-3.0.xsd
		http://www.springframework.org/schema/beans
		http://www.springframework.org/schema/beans/spring-beans-3.0.xsd
		http://www.springframework.org/schema/context
		http://www.springframework.org/schema/context/spring-context-3.0.xsd
		http://www.springframework.org/schema/mvc
		http://www.springframework.org/schema/mvc/spring-mvc-3.0.xsd
		http://www.springframework.org/schema/tx
		http://www.springframework.org/schema/tx/spring-tx-3.0.xsd">

	<mvc:annotation-driven />
	<context:component-scan base-package="com.well" />

	<bean class="org.springframework.web.servlet.view.InternalResourceViewResolver">
		<property name="prefix" value="/WEB-INF/jsp/" />
		<property name="suffix" value=".jsp" />
	</bean>

</beans>
4、编写一个Controller代码:
package com.well;

import org.springframework.stereotype.Controller;
import org.springframework.ui.Model;
import org.springframework.web.bind.annotation.RequestMapping;
import org.springframework.web.bind.annotation.RequestMethod;

@Controller
public class MyController {

	@RequestMapping(value="index.do", method = RequestMethod.GET)
	public void index_jsp(Model model){
		model.addAttribute("well", "HelloWorld");
		System.out.println("index.jsp");
	}
}
5、编写index.jsp页面
在/webapp/WEB-INF/jsp下创建index.jsp
<%@ page language="java" contentType="text/html; charset=UTF-8" pageEncoding="UTF-8"%>
<%@ taglib prefix="c" uri="http://java.sun.com/jsp/jstl/core"%>
<!DOCTYPE html PUBLIC "-//W3C//DTD HTML 4.01 Transitional//EN" "http://www.w3.org/TR/html4/loose.dtd">
<html>
	<head>
		<meta http-equiv="Content-Type" content="text/html; charset=UTF-8">
		<title>index</title>
	</head>

	<body>
		<c:out value="${well}"></c:out>
	</body>
</html>
6、tomcat中部署testMaven
右击tomcat服务器---Add and Remove---选择testMaven--Add--Finish
7、测试地址:http://localhost:8080/testMaven/index.do
