Sping3+CXF Web应用
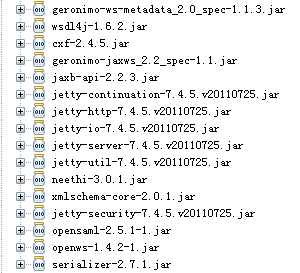
一、准备环境
Apache Cxf 2.4.5
二、服务端
由于最近再写一个发送邮件的东西,于是在这个东西上稍加修改成为我们的服务端程序。这里只是用来表达CXF的工作流程及配置!
1、服务接口
package com.webservice.server;
import javax.jws.WebService;
/**
 *
 * @author WY
 * @version 2011-12-23
 */
@WebService
public interface IMailSendService {

	/**
	 * 邮件发送成功返回true;否则返回false
	 * @param userName    邮箱名称
	 * @param password    邮箱密码
	 * @param mailSubject 邮件主题
	 * @param to          邮件接收人
	 * @param mailBody    邮件内容
	 * @return
	 */
	public boolean sendMail(String userName, String password,
			String mailSubject, String to, String mailBody);
}
服务接口实现类
package com.webservice.server.impl;

import org.apache.log4j.Logger;
import javax.jws.WebService;
import com.util.mail.SendMail;
import com.webservice.server.IMailSendService;

/**
 *
 * @author WY
 * @version 2011-12-23
 */
@WebService
public class MailSendServiceImpl implements IMailSendService {

	private static Logger log = Logger.getLogger(MailSendServiceImpl.class);

	public boolean sendMail(String userName, String password, String mailSubject, String to, String mailBody){
		if(userName == null || password == null){
			log.error("请输入用户名或密码!");
			return false;
		}
		if(to == null){
			log.error("请输入邮件接收人的邮箱地址!");
			return false;
		}
		if(userName.indexOf('@') == -1){
			log.error("请输出完整的邮箱名称!");
			return false;
		}
		String hostName = userName.substring(userName.indexOf('@'));
		String smtp = hostName.replace("@", "smtp.");
		boolean need = true;
		SendMail sendMail = new SendMail(smtp, need, userName, password);
		//创建MIME邮件对象
		boolean mimeMessage = sendMail.createMimeMessage();
		if(mimeMessage == true){
			boolean subject = sendMail.setSubject(mailSubject);
			if(subject == true){
				boolean tto = sendMail.setTo(to);
				if(tto == true){
					boolean from = sendMail.setFrom(userName, null);
					if(from == true){
						boolean body = sendMail.setBody(mailBody);
						if(body == true){
							boolean bool = sendMail.sendout(userName, password);
							return bool;
						}else{
							log.error("设置邮件正文时发生异常!");
							return false;
						}
					}else{
						log.error("设置邮件发送人时异常!");
						return false;
					}
				}else{
					log.error("设置邮件接收人时异常!");
					return false;
				}
			}else{
				log.error("设置邮件主题时异常!");
				return false;
			}
		}else{
			log.error("创建MIME邮件对象时异常!");
			return false;
		}
	}
}
2、服务端配置文件
<?xml version="1.0" encoding="UTF-8"?>
<beans xmlns="http://www.springframework.org/schema/beans"
	xmlns:xsi="http://www.w3.org/2001/XMLSchema-instance"
	xmlns:jaxws="http://cxf.apache.org/jaxws"
	xmlns:cxf="http://cxf.apache.org/core"
	xmlns:http-conf="http://cxf.apache.org/transports/http/configuration"
	xsi:schemaLocation="http://www.springframework.org/schema/beans
		http://www.springframework.org/schema/beans/spring-beans-2.5.xsd
 		http://cxf.apache.org/jaxws
 		http://cxf.apache.org/schemas/jaxws.xsd
 		http://cxf.apache.org/core
 		http://cxf.apache.org/schemas/core.xsd
 		http://cxf.apache.org/transports/http/configuration
 		http://cxf.apache.org/schemas/configuration/http-conf.xsd">

	<!-- CXF需要import的 -->
	<import resource="classpath:META-INF/cxf/cxf.xml" />
	<import resource="classpath:META-INF/cxf/cxf-extension-soap.xml" />
	<import resource="classpath:META-INF/cxf/cxf-servlet.xml" />

	<!-- CXF的log配置 -->
	<cxf:bus>
		<cxf:features>
			<cxf:logging></cxf:logging>
		</cxf:features>
	</cxf:bus>

	<!--配置默认客户端超时时间,连接超时为45秒,响应等待超时为5分钟 -->
	<http-conf:conduit name="*.http-conduit">
		<http-conf:client ConnectionTimeout="45000"	ReceiveTimeout="600000"/>
	</http-conf:conduit>

	<!-- (第一种方式)CXF服务端配置 -->
	<jaxws:endpoint id="mailSendService" implementor="com.webservice.server.impl.MailSendServiceImpl"
	    address="${ws_address}/${contextPath}/ws/mailSendService" publish="true" >
        <jaxws:features>
            <bean class="org.apache.cxf.feature.LoggingFeature" />
        </jaxws:features>
    </jaxws:endpoint>
    <!-- (第二种方式)CXF服务端配置
    <bean id="mailSendServiceImpl" class="com.webservice.server.impl.MailSendServiceImpl" />
	<jaxws:endpoint id="mailSendService" implementor="#mailSendServiceImpl"
	    address="${ws_address}/${contextPath}/ws/mailSendService" publish="true" >
        <jaxws:features>
            <bean class="org.apache.cxf.feature.LoggingFeature" />
        </jaxws:features>
    </jaxws:endpoint>
    -->

</beans>
GlobalConstants.properties
#contextPath
contextPath=eis
#webService
ws_address=http\://127.0.0.1\:8090
3、发布服务
发布服务时一定要注意接口服务的端口不要和应用程序的端口一样。我的应用程序发布到tomcat中端口是8080,而接口服务的端口我修改为8090.
否则就会出现接口服务发布成功即wsdl可以正常访问,而应用程序无法访问(404)
三、客户端
1、生成客户端
利用cxf中的wsdl2java.bat生成客户端,也可以使用soapui来生成客户端(简单使用介绍http://exceptioneye.iteye.com/blog/1276869)
虽然客户端生成了但是却报出异常
----------------------------
ID: 7
Address: http://localhost:8090/eis/ws/mailSendService?wsdl=IMailSendService.wsdl
Http-Method: GET
Content-Type:
Headers: {Accept=[text/html, image/gif, image/jpeg, *; q=.2, */*; q=.2], Cache-Control=[no-cache], connection=[keep-alive], Content-Type=[null], Host=[localhost:8090], Pragma=[no-cache], User-Agent=[Java/1.6.0_16]}
--------------------------------------
[DEBUG][2011-12-24 00:04:54][org.apache.cxf.phase.PhaseInterceptorChain.doIntercept(PhaseInterceptorChain.java:260)]:Invoking handleMessage on interceptor org.apache.cxf.interceptor.AttachmentInInterceptor@f1e2d9
[DEBUG][2011-12-24 00:04:54][org.apache.cxf.interceptor.AttachmentInInterceptor.handleMessage(AttachmentInInterceptor.java:53)]:AttachmentInInterceptor skipped in HTTP GET method
[DEBUG][2011-12-24 00:04:54][org.apache.cxf.phase.PhaseInterceptorChain.doIntercept(PhaseInterceptorChain.java:260)]:Invoking handleMessage on interceptor org.apache.cxf.transport.https.CertConstraintsInterceptor@177b6fc
[DEBUG][2011-12-24 00:04:54][org.apache.cxf.phase.PhaseInterceptorChain.doIntercept(PhaseInterceptorChain.java:260)]:Invoking handleMessage on interceptor org.apache.cxf.interceptor.StaxInInterceptor@643c06
[DEBUG][2011-12-24 00:04:54][org.apache.cxf.interceptor.StaxInInterceptor.handleMessage(StaxInInterceptor.java:61)]:StaxInInterceptor skipped.
[DEBUG][2011-12-24 00:04:54][org.apache.cxf.phase.PhaseInterceptorChain.doIntercept(PhaseInterceptorChain.java:260)]:Invoking handleMessage on interceptor org.apache.cxf.frontend.WSDLGetInterceptor@179997b
[DEBUG][2011-12-24 00:04:54][org.apache.cxf.transport.http_jetty.JettyHTTPDestination.serviceRequest(JettyHTTPDestination.java:338)]:Finished servicing http request on thread: Thread[qtp17215886-26 - /eis/ws/mailSendService?wsdl=IMailSendService.wsdl,5,main]
[DEBUG][2011-12-24 00:04:54][org.eclipse.jetty.util.log.Slf4jLog.debug(Slf4jLog.java:70)]:RESPONSE /eis/ws/mailSendService  200
[DEBUG][2011-12-24 00:04:56][org.eclipse.jetty.util.log.Slf4jLog.debug(Slf4jLog.java:70)]:closed org.eclipse.jetty.server.nio.SelectChannelConnector$SelectChannelHttpConnection@[email protected]:8090<->127.0.0.1:1966
[DEBUG][2011-12-24 00:04:56][org.eclipse.jetty.util.log.Slf4jLog.debug(Slf4jLog.java:80)]:EXCEPTION
java.io.IOException: 远程主机强迫关闭了一个现有的连接。
	at sun.nio.ch.SocketDispatcher.read0(Native Method)
	at sun.nio.ch.SocketDispatcher.read(SocketDispatcher.java:25)
	at sun.nio.ch.IOUtil.readIntoNativeBuffer(IOUtil.java:233)
	at sun.nio.ch.IOUtil.read(IOUtil.java:206)
	at sun.nio.ch.SocketChannelImpl.read(SocketChannelImpl.java:236)
	at org.eclipse.jetty.io.nio.ChannelEndPoint.fill(ChannelEndPoint.java:165)
	at org.eclipse.jetty.http.HttpParser.parseNext(HttpParser.java:289)
	at org.eclipse.jetty.http.HttpParser.parseAvailable(HttpParser.java:214)
	at org.eclipse.jetty.server.HttpConnection.handle(HttpConnection.java:411)
	at org.eclipse.jetty.io.nio.SelectChannelEndPoint.handle(SelectChannelEndPoint.java:535)
	at org.eclipse.jetty.io.nio.SelectChannelEndPoint$1.run(SelectChannelEndPoint.java:40)
	at org.eclipse.jetty.util.thread.QueuedThreadPool$3.run(QueuedThreadPool.java:529)
	at java.lang.Thread.run(Thread.java:619)
[DEBUG][2011-12-24 00:05:50][org.eclipse.jetty.util.log.Slf4jLog.debug(Slf4jLog.java:70)]:closed org.eclipse.jetty.server.nio.SelectChannelConnector$SelectChannelHttpConnection@[email protected]:8090<->127.0.0.1:1965
[DEBUG][2011-12-24 00:05:50][org.eclipse.jetty.util.log.Slf4jLog.debug(Slf4jLog.java:80)]:EXCEPTION
java.io.IOException: 远程主机强迫关闭了一个现有的连接。
	at sun.nio.ch.SocketDispatcher.read0(Native Method)
	at sun.nio.ch.SocketDispatcher.read(SocketDispatcher.java:25)
	at sun.nio.ch.IOUtil.readIntoNativeBuffer(IOUtil.java:233)
	at sun.nio.ch.IOUtil.read(IOUtil.java:206)
	at sun.nio.ch.SocketChannelImpl.read(SocketChannelImpl.java:236)
	at org.eclipse.jetty.io.nio.ChannelEndPoint.fill(ChannelEndPoint.java:165)
	at org.eclipse.jetty.http.HttpParser.parseNext(HttpParser.java:289)
	at org.eclipse.jetty.http.HttpParser.parseAvailable(HttpParser.java:214)
	at org.eclipse.jetty.server.HttpConnection.handle(HttpConnection.java:411)
	at org.eclipse.jetty.io.nio.SelectChannelEndPoint.handle(SelectChannelEndPoint.java:535)
	at org.eclipse.jetty.io.nio.SelectChannelEndPoint$1.run(SelectChannelEndPoint.java:40)
	at org.eclipse.jetty.util.thread.QueuedThreadPool$3.run(QueuedThreadPool.java:529)
	at java.lang.Thread.run(Thread.java:619)
如果哪位有解决方法还请指点!
虽然报异常,但是却不影响功能!
如果出现 Service(URL, QName, WebServiceFeature[]) is undefined
解决方法:http://exceptioneye.iteye.com/blog/1177361
2、客户端配置文件
<?xml version="1.0" encoding="UTF-8"?>
<beans xmlns="http://www.springframework.org/schema/beans"
	xmlns:xsi="http://www.w3.org/2001/XMLSchema-instance"
	xsi:schemaLocation="http://www.springframework.org/schema/beans
		http://www.springframework.org/schema/beans/spring-beans-2.5.xsd
 		http://cxf.apache.org/core
 		http://cxf.apache.org/schemas/core.xsd">

 	<!-- CXF 客户端配置 -->
    <bean id="iMailSendServiceClientFactory" class="org.apache.cxf.jaxws.JaxWsProxyFactoryBean">
      <property name="serviceClass" value="com.webservice.client.IMailSendService" />
      <property name="address" value="${ws_address}/${contextPath}/ws/mailSendService?wsdl" />
    </bean>
 	<bean id="mailSendServiceClient" class="com.webservice.client.IMailSendService"
      factory-bean="iMailSendServiceClientFactory" factory-method="create" />

</beans>
四、测试
业务处理
IMailSendService mailSendService = (IMailSendService) ApplicationContextHelper.getBean("mailSendServiceClient");
	   mailSendService.sendMail("", "", "邮件测试", "", "邮件测试!");
邮件发送成功,OK。

