甘特图组件DHTMLX Gantt中文教程 - 如何实现持久UI状态
DHTMLX Gantt是用于跨浏览器和跨平台应用程序的功能齐全的Gantt图表。可满足项目管理应用程序的所有需求,是最完善的甘特图图表库。
在现代Web应用程序中,在页面重新加载之间保持UI元素的状态对于流畅的用户体验至关重要。
在本教程中我们将知道您完成DHTMLX Gantt中持久UI的简单实现,重点关注一小部分特性——即任务的展开或折叠分支,以及选定的甘特图缩放级别。您将了解如何将这些设置存储在浏览器的本地存储中并在以后恢复,以便在重新加载页面后甘特图保持一致。通过本教程的学习,您可以让应用程序的最终用户继续保持他们离开的状态,不需要重新配置设置,从而节省时间并提高效率。
DHTMLX Gantt v8.0正式版下载
为什么在甘特图中需要持久的UI状态?
在深入研究代码之前,让我们更详细地考虑一下本教程的目标。
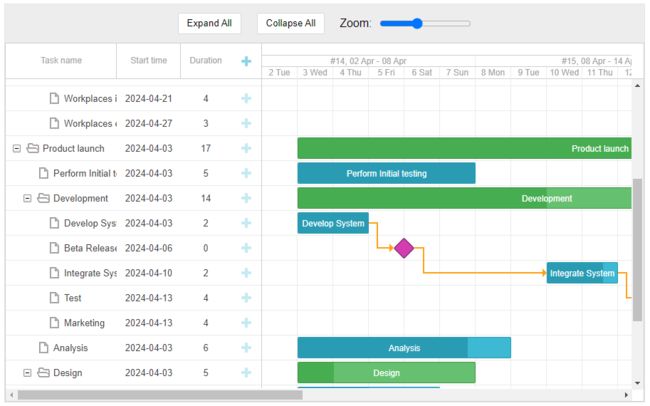
在下面的示例中,您可以将整个项目折叠成一个紧凑视图,将其展开并使用简单的工具在甘特图的缩放级别之间切换。但是一旦重新加载页面,所有更改将丢失。因为动态UI更改很少保存到数据库中,但是在实践中这对最终用户非常不方便。

为了进行比较,您还可以测试下面的第二个示例,其中实现了持久状态。
尝试切换缩放级别或展开、折叠甘特图中的某些分支,然后重新加载页面。您将看到重新加载之前引入的所有更改甘特图,可以为更好的甘特图用户体验做出贡献。
现在是时候向您展示如何逐步将持久UI状态集成到JavaScript甘特图中了。
Step 1:设置甘特图
对于本教程,创建一个简单的甘特图并添加一个工具栏就足够了,以便快速操作,如缩放和扩展分支。
您需要创建HTML布局。
Persistent UI State in DHTMLX Gantt
在这里您为甘特图创建了一个容器,并在其上放置了一个工具栏。工具栏包含展开和折叠所有任务的按钮,以及调整缩放级别的滑块。
这些控件将在下一步中描述的甘特图初始化之后立即启用。
配置并初始化甘特图
在这个阶段,您将使用Zoom扩展创建一个基本的甘特图配置。不要被代码的数量吓倒,其中大部分是样板时间刻度配置和测试数据。
gantt.config.open_tree_initially = true;
gantt.ext.zoom.init({
levels: [
{
name: "hour",
scale_height: 50,
min_column_width: 30,
scales: [
{ unit: "day", step: 1, format: "%d %M" },
{ unit: "hour", step: 1, format: "%H" }
]
},
{
name: "day",
scale_height: 50,
min_column_width: 80,
scales: [
{ unit: "month", format: "%F, %Y" },
{ unit: "day", step: 1, format: "%d %M" }
]
},
{
name: "week",
scale_height: 50,
min_column_width: 50,
scales: [
{ unit: "month", format: "%F, %Y" },
{
unit: "week", step: 1, format: function (date) {
const dateToStr = gantt.date.date_to_str("%d %M");
const endDate = gantt.date.add(date, 6, "day");
const weekNum = gantt.date.date_to_str("%W")(date);
return "#" + weekNum + ", " + dateToStr(date) + " - " + dateToStr(endDate);
}
},
{ unit: "day", step: 1, format: "%j %D" }
]
},
{
name: "month",
scale_height: 50,
min_column_width: 120,
scales: [
{ unit: "month", format: "%F, %Y" },
{ unit: "week", format: "Week #%W" }
]
},
{
name: "quarter",
height: 50,
min_column_width: 90,
scales: [
{ unit: "month", step: 1, format: "%M" },
{
unit: "quarter", step: 1, format: function (date) {
const dateToStr = gantt.date.date_to_str("%M");
const endDate = gantt.date.add(gantt.date.add(date, 3, "month"), -1, "day");
return dateToStr(date) + " - " + dateToStr(endDate);
}
}
]
},
{
name: "year",
scale_height: 50,
min_column_width: 30,
scales: [
{ unit: "year", step: 1, format: "%Y" }
]
}
]
});
gantt.ext.zoom.setLevel(1);
gantt.init("gantt_here");
gantt.parse({
data: [
{ id: 1, text: "Office itinerancy", type: "project", start_date: "02-04-2024 00:00", duration: 17, progress: 0.4, parent: 0 },
{ id: 2, text: "Office facing", type: "project", start_date: "02-04-2024 00:00", duration: 8, progress: 0.6, parent: "1" },
{ id: 3, text: "Furniture installation", type: "project", start_date: "11-04-2024 00:00", duration: 8, parent: "1", progress: 0.6, },
{ id: 4, text: "The employee relocation", type: "project", start_date: "13-04-2024 00:00", duration: 5, parent: "1", progress: 0.5 },
{ id: 5, text: "Interior office", type: "task", start_date: "03-04-2024 00:00", duration: 7, parent: "2", progress: 0.6 },
{ id: 6, text: "Air conditioners check", type: "task", start_date: "03-04-2024 00:00", duration: 7, parent: "2", progress: 0.6 },
{ id: 7, text: "Workplaces preparation", type: "task", start_date: "12-04-2024 00:00", duration: 8, parent: "3", progress: 0.6, },
{ id: 8, text: "Preparing workplaces", type: "task", start_date: "14-04-2024 00:00", duration: 5, parent: "4", progress: 0.5 },
{ id: 9, text: "Workplaces importation", type: "task", start_date: "21-04-2024 00:00", duration: 4, parent: "4", progress: 0.5 },
{ id: 10, text: "Workplaces exportation", type: "task", start_date: "27-04-2024 00:00", duration: 3, parent: "4", progress: 0.5 },
{ id: 11, text: "Product launch", type: "project", progress: 0.6, start_date: "02-04-2024 00:00", duration: 13, parent: 0 },
{ id: 12, text: "Perform Initial testing", type: "task", start_date: "03-04-2024 00:00", duration: 5, parent: "11", progress: 1 },
{ id: 13, text: "Development", type: "project", start_date: "03-04-2024 00:00", duration: 11, parent: "11", progress: 0.5 },
{ id: 14, text: "Analysis", type: "task", start_date: "03-04-2024 00:00", duration: 6, parent: "11", owner: [], progress: 0.8 },
{ id: 15, text: "Design", type: "project", start_date: "03-04-2024 00:00", duration: 5, parent: "11", progress: 0.2 },
{ id: 16, text: "Documentation creation", type: "task", start_date: "03-04-2024 00:00", duration: 7, parent: "11", progress: 0 },
{ id: 17, text: "Develop System", type: "task", start_date: "03-04-2024 00:00", duration: 2, parent: "13", progress: 1 },
{ id: 25, text: "Beta Release", type: "milestone", start_date: "06-04-2024 00:00", parent: "13", progress: 0, duration: 0 },
{ id: 18, text: "Integrate System", type: "task", start_date: "10-04-2024 00:00", duration: 2, parent: "13", progress: 0.8 },
{ id: 19, text: "Test", type: "task", start_date: "13-04-2024 00:00", duration: 4, parent: "13", progress: 0.2 },
{ id: 20, text: "Marketing", type: "task", start_date: "13-04-2024 00:00", duration: 4, parent: "13", progress: 0 },
{ id: 21, text: "Design database", type: "task", start_date: "03-04-2024 00:00", duration: 4, parent: "15", progress: 0.5 },
{ id: 22, text: "Software design", type: "task", start_date: "03-04-2024 00:00", duration: 4, parent: "15", progress: 0.1 },
{ id: 23, text: "Interface setup", type: "task", start_date: "03-04-2024 00:00", duration: 5, parent: "15", progress: 0 },
{ id: 24, text: "Release v1.0", type: "milestone", start_date: "20-04-2024 00:00", parent: "11", progress: 0, duration: 0 }
],
links: [
{ id: "2", source: "2", target: "3", type: "0" },
{ id: "3", source: "3", target: "4", type: "0" },
{ id: "7", source: "8", target: "9", type: "0" },
{ id: "8", source: "9", target: "10", type: "0" },
{ id: "16", source: "17", target: "25", type: "0" },
{ id: "17", source: "18", target: "19", type: "0" },
{ id: "18", source: "19", target: "20", type: "0" },
{ id: "22", source: "13", target: "24", type: "0" },
{ id: "23", source: "25", target: "18", type: "0" }
]
});
下一步是激活工具栏。
首先您添加按钮,将有助于展开和折叠所有任务:
// Toolbar handlers
document.getElementById('expandAll').addEventListener('click', function () {
gantt.eachTask(function (task) {
task.$open = true;
});
gantt.render();
});

document.getElementById('collapseAll').addEventListener('click', function () {
gantt.eachTask(function (task) {
task.$open = false;
});
gantt.render();
});
之后添加缩放滑块功能,用于放大和缩小甘特图。
document.getElementById('zoomSlider').addEventListener('input', function () {
const zoomLevel = parseInt(this.value, 10);
gantt.ext.zoom.setLevel(zoomLevel);
});
Step 2:保存和恢复展开和折叠任务的状态
现在我们终于可以达到本教程的主要目标,即保存分支的状态并在页面重新加载后恢复它。
您可以使用localStorage存储状态,如下所示:
// State of opened/closed branches
function saveBranchesState() {
const state = {};
gantt.eachTask((task) => {
state[task.id] = !!task.$open;
});
localStorage.setItem('gantt_expanded_tasks', JSON.stringify(state));
}
function restoreBranchesState() {
const expandedTasks = JSON.parse(localStorage.getItem('gantt_expanded_tasks') || "{}");
gantt.eachTask((task) => {
if (expandedTasks[task.id] !== undefined) {
task.$open = expandedTasks[task.id];
}
})

gantt.render();
}
每次分支被展开或折叠时,您都需要保存状态,并在任务被加载到甘特图中时恢复状态:
gantt.attachEvent("onTaskClosed", saveBranchesState);
gantt.attachEvent("onTaskOpened", saveBranchesState);
gantt.attachEvent("onParse", restoreBranchesState, { once: true });
当用户按下工具栏中的全部展开/全部折叠按钮时,也需要保存甘特图状态:
// Toolbar handlers
document.getElementById('expandAll').addEventListener('click', function () {
…
saveBranchesState();
});

document.getElementById('collapseAll').addEventListener('click', function () {
…
saveBranchesState();
});
Step 3:保存和恢复缩放状态
类似地,您可以实现存储和恢复Zoom状态的函数。
function saveZoomState() {
const zoomLevel = gantt.ext.zoom.getCurrentLevel();
localStorage.setItem('gantt_zoom_level', zoomLevel);
document.getElementById('zoomSlider').value = zoomLevel;
}

function restoreZoomState() {
const zoomLevel = localStorage.getItem('gantt_zoom_level');
if (zoomLevel) {
gantt.ext.zoom.setLevel(zoomLevel);
document.getElementById('zoomSlider').value = zoomLevel;
}
}
当最终用户在工具栏中更改缩放级别时保存该状态,在页面上初始化甘特图时恢复该状态:
document.getElementById('zoomSlider').addEventListener('input', function () {
const zoomLevel = parseInt(this.value, 10);
gantt.ext.zoom.setLevel(zoomLevel);
saveZoomState();
});
gantt.attachEvent("onGanttReady", restoreZoomState);
按照上面的步骤,您可以像本示例一样实现永久甘特图状态。
总结
本教程清楚地解释了如何构建甘特图,以保留展开/折叠分支的状态以及页面重新加载之间的缩放级别。此实现通过确保维护用户的自定义来增强用户体验,从而节省时间和精力。