【MongoDB系列】:MongoDB 集群,副本集模式(二)
mongoDB官方已经不建议使用主从模式了,替代方案是采用副本集的模式。详情
副本集
使用复制可以将数据副本保存到多台服务器上,这是生产环境必须使用的。使用MongoDB得复制功能。即时一台或者多台服务器出错,也可以保证应用程序正常运行和数据安全。
在MongoDB中,创建一个副本集后就可以使用复制功能。副本集是一组服务器,其中有一个主服务器(primary),用户处理客户端请求;还有多个备份服务器(secondary),用于保存主服务器的数据副本。如果主服务器奔溃了,备份服务器会自动将其中一个成员升级为新的主服务器。
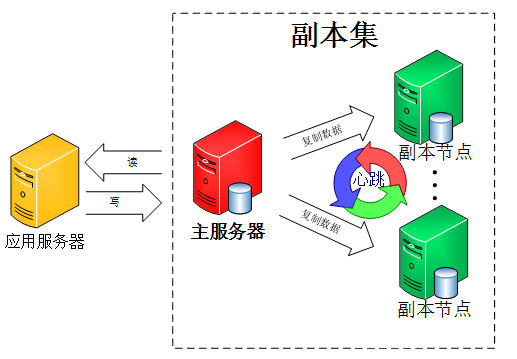
使用副本集,我们就可以解决上篇博客遗留的第一个问题。我们来看看mongoDB副本集的架构图:
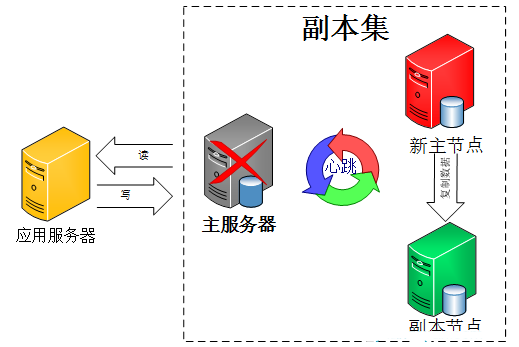
由图可以看到客户端连接到整个副本集,不关心具体哪一台机器是否挂掉。主服务器负责整个副本集的读写,副本集定期同步数据备份,一但主节点挂掉,副本节点就会选举一个新的主服务器,这一切对于应用服务器不需要关心。我们看一下主服务器挂掉后的架构:
副本集中的副本节点在主节点挂掉后通过心跳机制检测到后,就会在集群内发起主节点的选举机制,自动选举一位新的主服务器。
官方推荐的副本集机器数量为至少3个,那我们也按照这个数量配置测试。我们的测试依旧是在本机。
1、解压mongodb-win32-x86_64-2008plus-3.0.7.zip文件,重命名为mongodb_1、mongodb_2、mongodb_3
2、分别在目录下载创建data文件夹,再data文件下创建db和log文件夹。
3、创建批处理文件start_mongodb_1.bat、start_mongodb_2.bat、start_mongodb_3.bat
mongodb_1\bin\mongod --replSet repset --port 5001 --dbpath mongodb_1\data\db --logpath=mongodb_1\data\log\r1.log --logappend
mongodb_2\bin\mongod --replSet repset --port 5002 --dbpath mongodb_2\data\db --logpath=mongodb_2\data\log\r2.log --logappend
mongodb_3\bin\mongod --replSet repset --port 5003 --dbpath mongodb_3\data\db --logpath=mongodb_3\data\log\r3.log --logappend
4、分别启动MongoDB。
5、查看状态
> rs.status();
{
        "info" : "run rs.initiate(...) if not yet done for the set",
        "ok" : 0,
        "errmsg" : "no replset config has been received",
        "code" : 94
}
>
提示错误信息,这是因为副本集还有没有进行初始化操作。
6、初始化副本集
登录任意一套MongoDB服务器,我默认登录5001
#定义副本集配置变量,这里的 _id:”rs1” 和上面命令参数“ –replSet rs1” 要保持一样。因为我登录得是5001,所以默认就是rs1
config = { _id:"repset", members:[
{_id:0,host:"127.0.0.1:5001"},
{_id:1,host:"127.0.0.1:5002"},
{_id:2,host:"127.0.0.1:5003"}]
}
输出:
{
        "_id" : "rs1",
        "members" : [
                {
                        "_id" : 0,
                        "host" : "127.0.0.1:5001"
                },
                {
                        "_id" : 1,
                        "host" : "127.0.0.1:5002"
                },
                {
                        "_id" : 2,
                        "host" : "127.0.0.1:5003"
                }
        ]
}
开始初始化副本集
rs.initiate(config);
输出成功
{
        "ok" : 1
}
查看状态
repset:OTHER> rs.status();
{
        "set" : "repset",
        "date" : ISODate("2015-12-07T09:17:37.503Z"),
        "myState" : 1,
        "members" : [
                {
                        "_id" : 0,
                        "name" : "127.0.0.1:5001",
                        "health" : 1,
                        "state" : 1,
                        "stateStr" : "PRIMARY",
                        "uptime" : 859,
                        "optime" : Timestamp(1449479764, 1),
                        "optimeDate" : ISODate("2015-12-07T09:16:04Z"),
                        "electionTime" : Timestamp(1449479769, 1),
                        "electionDate" : ISODate("2015-12-07T09:16:09Z"),
                        "configVersion" : 1,
                        "self" : true
                },
                {
                        "_id" : 1,
                        "name" : "127.0.0.1:5002",
                        "health" : 1,
                        "state" : 2,
                        "stateStr" : "SECONDARY",
                        "uptime" : 683,
                        "optime" : Timestamp(1449479764, 1),
                        "optimeDate" : ISODate("2015-12-07T09:16:04Z"),
                        "lastHeartbeat" : ISODate("2015-12-07T09:17:37.177Z"),
                        "lastHeartbeatRecv" : ISODate("2015-12-07T09:17:35.909Z"
),
                        "pingMs" : 0,
                        "configVersion" : 1
                },
                {
                        "_id" : 2,
                        "name" : "127.0.0.1:5003",
                        "health" : 1,
                        "state" : 2,
                        "stateStr" : "SECONDARY",
                        "uptime" : 683,
                        "optime" : Timestamp(1449479764, 1),
                        "optimeDate" : ISODate("2015-12-07T09:16:04Z"),
                        "lastHeartbeat" : ISODate("2015-12-07T09:17:35.747Z"),
                        "lastHeartbeatRecv" : ISODate("2015-12-07T09:17:35.747Z"
),
                        "pingMs" : 0,
                        "configVersion" : 1
                }
        ],
        "ok" : 1
}
repset:PRIMARY>
我们可以到5001为主节点(primary),5002、5003为副本节点(secondary),这样我们的副本集就搭建成功了。
7、测试副本集复制功能
7.1 连接主节点,插入一条数据
mongo 127.0.0.1:5001
repset:PRIMARY> db.user.insert({"userName":"test1","age":25})
WriteResult({ "nInserted" : 1 })
repset:PRIMARY> db.user.find()
{ "_id" : ObjectId("566550638db08caa9ace63f6"), "userName" : "test1", "age" : 25
 }
7.2 连接副本节点
mongo 127.0.0.1:5002
C:\Users\hanfeng>mongo 127.0.0.1:5002
2015-12-07T17:26:03.138+0800 I CONTROL  Hotfix KB2731284 or later update is not
installed, will zero-out data files
MongoDB shell version: 3.0.7
connecting to: 127.0.0.1:5002/test
repset:SECONDARY> show tables;
2015-12-07T17:26:36.299+0800 E QUERY    Error: listCollections failed: { "note"
: "from execCommand", "ok" : 0, "errmsg" : "not master" }
    at Error (<anonymous>)
    at DB._getCollectionInfosCommand (src/mongo/shell/db.js:646:15)
    at DB.getCollectionInfos (src/mongo/shell/db.js:658:20)
    at DB.getCollectionNames (src/mongo/shell/db.js:669:17)
    at shellHelper.show (src/mongo/shell/utils.js:625:12)
    at shellHelper (src/mongo/shell/utils.js:524:36)
    at (shellhelp2):1:1 at src/mongo/shell/db.js:646
repset:SECONDARY>
上面报错,这是因为mongodb默认是从主节点读写数据的,副本节点上不允许读,需要设置副本节点可以读。
db.getMongo().setSlaveOk();
repset:SECONDARY> db.user.find()
{ "_id" : ObjectId("566550638db08caa9ace63f6"), "userName" : "test1", "age" : 25
 }
这样我们就读取到数据。
测试副本集故障转移功能
1、我们先停掉主节点,即端口5001,然后连接到5001
C:\Users\hanfeng>mongo 127.0.0.1:5001
2015-12-08T09:42:01.459+0800 I CONTROL  Hotfix KB2731284 or later update is not
installed, will zero-out data files
MongoDB shell version: 3.0.7
connecting to: 127.0.0.1:5001/test
2015-12-08T09:42:02.516+0800 W NETWORK  Failed to connect to 127.0.0.1:5001, rea
son: errno:10061 由于目标计算机积极拒绝,无法连接。
2015-12-08T09:42:02.519+0800 E QUERY    Error: couldn't connect to server 127.0.
0.1:5001 (127.0.0.1), connection attempt failed
    at connect (src/mongo/shell/mongo.js:181:14)
    at (connect):1:6 at src/mongo/shell/mongo.js:181
exception: connect failed
我们发现服务器被停止,已经无法连接到5001上。
2、连接到5002,发现不受影响
C:\Users\hanfeng>mongo 127.0.0.1:5002
2015-12-08T09:42:27.633+0800 I CONTROL  Hotfix KB2731284 or later update is not
installed, will zero-out data files
MongoDB shell version: 3.0.7
connecting to: 127.0.0.1:5002/test
3、查看节点状态
repset:SECONDARY> rs.status();
{
        "set" : "repset",
        "date" : ISODate("2015-12-08T01:42:33.200Z"),
        "myState" : 2,
        "members" : [
                {
                        "_id" : 0,
                        "name" : "127.0.0.1:5001",
                        "health" : 0,
                        "state" : 8,
                        "stateStr" : "(not reachable/healthy)",
                        "uptime" : 0,
                        "optime" : Timestamp(0, 0),
                        "optimeDate" : ISODate("1970-01-01T00:00:00Z"),
                        "lastHeartbeat" : ISODate("2015-12-08T01:42:32.154Z"),
                        "lastHeartbeatRecv" : ISODate("2015-12-08T01:41:24.063Z"
),
                        "pingMs" : 0,
                        "lastHeartbeatMessage" : "Failed attempt to connect to 1
27.0.0.1:5001; couldn't connect to server 127.0.0.1:5001 (127.0.0.1), connection
 attempt failed",
                        "configVersion" : -1
                },
                {
                        "_id" : 1,
                        "name" : "127.0.0.1:5002",
                        "health" : 1,
                        "state" : 2,
                        "stateStr" : "SECONDARY",
                        "uptime" : 216,
                        "optime" : Timestamp(1449480292, 2),
                        "optimeDate" : ISODate("2015-12-07T09:24:52Z"),
                        "configVersion" : 1,
                        "self" : true
                },
                {
                        "_id" : 2,
                        "name" : "127.0.0.1:5003",
                        "health" : 1,
                        "state" : 1,
                        "stateStr" : "PRIMARY",
                        "uptime" : 177,
                        "optime" : Timestamp(1449480292, 2),
                        "optimeDate" : ISODate("2015-12-07T09:24:52Z"),
                        "lastHeartbeat" : ISODate("2015-12-08T01:42:32.048Z"),
                        "lastHeartbeatRecv" : ISODate("2015-12-08T01:42:31.865Z"
),
                        "pingMs" : 0,
                        "electionTime" : Timestamp(1449538889, 1),
                        "electionDate" : ISODate("2015-12-08T01:41:29Z"),
                        "configVersion" : 1
                }
        ],
        "ok" : 1
}
我们发现5001状态确实是被停止掉,5002正常,5003已经被选举为主节点了。
4、接着我们在启动5001端口服务,我们会发现5001已经变成从节点了。
repset:SECONDARY> rs.status();
{
        "set" : "repset",
        "date" : ISODate("2015-12-08T01:47:56.763Z"),
        "myState" : 2,
        "members" : [
                {
                        "_id" : 0,
                        "name" : "127.0.0.1:5001",
                        "health" : 1,
                        "state" : 2,
                        "stateStr" : "SECONDARY",
                        "uptime" : 47,
                        "optime" : Timestamp(1449480292, 2),
                        "optimeDate" : ISODate("2015-12-07T09:24:52Z"),
                        "lastHeartbeat" : ISODate("2015-12-08T01:47:55.362Z"),
                        "lastHeartbeatRecv" : ISODate("2015-12-08T01:47:55.308Z"
),
                        "pingMs" : 0,
                        "lastHeartbeatMessage" : "could not find member to sync
from",
                        "configVersion" : 1
                },
                {
                        "_id" : 1,
                        "name" : "127.0.0.1:5002",
                        "health" : 1,
                        "state" : 2,
                        "stateStr" : "SECONDARY",
                        "uptime" : 539,
                        "optime" : Timestamp(1449480292, 2),
                        "optimeDate" : ISODate("2015-12-07T09:24:52Z"),
                        "configVersion" : 1,
                        "self" : true
                },
                {
                        "_id" : 2,
                        "name" : "127.0.0.1:5003",
                        "health" : 1,
                        "state" : 1,
                        "stateStr" : "PRIMARY",
                        "uptime" : 500,
                        "optime" : Timestamp(1449480292, 2),
                        "optimeDate" : ISODate("2015-12-07T09:24:52Z"),
                        "lastHeartbeat" : ISODate("2015-12-08T01:47:56.068Z"),
                        "lastHeartbeatRecv" : ISODate("2015-12-08T01:47:55.925Z"
),
                        "pingMs" : 0,
                        "electionTime" : Timestamp(1449538889, 1),
                        "electionDate" : ISODate("2015-12-08T01:41:29Z"),
                        "configVersion" : 1
                }
        ],
        "ok" : 1
}
JAVA测试
三个节点有一个节点挂掉也不会影响应用程序客户端对整个副本集的读写!
package com.hanfeng.test;
import java.util.List;
import org.bson.Document;
import org.junit.BeforeClass;
import org.junit.Test;
import org.slf4j.Logger;
import org.slf4j.LoggerFactory;
import com.google.common.collect.Lists;
import com.mongodb.BasicDBObject;
import com.mongodb.MongoClient;
import com.mongodb.ServerAddress;
import com.mongodb.client.FindIterable;
import com.mongodb.client.MongoCollection;
import com.mongodb.client.MongoCursor;
import com.mongodb.client.MongoDatabase;
/**
 *
* @Title: TestMongoDBReplSet.java
* @Package com.hanfeng.test
* @Description: TODO
* @author hanfeng
* @date 2015年12月8日 上午10:35:06
* @version V1.0
* @Copyright: 2011-2015 xxx.cn Inc. All rights reserved.
 */
public class TestMongoDBReplSet {
private static Logger log =LoggerFactory.getLogger(TestMongoDBReplSet.class);
private static MongoClient client;
private static MongoDatabase db;
@BeforeClass
public static void init(){
List<ServerAddress> addresses = Lists.newArrayList();
addresses.add(new ServerAddress("127.0.0.1", 5001));
addresses.add(new ServerAddress("127.0.0.1", 5002));
addresses.add(new ServerAddress("127.0.0.1", 5003));
client = new MongoClient(addresses);
    db = client.getDatabase("test");
}
/**
 * 插入数据
 */
@Test
public void testInsert() {
log.debug("begin Test insert data");
        MongoCollection<Document> collection = db.getCollection("user");

        // 插入
        Document doc = new Document();
        doc.put("userName", "测试用户");
        doc.put("age", 200);
        collection.insertOne(doc);
}
/**
 * 查询数据
 */
@Test
public void testFind(){
 MongoCollection<Document> collection = db.getCollection("user");
 FindIterable<Document> iterable = collection.find();
        MongoCursor<Document> cursor = iterable.iterator();
        while (cursor.hasNext()) {
         Document user = cursor.next();
         log.debug("检索的数据:"+user.getString("userName")+":"+user.getInteger("age"));
        }
}
/**
 * 更新数据
 */
@Test
public void testUpdate(){
 MongoCollection<Document> collection = db.getCollection("user");
 BasicDBObject newDocument = new BasicDBObject();
 //更新一个特定的值,使用 $set 来处理,不然会把整个文档替换掉
 newDocument.append("$set", new BasicDBObject().append("age", 30));

 BasicDBObject searchQuery = new BasicDBObject().append("userName", "test1");

 collection.updateOne(searchQuery, newDocument);
}
/**
 * 删除数据
 */
@Test
public void testDelete(){
 MongoCollection<Document> collection = db.getCollection("user");
 BasicDBObject query = new BasicDBObject("userName", "测试用户");
 collection.deleteMany(query);
}
}
到这里我们已经完成了副本集得架构搭建,那么这个架构是否完美呢?再这个架构上,我们的读写是在一起的,那么该如何解决读写压力过大问题,我们最常用的解决办法就是读写分离,那MongoDB得读写分离是如何进行的?我们接着来解决这个问题吧。
副本集读写分离
我们来改造下架构,如下
在大多数系统中,写的操作永远没有读的操作多,再3台副本集中,我们其中的一台主节点用来写操作,两台从节点负责读取操作。
1、设置读写分离需要先在副本节点SECONDARY 设置 setSlaveOk。
C:\Users\hanfeng>mongo 127.0.0.1:5001
2015-12-08T10:46:21.756+0800 I CONTROL  Hotfix KB2731284 or later update is not
installed, will zero-out data files
MongoDB shell version: 3.0.7
connecting to: 127.0.0.1:5001/test
repset:SECONDARY> db.user.find()
Error: error: { "$err" : "not master and slaveOk=false", "code" : 13435 }
repset:SECONDARY> db.getMongo().setSlaveOk();
repset:SECONDARY> db.user.find()
{ "_id" : ObjectId("566550638db08caa9ace63f6"), "userName" : "test1", "age" : 30
 }
{ "_id" : ObjectId("56663f6c1e2f251e14ddf934"), "userName" : "测试用户", "age" :
 200 }
repset:SECONDARY>
2、测试读写分离
//读操作从副本节点读取
ReadPreference preference = ReadPreference.secondary();
client.setReadPreference(preference);
读参数除了secondary一共还有五个参数:primary、primaryPreferred、secondary、secondaryPreferred、nearest。
primary:默认参数,只从主节点上进行读取操作;
primaryPreferred:大部分从主节点上读取数据,只有主节点不可用时从secondary节点读取数据。
secondary:只从secondary节点上进行读取操作,存在的问题是secondary节点的数据会比primary节点数据“旧”。
secondaryPreferred:优先从secondary节点进行读取操作,secondary节点不可用时从主节点读取数据;
nearest:不管是主节点、secondary节点,从网络延迟最低的节点上读取数据。
好,读写分离做好我们可以数据分流,减轻压力解决了“主节点的读写压力过大如何解决?”这个问题。不过当我们的副本节点增多时,主节点的复制压力会加大有什么办法解决吗?mongodb早就有了相应的解决方案。
其中的仲裁节点不存储数据,只是负责故障转移的群体投票,这样就少了数据复制的压力。是不是想得很周到啊,一看mongodb的开发兄弟熟知大数据架构体系,其实不只是主节点、副本节点、仲裁节点,还有Secondary-Only、Hidden、Delayed、Non-Voting。
Secondary-Only:不能成为primary节点,只能作为secondary副本节点,防止一些性能不高的节点成为主节点。
Hidden:这类节点是不能够被客户端制定IP引用,也不能被设置为主节点,但是可以投票,一般用于备份数据。
Delayed:可以指定一个时间延迟从primary节点同步数据。主要用于备份数据,如果实时同步,误删除数据马上同步到从节点,恢复又恢复不了。
Non-Voting:没有选举权的secondary节点,纯粹的备份数据节点。
到此整个mongodb副本集搞定了两个问题:
主节点挂了能否自动切换连接?目前需要手工切换。
主节点的读写压力过大如何解决?
还有这两个问题后续解决:
从节点每个上面的数据都是对数据库全量拷贝,从节点压力会不会过大?
数据压力大到机器支撑不了的时候能否做到自动扩展?
做了副本集发现又一些问题:
副本集故障转移,主节点是如何选举的?能否手动干涉下架某一台主节点。
官方说副本集数量最好是奇数,为什么?
mongodb副本集是如何同步的?如果同步不及时会出现什么情况?会不会出现不一致性?
mongodb的故障转移会不会无故自动发生?什么条件会触发?频繁触发可能会带来系统负载加重
参考:http://www.lanceyan.com/tech/mongodb/mongodb_repset1.html
https://docs.mongodb.org/manual/


