Unity3D上路_03-塔防游戏
4.5: http://netstorage.unity3d.com/unity/UnitySetup-4.5.0.exe
本文资源: http://pan.baidu.com/s/1dDxi1s1
书接前文,
一。新建地图
1.创建地形
GameObject,Create Other,Terrain,

2.设置地形尺寸
本例中设为Terrain Windth=10,Terrrain Length=10即可。
3.绘制路径
1)添加地形纹理
2)选择纹理
执行“Add”后整个地形纹理被改变。Texture:普通文理贴图,Normal Map:法线贴图,

3)添加路径纹理
4)加入我方基地
二。敌军路面(禁止埋伏地带)
1.创建敌军路面节点
创建“Dushman_Road”空游戏体,设置其Tag为“Dushman_Road”,

2.路面节点控制脚本
创建Dushman_Road.cs脚本,并关联路面节点游戏体,
using UnityEngine;
using System.Collections;

//定义场景信息
[System.Serializable]
/** 内部类。public:可被外部访问
    * 这个类不是继承自MonoBehaviour
    * 须使用 [System.Serializable] 保证其序列化
    * 从而可在编辑器中操作
    **/
public class MapData {
    public enum FieldTypeID {
        // 可以放置防守单位
        GN_Enable,
        //不可以放置防守单位
        GN_Disable,
    }
    //默认可以放置防守单位
    public FieldTypeID fieldtype = FieldTypeID.GN_Enable;
}

/** 主类
 * 敌军道路的路标
 **/
public class Dushman_Road : MonoBehaviour {

    public MapData _mapData;

    void OnDrawGizmos() {
        Gizmos.DrawIcon(this.transform.position, "gn_Disable.png");
    }
}
3.地图信息
创建GridMap.cs脚本,
using UnityEngine;
using System.Collections;

/** 存储整个地形的地图信息(网格、路标、转角) **/
public class GridMap : MonoBehaviour {

    // 单例
    static public GridMap Instance = null;

    // 是否显示场景信息
    public bool m_debug = false;

    // 场景的大小。10x10 个方块,编辑器内Terrain的属性也是10x10
    public int MapSizeX = 11;
    public int MapSizeZ = 11;

    // 一个二维数组用于保存场景信息
    public MapData[,] m_map;

    void Awake() {          // 早于Start方法执行
        Instance = this;

        // 初始化场景信息
        this.BuildMap();
    }

    /***************************** 创建地图 ************************/
    [ContextMenu("BuildMap")]   // 在本类的关联游戏体上添加项目属性菜单
    public void BuildMap() {
        // 初始化二维数组
        m_map = new MapData[MapSizeX, MapSizeZ];    // 指定数组长度

        for (int i = 0; i < MapSizeX; i++) {
            for (int k = 0; k < MapSizeZ; k++)
                m_map[i, k] = new MapData();
        }

        // 获得所有Tag为gridnode的节点
        GameObject[] nodes = (GameObject[])GameObject.FindGameObjectsWithTag("Dushman_Road");

        foreach (GameObject nodeobj in nodes) {
            // 节点实例
            Dushman_Road node = nodeobj.GetComponent<Dushman_Road>();
            // 节点位置
            Vector3 pos = nodeobj.transform.position;

            // 如果节点的位置超出场景范围,则忽略
            if ((int)pos.x >= MapSizeX || (int)pos.z >= MapSizeZ)
                continue;

            // 设置格子的属性
            m_map[(int)pos.x, (int)pos.z].fieldtype = node._mapData.fieldtype;
        }
    }

    // 绘制场景信息
    void OnDrawGizmos() {
        if (!m_debug || m_map == null)
            return;

        // 线条的颜色
        Gizmos.color = Color.blue;

        // 绘制线条的高度
        float height = 0;

        // 绘制网格
        for (int i = 0; i < MapSizeX; i++) {
            // i决定了格子的宽度
            Gizmos.DrawLine(new Vector3(i, height, 0), new Vector3(i, height, MapSizeZ));
        }
        for (int k = 0; k < MapSizeZ; k++) {
            // k决定格子高度
            Gizmos.DrawLine(new Vector3(0, height, k), new Vector3(MapSizeX, height, k));
        }

        // 改为红色
        Gizmos.color = Color.red;

        for (int i = 0; i < MapSizeX; i++) {
            for (int k = 0; k < MapSizeZ; k++) {
                //在不能放置防守区域的方格内绘制红色的方块
                if (m_map[i,k].fieldtype == MapData.FieldTypeID.GN_Disable) {
                    Gizmos.color = new Color(1, 0, 0, 0.5f);

                    Gizmos.DrawCube(new Vector3(i + 0.5f, height, k + 0.5f), new Vector3(1, height + 0.1f, 1));
                }
            }
        }
    }
}
4.地图控制器
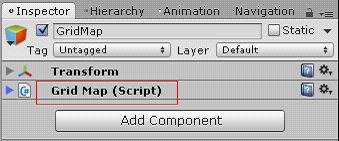
创建“GridMap”空游戏体,关联GridMap.cs脚本,
5.绘制网格
1)开启显示节点
2)绘制路面
执行GridMap属性/脚本/BuildMap命令,
目前Scene中已经有一个Dushman_Road游戏体了,如果没有会报错,

6.添加一个路径节点
目前已经有一个,将这个节点的属性 / Script / Map Data / Fieldtype设为“GN_Disable”,

7.依次添加全部节点
Ctrl + D 复制,(如果节点很多,可以创建一个空物体作为它们的父对象)
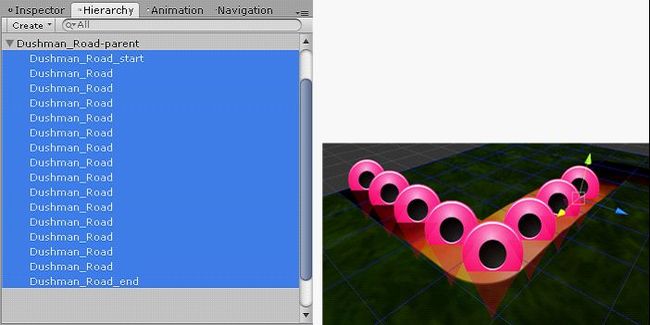
8.重新绘制路面
三。敌方行走线路
路面主要是供查看,以及设置我军不得在上面设防。下面的操作才决定敌人如何行动。
1.线路定义
Dushman_Path.cs
using UnityEngine;
using System.Collections;

/** 敌方线路定义点 **/
public class Dushman_Path : MonoBehaviour {

    public Dushman_Path m_PathPoint_Here;    // 当前起点
  public Dushman_Path m_PathPoint_There;   // 下一个目标点(转弯)

    /** 设置本起点的下一个目标点 **/
    public void SetNext(Dushman_Path node) {
        // 如果没有下一个目标点未指定
        if (m_PathPoint_There != null)
            // 起点的下一个目标
            m_PathPoint_There.m_PathPoint_Here = null;

        // 下一个目标点设为指定点
        m_PathPoint_There = node;
        // 当前起点就是本实例
        node.m_PathPoint_Here = this;
    }

    void OnDrawGizmos() {
        Gizmos.DrawIcon(this.transform.position, "Node.tif");
    }
}
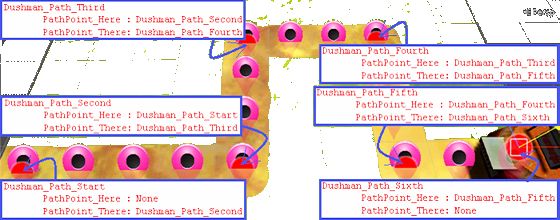
2.第一个路标-起点
创建空游戏体“Dushman_Path_Start”,关联Dushman_Path.cs,Tag设为“Dushman_Path”。移动到敌方行走路线起始处,

3.全部路标
1)创建第二个路标
Ctrl + D,复制Dushman_Path_Start为“Dushman_Path_Second”,放在第一个转弯处,

2)修改第一个路标属性
3)创建第三个路标
Ctrl + D,复制Dushman_Path_Start或Dushman_Path_Second为“Dushman_Path_Third”,放在下一个转弯处,

4)修改第二个路标属性
5)依次创建并设置后续路标
4.路标连线
1)升级地图控制器
GridMap.cs
using UnityEngine;
using System.Collections;

/** 存储整个地形的地图信息(网格、路标、转角) **/
public class GridMap : MonoBehaviour {
    static public GridMap Instance = null;
    public bool m_debug = false;
    public int MapSizeX = 11;
    public int MapSizeZ = 11;
    public MapData[,] m_map;

    // 敌方行走线路开关
    public bool m_pathDebug = false;
    // 敌方行走线路路标
    public ArrayList m_Dushman_Paths;

    void Awake() {
        Instance = this;
        this.BuildMap();
    }

    // 在Script属性项目添加菜单
    [ContextMenu("BuildPath")]
    public void BuildPath(){
        m_Dushman_Paths = new ArrayList();  // 初始化集合
        GameObject[] objs = GameObject.FindGameObjectsWithTag("Dushman_Path");  // 获取敌军路线坐标-路标
        for (int i = 0; i < objs.Length; i ++ ) {   // 遍历数组
            Dushman_Path node = objs[i].GetComponent<Dushman_Path>();   // 获取路标实例
            m_Dushman_Paths.Add(node);  // 保存到集合中
        }
    }

    [ContextMenu("BuildMap")]
    public void BuildMap() { 略 }

    void OnDrawGizmos() {
        if (!m_debug || m_map == null) // 这里会影响路标连线的显示
            return;
        Gizmos.color = Color.blue;
        float height = 0;
        for (int i = 0; i < MapSizeX; i++) {
            Gizmos.DrawLine(new Vector3(i, height, 0), new Vector3(i, height, MapSizeZ));
        }
        for (int k = 0; k < MapSizeZ; k++) {
            Gizmos.DrawLine(new Vector3(0, height, k), new Vector3(MapSizeX, height, k));
        }
        Gizmos.color = Color.red;
        for (int i = 0; i < MapSizeX; i++) {
            for (int k = 0; k < MapSizeZ; k++) {
                if (m_map[i,k].fieldtype == MapData.FieldTypeID.GN_Disable) {
                    Gizmos.color = new Color(1, 0, 0, 0.5f);
                    Gizmos.DrawCube(new Vector3(i + 0.5f, height, k + 0.5f), new Vector3(1, height + 0.1f, 1));
                }
            }
        }

        //------------------- 路标连线 -------------------------
        // 如果 敌方行走线路开关 未打开,或者路标数组为空
        if (!m_pathDebug || m_Dushman_Paths == null)
            return; // 啥也不干

        // 否则,

        Gizmos.color = Color.black;

        // 绘制路标连线
        foreach (Dushman_Path node in m_Dushman_Paths) {
            if (node.m_PathPoint_There != null) {
                Gizmos.DrawLine(node.transform.position, node.m_PathPoint_There.transform.position);
            }
        }
    }
}
2)创建连线
四。敌军
1.装甲车
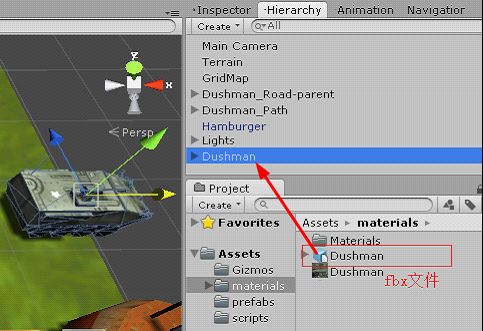
1)创建地面游戏体
2)关联控制脚本
Dushman.cs
using UnityEngine;
using System.Collections;

public class Dushman : MonoBehaviour
{
    public Dushman_Path m_StartNode;  // 路标
    public int m_life = 15;         // 生命
    public int m_maxlife = 15;      // 最大生命
    public float m_speed = 2;       // 移动速度

    public enum TYPE_ID { // 敌人的类型
        GROUND, // 地面类型
        AIR,    // 空中类型
    }
    public TYPE_ID m_type = TYPE_ID.GROUND; // 默认是地面的装甲车

    // Update is called once per frame
	void Update () {
        RotateTo();
        MoveTo();
	}

    /** 调整方向 **/
    public void RotateTo() {
        float current= this.transform.eulerAngles.y;    // 当前敌军姿势
        this.transform.LookAt(m_StartNode.transform); // 朝向路标
        Vector3 target = this.transform.eulerAngles;    // 定义目标点
        // Mathf.MoveTowardsAngle:基于旋转角度,计算出当前角度转向目标角度的差值角度(当前角度,目标角度,时长)
        float next=Mathf.MoveTowardsAngle(current, target.y, 120 * Time.deltaTime); // 转身角度
        this.transform.eulerAngles = new Vector3(0, next, 0);   // 转向
    }

    /** 调整位置,移动 **/
    public void MoveTo() {
        Vector3 pos1 = this.transform.position;             // 当前位置
        Vector3 pos2 = m_StartNode.transform.position;    // 路标位置
        // Vector2.Distance:计算平面上两个点的距离(第一个点,第二个点)
        float dist = Vector2.Distance(new Vector2(pos1.x,pos1.z),new Vector2(pos2.x,pos2.z));
        // 如果两点距离小于1(地形宽10,高10;地图的每个格子是1x1)
        if (dist < 1.0f) {
            // 如果是最后一个路标-没有linepoint_next
            if (m_StartNode.m_PathPoint_There == null) {
                Destroy(this.gameObject);   // 销毁游戏体
            }
            // 如果本路标后面有下一个路标
            else
                // 替换“下一个”为“本”
                m_StartNode = m_StartNode.m_PathPoint_There;
        }

        // 按 m_speed * Time.deltaTime 的速度向z方向移动
        this.transform.Translate(new Vector3(0, 0, m_speed * Time.deltaTime));
    }
}
3)指定起点路标
4)制作为prefab资源
2.飞艇
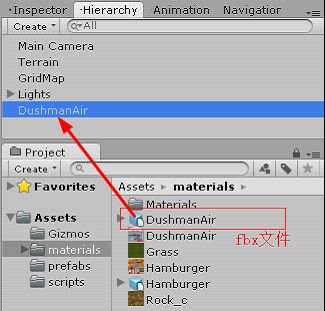
1)创建空中游戏体
2)关联飞艇控制脚本
using UnityEngine;
using System.Collections;

public class DushmanAir : Dushman{
	void Update () {
        RotateTo();
        MoveTo();
        Fly();  // 添加一个增强功能
	}

    /** 升空 **/
    public void Fly() {
        float hight = 0.15f;
        if (this.transform.position.y > 0.5) {
            hight = 0.15f;
        }

        float tt = Time.deltaTime;

        // 高度控制(在某方向上前进,递增)
        this.transform.Translate(new Vector3(0, hight * tt, 0));
  }
}
3)制作为prefab资源
3.敌军生产设备
1)敌军配置
DushmanWave.xml
<?xml version="1.0" encoding="UTF-8" standalone="yes"?>
<ROOT>
	<!--
    有几行table即有多少个敌军
		wave=攻击波次
		enemyname=敌军类型。对应prefab文件的Tag
		level=敌军级别
		wait=攻击延时
	-->
  <table wave="1" enemyname="air" level="7" wait="1"/>
	<table wave="1" enemyname="ground" level="1" wait="3"/>
	<table wave="1" enemyname="ground" level="1" wait="3"/>
	<table wave="1" enemyname="ground" level="7" wait="1"/>
	<table wave="1" enemyname="air" level="7" wait="1"/>
	<table wave="2" enemyname="air" level="2" wait="4"/>
	<table wave="2" enemyname="air" level="2" wait="4"/>
	<table wave="3" enemyname="ground" level="2" wait="3"/>
	<table wave="3" enemyname="air" level="3" wait="3"/>
	<table wave="4" enemyname="ground" level="3" wait="5"/>
	<table wave="4" enemyname="ground" level="3" wait="4"/>
	<table wave="5" enemyname="air" level="4" wait="4"/>
	<table wave="5" enemyname="air" level="4" wait="4"/>
	<table wave="6" enemyname="ground" level="4" wait="4"/>
	<table wave="6" enemyname="ground" level="4" wait="5"/>
	<table wave="7" enemyname="air" level="5" wait="4"/>
	<table wave="7" enemyname="ground" level="5" wait="3"/>
	<table wave="8" enemyname="air" level="5" wait="4"/>
	<table wave="8" enemyname="ground" level="5" wait="4"/>
	<table wave="9" enemyname="air" level="6" wait="4"/>
	<table wave="9" enemyname="air" level="6" wait="5"/>
  <table wave="10" enemyname="ground" level="7" wait="4"/>
  <table wave="10" enemyname="air" level="7" wait="4"/>
</ROOT>
2)生产设备控制脚本
DushmanSpawn.cs。需要引用到3个操作xml的类,
using UnityEngine;
using System.Collections;

public class DushmanSpawn : MonoBehaviour {
    public EnemyTable[] m_enemies;  // 敌军
    public Dushman_Path m_startNode; // 起始路点
    public TextAsset xmldata;       // 存储敌军出场顺序的XML
    ArrayList m_enemylist;          // 保存所有的从XML读取的数据
    float m_timer = 0;              // 距离下一次敌军出场的时间
    int m_index = 0;                // 出场敌军的序列号
    // 本次袭击的敌军数量,只有销毁当前波内所有敌人,才能进入下一波
    public int m_liveEnemy = 0;

    void Start() {
        ReadXML();// 读取XML

        // 获取下一个敌人
        SpawnData data = (SpawnData)m_enemylist[m_index];
        m_timer = data.wait;
    }

    // 读取XML
    void ReadXML() {
        m_enemylist = new ArrayList();
        XMLParser xmlparse = new XMLParser();
        XMLNode node = xmlparse.Parse(xmldata.text);

        XMLNodeList list = node.GetNodeList("ROOT>0>table");
        for (int i = 0; i < list.Count; i++) {

            string wave = node.GetValue("ROOT>0>table>" + i + ">@wave");
            string enemyname = node.GetValue("ROOT>0>table>" + i + ">@enemyname");
            string level = node.GetValue("ROOT>0>table>" + i + ">@level");
            string wait = node.GetValue("ROOT>0>table>" + i + ">@wait");

            SpawnData data = new SpawnData();
            data.wave = int.Parse(wave);
            data.enemyname = enemyname;
            data.level = int.Parse(level);
            data.wait = float.Parse(wait);

            m_enemylist.Add(data);
        }
    }

    void Update() {
        SpawnEnemy();
    }

    // 每隔一定时间生成一个敌军
    void SpawnEnemy() {
        if (m_index >= m_enemylist.Count)   // 如果已经生成所有敌人
            return;

        SpawnData data = (SpawnData)m_enemylist[m_index];// 获取下一个敌军

        // 等待
        m_timer -= Time.deltaTime;
        if (m_timer > 0)
            return;

        Transform enemyprefab = FindEnemy(data.enemyname);  // 查找敌人

        // 生成敌人
        if (enemyprefab != null) {
            Transform trans = (Transform)Instantiate(enemyprefab, this.transform.position, Quaternion.identity);
            Dushman enemy = trans.GetComponent<Dushman>();

            enemy.m_StartNode = m_startNode;      // 设置敌人的出发路点
            enemy.m_Spawn = this;              // 设置敌人的生成点
            // 设置敌人初始旋转方向
            enemy.transform.LookAt(m_startNode.transform);
            float ry = enemy.transform.eulerAngles.y;
            enemy.transform.eulerAngles = new Vector3(0, ry, 0);

            // 根据data.level设置敌人等级,本示例中略,只是简单的根据波数增加敌人的生命
            enemy.m_life = data.level * 3;
            enemy.m_maxlife = data.level * 3;
        }

        // 下一个
        m_index++;
        if (m_index >= m_enemylist.Count)
            return;

        SpawnData nextdata = (SpawnData)m_enemylist[m_index];       // 获得下一个敌人的数据
        m_timer = data.wait;                                        // 生成下一个敌人需要等待的时间
    }

    // 在EnemyTable查找enemy的prefab
    Transform FindEnemy(string enemyname) {
        foreach (EnemyTable enemy in m_enemies) {
            if (enemy.enemyName.CompareTo(enemyname) == 0) {
                return enemy.enemyPrefab;
            }
        }
        return null;
    }

    void OnDrawGizmos() {
        Gizmos.DrawIcon(this.transform.position, "item.png");
    }

    // 定义敌人标识
    [System.Serializable]
    public class EnemyTable {
        public string enemyName = "";
        public Transform enemyPrefab;
    }

    // XML数据
    public class SpawnData {
        // 波数
        public int wave = 1;
        public string enemyname = "";
        public int level = 1;
        public float wait = 1.0f;
    }
}
3)升级敌军脚本
Dushman.cs
using UnityEngine;
using System.Collections;

public class Dushman : MonoBehaviour {
    public Dushman_Path m_StartNode;
    public int m_life = 15;
    public int m_maxlife = 15;
    public float m_speed = 2;
    public enum TYPE_ID {
        GROUND,
        AIR,
    }
    public TYPE_ID m_type = TYPE_ID.GROUND;

  public DushmanSpawn m_Spawn;

    void Start() {
        m_Spawn.m_liveEnemy++;
    }

    void OnDisable() {
        if (m_Spawn)
            m_Spawn.m_liveEnemy--;
    }

    void Update() {
        RotateTo();
        MoveTo();
    }
    public void RotateTo() { 略 }
    public void MoveTo() { 略 }
}
4)创建生产设备游戏体
创建空游戏体,关联控制脚本,修改位置到敌军行走路线的起始路标处,

五。管理器
1.脚本
GameManager.cs
using UnityEngine;
using System.Collections;
public class GameManager : MonoBehaviour {
    public static GameManager Instance;
    // 敌人列表
    public ArrayList m_EnemyList = new ArrayList();
    void Awake() {
        Instance = this;
    }
}
2.游戏体
六。我军
1.升级敌军控制脚本
Dushman.cs
using UnityEngine;
using System.Collections;
public class Dushman : MonoBehaviour {
    public Dushman_Path m_StartNode;
    public int m_life = 15;
    public int m_maxlife = 15;
    public float m_speed = 2;
    public enum TYPE_ID {
        GROUND,
        AIR,
    }
    public TYPE_ID m_type = TYPE_ID.GROUND;
  public Dushman m_Spawn;

    void Start() {
        m_Spawn.m_liveEnemy++;

        GameManager.Instance.m_EnemyList.Add(this);
 	}

  void OnDisable() {
        if (m_Spawn)
            m_Spawn.m_liveEnemy--;

      if ( GameManager.Instance )
            GameManager.Instance.m_EnemyList.Remove(this);
  }

    void Update() {
        RotateTo();
        MoveTo();
    }
    public void RotateTo() { 略 }
  public void MoveTo() { 略 }

    public void SetDamage(int damage) {
        m_life -= damage;

        if (m_life <= 0) {
            Destroy(this.gameObject);
        }
    }
}
2.我军控制脚本
Defender.cs
using UnityEngine;
using System.Collections;

public class Defender : MonoBehaviour {

    // 目标敌人
    Dushman m_targetEnemy;

    // 攻击距离
    public float m_attackArea = 1.5f;

    // 攻击力
    public int m_power = 1;

    // 攻击时间间隔
    public float m_attackTime = 1.0f;

    // 攻击时间间隔
    public float m_timer = 0.0f;


	// Use this for initialization
	void Start () {

        GridMap.Instance.m_map[(int)this.transform.position.x, (int)this.transform.position.z].fieldtype = MapData.FieldTypeID.GN_Disable;
	}

	// Update is called once per frame
	void Update () {
        FindEnemy();    // 搜索敌军

        Attack();       // 攻击
	}

    /** 查找敌人 **/
    void FindEnemy(){
        m_targetEnemy = null;   // 目标敌军

        int lastlife = 0;
        ArrayList enemys = GameManager.Instance.m_EnemyList;   // 从管理器获取全部参战敌军

        foreach (Dushman enemy in enemys){
            if (enemy.m_life == 0)
                continue;

            Vector3 pos1 = this.transform.position;     // 我军位置
            Vector3 pos2 = enemy.transform.position;    // 敌军位置

            // 获取两个点的距离
            float dist=Vector2.Distance(new Vector2(pos1.x, pos1.z), new Vector2(pos2.x, pos2.z));

            if (dist > m_attackArea) {
                //Debug.Log("太远");

                //continue;
                return;
            }
            else {
                //Debug.Log("距离:" + dist);
            }

            if (lastlife == 0 || lastlife > enemy.m_life){
                m_targetEnemy = enemy;
                lastlife = enemy.m_life;
            }
        }
    }

    public void Attack(){
        RotateTo();     // 面向敌军

        m_timer -= Time.deltaTime;

        if (m_targetEnemy == null)
            return;

        if (m_timer > 0)
            return;

        m_targetEnemy.SetDamage(m_power);
        m_timer = m_attackTime;
    }


    public void RotateTo() {
        if (m_targetEnemy == null)
            return;

        Vector3 current = this.transform.eulerAngles;

        this.transform.LookAt(m_targetEnemy.transform);

        Vector3 target = this.transform.eulerAngles;

        float next = Mathf.MoveTowardsAngle(current.y, target.y, 120 * Time.deltaTime);

        this.transform.eulerAngles = new Vector3(current.x, next, current.z);
    }
}
3.我军游戏体
创建游戏体Defender,关联Defender.cs脚本,

4.制作为prefab资源
5.我军加兵按钮
1)脚本
DefenderButton.cs
using UnityEngine;
using System.Collections;

public class DefenderButton : MonoBehaviour {
    // button state
    protected enum StateID {
        NORMAL=0,   // 正常
        FOCUS,      // Focus
        ACTIV,      // 选中
    }
    protected StateID m_state = StateID.NORMAL;

    public Texture[] m_ButtonSkin;  // 0- normal, 1- focus, 2- activ

    // 按钮的ID
    public int m_ID = 0;    // 默认

    // 按钮是否处于始终激活状态
    protected bool m_isOnActiv = false;


    // 按钮的缩放
    [HideInInspector]   //使得一个变量不显示在inspector(检视面板)但是被序列化。即不会显示,也不会被外部类调用
    public float m_scale = 1.0f;

    // 屏幕位置
    Vector2 m_screenPosition;

    // 当前贴图
    public GUITexture m_texture;


    void Awake() {
        // 获得贴图
        m_texture = this.guiTexture;

        // 获得位置
        m_screenPosition = new Vector3(m_texture.pixelInset.x, m_texture.pixelInset.y, 0);

        // 设定状态
        SetState(StateID.NORMAL);
    }

    // 更新按钮状态,返回ID
    public int UpdateState(bool mouse, Vector3 mousepos) {
        int result = -1;

        if (m_texture.HitTest(mousepos)) {
            if (mouse) {
                SetState(StateID.ACTIV);

                return m_ID;
            }
            else {
                SetState(StateID.FOCUS);
            }

        }
        else {
            if (m_isOnActiv) {
                SetState(StateID.ACTIV);
            }
            else {
                SetState(StateID.NORMAL);
            }
        }

        return result;
    }


    // 设置按钮状态
    protected virtual void SetState(StateID state) {
        if (m_state == state)
            return;

        m_state = state;

        m_texture.texture = m_ButtonSkin[(int)m_state];

        float w = m_ButtonSkin[(int)m_state].width * m_scale;
        float h = m_ButtonSkin[(int)m_state].height * m_scale;

        m_texture.pixelInset = new Rect(this.m_screenPosition.x, m_screenPosition.y, w, h);
    }

    // 设置缩放
    public virtual void SetScale(float scale) {
        m_scale = scale;

        float w = m_ButtonSkin[0].width * scale;
        float h = m_ButtonSkin[0].height * scale;

        m_screenPosition.x *= scale;
        m_screenPosition.y *= scale;

        m_texture.pixelInset = new Rect(m_screenPosition.x, m_screenPosition.y, w, h);

    }

    // 是否始终处于高亮激活状态
    public virtual void SetOnActiv(bool isactiv) {
        if (isactiv) {
            SetState(StateID.ACTIV);
        }
        else if (m_isOnActiv) {
            SetState(StateID.NORMAL);
        }

        m_isOnActiv = isactiv;
    }
}
2)GUITexture
3)设置按钮
4)调整地形Layer
5)升级管理器
首先:将“DefenderButton”游戏体设为GameManager的子物体,

然后:升级管理器脚本,
using UnityEngine;
using System.Collections;

public class GameManager : MonoBehaviour {

    public static GameManager Instance;

    // 敌人列表
    public ArrayList m_EnemyList = new ArrayList();

    // 按钮
    DefenderButton m_button;       //----------------------------------

    // 当前选中的按钮ID
    int m_ID;                           //----------------------
    // 防守单位prefab
    public Transform m_guardPrefab;     //----------------------
    // 地面的碰撞层
    public LayerMask m_groundlayer;     //----------------------

    void Awake() {
        Instance = this;
    }


        // ------------------------------------
        void Start () {
            m_button = this.transform.FindChild("DefenderButton").GetComponent<DefenderButton>();

        }

        // -------------------------------------------------
        void Update () {

            // 按下鼠标操作
            bool press=Input.GetMouseButton(0);

            // 松开鼠标操作
            bool mouseup = Input.GetMouseButtonUp(0);

            // 获得鼠标位置
            Vector3 mousepos = Input.mousePosition;

            // 获得鼠标移动距离
            float mx = Input.GetAxis("Mouse X");
            float my = Input.GetAxis("Mouse Y");

            // 如果当前按钮ID大于0,并且处于松开鼠标操作
            if (m_ID > 0 && mouseup ) {
                //创建一条从摄像机射出的射线
                Ray ray = Camera.main.ScreenPointToRay(mousepos);

                //计算射线与地面的碰撞
                RaycastHit hit;
                if ( Physics.Raycast(ray, out hit, 100, m_groundlayer) ) {
                    //获得碰撞点的位置
                    int ix = (int)hit.point.x;
                    int iz = (int)hit.point.z;

                    if (ix >= GridMap.Instance.MapSizeX || iz >= GridMap.Instance.MapSizeZ || ix<0 || iz<0 )
                        return;

                    // 如果当前单元格可以摆放防守单位
                    if (GridMap.Instance.m_map[ix, iz].fieldtype == MapData.FieldTypeID.GN_Enable) {
                        Vector3 pos = new Vector3((int)hit.point.x + 0.5f, 0, (int)hit.point.z + 0.5f);

                        // 创建防守单位
                        Instantiate(m_guardPrefab, pos, Quaternion.identity);
                        m_ID = 0;

                        // 按钮重新恢复到正常状态
                        m_button.SetOnActiv(false);
                    }
                }
            }

            // 获得按钮的ID
            int id = m_button.UpdateState(mouseup, Input.mousePosition);
            if (id > 0) {
                m_ID = id;
                m_button.SetOnActiv(true);
                return;
            }
        }
}
6)关联管理器属性
6.测试

- end
资源:
本篇博文《Unity3D上路》: http://pan.baidu.com/s/1bnCfElL
鸣谢!
Unity3D高级开发 Mr.Vampire,QQ:475563418


