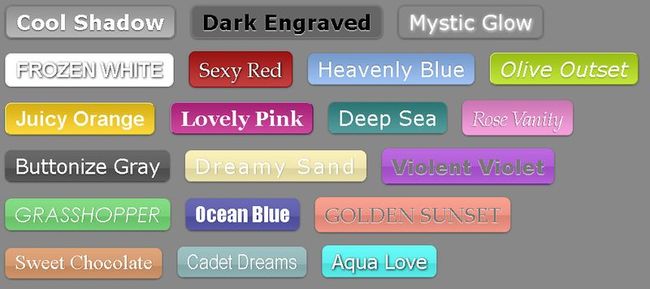
CSS3质感分析——表面线性渐变
W3cplus有关于CSS3的教程在国内来说算是比较多,也比较全的了,有理论介绍,也有实例分析。但有关于质感这种细节上的分析文章还没有写过。由于自己的美感较差,也不敢班门弄斧,恐怕误人子弟。今天由好友99客串W3cplus,由他向大家介绍一些有关于这方面的知识,希望大家喜欢,更希望这系列文章对大家今后的工作与设计有所帮助。
所谓质感。。。其实我也不知道怎么说,可以叫做 立体感,或者光感吧。。。作为前端,最怕的不是切什么图,其实是要把设计师的设计利用代码css3化表现出来,写过的css3效果也多不胜数了- -最近总结下,如何做类似的“质感”效果。这个系列我准备分析以下几种质感:
表面的颜色微凸感
单层牌匾立体效果
单层外侧盒子立体效果
多层立体效果
表面质感立体效果
光感动画效果
之后的文章,会详细分析网上流行的css3的一些质感效果,让大家不再恐惧Css3,最终可以见到一张图片就可以构思出他的css3实现!文章中主要用的工具:
markman标注神器。hypersnap7截图工具,新版本已经好用到极点了 chrome developer也就是chrome的F12 FB弱爆了..
css3在线渐变http://www.colorzilla.com/gradient-editor/
css3 http://www.css3maker.com/
1.表面渐变的立体感
分析第一张图 ,可以看到白色区域持续了25%左右,之后线性渐变到e6e6e6,(神马,你要问我怎么分析的。。其实在chrome控制台去掉按钮的文字,宽高padding加大就是了- -)
注意 持续,在css3线性渐变可以写作color-stop,之后我们利用生成器生成代码
background: rgb(254,255,255); /* Old browsers */
background: -moz-linear-gradient(top,  rgba(254,255,255,1) 0%, rgba(255,255,255,1) 25%, rgba(230,230,230,1) 100%); /* FF3.6+ */
background: -webkit-gradient(linear, left top, left bottom, color-stop(0%,rgba(254,255,255,1)), color-stop(25%,rgba(255,255,255,1)), color-stop(100%,rgba(230,230,230,1))); /* Chrome,Safari4+ */
background: -webkit-linear-gradient(top,  rgba(254,255,255,1) 0%,rgba(255,255,255,1) 25%,rgba(230,230,230,1) 100%); /* Chrome10+,Safari5.1+ */
background: -o-linear-gradient(top,  rgba(254,255,255,1) 0%,rgba(255,255,255,1) 25%,rgba(230,230,230,1) 100%); /* Opera 11.10+ */
background: -ms-linear-gradient(top,  rgba(254,255,255,1) 0%,rgba(255,255,255,1) 25%,rgba(230,230,230,1) 100%); /* IE10+ */
background: linear-gradient(to bottom,  rgba(254,255,255,1) 0%,rgba(255,255,255,1) 25%,rgba(230,230,230,1) 100%); /* W3C */
filter: progid:DXImageTransform.Microsoft.gradient( startColorstr='#feffff', endColorstr='#e6e6e6',GradientType=0 ); /* IE6-9 */
这是多么长的一坨啊- -
第二张图其实也很简单的。。虽然这个颜色我不知道,但我不会抄啊。。
你要问为啥会标出#8f0222 我也不是很清楚- - 查看代码应该是44%左右的渐变,于是我们继续生成一个渐变代码
background: rgb(168,3,41); /* Old browsers */
background: -moz-linear-gradient(top,  rgba(168,3,41,1) 0%, rgba(143,2,34,1) 44%, rgba(109,0,25,1) 100%); /* FF3.6+ */
background: -webkit-gradient(linear, left top, left bottom, color-stop(0%,rgba(168,3,41,1)), color-stop(44%,rgba(143,2,34,1)), color-stop(100%,rgba(109,0,25,1))); /* Chrome,Safari4+ */
background: -webkit-linear-gradient(top,  rgba(168,3,41,1) 0%,rgba(143,2,34,1) 44%,rgba(109,0,25,1) 100%); /* Chrome10+,Safari5.1+ */
background: -o-linear-gradient(top,  rgba(168,3,41,1) 0%,rgba(143,2,34,1) 44%,rgba(109,0,25,1) 100%); /* Opera 11.10+ */
background: -ms-linear-gradient(top,  rgba(168,3,41,1) 0%,rgba(143,2,34,1) 44%,rgba(109,0,25,1) 100%); /* IE10+ */
background: linear-gradient(to bottom,  rgba(168,3,41,1) 0%,rgba(143,2,34,1) 44%,rgba(109,0,25,1) 100%); /* W3C */
filter: progid:DXImageTransform.Microsoft.gradient( startColorstr='#a80329', endColorstr='#6d0019',GradientType=0 ); /* IE6-9 */
这又是多么长的一坨。。
玻璃效果
这是非常常见跟实用的效果,可以在大部分网站看到,包括苹果等。这类的效果很明显会发现在中间有个颜色突变,一般是50%是渐变色,51% 突变为另一种颜色。一般51%部分的颜色比上面要略深一点
因此我们可以写四个渐变点,仍然是线性渐变。
background: #eec2c7; /* Old browsers */
background: -moz-linear-gradient(top,  #eec2c7 0%, #d24d5c 50%, #ba2737 51%, #ee8894 100%); /* FF3.6+ */
background: -webkit-gradient(linear, left top, left bottom, color-stop(0%,#eec2c7), color-stop(50%,#d24d5c), color-stop(51%,#ba2737), color-stop(100%,#ee8894)); /* Chrome,Safari4+ */
background: -webkit-linear-gradient(top,  #eec2c7 0%,#d24d5c 50%,#ba2737 51%,#ee8894 100%); /* Chrome10+,Safari5.1+ */
background: -o-linear-gradient(top,  #eec2c7 0%,#d24d5c 50%,#ba2737 51%,#ee8894 100%); /* Opera 11.10+ */
background: -ms-linear-gradient(top,  #eec2c7 0%,#d24d5c 50%,#ba2737 51%,#ee8894 100%); /* IE10+ */
background: linear-gradient(to bottom,  #eec2c7 0%,#d24d5c 50%,#ba2737 51%,#ee8894 100%); /* W3C */
filter: progid:DXImageTransform.Microsoft.gradient( startColorstr='#eec2c7', endColorstr='#ee8894',GradientType=0 ); /* IE6-9 */
中间高光
这一类也是线性渐变的典型。我们要写五个渐变点,他的中间区域是高光区域。其实注意到1e589b跟1e589a两个颜色,这两个其实是无所谓的,跟边角相似即可,甚至相同也可以。生成了个类似代码,不用纠结里面的颜色。 这个渐变设计的要点是 中间的颜色要亮,并且不要一直过渡过去,前面20% 80%左右要有个缓冲。
background: #1e5799; /* Old browsers */
background: -moz-linear-gradient(top,  #1e5799 20%, #2989d8 50%, #1e5799 80%); /* FF3.6+ */
background: -webkit-gradient(linear, left top, left bottom, color-stop(20%,#1e5799), color-stop(50%,#2989d8), color-stop(80%,#1e5799)); /* Chrome,Safari4+ */
background: -webkit-linear-gradient(top,  #1e5799 20%,#2989d8 50%,#1e5799 80%); /* Chrome10+,Safari5.1+ */
background: -o-linear-gradient(top,  #1e5799 20%,#2989d8 50%,#1e5799 80%); /* Opera 11.10+ */
background: -ms-linear-gradient(top,  #1e5799 20%,#2989d8 50%,#1e5799 80%); /* IE10+ */
background: linear-gradient(to bottom,  #1e5799 20%,#2989d8 50%,#1e5799 80%); /* W3C */
filter: progid:DXImageTransform.Microsoft.gradient( startColorstr='#1e5799', endColorstr='#1e5799',GradientType=0 ); /* IE6-9 */
大家可以尝试做做以下的效果,利用上面的知识即可搞定~
总结 表面渐变颜色的取值是开始写表面质感的朋友最纠结的地方,其实完全可以不用太在意颜色,只要思路对了,渐变拐点打好了,可以轻松作出各种表面的质感效果
注意貌似有不少人对生成的渐变不太理解,我给个公式吧,来转换rgb颜色 rgb(255,255,255,0.6)与hex颜色 。之前的博客有讲过颜色转换 http://99jty.com/?p=573
下面是透明度+颜色
/*
* StartColorStr 和 EndColorStr:
* #4c000000 是 30% 透明度的 #000000 的意思
* 组成: # + 透明度 + 颜色
* 算法: Math.floor(0.6 * 255).toString(16);
*/
background:rgba(0, 0, 0, 0.65);
filter:progid:DXImageTransform.Microsoft.Gradient(GradientType=0, StartColorStr='#99000000', EndColorStr='#99000000
特别声明,这篇文章是由我的好友99写的,特别放到W3cplus与大家分享他的学习心得,希望大家能在文章中有所收获。您也可以点击原文阅读。W3cplus后续会持续发布相关文章,喜欢的同学请观注w3cplus的有关更新。
如需转载烦请注明出处:http://www.w3cplus.com/css3/surface-linear-gradient-with-css3-part1.html 同时注明作者:http://99jty.com/?p=763
