架构优化 - 应用,MQ Broker,业务处理分层
回顾
之前的两篇文章JavaMail发送google email 与 JMS-使用消息队列优化网站性能 以邮件发送系统为例,演示了网站架构的优化。
第一篇文章中的架构为同步式的,即用户请求,业务处理,用户响应是在一个线程中同步处理的。当业务处理需要花太多时间的时候,用户的体验度将大大下降。当大量并发的时候,用户的业务请求又无法得到响应。
第二篇文章对之前的邮件发送系统进行了优化,使用消息队列异步处理用户的业务。这样可以减少用户的响应时间,并在高并发的时候通过消息队列,延迟处理,以减缓服务器压力,避过洪峰。但由于用户请求处理,消息队列,以及业务处理均在同一个服务器上,它只能负担小型网站,但无法在性能,伸缩性,可用性上满足大型网站的需求。
本篇文章将继续前两篇文章的道路,改进架构,以满足大型网站的需求。
架构
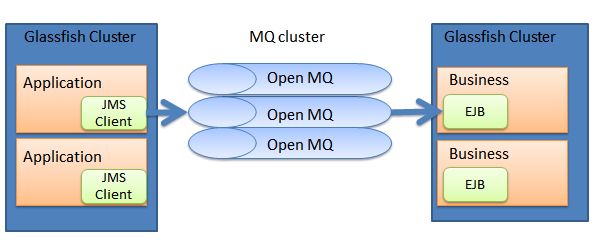
为了提高网站的性能,伸缩性和可用性,首先要做的就是对架构分层。将应用层或展示层和业务层,如果有数据访问层,统统分开。可以将它们放在不同的服务器上。以我们的邮件系统为例,首先需要对此分层,每层部署在单独的服务器上。
上图的模式无法满足可用性。一旦一个server挂掉,整个网站就瘫痪了。
为了提供网站并发的能力,提高可用性和伸缩性,可以将上面的架构改造成集群方式。
每个集群的节点可能在不同的物理机上,这样实现了高可用性,如果需要提高性能,可以继续想cluster中添加节点,这实现了伸缩性。
GlassFish Cluster,MQ cluster都不是很复杂,网上有大量的文档。然后cluster的搭建也是有多重方式的。应对不同容量的网站,cluster的搭建方式不同。越是高并发的cluster,越需要无状态的cluster。这点会在另一篇文章中详细叙述。
今天的例子,主要是针对分层,并不针对cluster。
分层实现
前提软件
Glassfish4
Standalone Open MQ
部署结构
最佳验证方式是使用3台物理机,其中其中两台安装glassfish,第三台安装Open MQ。应用层和业务层分别部署在两个不同的glassfish上,应用层与业务层通过第三台上的Open MQ进行消息传递。
如果没有3台物理机,也可以将它们装在一个物理机上。复制两份glassfish,一个安装应用层,一个安装业务层,同时启动,也可以模拟分布式。
安装配置Open MQ
到网站https://mq.java.net/downloads/index.html 下载最新版的MQ。
将下载的MQ压缩包解压到例如D:\sts\MessageQueue5.0。假设此目录为MQ_HOME.
打开文件MQ_HOME/etc/mq/imqenv.conf,加入
REM 如果消息的持久化需要数据库支持,则需要额外的数据库连接,把MQ需要的包放到下面。为了简单,本文使用文件持久化。
REM set IMQ_DEFAULT_EXT_JARS=c:\Program Files\Sun\JavaES5\hadb\4.4.3-5\lib\hadbjdbc4.jar;c:\Program Files\Sun\JavaDB\lib\derby.jar

set IMQ_DEFAULT_JAVAHOME=D:\sts\jdk1.7.0_10
set IMQ_DEFAULT_VARHOME=D:\sts\MessageQueue5.0\var
启动MQ,运行命令
MQ_HOME/mq/bin/imqbrokerd.exe -name mybroker -port 7677
查看log,发现Broker "mybroker@pcname:7677" ready.
添加MQ用户,运行命令
MQ_HOME/mq/bin/imqusermgr.exe add -i mybroker -u xpbug -p xpbug
列出用户:
MQ_HOME/mq/bin/imqusermgr.exe list -i mybroker -u xpbug
配置Glassfish的JMS服务
两个Glassfish的配置方法相同。首先打开glassfish的控制界面:http://localhost:4848/
如果Glassfish配置了cluster,JMS服务需要在cluster下创建,如果没有配置cluster,则需要在Server-config目录下配置JMS服务。另外一种方式就是使用JCA架构,配置Connector Resource,这种方式可以通过此文了解http://logicoy.com/logicoyblog/?p=129
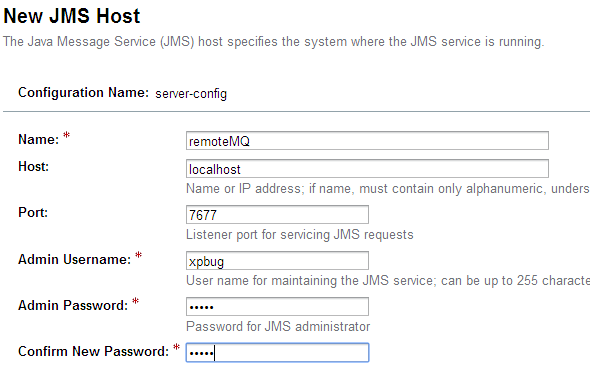
展开Configurations->Default-config->Java Mail Service,点击JMS hosts,删除Glassfish自带的defalt jms host。然后点击new按钮,创建自己的JMS host。
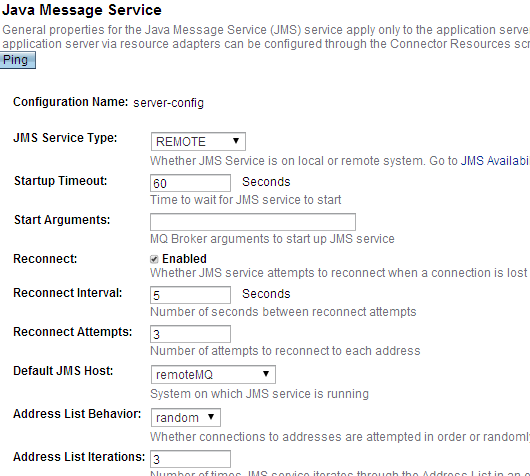
然后在左边的navigation中,点击Java Mail Service,选择remote jms host。
保存以后,我们的glassfish开始使用remote standalone OpemMQ了。
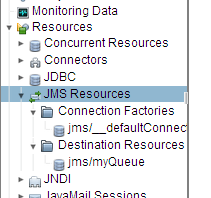
接下来,在Resources下面分别创建自己的ConnectionsFactory JNDI和JMS Destination JNDI
保存以后,Glassfish的配置就完成了。
在业务层服务器上配置Java Mail Session
请在上一篇文章中http://my.oschina.net/xpbug/blog/263974#OSC_h2_3 找到Gmail的配置方法。
开发应用层
创建一个Web项目,取名叫sample.
在welcome页面中,加入代码:
index.html
<html>
    <head>
        <title>TODO supply a title</title>
        <meta charset="UTF-8">
        <meta name="viewport" content="width=device-width, initial-scale=1.0">
    </head>
    <body>
        <form method="post" action="/sample/NotifyServlet">
            Email:<input name="email" value=""/>
            <input type="submit" value="Send" name="submit"/>
        </form>
    </body>
</html>
创建NotifyServlet:
package com.mycompany;

import java.io.IOException;
import java.io.PrintWriter;
import javax.annotation.Resource;
import javax.jms.ConnectionFactory;
import javax.jms.JMSContext;
import javax.jms.Queue;
import javax.servlet.ServletException;
import javax.servlet.annotation.WebServlet;
import javax.servlet.http.HttpServlet;
import javax.servlet.http.HttpServletRequest;
import javax.servlet.http.HttpServletResponse;

/**
 *
 * @author none2
 */
@WebServlet(name = "NotifyServlet", urlPatterns = {"/NotifyServlet"})
public class NotifyServlet extends HttpServlet {
    @Resource(lookup = "java:comp/MyJMSConnectionFactory")
    private ConnectionFactory connectionFactory;

    @Resource(lookup = "jms/myQueue")
    private Queue queue;

    @Override
    protected void doPost(HttpServletRequest request, HttpServletResponse response)
            throws ServletException, IOException {
        String email = request.getParameter("email");
        try (JMSContext context = connectionFactory.createContext();) {
            context.createProducer().send(queue, email);
        }
        response.setContentType("text/html;charset=UTF-8");
        try (PrintWriter out = response.getWriter()) {
            /* TODO output your page here. You may use following sample code. */
            out.println("<!DOCTYPE html>");
            out.println("<html>");
            out.println("<head>");
            out.println("<title>Servlet NotifyServlet</title>");
            out.println("</head>");
            out.println("<body>");
            out.println("<h1>You have send a notification to " + email + "</h1>");
            out.println("</body>");
            out.println("</html>");
        }
    }
}
然后打包web项目,并部署到glassfish1上。
开发业务层
创建一个EJB module project。在项目中,创建一个Message Driven Bean。
package com.mycompany;

import java.util.logging.Level;
import java.util.logging.Logger;
import javax.ejb.ActivationConfigProperty;
import javax.ejb.MessageDriven;
import javax.jms.JMSException;
import javax.jms.Message;
import javax.jms.MessageListener;
import javax.mail.Address;
import javax.mail.MessagingException;
import javax.mail.Session;
import javax.mail.Transport;
import javax.mail.internet.InternetAddress;
import javax.mail.internet.MimeMessage;
import javax.naming.Context;
import javax.naming.InitialContext;
import javax.naming.NamingException;

/**
 *
 * @author none2
 */
@MessageDriven(activationConfig = {
    @ActivationConfigProperty(propertyName = "destinationLookup", propertyValue = "jms/myQueue"),
    @ActivationConfigProperty(propertyName = "destinationType", propertyValue = "javax.jms.Queue")
})
public class EmailMessageBean implements MessageListener {
    private final Session mySession;

    public EmailMessageBean() throws NamingException {
        Context initCtx = new InitialContext();
        mySession = (Session) initCtx.lookup("mail/mySession");
    }

    @Override
    public void onMessage(Message message) {
        try {
            String address = message.getBody(String.class);
            javax.mail.Message mail = new MimeMessage(mySession);
            mail.setFrom(new InternetAddress("[email protected]"));
            Address toAddress = new InternetAddress(address);
            mail.addRecipient(javax.mail.Message.RecipientType.TO, toAddress);
            mail.setSubject("Hello");
            mail.setText("A notification.");
            Transport.send(mail);
        } catch (MessagingException | JMSException ex) {
            Logger.getLogger(EmailMessageBean.class.getName()).log(Level.SEVERE, null, ex);
        }
    }

}
然后将EJB打包,并部署到glassfish2上。
接下来,测试一下email系统是否工作吧。


