Maven环境下搭建Nexus本地仓库
1 下载nexus安装包 网址:http://www.sonatype.org/nexus/
建议下载最新的版本,最新的版本支持比较新的jdk版本
2 启动nexus服务
进入nexus的文件目录:D:\nexus-oss-webapp-1.9.2.4-bundle\nexus-oss-webapp-1.9.2.4\bin\jsw\windows-x86-32下面,
Installnexus.bat 表示安装nexus服务到window服务中去。
Startnexus.bat 表示启动nexus服务。
nexus.bat 表示启动nexus应用程序 。
Resumenexus.bat 表示重启nexus 。
Stopnexus.bat 表示停止nexus服务
启动nexus 无需启动tomcat,只需要点击“nexus.bat "就可以启动。
启动成功后 在浏览器地址栏中输入:
http://localhost:8081/nexus/index.html
如果看到nexus界面 说明启动成功。
3 设置maven的setting.xml文件
3.1 设置自定义的仓库
默认仓库会保存在c盘的C:\Users\dell\.m2下面,如果要使用自定义的仓库,则在setting.xml中添加下面的配置
<localRepository>e:/work/repository</localRepository>
3.2 设置镜像私服
 <mirrors>
    <!-- mirror
     | Specifies a repository mirror site to use instead of a given repository. The repository that
     | this mirror serves has an ID that matches the mirrorOf element of this mirror. IDs are used
     | for inheritance and direct lookup purposes, and must be unique across the set of mirrors.
     |-->
    <mirror>
      <id>nexus</id>
      <mirrorOf>*</mirrorOf>
      <name>Nexus Mirror</name>
      <url>http://localhost:8081/nexus/content/groups/public</url>
    </mirror>

  </mirrors>
3.3 设置 profile
 <profile>
      <id>nexus</id>
      <repositories>
        <repository>
          <id>nexus</id>
          <name>Nexus</name>
          <url>http://localhost:8081/nexus/content/groups/public</url>
          <releases><enabled>true</enabled></releases>
          <snapshots><enabled>true</enabled></snapshots>
        </repository>
      </repositories>
      <pluginRepositories>
        <pluginRepository>
          <id>nexus</id>
          <name>Nexus</name>
          <url>http://localhost:8081/nexus/content/groups/public</url>
          <releases><enabled>true</enabled></releases>
          <snapshots><enabled>true</enabled></snapshots>
        </pluginRepository>
      </pluginRepositories>
    </profile>
    <!--激活配置-->
    <activeProfiles>
        <activeProfile>nexus</activeProfile>
    </activeProfiles>
保存文件。
4 登录nexus 用户名admin 密码 admin123.
进入Repository菜单,修改 Apache Snapshots,Codehaus Snapshots,Maven Central的Download Remote indexs 为true.
并右击每一个仓库的 repair Index ,进行更新index 并把所有的proxy类型的仓库添加到public repository中去。
自己觉得比较好的其他的代理仓库如下:
添加新的repository 即代理仓库
http://repository.jboss.org/nexus/content/groups/public/
https://repository.jboss.org/nexus/content/groups/developer/
http://morphia.googlecode.com/svn/mavenrepo/
5 更新 public repository 的index
经过上面的配置后,基本的Maven+Nexus仓库就搭建好了 可以创建一个新的Maven project 进行测试。
6 备注
如果你安装的jdk是1.7的版本或者更高,请使用nexus版本2.0以上的版本
7 上传jar到本地仓库,如第三方的jar包 gearman 相关的jar包
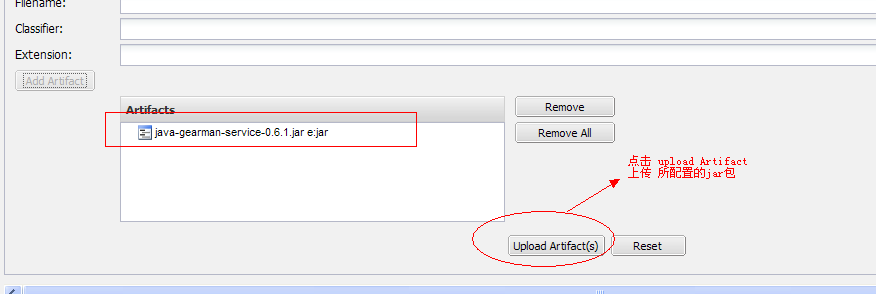
选中3rd party 点击Artifact Upload标签
点击 select artifact(s) 按钮 选择要上传到jar包 然后再add artiffact 如图所示
点击 uplaod artiffacts 上传jar包


