Tomcat 6 --- JNDI详解
JNDI(Java Naming and Directory Interface, Java命名和目录接口),说白了,就是通过配置一些xml文件,方便用户直接调用API使用某些通用的资源。
举个简单的例子,如果在tomcat中部署了很多应用,应用都需要使用同一个数据库,如果每个应用都在代码中配置数据库的连接,肯定是很麻烦的。
所以通过JNDI就可以简单的通过 InitialContext 获取到统一配置的资源,简化代码的编写。
本篇主要内容按照上面来讲解,其中样例部分主要说明一下通用javabeans和userdatabase,javamail很少使用,JDBC又很大众化,网上很多资料,可以参考 JNDI配置数据源,就不做重复工作了。
为了避免篇幅过长,自定义JNDI则留到后面再说。
配置
这里说明的内容,不是每次编码必须的步骤,只是先说明一下都有哪些地方涉及到配置。
web.xml
这部分内容配置资源引用,举个例子:
<resource-env-ref>
  <description>
    资源配置说明
  </description>
  <resource-env-ref-name>
    bean/MyBeanFactory
  </resource-env-ref-name>
  <resource-env-ref-type>
    com.mycompany.MyBean
  </resource-env-ref-type>
</resource-env-ref>
在web.xml中可以配置三种形式的资源:
<env-entry> 用于配置一些应用程序的变量,比如参考 tomcat下部署solr。
<resource-ref> 资源引用,通常是一个对象工厂资源,比如典型的JDBC数据源。
<resource-env-ref> 资源环境引用,他是servlet2.4中新引入的特性,在resource-ref的基础上,可以更简单方便的配置信息而不用经过身份验证,比如简单的javabean。
context.xml
这部分定义其引用的资源工厂以及一些必要的额外信息,比如:
<Context ...>
  ...
  <Resource name="bean/MyBeanFactory" auth="Container"
            type="com.mycompany.MyBean"
            factory="org.apache.naming.factory.BeanFactory"
            bar="23"/>
  ...
</Context>
这里需要注意的是,<context>标签有三种配置位置:
1 在conf/server.xml中;
2 在conf/context.xml中;
3 在/webapps/xxx/WEB-INF/context.xml;
这三种的区别是,server.xml与context.xml类似都是所有应用通用的,但是context.xml只是把它分离出来单独形成了一个文件而已。在WEB-INF/下的context.xml则是应用自己的,所以如果不想把某些信息公开,放在这里就可以了。
在<context>中可以配置如下的标签:
<Environment> 配置一些键值对变量,类似于<env-entry>
<Resource> 配置一些资源的类型和变量信息,类似于<resouce-ref>
<ResourceLink> 指定资源链接到全局上下文中的配置,比如在server.xml中配置了全局的一个标签,这里可以直接引入该标签名字。
<Transaction> 添加工厂资源实例
server.xml
这个文件中可以配置<context>标签,前面说过了;还可以配置全局JNDI资源,比如默认的tomcat就配置了一个userdatabase的资源
<GlobalNamingResources>
    <!-- Editable user database that can also be used by
         UserDatabaseRealm to authenticate users
    -->
    <Resource auth="Container" description="User database that can be updated and saved" factory="org.apache.catalina.users.MemoryUserDatabaseFactory" name="UserDatabase" pathname="conf/tomcat-users.xml" type="org.apache.catalina.UserDatabase"/>
  </GlobalNamingResources>
它就是一个全局的配置。
使用
配置好相应的xml文件,就可以在代码中直接通过创建Context实例,例如在配置数据源中:
Context initCtx = new InitialContext();
Context envCtx = (Context) initCtx.lookup("java:comp/env");
//上面写法都是不变的,下面这行中lookup中的字符串就是配置的JNDI名称,
//比如context中的<resource name="xxx">或者web.xml中的<resource-env-ref-name>
DataSource ds = (DataSource)envCtx.lookup("jdbc/EmployeeDB");
Connection conn = ds.getConnection();
... use this connection to access the database ...
conn.close();
样例
最后参考几个样例,了解一下编码细节。
1 通用JavaBean资源
首先,创建自己的javabean,并配置其构造方法设置初始化值。
package com.mycompany;

public class MyBean {
    //配置变量foo
    private String foo = "xingoo";
    public String getFoo() {
        return (this.foo);
    }
    public void setFoo(String foo) {
        this.foo = foo;
    }
    //配置变量bar
    private int bar = 0;
    public int getBar() {
        return (this.bar);
    }
    public void setBar(int bar) {
        this.bar = bar;
    }
}
然后,配置web.xml中资源引用
<?xml version="1.0" encoding="UTF-8"?>
<web-app xmlns:xsi="http://www.w3.org/2001/XMLSchema-instance" xmlns="http://java.sun.com/xml/ns/javaee" xsi:schemaLocation="http://java.sun.com/xml/ns/javaee http://java.sun.com/xml/ns/javaee/web-app_2_5.xsd" id="WebApp_ID" version="2.5">
  <display-name>JSPTest</display-name>

<resource-env-ref>
  <description>
    javaBean测试
  </description>
  <resource-env-ref-name>
    bean/MyBeanFactory
  </resource-env-ref-name>
  <resource-env-ref-type>
    com.mycompany.MyBean
  </resource-env-ref-type>
</resource-env-ref>

  <welcome-file-list>
    <welcome-file>index.html</welcome-file>
    <welcome-file>index.htm</welcome-file>
    <welcome-file>index.jsp</welcome-file>
    <welcome-file>default.html</welcome-file>
    <welcome-file>default.htm</welcome-file>
    <welcome-file>default.jsp</welcome-file>
  </welcome-file-list>
</web-app>
接下来,在tomcat conf/context.xml中配置工厂资源引用,并设置初始化的值
<?xml version="1.0" encoding="UTF-8"?>
<!--
  Licensed to the Apache Software Foundation (ASF) under one or more
  contributor license agreements.  See the NOTICE file distributed with
  this work for additional information regarding copyright ownership.
  The ASF licenses this file to You under the Apache License, Version 2.0
  (the "License"); you may not use this file except in compliance with
  the License.  You may obtain a copy of the License at

      http://www.apache.org/licenses/LICENSE-2.0

  Unless required by applicable law or agreed to in writing, software
  distributed under the License is distributed on an "AS IS" BASIS,
  WITHOUT WARRANTIES OR CONDITIONS OF ANY KIND, either express or implied.
  See the License for the specific language governing permissions and
  limitations under the License.
--><!-- The contents of this file will be loaded for each web application --><Context>

    <!-- Default set of monitored resources -->
    <WatchedResource>WEB-INF/web.xml</WatchedResource>

    <!-- Uncomment this to disable session persistence across Tomcat restarts -->
    <!--
    <Manager pathname="" />
    -->

    <!-- Uncomment this to enable Comet connection tacking (provides events
         on session expiration as well as webapp lifecycle) -->
    <!--
    <Valve className="org.apache.catalina.valves.CometConnectionManagerValve" />
    -->

  <Resource name="bean/MyBeanFactory" auth="Container"
            type="com.mycompany.MyBean"
            factory="org.apache.naming.factory.BeanFactory"
            bar="23"/>
</Context>
最后在JSP中调用lookup方法,获得实例。
<%@ page language="java" contentType="text/html; charset=utf-8"
    import="java.net.*,javax.naming.*,com.mycompany.*"
    pageEncoding="utf-8"%>
<!DOCTYPE html PUBLIC "-//W3C//DTD HTML 4.01 Transitional//EN" "http://www.w3.org/TR/html4/loose.dtd">
<html>
<head>
<meta http-equiv="Content-Type" content="text/html; charset=utf-8">
<title>test JNDI</title>
</head>
<body>
    <h1>test JNDI</h1>
    <hr>
    <%
    Context initCtx = new InitialContext();
    Context envCtx = (Context) initCtx.lookup("java:comp/env");
    MyBean bean = (MyBean) envCtx.lookup("bean/MyBeanFactory");
    %>
    foo:<%=bean.getFoo() %><br>
    bar:<%=bean.getBar() %>
</body>
</html>
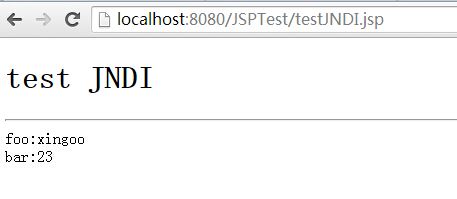
运行效果:
由于foo没有在<Resouce>标签中设置值,因此读取的还是默认的值,而bar则为设置的值。
2 Userdatabase使用
userdatabase即用户数据库,主要用于配置用户信息,以供某些应用进行授权验证。
关于其他的配置比如web.xml的Realm配置这里就不多说了,看看server.xml中如何设置全局资源引用:
<?xml version="1.0" encoding="UTF-8"?>
<Server port="8005" shutdown="SHUTDOWN">
...
  <GlobalNamingResources>
    <Resource auth="Container" description="User database that can be updated and saved" factory="org.apache.catalina.users.MemoryUserDatabaseFactory" name="UserDatabase" pathname="conf/tomcat-users.xml" type="org.apache.catalina.UserDatabase"/>
  </GlobalNamingResources>
  <Service name="Catalina">
    ...
    <Engine defaultHost="localhost" name="Catalina">
      <Realm className="org.apache.catalina.realm.UserDatabaseRealm" resourceName="UserDatabase"/>
     ...
    </Engine>
  </Service>
</Server>
其中<GlobalNamingResources>配置了全局命名资源UserDatabase,后面再进行Realm域管理时,直接通过resourceName链接到该资源。
3 JNDI数据源配置
这部分就不多说了,参考下面的JNDI配置数据源即可。
参考
【1】tomcat 6 JNDI resource : http://tomcat.apache.org/tomcat-6.0-doc/jndi-resources-howto.html
【2】通过JNDI配置数据源:http://www.blogjava.net/supercrsky/articles/174931.html

