httpd-2.4.9编译安装与配置(CGI、虚拟主机、https、deflate压缩)
1、准备好软件:
| pcre及pcre-devel | pcre是一个perl库,包含perl所兼容的正则表达式库。由于httpd服务具有CGI功能,而大多数的CGI都是基于perl的,所以需要安装这个库。 |
| apr-1.5.1 | apr是Apache可移植运行库,此库可以使httpd跨平台使用。是Apache必须依赖的库。httpd-2.4的event模块apr必须是1.5.x以上的 |
| apr-util-1.5.3 | 基于apr的更高级的库,名字类似是apr的工具 |
| httpd-2.4.9 |
今天要编译配置的主角。httpd-2.4.9相比2.2.x版本的已经全面支持event,并且IP控制使用Require all {granted|denied}取代了Allow from等等,而且虚拟主机不需要NameVirtualHost指令声明。 |
2、编译:
[root@pan soft]# ls apr-1.5.1.tar.gz apr-util-1.5.3.tar.bz2 httpd-2.4.9.tar.gz [root@pan soft]# |
#解包 [root@pan soft]# tar xf apr-1.5.1.tar.gz [root@pan soft]# tar xf apr-util-1.5.3.tar.bz2 [root@pan soft]# tar xf httpd-2.4.9.tar.gz [root@pan soft]# ls apr-1.5.1 apr-util-1.5.3 httpd-2.4.9 apr-1.5.1.tar.gz apr-util-1.5.3.tar.bz2 httpd-2.4.9.tar.gz [root@pan soft]# |
#编译安装apr-1.5.1到/application/apr-1.5.1目录中 [root@pan soft]# cd apr-1.5.1 [root@pan apr-1.5.1]# ./configure \ --prefix=/application/apr-1.5.1 && make && make install |
#编译安装apr-util-1.5.3到/application/apr-util-1.5.3目录中,并且指定apr所在目录 [root@pan soft]# cd apr-util-1.5.3 [root@pan apr-util-1.5.3]# ./configure \ --prefix=/application/apr-util-1.5.3 \ --with-apr=/application/apr-1.5.1/ && make && make install |
#编译安装httpd-2.4.9: [root@pan soft]# cd httpd-2.4.9 [root@pan httpd-2.4.9]# ./configure \ --prefix=/application/httpd --sysconfdir=/etc/httpd24 \ --enable-modules=most --enable-so --enable-ssl \ --enable-mpms-shared=all --enable-cgi --enable-rewrite \ --with-apr=/application/apr-1.5.1/ \ --with-apr-util=/application/apr-util-1.5.3/ \ --with-ssl --with-mpm=event --with-zlib && make && make install ######编译选项说明############## --prefix= #指定安装目录 --sysconfdir= #指定配置文件目录 --enable-modules=most #编译大多数模块 --enable-so #开启动态加载模块方式 --enable-ssl #开启ssl模块 --with-ssl= #指定ssl库的目录,如果不指定则自动搜寻系统路径。要安装openssl和openssl-devel --enable-mpms-shared=all #启用所有的mpm模块 --with-mpm=event #默认mpm模块是event,就是默认工作模型 --enable-cgi #开启cgi功能 --enable-rewrite #开启rewrite功能 --with-zlib #开启压缩库 --with-apr=/application/apr-1.5.1/ #指定的apr目录 --with-apr-util=/application/apr-util-1.5.3/ #指定apr-util的目录 |
3.一些后续操作
链接头文件 |
[root@pan httpd]# ln -s /application/httpd/include/ /usr/include/httpd |
链接库文件 |
#httpd没有生成库文件,所以不用链接。如果需要链接的话,可以执行: echo "库路径" >/etc/ld.so.conf.d/软件名.conf 或者 ln -sv 库路径 /usr/lib[64]/软件名 然后执行: ldconfig 重新加载即可 注:ldconfig -p 可以查看当前加载的库 |
| 链接man文档 | 在man.config添加:MANPATH /application/httpd/man |
链接bin目录 |
在/etc/profile.d/中添加httpd.sh,内容如下: export PATH=$PATH:/application/httpd/bin 重新登陆加载: . /etc/profile.d/httpd.sh |
| 备份 | tar Jcf /bak/httpd_config.tar.xz /etc/httpd24 |
4.基本配置:
隐藏httpd版本号 |
ServerTokens Prod ServerSignature Off |
| 配置默认首页 |
DirectoryIndex index.html |
| 配置监听端口 | Listen 80 |
| 配置网页目录 |
DocumentRoot "/application/httpd/htdocs" |
| 配置网页目录属性 | <Directory "/application/httpd/htdocs"> Options None AllowOverride None Require all granted </Directory> |
6.配置CGI方式的httpd:
CGI(Common Gateway Interface)是WWW技术中最重要的技术之一,有着不可替代的重要地位。CGI是外部应用程序(CGI程序)与Web服务器之间的接口标准,是在CGI程序和Web服务器之间传递信息的规程。CGI规范允许Web服务器执行外部程序,并将它们的输出发送给Web浏览器,CGI将Web的一组简单的静态超媒体文档变成一个完整的新的交互式媒体。
动态网站就是通过执行脚本来获得动态的数据。不过由于CGI并不安全(http需要调用并执行程序脚本,可能执行的程序脚本需要一些特殊权限,这时就会带来一些安全隐患问题),实际应用已经很少。
①确保mod_cgi.so模块已经加载:
[root@pan ~]# egrep "mod_cgi.so" /etc/httpd24/httpd.conf
LoadModule cgi_module modules/mod_cgi.so
[root@pan ~]#
②修改配置文件:
DocumentRoot "/application/httpd/htdocs"
AddHandler cgi-script .cgi .pl .sh
<Directory "/application/httpd/htdocs">
    Options ExecCGI
    AllowOverride None
    Require all granted
</Directory>
③添加一个bash测试脚本到/application/httpd/htdocs目录:
[root@pan htdocs]# cat index.sh
#!/bin/bash
#
cat << EOF
Content-Type: text/html
<pre>
The hostname is: `hostname`.
The time is: `date`
</pre>
EOF
[root@pan htdocs]# chmod +x index.sh
[root@pan htdocs]# ls -l index.sh
-rwxr-xr-x 1 root root 116 Dec  7 11:45 index.sh
[root@pan htdocs]#
④启动http并访问测试:
[root@pan htdocs]# httpd -t
Syntax OK
[root@pan htdocs]# httpd -k start
[root@pan htdocs]# ss -tnl
State       Recv-Q Send-Q        Local Address:Port          Peer Address:Port
LISTEN      0      3             10.247.56.153:53                       *:*
LISTEN      0      3                 127.0.0.1:53                       *:*
LISTEN      0      128                       *:22                       *:*
LISTEN      0      128               127.0.0.1:953                      *:*
LISTEN      0      100               127.0.0.1:25                       *:*
LISTEN      0      50                        *:3306                     *:*
LISTEN      0      128                       *:80                       *:*
[root@pan htdocs]#

7.配置脚本别名的CGI:
配置别名,就是用户访问的URL指定到一个特定的目录中,例如用户访问的是www.baidu.com/www/index.html,默认他会访问httpd根网页目录下的/www/index.html(在我们的环境就是/application/httpd/htdocs/www/index.html),而我们完全可以通过别名把他定位到/application/test目录中。当用户访问www.baidu.com/www/index.html会直接进入/application/test目录中。
而脚本别名的CGI,就是别名的CGI目录而已。注意:Alias用于定义普通别名,ScriptAlias定义脚本别名的CGI。
①为了体现实验效果,将刚才的配置注释并更改回原来的配置(不更改也不影响,我们为的是体现实验效果,也就是脚本别名不需要手动添加httpd服务的AddHandler cgi-script xx项和目录的ExecCGI选项,ScriptAlias参数会自动加载这两个选项):
DocumentRoot "/application/httpd/htdocs"
#AddHandler cgi-script .cgi .pl .sh
<Directory "/application/httpd/htdocs">
    Options None
    AllowOverride None
    Require all granted
</Directory>
②确保mod_alias.so和mod_cgi.so模块已经加载
[root@pan htdocs]# egrep "mod_cgi.so|mod_alias" /etc/httpd24/httpd.conf
LoadModule cgi_module modules/mod_cgi.so
LoadModule alias_module modules/mod_alias.so
[root@pan htdocs]#
③修改配置文件:
<IfModule alias_module>
ScriptAlias /cgi-bin/ "/application/httpd/cgi-bin/"
</IfModule>
<Directory "/application/httpd/cgi-bin">
    AllowOverride None
    Options None
    Require all granted
</Directory>
④添加脚本到/application/httpd/cgi-bin目录:
root@pan ~]# cp /application/httpd/htdocs/index.sh /application/httpd/cgi-bin
[root@pan ~]# ls /application/httpd/cgi-bin
index.sh  printenv  printenv.vbs  printenv.wsf  test-cgi
[root@pan ~]#
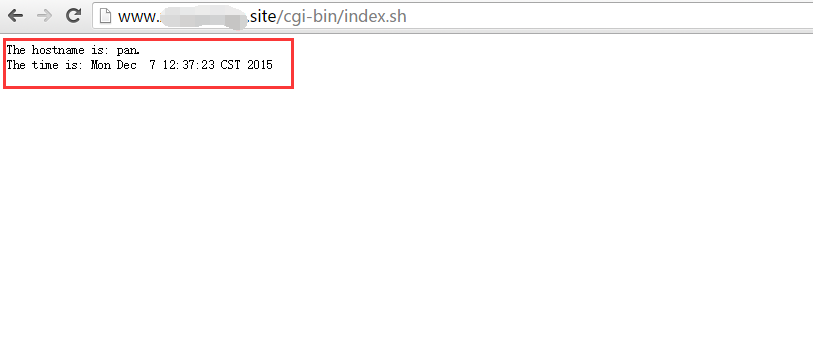
⑤重新加载配置文件并访问测试:
[root@pan ~]# httpd -k restart
[root@pan ~]# ss -tnl
State       Recv-Q Send-Q        Local Address:Port          Peer Address:Port
LISTEN      0      3             10.247.56.153:53                       *:*
LISTEN      0      3                 127.0.0.1:53                       *:*
LISTEN      0      128                       *:22                       *:*
LISTEN      0      128               127.0.0.1:953                      *:*
LISTEN      0      100               127.0.0.1:25                       *:*
LISTEN      0      50                        *:3306                     *:*
LISTEN      0      128                       *:80                       *:*
[root@pan ~]#
8.配置基于域名的虚拟主机:
虚拟主机可以在同一个服务器上实现多个web站点。可以配置多个虚拟主机,但是不能和中心主机并存。
①关闭中心主机配置(注释掉DocumentRoot项即可):
[root@pan extra]# sed -i 's@^DocumentRoot@#&@g' /etc/httpd24/httpd.conf
[root@pan extra]# grep "^#Document" /etc/httpd24/httpd.conf
#DocumentRoot "/application/httpd/htdocs"
[root@pan extra]#
②启用虚拟主机配置文件:
Include /etc/httpd24/extra/httpd-vhosts.conf
③配置虚拟主机:
[root@pan extra]# cat /etc/httpd24/extra/httpd-vhosts.conf
<VirtualHost *:80>
    DocumentRoot "/www/htdocs/a.com"
    ServerName www.a.com
    <Directory "/www/htdocs/a.com">
	Options None
	AllowOverride None
	Require all granted
    </Directory>
    ErrorLog "logs/a.com-error_log"
    CustomLog "logs/a.com-access_log" common
</VirtualHost>

<VirtualHost *:80>
    DocumentRoot "/www/htdocs/b.com"
    ServerName www.b.com
    <Directory "/www/htdocs/b.com">
	Options None
	AllowOverride None
	Require all granted
    </Directory>
    ErrorLog "logs/b.com-error_log"
    CustomLog "logs/b.com-access_log" common
</VirtualHost>
[root@pan extra]#
④提供页面:
[root@pan ~]# cat /www/htdocs/a.com/index.html
a.com
[root@pan ~]# cat /www/htdocs/b.com/index.html
b.com
[root@pan ~]# httpd -t
Syntax OK
[root@pan ~]# httpd -k restart
[root@pan ~]# ss -tnl
State       Recv-Q Send-Q        Local Address:Port          Peer Address:Port
LISTEN      0      3             10.247.56.153:53                       *:*
LISTEN      0      3                 127.0.0.1:53                       *:*
LISTEN      0      128                       *:22                       *:*
LISTEN      0      128               127.0.0.1:953                      *:*
LISTEN      0      100               127.0.0.1:25                       *:*
LISTEN      0      50                        *:3306                     *:*
LISTEN      0      128                       *:80                       *:*
[root@pan ~]#
⑤.测试:
Linux配置hosts解析:
[root@pan ~]# cat /etc/hosts
127.0.0.1 localhost www.a.com www.b.com
[root@pan ~]#
测试:
[root@pan ~]# curl www.a.com
a.com
[root@pan ~]# curl www.b.com
b.com
[root@pan ~]#
windows配置hosts解析:在C:\Windows\System32\drivers\etc\hosts添加IP对应的域名,我的是:
115.159.120.253 www.b.com
测试:


9.配置SSL主机。
SSL/TLS基于IP和端口建立安全的连接,如果要配置虚拟主机启用SSL功能的话,默认只能一个IP:Port配置一个虚拟主机,https默认为443端口。
①启用SSL配置文件:
Include /etc/httpd24/extra/httpd-ssl.conf
②为了实验效果我们关闭虚拟主机:
#Include /etc/httpd24/extra/httpd-vhosts.conf
③启动SSL模块
LoadModule socache_shmcb_module modules/mod_socache_shmcb.so
LoadModule ssl_module modules/mod_ssl.so
④使用openssl创建私有CA并生成证书
创建CA自己的私钥 |
[root@pan ~]# (umask 277;openssl genrsa -out /etc/pki/CA/private/cakey.pem 2048) Generating RSA private key, 2048 bit long modulus .......................................+++ ..............................+++ e is 65537 (0x10001) [root@pan ~]# ls /etc/pki/CA/private/ -l total 4 -r-------- 1 root root 1675 Dec 7 13:40 cakey.pem [root@pan ~]# |
生成CA自己的证书,并设置颁发列表文件 |
[root@pan ~]# (umask 277;openssl req -new -x509 -key /etc/pki/CA/private/cakey.pem -out /etc/pki/CA/cacert.pem) You are about to be asked to enter information that will be incorporated into your certificate request. What you are about to enter is what is called a Distinguished Name or a DN. There are quite a few fields but you can leave some blank For some fields there will be a default value, If you enter '.', the field will be left blank. ----- Country Name (2 letter code) [CN]:CN State or Province Name (full name) [BeiJing]:BeiJing Locality Name (eg, city) [ChangPing]:ChangPing Organization Name (eg, company) [Telecom]:Telecom Organizational Unit Name (eg, section) [Tech]:Tech Common Name (eg, your name or your server's hostname) []:ca.meng.com Email Address []: [root@pan ~]# touch /etc/pki/CA/index.txt [root@pan ~]# echo "00"> /etc/pki/CA/serial |
| 为http生成私钥 | [root@pan ~]# mkdir /etc/httpd24/ssl [root@pan ~]# (umask 277;openssl genrsa -out /etc/httpd24/ssl/httpd.key 2048) Generating RSA private key, 2048 bit long modulus .........................................+++ .+++ e is 65537 (0x10001) [root@pan ~]# |
http生成证书申请 |
[root@pan ~]# (umask 277;openssl req -new -key /etc/httpd24/ssl/httpd.key -out /etc/httpd24/ssl/httpd.csr -days 365) You are about to be asked to enter information that will be incorporated into your certificate request. What you are about to enter is what is called a Distinguished Name or a DN. There are quite a few fields but you can leave some blank For some fields there will be a default value, If you enter '.', the field will be left blank. ----- Country Name (2 letter code) [CN]:CN State or Province Name (full name) [BeiJing]:BeiJing Locality Name (eg, city) [ChangPing]:ChangPing Organization Name (eg, company) [Telecom]:Telecom Organizational Unit Name (eg, section) [Tech]:Tech Common Name (eg, your name or your server's hostname) []:www.ssl.com Email Address []: Please enter the following 'extra' attributes to be sent with your certificate request A challenge password []: An optional company name []: [root@pan ~]# |
| CA颁发证书 | [root@pan ~]# (umask 277;openssl ca -md sha256 -in /etc/httpd24/ssl/httpd.csr -out /etc/httpd24/ssl/httpd.crt) Using configuration from /etc/pki/tls/openssl.cnf Check that the request matches the signature Signature ok Certificate Details: Serial Number: 2 (0x2) Validity Not Before: Dec 7 05:49:40 2015 GMT Not After : Dec 6 05:49:40 2016 GMT Subject: countryName = CN stateOrProvinceName = BeiJing organizationName = Telecom organizationalUnitName = Tech commonName = www.ssl.com X509v3 extensions: X509v3 Basic Constraints: CA:FALSE Netscape Comment: OpenSSL Generated Certificate X509v3 Subject Key Identifier: CC:51:13:6B:2E:2A:C7:22:01:22:AC:66:0B:C2:91:EE:30:20:39:23 X509v3 Authority Key Identifier: keyid:BF:8A:1D:A7:EE:77:C5:7E:EC:5F:AB:1A:B5:BC:D4:9F:59:FE:56:38 Certificate is to be certified until Dec 6 05:49:40 2016 GMT (365 days) Sign the certificate? [y/n]:y 1 out of 1 certificate requests certified, commit? [y/n]y Write out database with 1 new entries Data Base Updated [root@pan ~]# ls -l /etc/httpd24/ssl total 16 -r-------- 1 root root 4453 Dec 7 13:49 httpd.crt -r-------- 1 root root 1005 Dec 7 13:47 httpd.csr -r-------- 1 root root 1675 Dec 7 13:45 httpd.key [root@pan ~]# |
⑤修改httpd的SSL配置文件:
[root@pan ~]# vim /etc/httpd24/extra/httpd-ssl.conf
######################SSL global Config###########################
Listen 443
SSLCipherSuite HIGH:MEDIUM:!aNULL:!MD5
SSLPassPhraseDialog  builtin
SSLSessionCache        "shmcb:/application/httpd/logs/ssl_scache(512000)"
SSLSessionCacheTimeout  300
######################Virtual Host Config#######################
<VirtualHost _default_:443>
DocumentRoot "/www/htdocs/ssl/"
ServerName www.ssl.com:443
<Directory "/www/htdocs/ssl">
  Options None
  Allowoverride None
  Require all granted
</Directory>
ErrorLog "/application/httpd/logs/ssl_error_log"
TransferLog "/application/httpd/logs/ssl_access_log"
SSLEngine on
SSLCertificateFile "/etc/httpd24/ssl/httpd.crt"   #证书文件
SSLCertificateKeyFile "/etc/httpd24/ssl/httpd.key"  #私钥文件
<FilesMatch "\.(cgi|shtml|phtml|php)$">
    SSLOptions +StdEnvVars
</FilesMatch>
<Directory "/application/httpd/cgi-bin">
    SSLOptions +StdEnvVars
</Directory>
BrowserMatch "MSIE [2-5]" \
         nokeepalive ssl-unclean-shutdown \
         downgrade-1.0 force-response-1.0
CustomLog "/application/httpd/logs/ssl_request_log" \
          "%t %h %{SSL_PROTOCOL}x %{SSL_CIPHER}x \"%r\" %b"
</VirtualHost>
⑥启动服务提供文件:
[root@pan extra]# httpd -t
Syntax OK
[root@pan extra]# echo "<h1>SSL Test</h1>" >/www/htdocs/ssl/index.html
[root@pan extra]# httpd -k restart
[root@pan extra]# ss -tnl
State       Recv-Q Send-Q        Local Address:Port          Peer Address:Port
LISTEN      0      3             10.247.56.153:53                       *:*
LISTEN      0      3                 127.0.0.1:53                       *:*
LISTEN      0      128                       *:22                       *:*
LISTEN      0      128               127.0.0.1:953                      *:*
LISTEN      0      100               127.0.0.1:25                       *:*
LISTEN      0      128                       *:443                      *:*
LISTEN      0      50                        *:3306                     *:*
LISTEN      0      128                       *:80                       *:*
[root@pan extra]#
⑧测试:
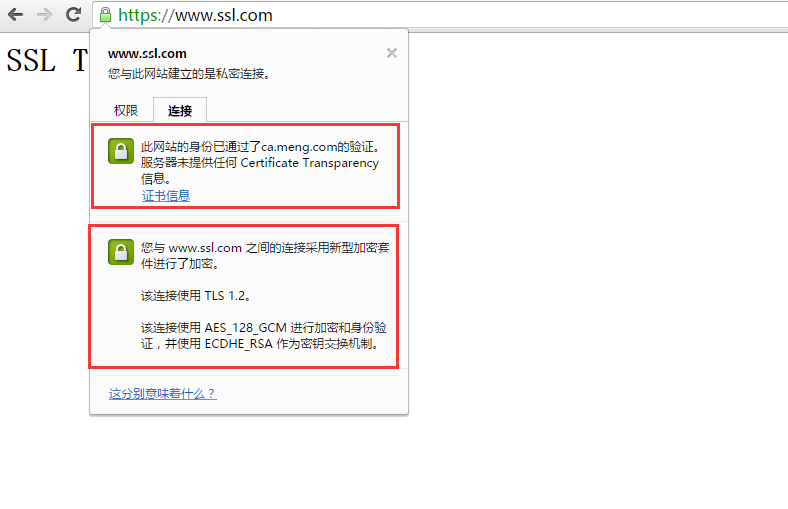
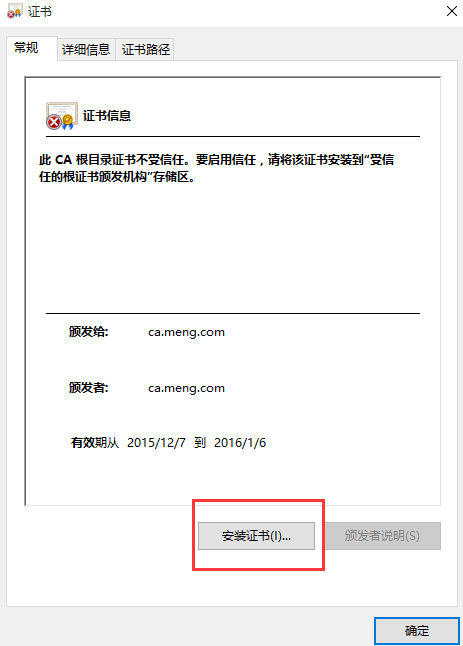
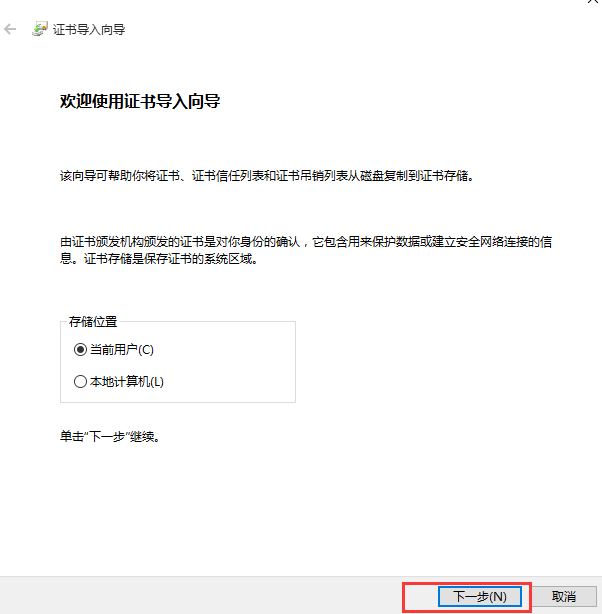
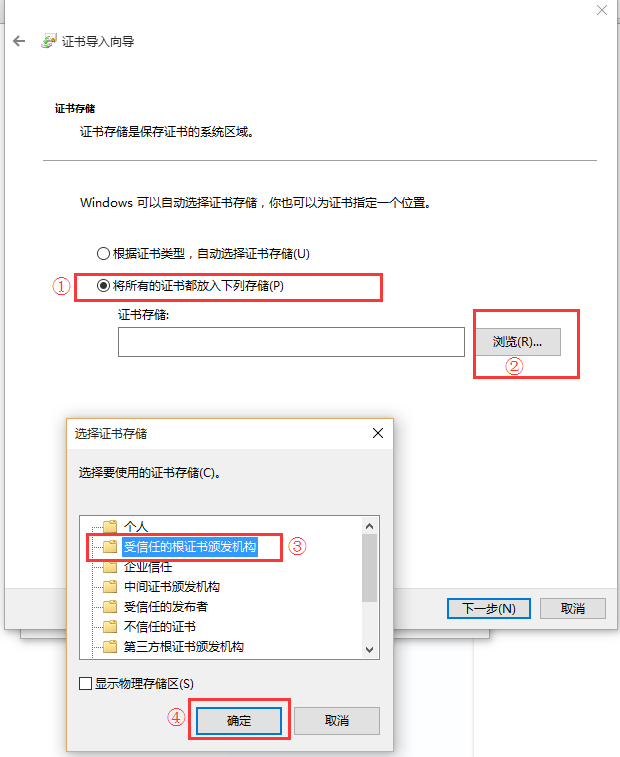
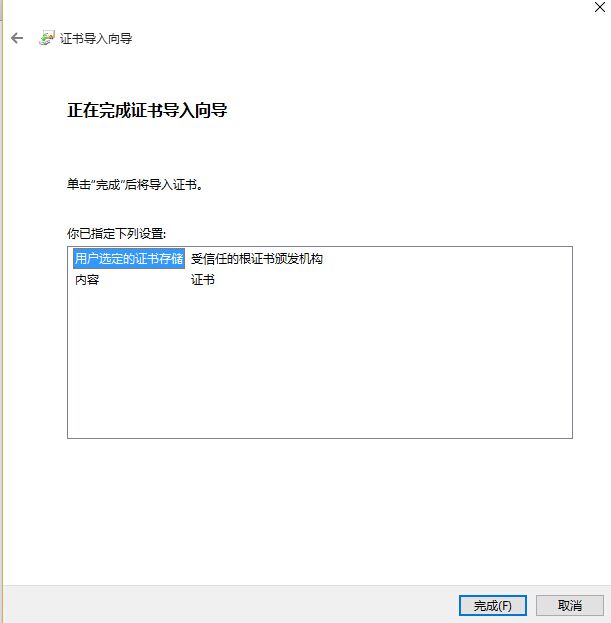
 这里显示不是私密连接,原因是我们的CA服务器的证书没有导入到本地计算机,所以无法验证服务器端的真实性,将CA的证书(/etc/pki/CA/cacert.pem)下载下来将后缀改为crt导入:



⑨访问测试:
