PXE + NFS + kickstart实现无人值守安装RHEL5
一、原理
实现网络安装的过程是这样的:PXE网卡启动------DHCP服务器------获得IP------从TFTP上下载pxelinux.0、vmlinuz、initrd------启动系统------通过PEXlinux去NFS下载ks.cfg文件-----根据ks.cfg去NFS下载RPM包及安装系统------完成安装。
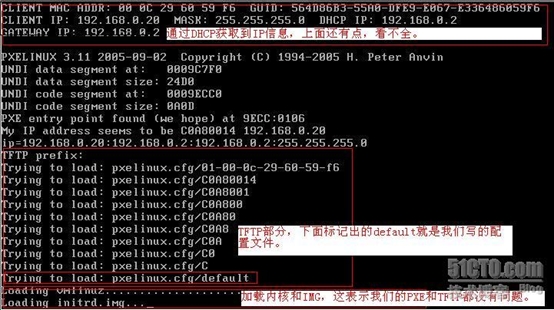
工作流程:
1、
pxe
启动,就广播寻找
dhcp
服务器获取
ip
地址和
bootstrap
文件,成功以后进入第二步(
DHCP
提供
IP
地址,还有
bootstrap
配置文件的位置)

2
、
client
通过
tftp
连接到服务器,下载
bootstrap
文件。(
linux
里的
bootstrap
文件就是
pxelinux.0
,系统内有,大家可以使用
#locate pxelinux.0
查找它存放的位置)
3、
client
下载成功
pxelinux.0
文件后,系统还会下载控制
pxelinux.0
的配置文件,叫
default
。然后
client
就会按照
default
的配置来执行
pxelinux.0
文件。
4、
现在
client
端会再获取一次
IP
地址。并且根据
DHCP
服务器配置文件找到
kickstart
配置文件并下载。也是使用的
tftp
协议。
5、
pxelinux.0
文件定义的想服务器请求
linux
内核,根文件系统之类的参数。运行这个文件,
client
就会向服务器请求相关的文件并
下载,都里使用的都是
tftp
协议。

6、
文件下载文成后,
client
就会启动
linux
内核,这就进入了我们安装时候看见的第一个图形界面,这个界面和自己安装看见的第一个画面一样,回车就是图形安装,输入
text
就是文本安装那里。如果使用了
kickstart
,这个界面消失很快,可能看不见。到这里
PXE
启动就完成了。
7、
下面就该主角
kickstart
出场了。其实
kickstart
在第四步已经出现了,当按照
default
要求运行
pxelinux.0
文件,系统读取内核,挂在根文件系统以后的任务就都交给了
kickstart
了。包括安装介质来源、语言、时区、分区、安装哪些包等,都是在
kickstart
文件中定义。
只要进入这一步, kickstart 配置文件正确,我们的无人值守安装已经成功了。
只要进入这一步, kickstart 配置文件正确,我们的无人值守安装已经成功了。
二、安装步骤
需要的环境
1
、一台
server
担任
DHCP\TFTP\NFS
服务器
2 、一台 client ,支持 pxe 网卡启动
3 、服务器要有安装所需的所有包
2 、一台 client ,支持 pxe 网卡启动
3 、服务器要有安装所需的所有包
具体实施步骤
1、
配置好自己的
yum
服务器
2
、配置
NFS
服务
[root@server1 tftpboot]# mkdir -p /mnt/install
[root@server1 tftpboot]# vim /etc/exports
/mnt/install 192.168.0.0/24(ro,async)
[root@server1 tftpboot]# service nfs restart
Shutting down NFS mountd: [FAILED]
Shutting down NFS daemon: [FAILED]
Shutting down NFS services: [ OK ]
Starting NFS services: [ OK ]
Starting NFS quotas: [ OK ]
Starting NFS daemon: [ OK ]
Starting NFS mountd: [ OK ]
[root@server1 tftpboot]# cp –rv /mnt/cdrom/* /mnt/install
/mnt/cdrom
是光盘挂载目录
这里我尝试使用
ln
,但是之后在客户机安装的时候找不到安装树
3
、配置
TFTP
服务
yum install –y tftp-server
安装
tftp server
软件包
[root@server1 Server]# vim /etc/xinetd.d/tftp
service tftp
{
socket_type = dgram
protocol = udp
wait = yes
user = root
server = /usr/sbin/in.tftpd
server_args = -s /tftpboot
disable = no
per_source = 11
cps = 100 2
flags = IPv4
}
或者
chkconfig tftp on
[root@server1 Server]# service xinetd restart
Stopping xinetd: [ OK ]
Starting xinetd: [ OK ]
[root@server1 Server]# netstat -nupal |grep 69
udp 0 0 0.0.0.0:69 0.0.0.0:* 5433/xinetd
udp 0 0 :::32769 :::* 5159/avahi-daemon:
[root@server1 Server]#
OK
,
TFTP
服务已经开启。
4
、配置
DHCP
服务
Yum install -y dhcp
安装
dhcp
软件包
[root@server1 Server]# cat /etc/dhcpd.conf
#
# DHCP Server Configuration file.
# see /usr/share/doc/dhcp*/dhcpd.conf.sample
[root@server1 Server]# cp /usr/share/doc/dhcp-3.0.5/dhcpd.conf.sample /etc/dhcp.conf
cp: overwrite `/etc/dhcpd.conf'? Y
[root@server1 Server]# vim /etc/dhcpd.conf
ddns-update-style interim; #
定义所支持的
DNS
动态更新类型(必选)
ignore client-updates;
subnet 192.168.0.0 netmask 255.255.255.0 {
# --- default gateway
option routers 192.168.0.1;
option subnet-mask 255.255.255.0;
filename "/pxelinux.0";
指定
pxelinux.0
的位置,相对于
tftpboot
next-server 192.168.0.1;
指定
TFTP
地址
option time-offset -18000; # Eastern Standard Time
range dynamic-bootp 192.168.0.128 192.168.0.254;
default-lease-time 21600;
max-lease-time 43200;
}
[root@server1 Server]# service dhcpd start
Starting dhcpd: [ OK ]
[root@server1 Server]# netstat -nupal | grep dhcpd
udp 0 0 0.0.0.0:67 0.0.0.0:* 5525/dhcpd
5
、配置
pxe
服务模块
[root@server1 Server]# updatedb
[root@server1 Server]# locate pxelinux.0
/tftpboot/linux-install/pxelinux.0
/usr/lib/syslinux/pxelinux.0
[root@server1 Server]# cp /usr/lib/syslinux/pxelinux.0 /tftpboot/
[root@server1 Server]#
[root@server1 cdrom]# pwd
/mnt/cdrom
[root@server1 cdrom]# /bin/cp isolinux/* /tftpboot/
此处的
vmlinuz initrd.img
用
images\pxeboot
中的也行
[root@server1 cdrom]# cd /tftpboot/
[root@server1 tftpboot]# mkdir pxelinux.cfg
[root@server1 tftpboot]# cp isolinux.cfg pxelinux.cfg/default
此处要注意
default
的权限,其他人要有可读权限
[root@server1 tftpboot]# vim pxelinux.cfg/default
default linux
prompt 1
timeout 10
设置
boot
:后面超时时间
display boot.msg
F1 boot.msg
F2 options.msg
F3 general.msg
F4 param.msg
F5 rescue.msg
label linux
kernel vmlinuz
append initrd=initrd.img ks=nfs:192.168.0.1:/mnt/install/ks.cfg
label text
kernel vmlinuz
append initrd=initrd.img text
label ks
kernel vmlinuz
append ks initrd=initrd.img
label local
localboot 1
label memtest86
kernel memtest
append -
安装
kickstart
配置工具:
[root@server1 ~]# cd /mnt/cdrom
[root@server1 cdrom]# cd Server/
[root@server1 Server]# yum install -y system-config-kickstart
[root@server1 Server]# system-config-kickstart
这个命令是在
X
下运行的。
用
system-config-kickstart
打开
/root/anaconda-ks.cfg,
根据需求修改配置。并且另存为
/mnt/install/ks.cfg
#platform=x86, AMD64, or Intel EM64T
# System authorization information
auth --useshadow --enablemd5
# System bootloader configuration
bootloader --append="rhgb quiet" --location=mbr --driveorder=sda
# Clear the Master Boot Record
zerombr
# Partition clearing information
clearpart --all --initlabel
这行一定不能注释,否则会让你确认是否格式化硬盘
# Use text mode install
text
# Firewall configuration
firewall --disabled
# Run the Setup Agent on first boot
firstboot --disable
key --skip
跳过安装序列号
# System keyboard
keyboard us
# System language
lang en_US
# Installation logging level
logging --level=info
# Use NFS installation media
nfs --server=192.168.0.1 –dir=/mnt/install
# Network information
network --bootproto=dhcp --device=eth0 --onboot=on
# Reboot after installation
reboot
#Root password
rootpw --iscrypted $1$K3L4H4zb$5DPvt/Va6WHXTYHnUKrzh.
# SELinux configuration
selinux --disabled
# System timezone
timezone --isUtc Asia/Shanghai
# Install OS instead of upgrade
install
# X Window System configuration information
xconfig --defaultdesktop=GNOME --depth=24 --resolution=1024x768 --startxonboot
# Disk partitioning information
part /boot --bytes-per-inode=4096 --fstype="ext3" --size=256
part swap --bytes-per-inode=4096 --fstype="swap" --size=512
part / --bytes-per-inode=4096 --fstype="ext3" --grow s--size=1
%packages
@office
@editors
@text-internet
@gnome-desktop
@dialup
@core
@base
@games
@java
@legacy-software-support
@base-x
@graphics
@printing
@sound-and-video
@admin-tools
@graphical-internet
emacs
kexec-tools
device-mapper-multipath
xorg-x11-utils
xorg-x11-server-Xnest
libsane-hpaio
-sysreport
这个是我的
ks.cfg
设置客户端从
pxe
启动就可以了,这样无人值守安装就完成了
kickstart
服务器排除
1 、关闭防火墙,系统自带的和 IPTABLES 都要关闭
2 、 从网卡启动,获取不到 IP 地址检查你的 DHCP 服务器是否开机,使用 #netstat -tulnp | grep dhcpd ,来查看是否在监听 67 号端口。
3 、获取 IP 后,在 TFTP 那步卡住了。检查你的 DHCP 配置文件, next-server 是不是指的正确的 tftp 服务器。 TFTP 服务器是否开启,是否运行正常。 可以在 linux 里面使用这个方法来测试
#tftp 您的服务器 IP 登陆进入后
tftp>get pxelinux.0
tftp>quit
查看当前目录是否有 pxelinux.0 这个文件,有的话,证明你的 tftp 服务器是正常的最后检查你的网络中是不是还有其他 dhcp 服务器
4 、内核成功加载后,系统有完成自动安装,需要人工介入,那就证明你的 kickstart 脚本文件出问题了,需要重新生成以个,或者使用我给的,在里面修改下 NFS 的服务器的地址就可以用了。
5 、监控服务器的 /var/log/message 文件,寻找故障原因。
在安装过程中有人会问 “
之前网卡 PXE
模块已经获取了一次 IP
地址,为什么现在还要设置一次? ”
这里我再说明以下,
1)PXE
获取的是安装用的内核以及安装程序等,安装程序要获取的是安装系统所需的二进制包以及配置文件!
2)PXE
模块和安装程序是相对独立的, PXE
的网络配置并不能传递给安装程序!