ngnix之lnmp环境搭建及Dvbbs搭建
LNMP环境搭建
引导语:前面我们做过LAMP环境的搭建,而对于后起之秀nginx而言,其性能相对apache提高了很多, 故本实验借助于nginx来LNMP环境,
环境搭建分三步:mysql绿色包安装,php源码包安装,nginx源码包安装
1.mysql绿色源码包安装,可以去这下载源码包http://downloads.mysql.com/archives.php
1)首先通过源码安装mysql,解压后,可通过目录下的INSTALL-BINARY来进行操作;
To install and use a MySQL binary distribution, the basic command
sequence looks like this:
shell> groupadd mysql #创建mysql组
shell> useradd -r -g mysql mysql #创建mysql用户并使其属于mysql组
shell> cd /usr/local
shell> tar zxvf /path/to/mysql-VERSION-OS.tar.gz
shell> ln -s full-path-to-mysql-VERSION-OS mysql#创建软链接,本实验中直接重名
shell> cd mysql
shell> chown -R mysql . #修改mysql目录及下所有文件的用户为mysql
shell> chgrp -R mysql .#修改mysql目录及下所有文件的用户组为mysql
shell> scripts/mysql_install_db --user=mysql#初始化mysql数据库
shell> chown -R root .#修改当前目录下的所有者为root
shell> chown -R mysql data #修改data目录及其下的所有文件为的所有者改为mysql
# Next command is optional#下面命令是可选的(本案例省略)
shell> cp support-files/my-medium.cnf /etc/my.cnf#复制并不用编辑该配置文件,默认情况即可
shell> bin/mysqld_safe --user=mysql &#以mysql用户启动mysql
# Next command is optional#下面命令是可选的
shell> cp support-files/mysql.server /etc/init.d/mysql.server
2)如上面语句一样,先创建mysql用户与组,并将解压后的软件包重命名为mysql,图中1修改mysql目录的权限,2是初始化mysql数据库;

3)按照INSTALL-BINARY修改权限:chwon -R root . ; chwon -R mysql data;
4)修改好了,看是否能正常启动mysql服务,发现并不能用service来启动mysqld服务; 
5)将support-files下mysql.server复制到/etc/init.d/下并命名为mysqld;
[root@centos support-files]# cp mysql.server /etc/init.d/mysqld
6)加载mysql的库文件,与头文件(1是编辑mysql.conf;2是查看mysql库文件是否正常加载上了)
在mysql.conf文件中写入内容:/usr/local/mysql/lib 
7)创建软链接来包含mysql的头文件;
[root@centos include ] # pwd
/usr/include
[root@centos include ] # ln -s /usr/local/mysql/include/ mysql
2.nginx相关包安装
Ⅰ、安装libevent
a.首先检测环境yun grouplist|less
Development Tools
Development Libraries
Legacy Software Development
X Software Development这几个组包是否安装
注:对应成中文就是:Development Libraries 开发库; Development Tools 开发工具;
Legacy Software Development 老的软件开发; X Software Development X软件开发;
例:yum groupinstall "Development Libraries",注意一定要加引号。
b.yum install gcc openssl-devel pcre-devel(主要是支持地址重写) zlib-devel
c.将所需的libevent软件包解压到/usr/local/src下,执行 ./configure; make ; make install
d.安装libevent后,要手动加载libevent库文件,
创建/etc/ld.so.conf.d/libevent.conf文件 在其中加入/usr/local/lib
Ⅱ、安装nginx
1)首先创建nginx组与用户
groupadd -r nginx
useradd -r -g nginx -s /bin/false -M nginx
2)将nginx源码包解压后,并切换其目录下执行安装:
./configure \
--prefix=/usr/local/nginx \
--sbin-path=/usr/sbin/nginx \
--conf-path=/etc/nginx/nginx.conf \
--error-log-path=/var/log/nginx/error.log \
--http-log-path=/var/log/nginx/access.log \
--pid-path=/var/run/nginx/nginx.pid \
--lock-path=/var/lock/nginx.lock \
--user=nginx \
--group=nginx \
--with-http_ssl_module \
--with-http_flv_module \
--with-http_stub_status_module \
--with-http_gzip_static_module \
--http-client-body-temp-path=/var/tmp/nginx/client/ \ (此行可以不要)
--http-proxy-temp-path=/var/tmp/nginx/proxy/ \
--http-fastcgi-temp-path=/var/tmp/nginx/fcgi/ \
--with-pcre
make
make install
3)安装后执行nginx命令会发现如下图:

4)创建目录,再次启动nginx,用netstat查看相关端口;
[root@host html]# netstat -utlpn |grep 80
tcp 0 0 0.0.0.0:80 0.0.0.0:* LISTEN 28071/nginx
5)nginx安装好后,我们来安装php的源码包吧,
3.PHP源码包安装
1)将所需源码包解压到/usr/loacl/src/,并切换到该目录,执行安装:
./configure \
--prefix=/usr/local/php \
--with-mysql=/usr/local/mysql/ \
--with-zlib --enable-xml --disable-rpath \
--enable-bcmath --with-gd \
--enable-shmop --enable-sysvsem \
--with-curl --with-curlwrappers --enable-fpm\
--with-openssl --with-mhash --enable-sockets \
--with-ldap --with-ldap-sasl --with-xmlrpc -enable-zip --enable-soap \
make
make install
2)复制php的配置文件
cp php.ini-development /usr/local/php/php.ini保持初始状态即可
3)复制一份php-fpm的主配置文件
cd /usr/local/php/
cp -p etc/php-fpm.conf.defaultetc/php-fpm.conf
并做如下修改:
将listen = 127.0.0.1:9000这行注释掉
listen = /var/run/php-fpm/php-fpm.sock 
4)根据修改项创建php-fpm目录
[root@server ~]# mkdir /var/run/php-fpm
[root@server ~]# /usr/local/php/sbin/php-fpm //启动php-fpm
5)修改nginx的配置文件/etc/nginx/nginx.conf,
记得"include fastcgi.conf"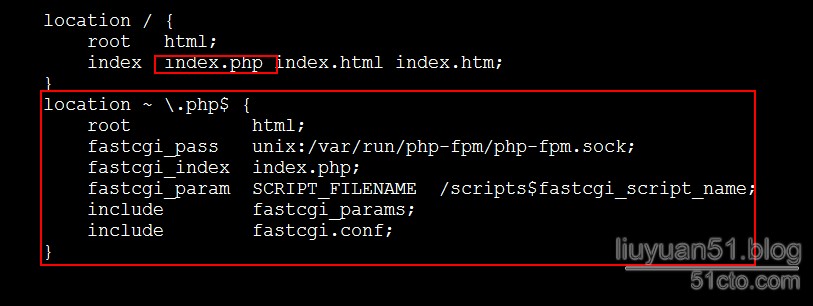
6)如下图编辑nginx主目录/usr/local/nginx/html/index.php文件,
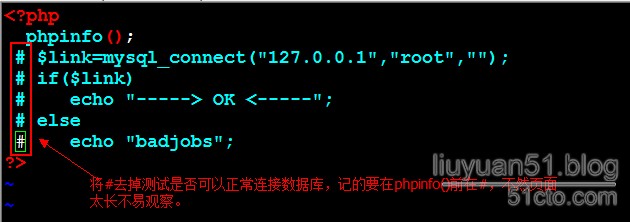
7)在测试机用浏览器访问,如下图,说明php与nginx关联成功,
a.关联php成功; 
b.可以正常连接数据库; 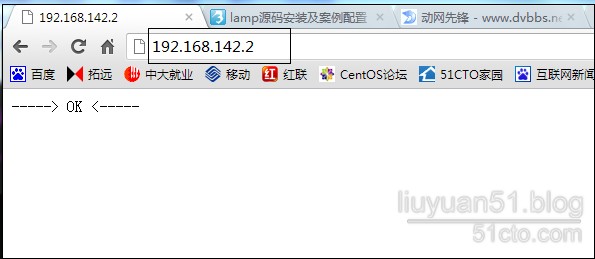
既然环境搭好了,那我们就在此基础上来搭建一下Dvbbs吧,
Dvbbs安装配置
注:可以去这http://dp.dvbbs.net/下载dvbbs的软件包,
1.将软件包解压后将所需upload目录上传到/usr/local/nginx/html/命名为dvbbs
2.通过浏览器访问http://192.168.142.2/dvbbs,如下图;

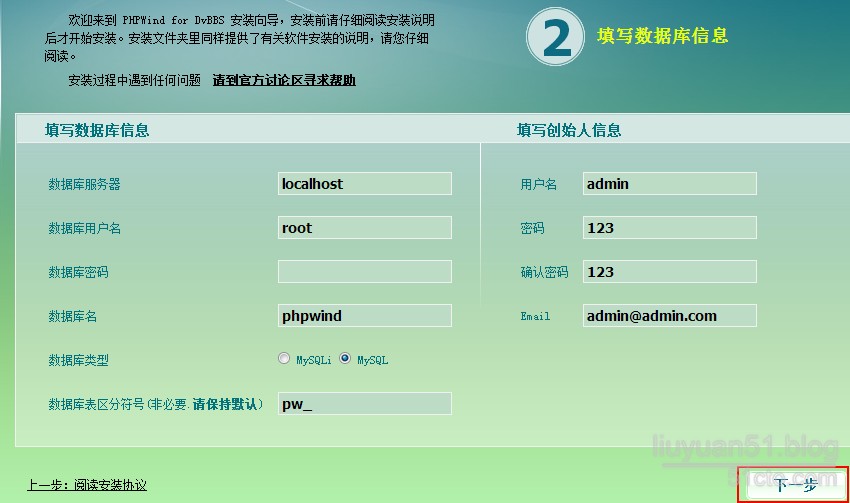
3.记得修改相关目录的权限为777,在同意“安装协议”后,进入数据库设置,如下图:
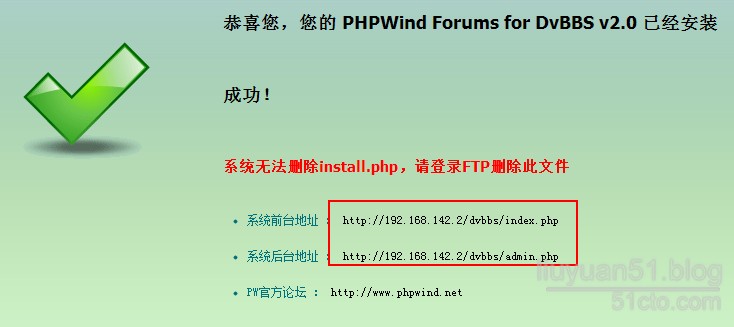
4.在设置论坛分类、论坛插件后,Dvbbs将开始初始化过程,在初始化完成后即可根据提供的地址访问论坛,
wordpress的配置,参看《lamp源码安装及案例配置》phpwind与wordpess简例。
要注意dvbbs和wordpress各自的存放目录,本实验均放在/usr/local/nginx/html/下以各自名命名的目录下。
实现基于主机头的虚拟主机
1.在nginx的主配置文件/etc/nginx/nginx.conf添加如下内容:
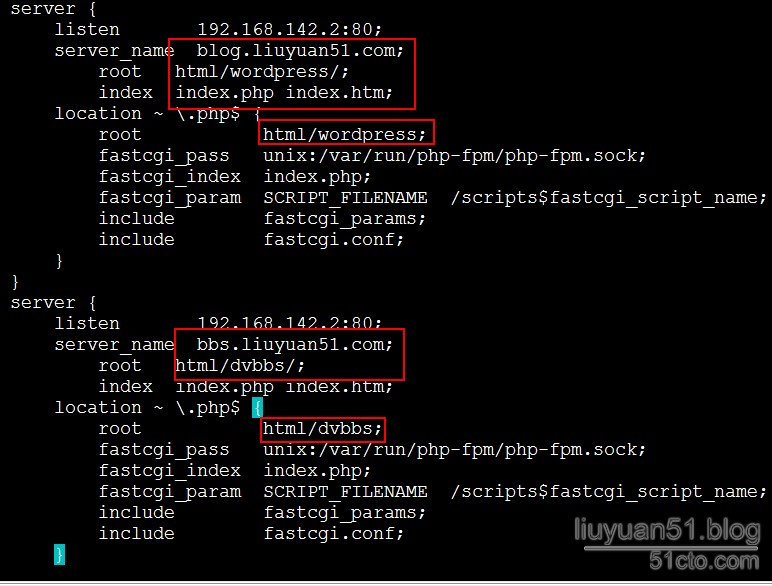
2,重启nginx服务,由于没有配置dns服务器,修改客户机的host文件,添加
192.168.142.2 blog.liuyuan51.com
192.168.142.2 bbs.liuyuan51.com
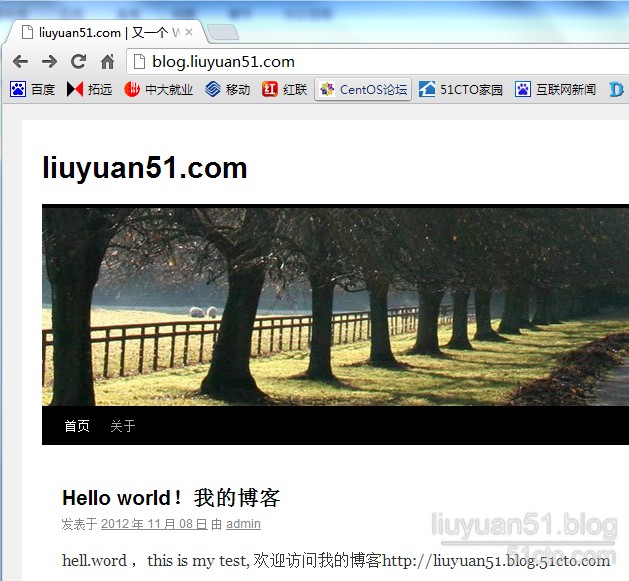
3,客户机host文件修改后,访问如下 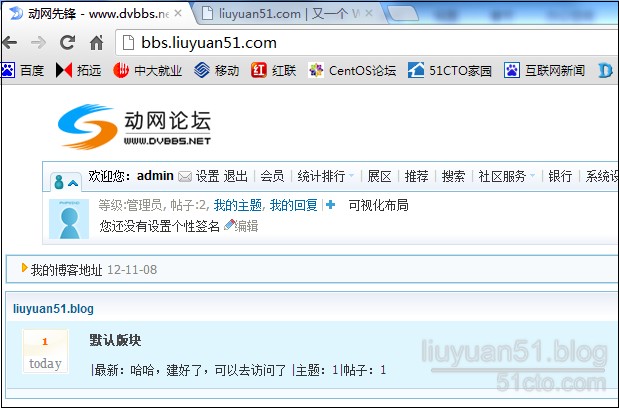
php编译安装时错误
1、/usr/local/src/php-5.3.7/sapi/cli/php: error while loading sharedlibraries: libmysqlclient.so.18: cannot open shared object file: No such fileor directory
mysql编译安装忘记导入库文件了,导入库就可以解决。
[root@centos ld.so.conf.d]# pwd
/etc/ld.so.conf.d
[root@centos ld.so.conf.d]# cp qt-i386.conf mysql.conf
[root@centos ld.so.conf.d]# cat mysql.conf
/usr/local/mysql/lib
[root@centos ld.so.conf.d]# ldconfig //重新加载动态链接库
2、Generating phar.phar
chmod: cannot access `ext/phar/phar.phar':No such file or directory
在对php进行configure的时候,只需要在./configure的后面加上--without-pear 即可.
启动php-fpm时报错
[06-Jun-2013 16:42:15] ALERT: [pool www]pm.min_spare_servers(0) must be a positive value
[06-Jun-2013 16:42:15] ERROR: failed topost process the configuration
[06-Jun-2013 16:47:39] WARNING: [pool www]pm.start_servers is not set. It's been set to 20.
配置php-fpm.conf
#vim etc/php-fpm.conf
pm.start_servers = 20
pm.max_spare_servers = 35
pm.min_spare_servers = 5