NBU7.5---Windows_BMR备份与恢复
Windows_BMR备份与恢复
一.Windows_BMR的OS备份步骤
A.安装BMR_NetBackup_Client(在安装NetBackup_Client时已经包含BMR_NetBackup_Client)
B.安装BMR_Master_Server(在安装Master_Server时已经包含BMR_Master_Server)
C.设置(BMR_Boot_Server)引导服务器(在安装NetBackup_Client时已经包含了)
D.备份策略
A.安装BMR_NetBackup_Client
其实在安装NetBackup_Client时已经包含BMR_NetBackup_Client模块,所以不需要再做任何其他的安装与配置。
B.安装BMR_Master_Server
其实在安装Master_Server时已经含BMR_Master_Server模块,所以不需要再做任何其他的安装,但是需要做如下配置(如果是Linux操作系统执行以下指令时要使用root用户):
1.
Run the following command to start the BMR master server daemon,if it is
not running:
/usr/openv/netbackup/bin/rc.bmrd start
2.Run the following command to create the BMR database:
/usr/openv/netbackup/bin/bmrsetupmaster
3.成功安装情况如下:
root@nbserver bin]# ./rc.bmrd start
[root@nbserver bin]# ./bmrsetupmaster
[Info] V-127-41 Setting up BMR Database ...
[Info] V-127-38 Initializing BMR database ...
[Info] V-127-39 Loading BMR database ...
[Info] V-127-68 Loading data from unattend.txt into BMR database ...
[Info] V-127-68 Loading data from BMRDB.install.sql into BMR database ...
[Info] V-127-68 Loading data from PnpDB_2000.xml into BMR database ...
[Info] V-127-68 Loading data from PnpDB_2000SP1.xml into BMR database ...
[Info] V-127-68 Loading data from PnpDB_2000SP2.xml into BMR database ...
[Info] V-127-68 Loading data from PnpDB_2000SP3.xml into BMR database ...
[Info] V-127-68 Loading data from PnpDB_2000SP4.xml into BMR database ...
[Info] V-127-68 Loading data from PnpDB_2003SP1.xml into BMR database ...
[Info] V-127-68 Loading data from PnpDB_WinPE_2003SP1.xml into BMR database ...
[Info] V-127-68 Loading data from PnpDB_XP.xml into BMR database ...
[Info] V-127-68 Loading data from PnpDB_XPSP1.xml into BMR database ...
[Info] V-127-68 Loading data from PnpDB_XPSP2.xml into BMR database ...
[Info] V-127-68 Loading data from PnPDB_2003.xml into BMR database ...
[Info] V-127-68 Loading data from PnpDB_2003SP2.xml into BMR database ...
[Info] V-127-68 Loading data from PnpDB_WinPE_2003SP1_X64.xml into BMR database ...
[Info] V-127-68 Loading data from PnpDB_WinPE_2008.xml into BMR database ...
[Info] V-127-68 Loading data from PnpDB_WinPE_2008_X64.xml into BMR database ...
[Info] V-127-68 Loading data from RuleDB_WinPE_Compatibility.xml into BMR database ...
Verifying the running version of BMRDB ...
BMRDB version 7.5.0.0 verified.
Nothing to upgrade. Version unchanged.
Database [BMRDB] validation successful.
[Info] V-127-66 Setting up BMR master server completed successfully.
[root@nbserver bin]# ps -ef | grep bmrd
root 5655 1 0 16:38 ? 00:00:00 /usr/openv/netbackup/bin/bmrd
C.设置(BMR_Boot_Server)引导服务器
选择引导服务器时,注意一定要与备份的客户端一样的操作系统,只要是Windows就可以,位数与版本可以不考虑,但是如果有一样的更好了,可以减少不必要的麻烦
1
Log on as Administrator on the server where you plan to install theBMRboot
server.
2
Open a
command
prompt and navigate to the NetBackup directory.
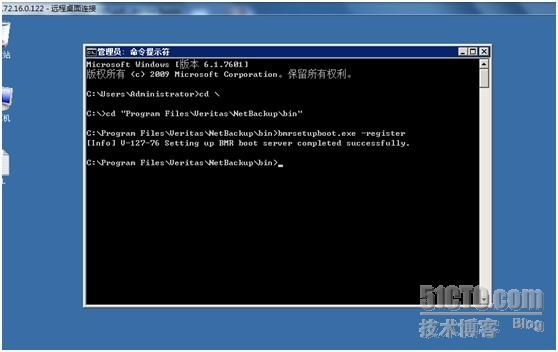
C:\Program Files\Veritas\NetBackup\bin>bmrsetupboot.exe -register
3
The BMRBoot Server
is registered. You can close the command prompt.
The following screenshot shows the registration of BMRBoot Server
.
4
The BMR boot server is registered.
5.注册BMRBoot Server成功如下:

D.备份策略
注意:policy type 选择为:Ms-Windows(Linux为:Standard),Collect disaster recovery informantion for要勾上,如图:

二
.Windows_BMR的OS恢复步骤
A.创建SRT(共享资源树)
需要Symantec NetBackup Client
B.选择备份点恢复prepare to restore
需要有备份历史记录点
C.创建镜像(ISO)
需要SRT
D.恢复
本文出自 “lucky dog” 博客,谢绝转载!