Spring3.0+Struts2.2+Hibernate3.6整合与常见问题
整合环境:
MyEclipse,Tomcat7.0,Hibernate3.6,Struts2.2.1,Spring3.0
一 所需匝包:
在MyEclipse中,可以点击window―preferences―user libraries―new自定义用户的个人匝包,将各个匝包引入进来。
Struts2.2.1下载解压后,将struts2.2.1/apps/struts2-blank-2.2.1/lib下的所有匝包引入到MyEclipse。匝包如下:

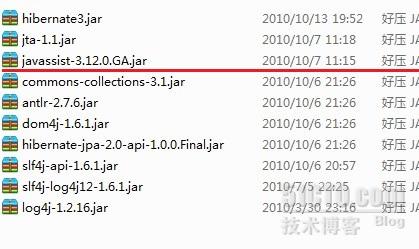
Hibernate3.6下载解压后,将hibernate3.jar和lib/jpa和lib/required中的匝包引入进来,这里利用log4j日志,所以需要下载apache-log4j-1.2.16以及slf4j-1.6.1。匝包如下:

(注意绘制红线的地方是包冲突的,需要在整合的过程中删除一个)
Spring3.0下载解压后,将Spring_3.0.5\spring-3.0.5.RELEASE\dist下的匝包引入,注意还需要下载commons-logging-1.0.4.jar,当要使用aop的时候由于Spring3.0不再带有一些依赖包,所以需要下载apectj方面的包,不过这里面的包都可以在解压后的lib中找到,所需aop方面的匝包如下:

Spring3.0与Hibernate3.6整合,在bean的xml中需要设置dataSource,需要引用两个包,所以需要下载 commons-dbcp-1.4.jar,commons-pool-1.6.jar。可到http://commons.apache.org/下载。
Struts2.与Spring3.0整合,struts是主导,所有的实例对象全部要交给Spring来管理,还需要使用struts2-spring-plugin-2.2.1.jar。这个可以在struts2.2.1/lib中导入。
凡是以commons开头的包,都可以到Apache Commons的官网下载。
先整合Spring+Hibernate,然后将struts添加上去。
二 具体整合
1 Spring3.0与Hibernate3.6整合
Spring3.0与Hibernate3.6整合,不再需要显示的定义一个Hibernate.cfg.xml文件了,将Hibernate.cfg.xml的配置全部配置在Spring的配置文件中。
Spring原始匝包:
Spring包中的dist文件夹下所有jar,aspectj包(如果要用AOP),commons-logging-1.0.4.jar
Hibernate原始包:hibernate的基本jar包
数据连接包:数据库连接基本jar包
整合所需包commons-dbcp-1.4.jar,commons-pool-1.6.jar
主要配置的是dataSource(必须),sessionFactory(必须),transaction(可选)。
基本数据源dataSource:
<bean id="myDataSource" class="org.apache.commons.dbcp.BasicDataSource" destroy-method="close">
   <property name="driverClassName"  value="com.mysql.jdbc.Driver"/>
   <property name="url" value="jdbc:mysql://localhost:3306/mydb"/>
   <property name="username" value="root"/>
   <property name="password" value="3423"/>
</bean>
也可以利用properties文件配置:
<bean class="org.springframework.beans.factory.config.PropertyPlaceholderConfigurer">
  <property name="locations" value="classpath:com/foo/jdbc.properties"/>
</bean>
<bean id="dataSource" destroy-method="close"
class="org.apache.commons.dbcp.BasicDataSource">
   <property name="driverClassName" value="${jdbc.driverClassName}"/>
   <property name="url" value="${jdbc.url}"/>
   <property name="username" value="${jdbc.username}"/>
   <property name="password" value="${jdbc.password}"/>
</bean>
sessionFactory配置:
<bean id="sessionFatory"
class="org.springframework.orm.hibernate3.annotation.AnnotationSessionFactoryBean">
<property name="dataSource" ref="dataSource" />
    <!―当用annotation注解实体的时候,class必须为    *.hibernate3.annotation.AnnotationSessionFactoryBean -->
   <property name="annotatedClasses">
      <list>
        <value>com.bjsxt.model.User</value>
         <value>com.bjsxt.model.Manager</value>
       </list>
</property>
 还有一种方法,这仅仅用于annotation中,扫描注定包中的实体类
   <property name="packagesToScan">
     <list>
        <value>com.bjsxt.model</value>
      </list>
   </property>
<!―当用hbm.xml的时候,class必须为*.hibernate3.LocalSessionFactoryBean -->
   <property name="mappingResources">
      <list>
         <value>product.hbm.xml</value>
      </list>
   </property>
  <!―第一种指定值-->
   <property name="hibernateProperties">
     <props>
      <prop key="hibernate.dialect">
org.hibernate.dialect.MySQLDialect</prop>
      <prop key="hibernate.show_sql">true</prop>
      <prop key="hibernate.format_sql">true</prop>
      <prop key="hibernate.hbm2ddl.auto">update</prop>
    </props>
   </property>
<!―第二种指定值-->
   <property name="hibernateProperties">
     <value>
        hibernate.dialect=org.hibernate.dialect.HSQLDialect
     </value>
      <value>hibernate.show_sql=true</value>
     </property>
</bean>
HibernateTemplate的配置:
<bean id="hibernateTemplate" class="org.springframework.orm.hibernate3.HibernateTemplate">
     <property name="sessionFactory" ref="sessionFactory"></property>
</bean>
使用HibernateTemplate的便利之处在于:HibernateTemplate将具体session的获取,事务的开始以及事务的提交与回滚都封装起来,中间留着自己的业务逻辑处理,采用了模板方法设计模式,在应用中的DAO中,将该hibernateTemplate注入进来setter,就可以直接使用其save、delete、update、find、get等方法。
2 Spring3.0+Hibernate与Struts整合
将struts整合到SH中,依然需要Struts.xml配置文件,需要做的事情有,引入struts-spring-plugin.xml的包,修改web.xml配置文件。
配置web.xml:
<?xml version="1.0" encoding="UTF-8"?>
<web-app id="WebApp_9" version="2.4"
    xmlns="http://java.sun.com/xml/ns/j2ee"
    xmlns:xsi="http://www.w3.org/2001/XMLSchema-instance"
    xsi:schemaLocation="http://java.sun.com/xml/ns/j2ee
          http://java.sun.com/xml/ns/j2ee/web-app_2_4.xsd">
<!―设置监听器,使得应用程序启动就开始创建我们的beans-->
<listener>
    <listener-class>org.springframework.web.context.ContextLoaderListener</listener-class>
</listener>
<!―配置应用程序加载的beans的路径-->
<context-param>
    <param-name>contextConfigLocation</param-name>
    <param-value>/WEB-INF/applicationContext-*.xml,classpath*:
applicationContext-*.xml</param-value>
</context-param>
<!―struts基本配置,主要是负责过滤url请求的-->
<display-name>Struts Blank</display-name>
<filter>
<filter-name>struts2</filter-name>
<filter-class>org.apache.struts2.dispatcher.ng.filter.StrutsPrepareAndExecuteFilter</filter-class>
</filter>
<filter-mapping>
  <filter-name>struts2</filter-name>
  <url-pattern>/*</url-pattern>
</filter-mapping>
<welcome-file-list>
<welcome-file>index.html</welcome-file>
</welcome-file-list>
</web-app>
OK,SSH整合OK啦!
三 整合注意事项及常见问题
1,当出现NotDefClass的时候
首先可能包冲突,将重名的包删除一个,下来就是出现缺失匝包,下载所需要的包,最后或者把匝包直接放入到WebRoot/WEB-INF/lib中。
2,在spring与hibernate整合的过程的时候,必须要
commons-dbcp-1.4.jar,commons-pool-1.6.jar,可到http://commons.apache.org/中下载
3,struts的配置文件和以前的一样的,不需要更改,需要引入插件struts2-spring-plugin-2.2.1.jar
4,struts的action的产生
struts读取配置文件的顺序如下:
1).Struts-default.xml该文件在struts2-core-2.2.1.jar下
2).struts-plugin.xml这里引了插件,则就会去读struts2-spring-plugin-2.2.1.jar中的
3).struts.xml
4).struts.properties 该文件在struts2-core-2.2.1.jar下org.apache.struts2包的default.properties
5).web.xml 该文件在WebRoot/WEB-INF
有一些整合会在struts.xml中配置<constant name="struts.objectFactory" value="spring" />
其实不用配置这个,因为这个配置已经在整合的插件中配置好了,即
struts2-spring-plugin-2.2.1.jar下的struts-plugin.xml,
<bean type="com.opensymphony.xwork2.ObjectFactory" name="spring" class="org.apache.struts2.spring.StrutsSpringObjectFactory"/>
<constant name="struts.objectFactory" value="spring"/>
由于struts-plugin比struts.xml先读取,所以就不必再次配置了。
这里的objectFactory,目的就是将生成action的对象工厂转换为让spring来生成,该对象工厂为StrutsSpringObjectFactory工厂。
由于struts.objectFactory为spring,struts2框架就会把action转发给spring来创建,装配,注入。但是action的bean创建完成之后,还是由struts容器来管理其生命周期,同时默认是prototype类型的。注意这里的action的创建其实真正的是由struts2-spring-plugin这个创建的,并不是由spring的。
struts的action可以由plugin来产生,或者给予spring来产生
plugin的产生,默认是prototype,且不需要在spring中进行action的bean配置,同时也不需要进行显示的注入,因为当action由插件创建后,它会根据类型到spring的容器中动态的注入相应的service,dao等对象的bean,struts.xml的配置还是照旧,但是这样就不能使用到spring的AOP功能了。
spring的产生,在bean中或者annotation中,需要设置该action的bean的id,且scope为prototype,
对于struts.xml中的配置,需要设置class为与之对应的bean的id
如在applicationContext.xml文件中:
<beanid="user" class="com.myapp.web.action.user.UserAction"/>然后在struts.xml中,指定class="user"即可。必须要将action的bean配置为scope=”prototype”或者singleton="false"
5,spring可以设置session的范围扩大到jsp页面上,在web.xml中配置一下,这个filter代表的作用就是让该session不用早,早的关闭,最后负责关闭该session,需要设置如下:
<filter>
  <filter-name>openSessionInView</filter-name>
<filter-class>org.springframework.orm.hibernate3.support.OpenSessionInViewFilter
</filter-class>
</filter>
<filter-mapping>
  <filter-name>openSessionInView</filter-name>
  <url-pattern>/*</url-pattern>
</filter-mapping>
该filer一定要放到struts的filter之前,并且它需要引用一个bean叫sessionFactory。在使用openSessionInView的时候,如果没有配置事务,它拦截到任何请求都认为是只读的。
6,在整合的过程中出现中文乱码
第一种方式,在web.xml中配置,这里用的是spring的
<filter>
  <filter-name>encodingFilter</filter-name>
  <filter-class>
      org.springframework.web.filter.CharacterEncodingFilter</filter-class>
   <init-param>
        <param-name>encoding</param-name>
        <param-value>GBK</param-value>
   </init-param>
</filter>
<filter-mapping>
  <filter-name>encodingFilter</filter-name>
   <url-pattern>/*</url-pattern>
</filter-mapping>
第二种方式,在struts.xml中配置<constant name="struts.i18n.encoding" value="GBK"/>
常量的名都可以到struts2-core-2.2.1下找default.propterties