企业级LAMMP架构应用实践
一、LAMMP介绍:
LAMMP值得是Linux+Apache+PHP+Memcached+Mysql的一个组合,在互联网行业中这个组合应用广泛。
二、企业级应用说明:
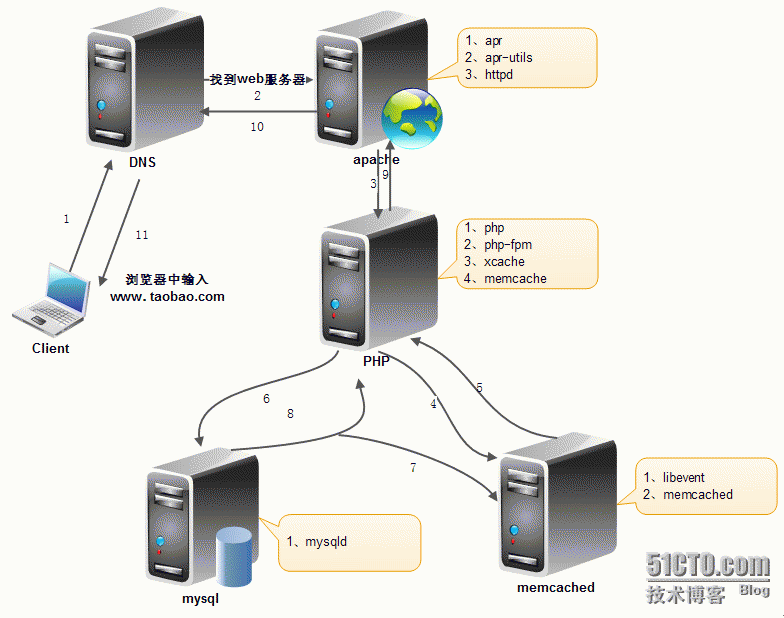
接下来讲解一下整个流程:
1、用户在浏览器中输入域名访问某个网站,假设访问的是淘宝。
2、然后开始DNS解析www.taobao.com域名对应web服务器的IP地址。
3、接下来就是apache开始响应请求了,他首先要找到index.php首页,而php需要有php环境解析,apache和php整合可以使用多种方式,比如php模块的方式,php-fpm方式。当然为了提高响应速度,可以使用缓存等机制,加入我们请求的是非静态的,需要和数据库进行交互。
4、php通过调用自己安装的memcache扩展,访问memcached服务进行查询,如果Memcached中有查询。
5、如果Memcached中有缓存结果,则直接返回。
6、如果Memcached中没有缓存结果,php就需要直接查询数据库了。
7、然后把查询的结果在Memcached中缓存一份。
8、并且直接把结果返回给用户。
三、PHP几个扩展作用:
1、memcache:他是php连接Memcached的一个api,支持php连接Memcached服务。而Memcached,他和apache一样是一个单独服务,是基于Key-Value缓存数据库查询结果的,从而加速数据返回的速度。
2、xcache:是对php代码进行优化,以提高执行速度。
四、安装和配置过程:
由于是实验,整个过程均在一台机器上实现,而简单的实现中蕴含这上述的架构。
服务器IP地址为:172.16.2.1
l编译安装apache:
1、解压下载的软件包
[root@stu2 ~]# tar xf apr-1.4.6.tar.bz2
[root@stu2 ~]# tar xf apr-util-1.5.2.tar.bz2
[root@stu2 ~]# tar xf httpd-2.4.6.tar.bz2
2、安装开发库,和依赖性包
[root@stu2 ~]# yum -y groupinstall "Development tools" "Server Platform Development"
[root@stu2 ~]# yum -y install pcre-devel  #安装依赖性包
3、编译安装apr软件
[root@stu2 ~]# cd apr-1.4.6
[root@stu2 apr-1.4.6]# ./configure --prefix=/usr/local/apr
[root@stu2 apr-1.4.6]# make && make install
4、编译安装apr-util软件包
[root@stu2 ~]# cd apr-util-1.5.2
[root@stu2 apr-util-1.5.2]# ./configure --prefix=/usr/local/apr-util --with-apr=/usr/local/apr
[root@stu2 apr-util-1.5.2]# make && make install
5、编译安装httpd的软件包
[root@stu2 ~] # cd httpd-2.4.6
[root@stu2 httpd-2.4.6]# ./configure --prefix=/usr/local/apache  --enable-so --enable-ssl --enable-cgi --enable-rewrite --with-zlib --with-pcre --with-apr=/usr/local/apr --with-apr-util=/usr/local/apr-util --enable-modules=most --enable-mpms-shared=all --with-mpm=event
[root@stu2 httpd-2.4.6] # make && make install
[root@stu2 httpd-2.4.6]# cp build/rpm/httpd.init /etc/rc.d/init.d/httpd    #复制源码包里面提供的httpd的SystemV脚本
[root@stu2 httpd-2.4.6]# vim /etc/rc.d/init.d/httpd
6、需要改动httpd的SystemV脚本的一些内容
prog=httpd
httpd=${HTTPD-/usr/local/apache/bin/httpd}
pidfile=${PIDFILE-/usr/local/apache/logs/${prog}.pid}
lockfile=${LOCKFILE-/var/lock/subsys/${prog}}
RETVAL=0
# check for 1.3 configuration
check13 () {
        CONFFILE=/usr/local/apache/conf/httpd.conf
[root@stu2 httpd-2.4.6]# vim /usr/local/apache/conf/httpd.conf
ServerName 172.16.2.1:80 #在配置文件中找到ServerName改成服务器的IP:端口
#这样启动的时候就不会报错
[root@stu2 httpd-2.4.6]# service httpd start  #启动服务
7、使系统能识别源码包安装的软件
[root@stu2 httpd-2.4.6]# echo "PATH=/usr/local/apache/bin/:$PATH" >/etc/profile.d/httpd.sh
[root@stu2 httpd-2.4.6]# source /etc/profile.d/httpd.sh
[root@stu2 httpd-2.4.6]# ln -sv /usr/local/apache/include/  /usr/include/httpd
[root@stu2 httpd-2.4.6]# chkconfig --add httpd #把服务加到开机自动启动的列表
[root@stu2 httpd-2.4.6]# chkconfig --level 35 httpd  on
l编译安装php、php-fpm、xcache、memcache:
1、解压下载的源码包
[root@stu2 ~]#tar xf php-5.4.19.tar.bz2
[root@stu2 ~]#tar xf memcache-2.2.7.tgz
[root@stu2 ~]#tar xf xcache-3.0.3.tar.bz2
2、安装开发包和安装依赖性包
[root@stu2 ~] #yum  groupinstall "Server Platform Development" "Development tools"  -y
[root@stu2 ~]#yum install libxml2-devel bzip2-devel  libmcrypt-devel  libmcrypt-devel -y
[root@stu2 ~]# cd php-5.4.19
编译参数--enable-fpm,支持FastCGI PHP模块,此参数决定是否能把PHP安装成#FastCGI服务器
[root@stu2 php-5.4.19]#./configure --prefix=/usr/local/php  --enable-fpm --with-openssl --enable-mbstring --with-freetype-dir --with-jpeg-dir --with-png-dir --with-zlib --with-libxml-dir=/usr --enable-xml  --enable-sockets  --with-mcrypt  --with-bz2 --with-config-file-path=/etc --with-config-file-scan-dir=/etc/php.d --with-mysql=mysqlnd --with-pdo-mysql=mysqlnd --with-mysqli=mysqlnd

出现如上图所示就可以接续编译安装了。
[root@stu2 php-5.4.19]# make && make install
3、建立php的配置文件,此配置文件在php的解压包中
[root@stu2 php-5.4.19]# cp php.ini-production   /etc/php.ini
[root@stu2 php-5.4.19]# cp sapi/fpm/init.d.php-fpm /etc/rc.d/init.d/php-fpm
4、使系统能够识别源码包安装的软件
[root@stu2 php-5.4.19]#echo "PATH=/usr/local/php/bin:/usr/local/php/sbin:$PATH" > /etc/profile.d/php-fpm.sh
[root@stu2 php-5.4.19]# source /etc/profile.d/php-fpm.sh
[root@stu2 php-5.4.19]#cd /usr/local/php/etc
5、建立php-fpm服务的配置文件,此配置文件的路径 /usr/local/php/etc
[root@stu2 etc]# cp php-fpm.conf.default php-fpm.conf
修改php-fpm服务配置文件的监听的IP地址改为本地IP地址
[root@stu2 etc]#vim /usr/local/php/etc/php-fpm.conf
              Listen 172.16.2.1:9000
6、把服务脚本加执行权限,开启服务,把服务加到开机自启动列表中
[root@stu2 etc]# chmod +x /etc/rc.d/init.d/php-fpm
[root@stu2 etc]# service php-fpm start
[root@stu2 etc]# chkconfig --add php-fpm
[root@stu2 etc]# chkconfig --level 35 php-fpm on
7、安装FastCGI与memcached服务连接的接口的一个软件
[root@stu2 ~]# cd memcache-2.2.7
[root@stu2 memcache-2.2.7]# yum install autoconf -y
[root@stu2 memcache-2.2.7]# /usr/local/php/bin/phpize
[root@stu2 memcache-2.2.7]# ./configure --with-php-config=/usr/local/php/bin/php-config --enable-memcache
[root@stu2 memcache-2.2.7]# make && make install
8、在php的配置文件里面装载memcache.so的模块路径
[root@stu2 memcache-2.2.7]#vim /etc/php.ini
extension=/usr/local/php/lib/php/extensions/no-debug-non-zts-20100525/memcache.so
9、安装FastCGI加速opcode代码的软件
[root@stu2 ~]# cd xcache-3.0.3
[root@stu2 xcache-3.0.3]# /usr/local/php/bin/phpize
[root@stu2 xcache-3.0.3]# ./configure --enable-xcache --with-php-config=/usr/local/php/bin/php-config
[root@stu2 xcache-3.0.3]# make && make install
10、建立xcache的配置文件,在xcache的解压的源码包里面
[root@stu2 xcache-3.0.3]# vim /etc/php.ini  添加:
extension=/usr/local/php/lib/php/extensions/no-debug-non-zts-20100525/xcache.so
[root@stu2 xcache-3.0.3]# service php-fpm restart  #重启php-fpm服务
l安装Memcached服务:
1、解压下载的软件
[root@stu2 ~]# tar xf libevent-2.0.21-stable.tar.gz
[root@stu2 ~]# tar xf memcached-1.4.15.tar.gz
2、编译安装libevent软件
[root@stu2 ~]# cd libevent-2.0.21-stable
[root@stu2 libevent-2.0.21-stable]# ./configure --prefix=/usr/local/libevent
[root@stu2 libevent-2.0.21-stable]# make && make install
3、使系统识别libevent的库文件和头文件
[root@stu2 libevent-2.0.21-stable] # echo "/usr/local/libevent/lib" >/etc/ld.so.conf.d/libevent.conf
[root@stu2 libevent-2.0.21-stable] # ldconfig -v
[root@stu2 libevent-2.0.21-stable] # ln -sv /usr/local/libevent/ /usr/include/libevent
4、编译安装memcached软件包
[root@stu2 ~] #cd memcached-1.4.15
[root@stu2 memcached-1.4.15] #./configure --prefix=/usr/local/memcached --with-libevent=/usr/local/libevent/
[root@stu2 memcached-1.4.15]# make && make install
5、建立memcached的systemV脚本,copy下面的脚本为服务脚本
[root@stu2 memcached-1.4.15]#vim  /etc/init.d/memcached
#!/bin/bash
#
# Init file for memcached
#
# chkconfig: - 86 14
# description: Distributed memory caching daemon
#
# processname: memcached
# config: /etc/sysconfig/memcached
. /etc/rc.d/init.d/functions
## Default variables
PORT="11211"
USER="nobody"
MAXCONN="1024"
CACHESIZE="64"
IP="172.16.2.1"
RETVAL=0
prog="/usr/local/memcached/bin/memcached"
desc="Distributed memory caching"
lockfile="/var/lock/subsys/memcached"
start() {
        echo -n $"Starting $desc (memcached): "
        daemon $prog -d -p $PORT -u $USER -c $MAXCONN -m $CACHESIZE -l $IP
        RETVAL=$?
        [ $RETVAL -eq 0 ] && success && touch $lockfile || failure
        echo
        return $RETVAL
}
stop() {
        echo -n $"Shutting down $desc (memcached): "
        killproc $prog
        RETVAL=$?
        [ $RETVAL -eq 0 ] && success && rm -f $lockfile || failure
        echo
        return $RETVAL
}
restart() {
        stop
        start
}
reload() {
        echo -n $"Reloading $desc ($prog): "
        killproc $prog -HUP
        RETVAL=$?
        [ $RETVAL -eq 0 ] && success || failure
        echo
        return $RETVAL
}
case "$1" in
  start)
        start
        ;;
  stop)
        stop
        ;;
  restart)
        restart
        ;;
  condrestart)
        [ -e $lockfile ] && restart
        RETVAL=$?
        ;;
  reload)
        reload
        ;;
  status)
        status $prog
        RETVAL=$?
        ;;
   *)
        echo $"Usage: $0 {start|stop|restart|condrestart|status}"
        RETVAL=1
esac
exit $RETVAL
6、把服务脚本给予执行权限,然后把服务加到开机启动列表中
[root@stu2 memcached-1.4.15]# chmod +x /etc/init.d/memcached
[root@stu2 memcached-1.4.15]# chkconfig --add memcached
[root@stu2 memcached-1.4.15]# chkconfig --level 35 memcached on
[root@stu2 memcached-1.4.15]# service memcached start
[root@stu2 memcached-1.4.15]# netstat -pant | grep memcached
l安装mysqld服务:
1、解压下载的mysql的通用二进制软件包 [root@stu2 ~] #tar xf mysql-5.5.33-linux2.6-x86_64.tar.gz -C /usr/local/ [root@stu2 ~] # cd /usr/local/ [root@stu2 local] # ln -sv mysql-5.5.33-linux2.6-x86_64 mysql 2、创建存放数据库的文件 [root@stu2 local] # mkdir -vp /mysql/data 3、创建用户,和设置文件的属主和权限 [root@stu2 local] # useradd -r mysql [root@stu2 local] # chown -R mysql.mysql /mysql/data [root@stu2 local] # chmod -R 755 /mysql/data/ [root@stu2 local] # cd /usr/local/mysql/ [root@stu2 local] # cd /usr/local/mysql/support-files/ 4、建立mysql的配置文件 [root@stu2 support-files] # cp my-large.cnf /etc/my.cnf cp: overwrite `/etc/my.cnf'? y 5、建立mysql的systemV服务脚本 [root@stu2 support-files] # cp mysql.server /etc/init.d/mysqld [root@stu2 support-files] # vim /etc/my.cnf 6、修改mysql的配置文件,修改或添加这两行 #vim /etc/my.cnf thread_concurrency = 4 datadir = /mysql/data 7、初始化mysql的脚本 [root@stu2 support-files]# cd ../scripts/ [root@stu2 scripts] # ./mysql_install_db --user=mysql --basedir=/usr/local/mysql --datadir=/mysql/data 8、开启mysql服务和把mysql的服务加入到开机自启的列表中 [root@stu2 scripts]# service mysqld start [root@stu2 scripts]# chkconfig --add mysqld [root@stu2 scripts]# chkconfig --level 35 mysqld on [root@stu2 scripts]# netstat -tnlp | grep mysqld # cd /usr/local/mysql/ 9、使系统能识别源码包安装的软件 修改环境变量PATH的路径 链接头文件的路径 连接库文件 提供man帮助文档 [root@stu2 scripts]# echo "PATH=/usr/local/mysql/bin:$PATH" > /etc/profile.d/mysqld.sh [root@stu2 scripts]# . !$ . /etc/profile.d/mysqld.sh [root@stu2 scripts]# ln -sv /usr/local/mysql/include/ /usr/include/mysqld create symbolic link `/usr/include/mysqld' to `/usr/local/mysql/include/' [root@stu2 scripts]# echo "/usr/local/mysql/lib/" >/etc/ld.so.conf.d/mysqld.conf [root@stu2 scripts]# ldconfig �Cv 10、创建登录数据库的用户的密码 [root@stu2 ~]# mysqladmin -u root password redhat //数据库管理帐号密码 [root@stu2 ~]# mysql -u root -p mysql> select user,password,host from mysql.user; #删除数据库的安全隐患的用户 mysql> drop user root@'::1'; Query OK, 0 rows affected (0.00 sec) mysql> drop user ''@'localhost'; Query OK, 0 rows affected (0.00 sec) #创建指定网段能访问数据库的用户名和密码 mysql> grant all privileges on *.* to lanlian@'172.16.%.%' identified by 'redhat'; Query OK, 0 rows affected (0.00 sec) mysql> flush privileges; Query OK, 0 rows affected (0.00 sec) mysql> \q
lapache和php整合:
[root@stu2 ~]# vim /usr/local/apache/conf/httpd.conf
#DocumentRoot "/usr/local/apache/htdocs"  #注释这行
LoadModule proxy_module modules/mod_proxy.so  #开启代理的模块
LoadModule proxy_fcgi_module modules/mod_proxy_fcgi.so#开启连接fastcgi的模块
添加下面两行内容
AddType application/x-httpd-php .php
AddType application/x-httpd-php-source .phps
添加默认php主页
DirectoryIndex index.php index.html
Include conf/extra/httpd-vhosts.conf #开启让主配置文件载入虚拟主机的配置文件
[root@stu2 ~]# mkdir /www/webpages/web1 -vp
[root@stu2 ~]# vim /usr/local/apache/conf/extra/httpd-vhosts.conf
#开启一个虚拟主机即可
<VirtualHost *:80>
    DocumentRoot "/www/webpages/web1"  #Apache服务器存放网页的目录
    ServerName www.lanlian.com
   <Directory "/www/webpages/web1">
       AllowOverride None
       Options None
     Require all granted
   </Directory>
    ProxyRequests Off  #关闭代理请求
    ProxyPassMatch ^/(.*\.php)$ fcgi://172.16.2.1:9000/www/webpages/web1/$1
</VirtualHost>
[root@stu2 ~]# service httpd restart
[root@stu2 ~]# vim /www/webpages/web1/index.php
#测试php网页的页面
<?php
$link=mysql_connect('172.16.2.1','lanlian','redhat');
if($link)
    echo "mysql test success!!";
else
    echo "mysql test failed!!!";
mysql_close();
phpinfo();
?>
[root@stu2 ~]# service php-fpm restart  #重启FastCGI服务器
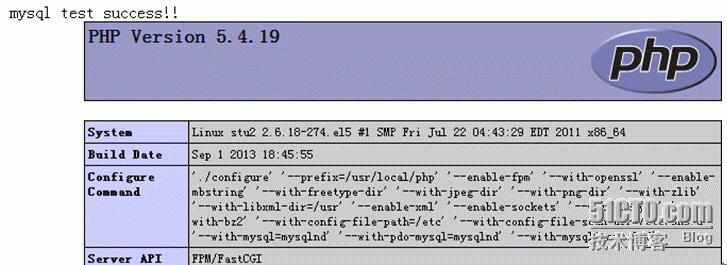
然后在浏览器中输入http://172.16.2.1即可测试:
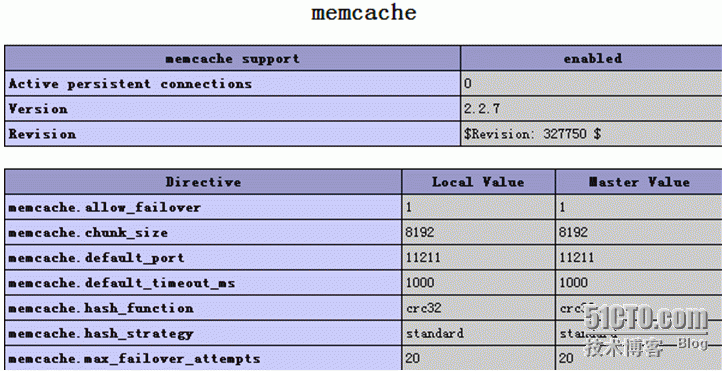
支持memcache扩展:
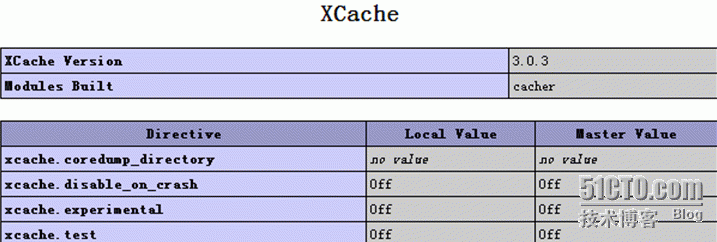
支持xcache扩展:
测试连接memcached效果:
[root@stu2 ~]# vim /www/webpages/web1/mem.php  添加一下内容:
<?php
$mem = new Memcache;
$mem->connect("172.16.2.1", 11211);
$mem->set('key','lanlian info');
print_r($mem->get('key'));
print_r($mem->getstats());
?>

安装phpMyadmin
[root@stu2 ~]# tar xf phpMyAdmin-4.0.5-all-languages.tar.bz2
[root@stu2 ~]#mv phpMyAdmin-4.0.5-all-languages/* /www/webpages/web1/
[root@stu2 ~]# cd /www/webpages/web1/
[root@stu2 web1]# cp config.sample.inc.php config.inc.php
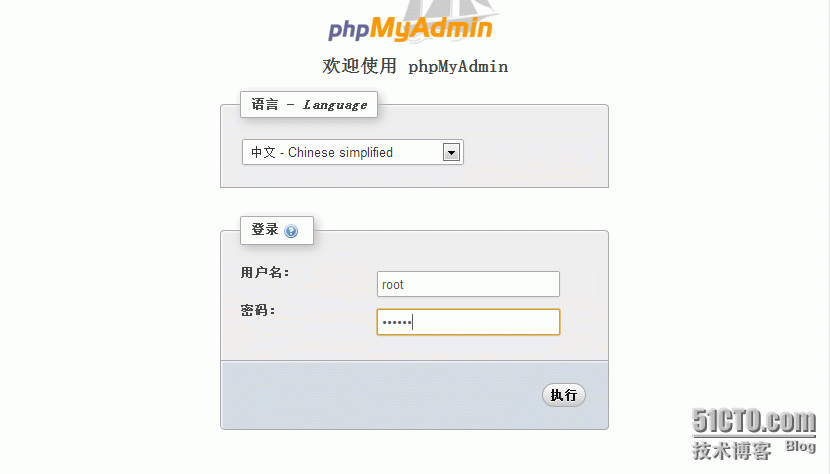
使用数据库的帐号密码root/redhat登录:
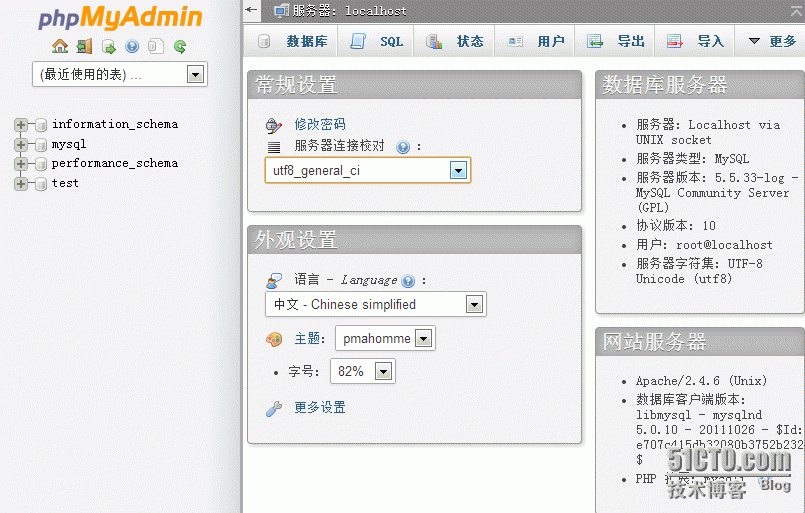
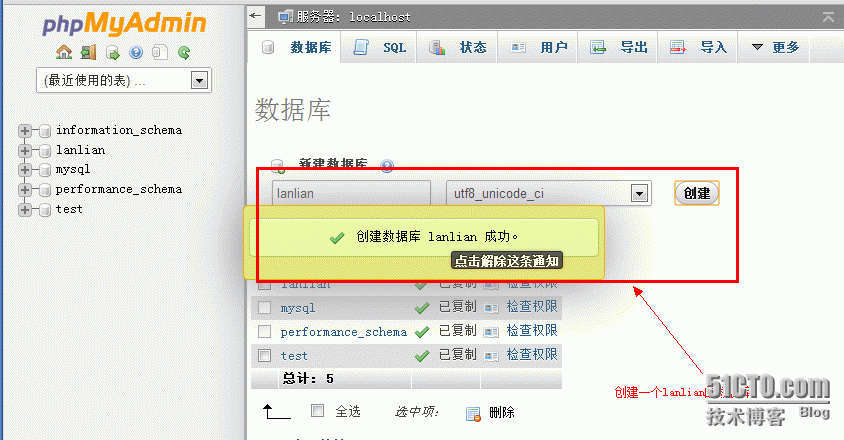
然后创建一个lanlian的库,其他的就和在数据库中操作一样了,一个图形化mysql管理工具就出来了。
整个LAMMP实验已经完成,欢迎大家点评。