nagios监控服务器
[root@localhost httpd-2.2.11]# make && make install容
> --with-apxs2=/usr/local/apache/bin/apxs
[root@localhost php-5.2.10]# make && make install
[root@localhost php-5.2.10]# cp php.ini-dist /usr/local/lib/php.ini
[root@localhost php-5.2.10]# vi /usr/local/apache/conf/httpd.conf请
AddType application/x-httpd-php .php .html
找到DirectoryIndex index.html
改为: DirectoryIndex index.php index.html
在最后加入nagios的访问目录:
ScriptAlias /nagios/cgi-bin /usr/local/nagios/sbin
<Directory "/usr/local/nagios/sbin">
AuthType Basic
Options ExecCGI
AllowOverride None
Order allow,deny
Allow from all
</Directory>
Alias /nagios /usr/local/nagios/share
<Directory "/usr/local/nagios/share">
AuthType Basic
Options None
AllowOverride None
Order allow,deny
Allow from all
</Directory> 请输入内容
 [root@localhost php-5.2.10]#
rpm -qa|grep gd gdb-6.5-37.el5 libgdiplus-1.2.5-1.el5.centos gd-2.0.33-9.4.el5_1.1 gdbm-1.8.0-26.2.1 sysklogd-1.4.1-44.el5 libgdiplus-devel-1.2.5-1.el5.centos gd-devel-2.0.33-9.4.el5_1.1
[root@localhost nagios-3.1.2]# useradd nagios [root@localhost nagios-3.1.2]#
./configure --prefix=/usr/local/nagios \ > --with
-gd-lib=/usr/lib --with-gd-inc=/usr/include --with-nagios-user=nagios \ > --with-nagios-group=nagios[root@localhost nagios-3.1.2]#make all [root@localhost nagios-3.1.2]#make install [root@localhost nagios-3.1.2]#make install-init[root@localhost nagios-3.1.2]#make install-commandmode[root@localhost nagios-3.1.2]#make install-config
[root@localhost nagios-plugins-1.4.13]#
./configure --prefix=/usr/local/nagios [root@localhost nagios-plugins-1.4.13]# make && make install
[root@localhost src]#tar zxvf library_linux.tar.gz[root@localhost src]#mv libACE* libcrypto.so.0.9.8 libssl.so.0.9.8 /usr/lib
[root@localhost src]#tar zxvf fetion20090406003-linux.tar.gz [root@localhost src]#mv install /usr/local/fetion [root@localhost src]#chmod -R 755 /usr/local/fetion [root@localhost src]#chown -R nagios:nagios /usr/local/fetion
[root@localhost src]#
/usr/local/fetion/fetion --mobile=137*** --pwd=*** \ > --to=136*** --msg-utf8="test"
[root@localhost php-5.2.10]#
rpm -qa|grep gd gdb-6.5-37.el5 libgdiplus-1.2.5-1.el5.centos gd-2.0.33-9.4.el5_1.1 gdbm-1.8.0-26.2.1 sysklogd-1.4.1-44.el5 libgdiplus-devel-1.2.5-1.el5.centos gd-devel-2.0.33-9.4.el5_1.1
[root@localhost nagios-3.1.2]# useradd nagios [root@localhost nagios-3.1.2]#
./configure --prefix=/usr/local/nagios \ > --with
-gd-lib=/usr/lib --with-gd-inc=/usr/include --with-nagios-user=nagios \ > --with-nagios-group=nagios[root@localhost nagios-3.1.2]#make all [root@localhost nagios-3.1.2]#make install [root@localhost nagios-3.1.2]#make install-init[root@localhost nagios-3.1.2]#make install-commandmode[root@localhost nagios-3.1.2]#make install-config
[root@localhost nagios-plugins-1.4.13]#
./configure --prefix=/usr/local/nagios [root@localhost nagios-plugins-1.4.13]# make && make install
[root@localhost src]#tar zxvf library_linux.tar.gz[root@localhost src]#mv libACE* libcrypto.so.0.9.8 libssl.so.0.9.8 /usr/lib
[root@localhost src]#tar zxvf fetion20090406003-linux.tar.gz [root@localhost src]#mv install /usr/local/fetion [root@localhost src]#chmod -R 755 /usr/local/fetion [root@localhost src]#chown -R nagios:nagios /usr/local/fetion
[root@localhost src]#
/usr/local/fetion/fetion --mobile=137*** --pwd=*** \ > --to=136*** --msg-utf8="test"
 [root@localhost src]#cd /usr/local/nagios/etc/objects/
[root@localhost objects]# vi hosts.cfg
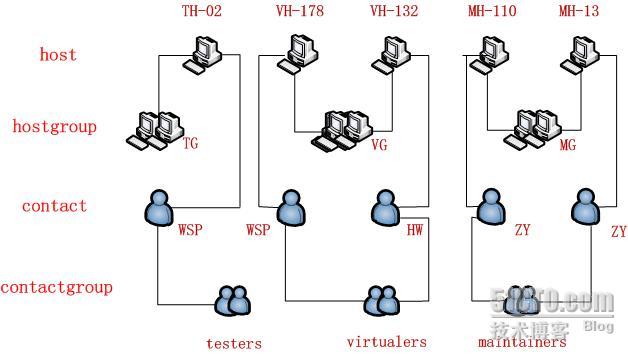
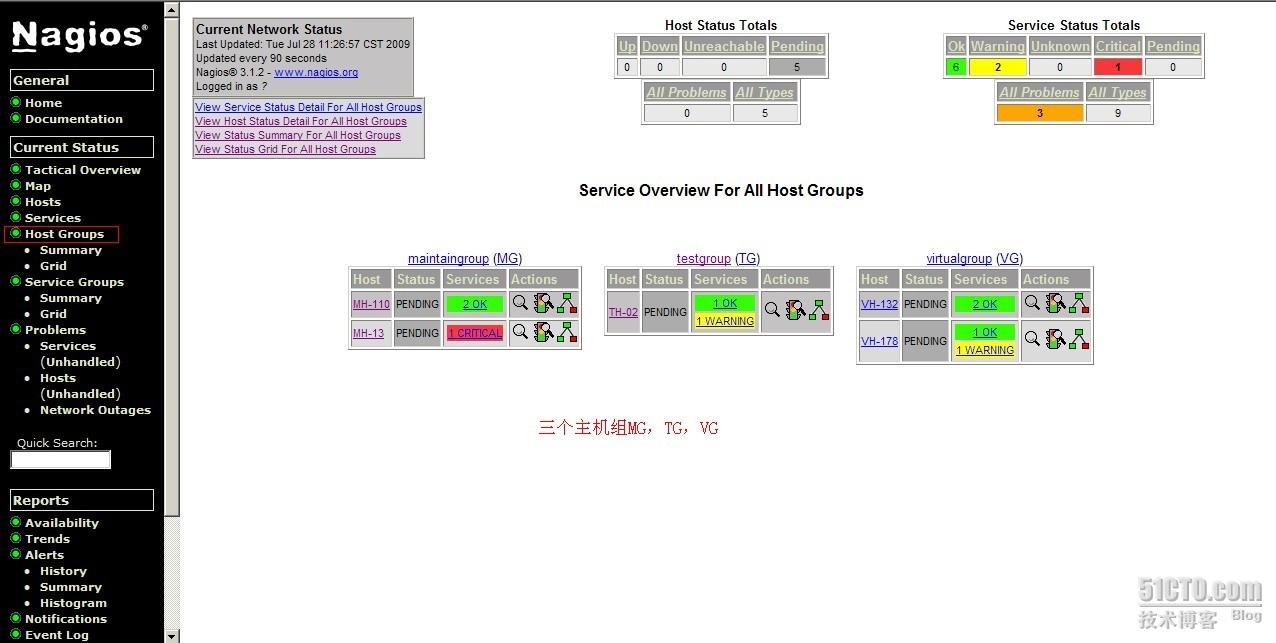
### Define whole host for all the machines# Define testgroup host for the testers machinedefine host{ host_name TH-02 alias testhost02 max_check_attempts 5 contact_groups testers address 60.191.*.* } # Define virtualgroup host for the virtualers machinedefine host{ host_name VH-178 alias Virutalhost178 max_check_attempts 5 contact_groups virtualers address *.*.*.178 } define host{ host_name VH-132 alias Virtualhost132 max_check_attempts 5 contact_groups virtualers address *.*.*.132 } # Define maintaingroup host for the maintainers machine define host{ host_name MH-110 alias maintainhost110 max_check_attempts 5 contact_groups maintainers address *.*.*.110 } define host{ host_name MH-13 alias maintainhost13 max_check_attempts 5 contact_groups maintainers address *.*.*.13 } ############################################################################## ### Define all hostgroup for the whole machine # Define testgroup define hostgroup{ hostgroup_name TG alias testgroup members TH-02 } # Define virtualgroupdefine hostgroup{ hostgroup_name VG alias virtualgroup members VH-178,VH-132 } # Define maintaingroup define hostgroup{ hostgroup_name MG alias maintaingroup members MH-110,MH-13 } ############################################################################# ### SERVICE DEFINITIONS # Define a service to "ping" the whole machinedefine service{ host_name TH-02,VH-178,VH-132,MH-110 service_description PING is_volatile 0 check_period 24x7 max_check_attempts 1 normal_check_interval 1 retry_check_interval 1 notification_options w,u,c,r notification_interval 1 notification_period 24x7 check_command check_ping!100.0,20%!500.0,60%
# Define a service to "HTTP" the whole machine define service{ host_name H-02,VH-178,VH-132,MH-13,MH-110
is_volatile 0 check_period 24x7 max_check_attempts 1 normal_check_interval 1 retry_check_interval 1 notification_options w,u,c,r notification_interval 1 notification_period 24x7 check_command check_http notifications_enabled 0 } ############################################################################### # CONTACTS.CFG - SAMPLE CONTACT/CONTACTGROUP DEFINITIONS # # Last Modified: 05-31-2007 # # NOTES: This config file provides you with some example contact and contact # group definitions that you can reference in host and service # definitions. # # You don't need to keep these definitions in a separate file from your # other object definitions. This has been done just to make things # easier to understand. # ############################################################################### ############################################################################### ############################################################################### # # CONTACTS # ############################################################################### ############################################################################### ### Define contact information for all the contacter # Define contact information for WSPdefine contact{ contact_name WSP use generic-contact alias WY-wsp service_notification_commands notify-service-by-email,service-notify-by-fei host_notification_commands notify-host-by-email,host-notify-by-fei email
[email protected]
pager 150*** } # Define contact information for HW
define contact{ contact_name HW use generic-contact alias WY-hw service_notification_commands notify-service-by-email,service-notify-by-fei host_notification_commands notify-host-by-email,host-notify-by-fei email
[email protected]
pager 135*** } # Define contact information for ZY
define contact{ contact_name ZY use generic-contact alias WY-zy service_notification_commands notify-service-by-email,service-notify-by-fei host_notification_commands notify-host-by-email,host-notify-by-fei email [email protected] pager 150*** } ############################################################################### ############################################################################### # # CONTACT GROUPS # ############################################################################### ############################################################################### ### Define contact group for all ther whole contacter # Define testers contact group define contactgroup{ contactgroup_name testers alias testhost contacters members WSP } # Define virtualers contact group define contactgroup{ contactgroup_name virtualers alias virtualhost contacters members WSP,HW } # Define maintainers contact group define contactgroup{ contactgroup_name maintainers alias maintainhost contacters members ZY } # 'notify-host-by-fei' command definition
define command { command_name host-notify-by-fei ; command_line /usr/local/fetion/fetion --mobile=137*** --pwd=*** --to=$CONTACTPAGER$ --msg-utf8="Host $HOSTSTATE$ alert for $HOSTNAME$! on '$LONGDATETIME$'" $CONTACTPAGER$ } # 'notify-service-by-fei' command definition
define command { command_name service-notify-by-fei command_line /usr/local/fetion/fetion --mobile=137*** --pwd=*** --to=$CONTACTPAGER$ --msg-utf8="$HOSTADDRESS$ $HOSTALIAS$/$SERVICEDESC$ is $SERVICESTATE$ on $LONGDATETIME$" $CONTACTPAGER$ }
为了不监控本机,现把localhost注释掉,找到此行,并且加以注释: # cfg_file=/usr/local/nagios/etc/objects/localhost.cfg 为了使刚才编辑的文件生效,需加入一行: cfg_file=/usr/local/nagios/etc/objects/hosts.cfg
authorized_for_system_information=* authorized_for_configuration_information=* authorized_for_system_commands=nagios authorized_for_all_services=* authorized_for_all_hosts=* authorized_for_all_service_commands=* authorized_for_all_host_commands=* *号在此表示所有用户,也可以改成相关用户,不过必须逐一添加。
[root@localhost objects]#
service nagios restart Running configuration check...done. Stopping nagios: done. Starting nagios: done. [root@localhost objects]#chkconfig nagios on [root@localhost objects]#
chkconfig --list|grep nagios nagios 0:关闭 1:关闭 2:启用 3:启用 4:启用 5:启用 6:关闭 [root@localhost ~]#
export PATH=$PATH:/usr/local/apache/bin [root@localhost ~]# apachectl -k start httpd (pid 3108) already running
[root@localhost ~]# /usr/local/nagios/bin/nagios -v /usr/local/nagios/etc/nagios.cfg Nagios 3.1.2 Copyright (c) 2009 Nagios Core Development Team and Community Contributors Copyright (c) 1999-2009 Ethan Galstad Last Modified: 06-23-2009 License: GPL Website: http://www.nagios.org Reading configuration data... Read main config file okay... Processing object config file '/usr/local/nagios/etc/objects/commands.cfg'... Processing object config file '/usr/local/nagios/etc/objects/contacts.cfg'... Processing object config file '/usr/local/nagios/etc/objects/timeperiods.cfg'... Processing object config file '/usr/local/nagios/etc/objects/templates.cfg'... Processing object config file '/usr/local/nagios/etc/objects/hosts.cfg'... Read object config files okay... Running pre-flight check on configuration data... Checking services... Checked 9 services. Checking hosts... Checked 5 hosts. Checking host groups... Checked 3 host groups. Checking service groups... Checked 0 service groups. Checking contacts... Checked 3 contacts. Checking contact groups... Checked 3 contact groups. Checking service escalations... Checked 0 service escalations. Checking service dependencies... Checked 0 service dependencies. Checking host escalations... Checked 0 host escalations. Checking host dependencies... Checked 0 host dependencies. Checking commands... Checked 26 commands. Checking time periods... Checked 5 time periods. Checking for circular paths between hosts... Checking for circular host and service dependencies... Checking global event handlers... Checking obsessive compulsive processor commands... Checking misc settings... Total Warnings: 0 Total Errors: 0
[root@localhost src]#cd /usr/local/nagios/etc/objects/
[root@localhost objects]# vi hosts.cfg
### Define whole host for all the machines# Define testgroup host for the testers machinedefine host{ host_name TH-02 alias testhost02 max_check_attempts 5 contact_groups testers address 60.191.*.* } # Define virtualgroup host for the virtualers machinedefine host{ host_name VH-178 alias Virutalhost178 max_check_attempts 5 contact_groups virtualers address *.*.*.178 } define host{ host_name VH-132 alias Virtualhost132 max_check_attempts 5 contact_groups virtualers address *.*.*.132 } # Define maintaingroup host for the maintainers machine define host{ host_name MH-110 alias maintainhost110 max_check_attempts 5 contact_groups maintainers address *.*.*.110 } define host{ host_name MH-13 alias maintainhost13 max_check_attempts 5 contact_groups maintainers address *.*.*.13 } ############################################################################## ### Define all hostgroup for the whole machine # Define testgroup define hostgroup{ hostgroup_name TG alias testgroup members TH-02 } # Define virtualgroupdefine hostgroup{ hostgroup_name VG alias virtualgroup members VH-178,VH-132 } # Define maintaingroup define hostgroup{ hostgroup_name MG alias maintaingroup members MH-110,MH-13 } ############################################################################# ### SERVICE DEFINITIONS # Define a service to "ping" the whole machinedefine service{ host_name TH-02,VH-178,VH-132,MH-110 service_description PING is_volatile 0 check_period 24x7 max_check_attempts 1 normal_check_interval 1 retry_check_interval 1 notification_options w,u,c,r notification_interval 1 notification_period 24x7 check_command check_ping!100.0,20%!500.0,60%
# Define a service to "HTTP" the whole machine define service{ host_name H-02,VH-178,VH-132,MH-13,MH-110
is_volatile 0 check_period 24x7 max_check_attempts 1 normal_check_interval 1 retry_check_interval 1 notification_options w,u,c,r notification_interval 1 notification_period 24x7 check_command check_http notifications_enabled 0 } ############################################################################### # CONTACTS.CFG - SAMPLE CONTACT/CONTACTGROUP DEFINITIONS # # Last Modified: 05-31-2007 # # NOTES: This config file provides you with some example contact and contact # group definitions that you can reference in host and service # definitions. # # You don't need to keep these definitions in a separate file from your # other object definitions. This has been done just to make things # easier to understand. # ############################################################################### ############################################################################### ############################################################################### # # CONTACTS # ############################################################################### ############################################################################### ### Define contact information for all the contacter # Define contact information for WSPdefine contact{ contact_name WSP use generic-contact alias WY-wsp service_notification_commands notify-service-by-email,service-notify-by-fei host_notification_commands notify-host-by-email,host-notify-by-fei email
[email protected]
pager 150*** } # Define contact information for HW
define contact{ contact_name HW use generic-contact alias WY-hw service_notification_commands notify-service-by-email,service-notify-by-fei host_notification_commands notify-host-by-email,host-notify-by-fei email
[email protected]
pager 135*** } # Define contact information for ZY
define contact{ contact_name ZY use generic-contact alias WY-zy service_notification_commands notify-service-by-email,service-notify-by-fei host_notification_commands notify-host-by-email,host-notify-by-fei email [email protected] pager 150*** } ############################################################################### ############################################################################### # # CONTACT GROUPS # ############################################################################### ############################################################################### ### Define contact group for all ther whole contacter # Define testers contact group define contactgroup{ contactgroup_name testers alias testhost contacters members WSP } # Define virtualers contact group define contactgroup{ contactgroup_name virtualers alias virtualhost contacters members WSP,HW } # Define maintainers contact group define contactgroup{ contactgroup_name maintainers alias maintainhost contacters members ZY } # 'notify-host-by-fei' command definition
define command { command_name host-notify-by-fei ; command_line /usr/local/fetion/fetion --mobile=137*** --pwd=*** --to=$CONTACTPAGER$ --msg-utf8="Host $HOSTSTATE$ alert for $HOSTNAME$! on '$LONGDATETIME$'" $CONTACTPAGER$ } # 'notify-service-by-fei' command definition
define command { command_name service-notify-by-fei command_line /usr/local/fetion/fetion --mobile=137*** --pwd=*** --to=$CONTACTPAGER$ --msg-utf8="$HOSTADDRESS$ $HOSTALIAS$/$SERVICEDESC$ is $SERVICESTATE$ on $LONGDATETIME$" $CONTACTPAGER$ }
为了不监控本机,现把localhost注释掉,找到此行,并且加以注释: # cfg_file=/usr/local/nagios/etc/objects/localhost.cfg 为了使刚才编辑的文件生效,需加入一行: cfg_file=/usr/local/nagios/etc/objects/hosts.cfg
authorized_for_system_information=* authorized_for_configuration_information=* authorized_for_system_commands=nagios authorized_for_all_services=* authorized_for_all_hosts=* authorized_for_all_service_commands=* authorized_for_all_host_commands=* *号在此表示所有用户,也可以改成相关用户,不过必须逐一添加。
[root@localhost objects]#
service nagios restart Running configuration check...done. Stopping nagios: done. Starting nagios: done. [root@localhost objects]#chkconfig nagios on [root@localhost objects]#
chkconfig --list|grep nagios nagios 0:关闭 1:关闭 2:启用 3:启用 4:启用 5:启用 6:关闭 [root@localhost ~]#
export PATH=$PATH:/usr/local/apache/bin [root@localhost ~]# apachectl -k start httpd (pid 3108) already running
[root@localhost ~]# /usr/local/nagios/bin/nagios -v /usr/local/nagios/etc/nagios.cfg Nagios 3.1.2 Copyright (c) 2009 Nagios Core Development Team and Community Contributors Copyright (c) 1999-2009 Ethan Galstad Last Modified: 06-23-2009 License: GPL Website: http://www.nagios.org Reading configuration data... Read main config file okay... Processing object config file '/usr/local/nagios/etc/objects/commands.cfg'... Processing object config file '/usr/local/nagios/etc/objects/contacts.cfg'... Processing object config file '/usr/local/nagios/etc/objects/timeperiods.cfg'... Processing object config file '/usr/local/nagios/etc/objects/templates.cfg'... Processing object config file '/usr/local/nagios/etc/objects/hosts.cfg'... Read object config files okay... Running pre-flight check on configuration data... Checking services... Checked 9 services. Checking hosts... Checked 5 hosts. Checking host groups... Checked 3 host groups. Checking service groups... Checked 0 service groups. Checking contacts... Checked 3 contacts. Checking contact groups... Checked 3 contact groups. Checking service escalations... Checked 0 service escalations. Checking service dependencies... Checked 0 service dependencies. Checking host escalations... Checked 0 host escalations. Checking host dependencies... Checked 0 host dependencies. Checking commands... Checked 26 commands. Checking time periods... Checked 5 time periods. Checking for circular paths between hosts... Checking for circular host and service dependencies... Checking global event handlers... Checking obsessive compulsive processor commands... Checking misc settings... Total Warnings: 0 Total Errors: 0 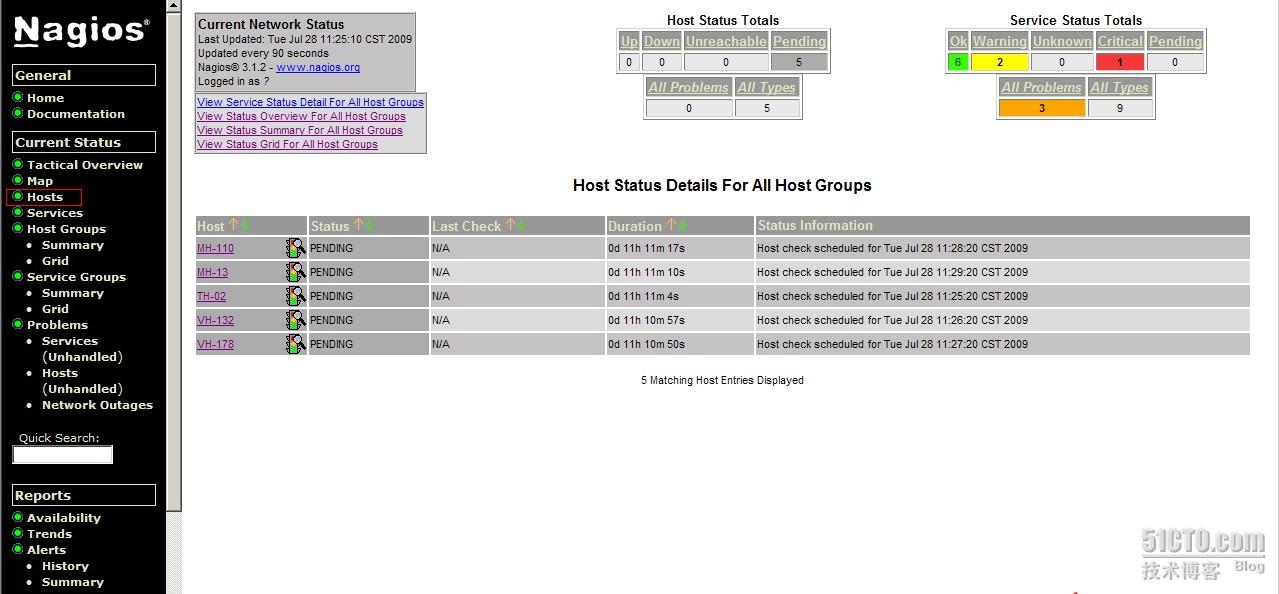

 [root@yibaner src]# useradd nagios -s /sbin/nologin -M [root@yibaner src]# tar zxvf nagios-plugins-1.4.13.tar.gz [root@yibaner src]# cd nagios-plugins-1.4.13 [root@yibaner nagios-plugins-1.4.13]# ./configure --prefix=/usr/local/nagios [root@yibaner nagios-plugins-1.4.13]# make && make install [root@yibaner nagios-plugins-1.4.13]# chown -R nagios.nagios /usr/local/nagios/
[root@yibaner src]# tar zxvf nrpe-2.12.tar.gz [root@yibaner nrpe-2.12]# cd nrpe-2.12 [root@yibaner nrpe-2.12]# ./configure [root@yibaner nrpe-2.12]# make all [root@yibaner nrpe-2.12]# make install-plugin [root@yibaner nrpe-2.12]# make install-daemon [root@yibaner nrpe-2.12]# make install-daemon-config
[root@yibaner nrpe-2.12]# vi /usr/local/nagios/etc/nrpe.cfg 将server_address的值修改为本机的IP地址:server_address=*.*.*.110 将allowed_hosts的值修改为远程监控服务器的IP地址: allowed_hosts=*.*.*.27
[root@yibaner nrpe-2.12]# /usr/local/nagios/bin/nrpe -c /usr/local/nagios/etc/nrpe.cfg -d [root@yibaner nrpe-2.12]# netstat -nap | grep nrpe
[root@yibaner src]# useradd nagios -s /sbin/nologin -M [root@yibaner src]# tar zxvf nagios-plugins-1.4.13.tar.gz [root@yibaner src]# cd nagios-plugins-1.4.13 [root@yibaner nagios-plugins-1.4.13]# ./configure --prefix=/usr/local/nagios [root@yibaner nagios-plugins-1.4.13]# make && make install [root@yibaner nagios-plugins-1.4.13]# chown -R nagios.nagios /usr/local/nagios/
[root@yibaner src]# tar zxvf nrpe-2.12.tar.gz [root@yibaner nrpe-2.12]# cd nrpe-2.12 [root@yibaner nrpe-2.12]# ./configure [root@yibaner nrpe-2.12]# make all [root@yibaner nrpe-2.12]# make install-plugin [root@yibaner nrpe-2.12]# make install-daemon [root@yibaner nrpe-2.12]# make install-daemon-config
[root@yibaner nrpe-2.12]# vi /usr/local/nagios/etc/nrpe.cfg 将server_address的值修改为本机的IP地址:server_address=*.*.*.110 将allowed_hosts的值修改为远程监控服务器的IP地址: allowed_hosts=*.*.*.27
[root@yibaner nrpe-2.12]# /usr/local/nagios/bin/nrpe -c /usr/local/nagios/etc/nrpe.cfg -d [root@yibaner nrpe-2.12]# netstat -nap | grep nrpe tcp 0 0 *.*.*.110:5666 0.0.0.0:* LISTEN 3538/nrpe
从上述情况来看,nrpe成功运行,并且占用了5666端口
[root@yibaner nrpe-2.12]#vi /etc/rc.local 在其中加中此行:/usr/local/nagios/bin/nrpe -c /usr/local/nagios/etc/nrpe.cfg -d
[root@localhost src]# telnet *.*.*.110 5666
测试如果一切正常,整个配置过程全部告一段落,只需到监控服务器中设置对被监控服务器的所需服务的监控即可。
注:It appears as though you do not have permission to view information for any of the hosts you requested...
If you believe this is an error, check the HTTP server authentication requirements for accessing this CGI
and check the authorization options in your CGI configuration file.
出现此错误 ,可能是没有编辑 cgi.cfg, 或者 不按照以上写的来编辑cgi.cfg配置文件的话,直接修改里面的一个参数:
use_authentication=1 默认为1,改为0即可
我想增加一个用户,要怎么设置? 前面都是按照上面写的设置的
可以试一下这个命令htpasswd /usr/local/nagios/etc/htpasswd.users <username>
或
第一步:
/usr/local/apache/bin/htpasswd /usr/local/nagios/etc/htpasswd.users 用户名称
第二步:
在httpd.conf中写成下面这样:
ScriptAlias /nagios/cgi-bin "/usr/local/nagios/sbin"
<Directory "/usr/local/nagios/sbin">
AuthType Basic
Options ExecCGI
AllowOverride None
Order allow,deny
Allow from all
AuthName "Nagios Access"
AuthUserFile /usr/local/nagios/etc/htpasswd.users
Require valid-user
</Directory>
Alias /nagios "/usr/local/nagios/share"
<Directory "/usr/local/nagios/share">
AuthType Basic
Options None
AllowOverride None
Order allow,deny
Allow from all
AuthName "Nagios Access"
AuthUserFile /usr/local/nagios/etc/htpasswd.users
Require valid-user
</Directory>