基于httpd2.4.9的一些常用配置

一、CGI的配置
CGI(公共网关接口[Common Gateway Interface]) 定义了网站服务器与外部内容协商程序之间交互的方法,通常是指CGI程序或者CGI脚本,是在网站上实现动态页面的最简单而常用的方法
要让CGI程序能正常运作,必须配置Apache以允许CGI的执行,我们在上次的编译安装时已经配置允许cgi的执行了
如果没有启用则编辑/etc/http24/httpd.conf
LoadModule alias_module modules/mod_alias.so //把前面的#号拿掉
LoadModule cgi_module modules/mod_cgi.so //把前面的#号拿掉
我们来先写一个简单的CGI脚本
先到/usr/local/apache1/cgi-bin目录下创建脚本test,内容如下
#!/bin/bash
cat <<EEE
Content-Type: text/html
<pre>
<h1>The time is :`date`</h>
</pre>
EEE
给tset以执行权限
chmod +x test
配置站点目录属性
允许使用mod_cgi模块执行CGI脚本
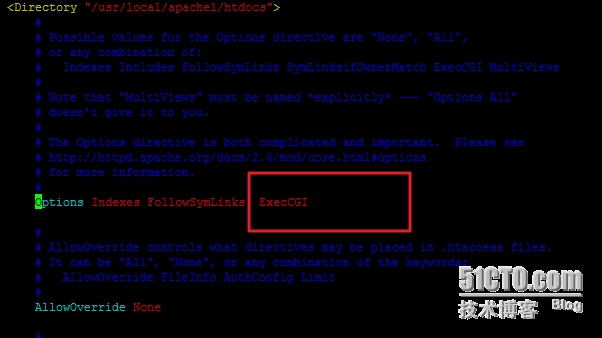
这样就可以在访问脚本时显示出脚本执行内容了
二、配置虚拟主机
虚拟主机是在一台服务器上同时运行多个网站业务,基于IP的虚拟主机可以根据不同的IP地址以及端口号定位不同的网站请求,但基于IP的虚拟主机需要独立的IP地址定位连接的网站,而目前IP地址是互联网的稀缺资源,所以很多时候我们更喜欢基于域名的虚拟主机,服务器可以根据客户端访问HTTP的头部信息来实现网站的分离解析,客户端可以使用不同的域名访问位于同一IP地址的服务器资源。
我们这里就讲一下基于域名的虚拟主机的搭建
编辑/etc/httpd24/extra目录下的httpd-vhosts.conf文件
[root@stucw ~]# vim /etc/httpd24/extra/ httpd-vhosts.conf
添加以下内容
<VirtualHost *:80>
    ServerName www.abc.com
    DocumentRoot "/usr/local/apache1/docs/abc"

<Directory "/usr/local/apache1/docs/abc">
 Options Indexes FollowSymLinks
 AllowOverride None
 Require all granted
 </Directory>
</VirtualHost>
<VirtualHost *:80>
 ServerName www.asd.com
 DocumentRoot "/usr/local/apache1/docs/asd"
<Directory "/usr/local/apache1/docs/asd">
 Options Indexes FollowSymLinks
 AllowOverride None
Require all granted
 </Directory>
</VirtualHost>
分别在/usr/local/apache1/docs/asd和/usr/local/apache1/docs/abc下创建网页文件,内容自定
编辑/etc/httpd24/httpd.conf
把主站点目录注释掉,启用httpd-vhosts.conf配置文件


重启服务测试


三、认证机制
基于用户认证的机制
编辑/etc/http24/httpd.conf
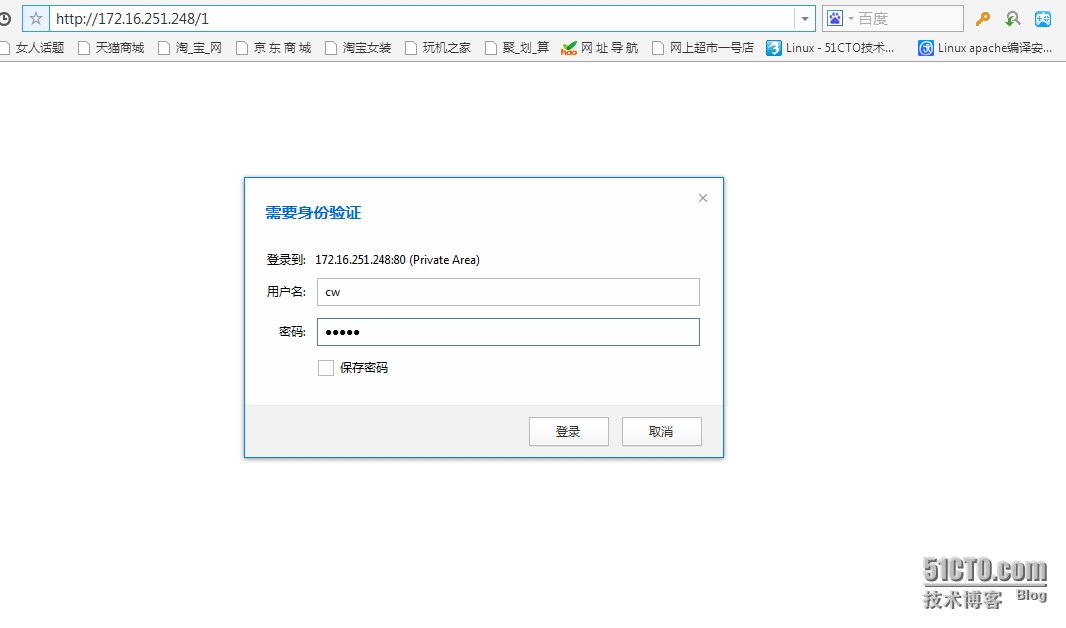
添加认证区域,假如访问/usr/local/apache1/htdocs/1 需要用户密码
<Directory "/usr/local/apache1/htdocs/1">
            Options None
            AllowOverride AuthConfig //访问需要认证
            AuthType Basic          //认证类型为基本认证
            AuthName "Private Area" //输出的认证标题
           AuthUserFile /usr/local/apache1/.htpasswd //认证的文件地址
            Require valid-user  //所有合法用户都可以认证
</Directory>
生成认证文件
[root@stucw apache1]# htpasswd -c -m .htpasswd cw //在/usr/local/apache1下生成.htpasswd文件,用户名为cw
认证如下图

四、 https协议
TCP/IP 网络产品的标准是 SSL ,对于 Internet 上普遍使用的超文本传输协议(HTTP)而言,其加密后的协议称为 HTTPS,缺省采用 443 端口。
HTTPS 数据是加密以后传输的,因此能有效保护在网络上传输的个人隐私信息。
1.创建服务器的私钥
[root@stucw extra]# cd /etc/pki/CA
[root@stucw private]# (umask 077;openssl genrsa 2048 > private/cakey.pem
2.CA生成自签证书:

3.创建必要的文件
[root@stucw CA] touch index.txt serial crlnumber
[root@stucw CA] echo 01 >>serial
4.在本机生成个http的密钥证书(因为在本机上做测试,因此在本地上再生成个密钥证书)
生成密钥httpd.key
[root@stucw ~]# cd /etc/httpd24
[root@stucw httpd24]# (umask 077;openssl genrsa 1024 >httpd.key)
生成证书httpd.csr
[root@stucw httpd24]# openssl req -new -key httpd.key -out httpd.csr
5.签署证书生成httpd.crt
[root@stucw httpd24]# openssl ca -in httpd.csr -out httpd.crt -days 3665
6. 配置ssl模块
6.1.编辑/etc/httpd24/httpd.conf
启用mod_ssl模块(把前面的#去掉)

启用mod_socache_shmcb模块(把前面的#去掉)

启用ssl加密认证配置文件(把前面#去掉)

6.2.编辑/etc/httpd24/extra/httpd-ssl.conf
修改其中证书与私钥的文件地址
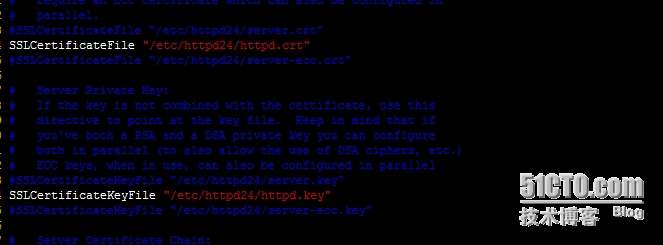
6.3.重启服务,测试
[root@stucw ~]# Service httpd24 restart
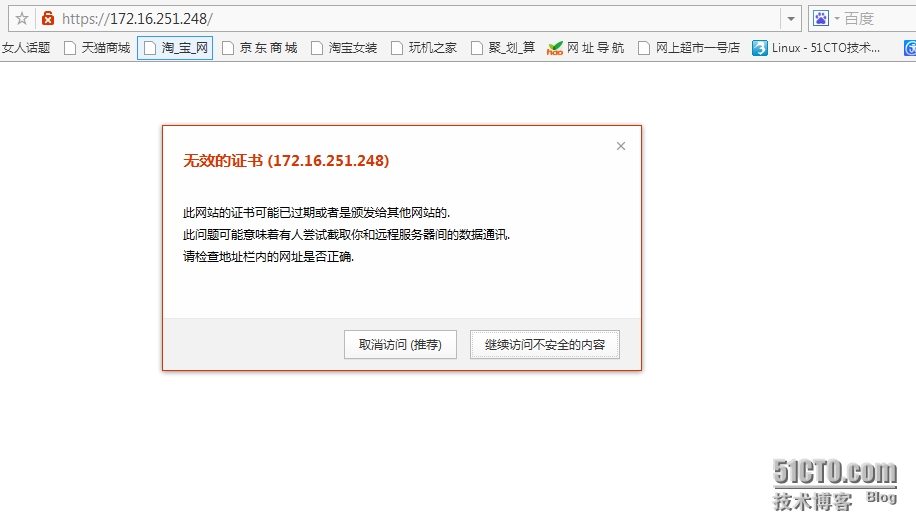
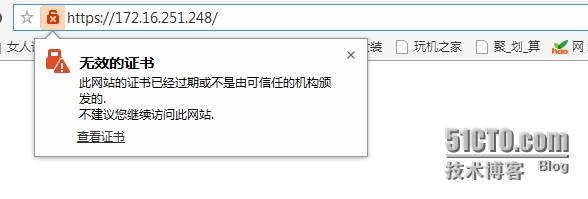
因为window上没有证书不能安全访问
7.在window上安装CA证书
把/etc/pli/CA/cacert.pem这个CA证书拷到window上,改名为cacer.crt,安装此证书
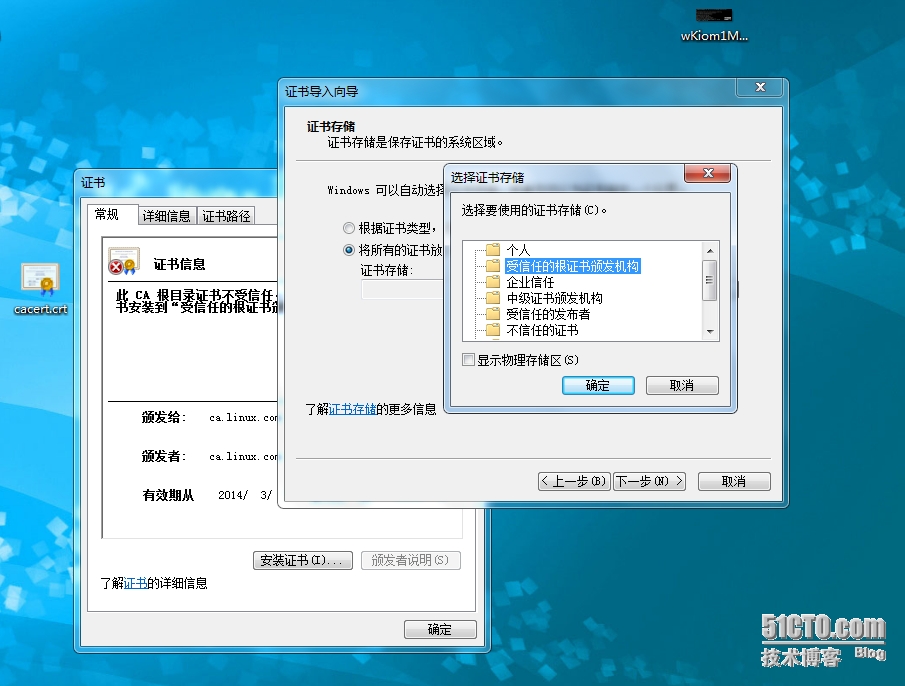
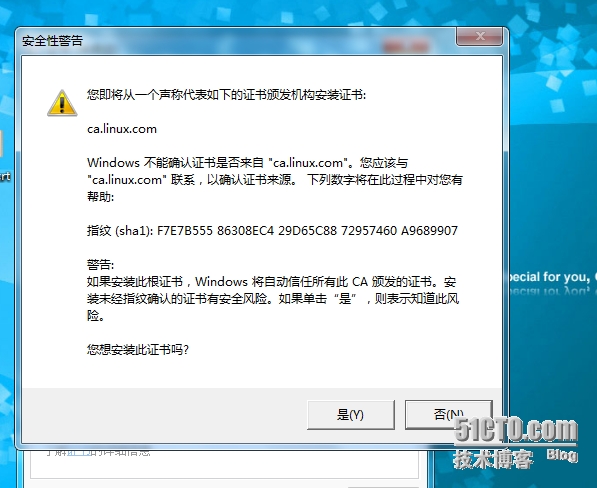
在windows 中C:\Windows\System32\drivers\etc\hosts
添加172.16.251.248 www.linux.com这条记录
这样我们就可以通过https加密访问了

我们还可以在linux上测试
[root@stucw ~]# openssl s_client -connect www.linux.com:443 -CAfile /etc/pki/CA/cacert.pem
这里就不作演示了。
五、配置mod_status
httpd内生的status信息,且此信息可以通过web预以显示
编辑/etc/httpd24/httpd.conf,事先确保mod_status模块启用

启用配置文件
Include /etc/httpd24/extra/httpd-info.conf //前面#去掉
编辑/etc/httpd24/extra/httpd-info.conf添加以下内容
<Location /server-status>               //url 为server-status
              SetHandler server-status
               AuthType Basic     //访问httpd的status信息需要通过用户加密认证才可以访问
              AuthName "Server Status"
              AuthUserFile "/usr/local/apache1/.htpasswd"
                Require valid-user
                Order deny,allow
                Allow from all
 </Location>
重启服务,测试
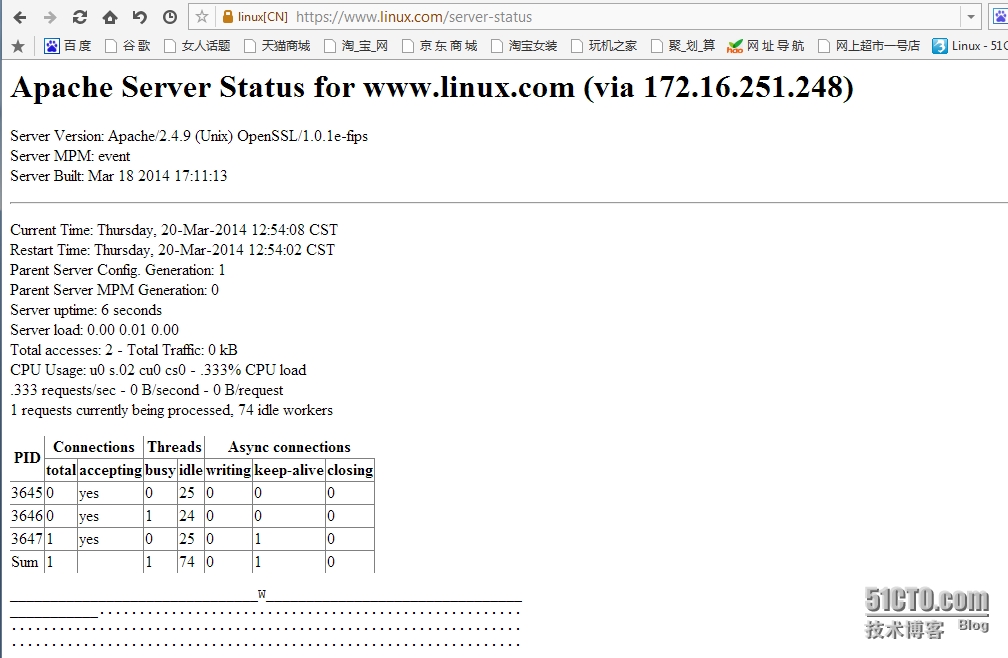
以上就是httpd的status内容
六、配置mod_deflate
使用mod_deflate模块压缩页面优化传输速度
编辑/etc/httpd24/httpd.conf,事先确保mod_deflate模块启用

在httpd.conf中添加以下内容
# mod_deflate configuration
 Include /etc/httpd24/extra/deflate.conf   //启用deflate.conf配置文件
在/etc/httpd24/extra下创建deflate配置文件
[root@stucw extra]# vim deflate.conf
SetOutputFilter DEFLATE
          # Restrict compression to these MIME types
          AddOutputFilterByType DEFLATE text/plain
          AddOutputFilterByType DEFLATE text/html
          AddOutputFilterByType DEFLATE application/xhtml+xml
          AddOutputFilterByType DEFLATE text/xml
          AddOutputFilterByType DEFLATE application/xml
          AddOutputFilterByType DEFLATE application/x-javascript
          AddOutputFilterByType DEFLATE text/javascript
          AddOutputFilterByType DEFLATE text/css

          # Level of compression (Highest 9 - Lowest 1)
          DeflateCompressionLevel 9

          # Netscape 4.x has some problems.
          BrowserMatch ^Mozilla/4 gzip-only-text/html

          # Netscape 4.06-4.08 have some more problems
          BrowserMatch ^Mozilla/4\.0[678] no-gzip

          # MSIE masquerades as Netscape, but it is fine
          BrowserMatch \bMSI[E] !no-gzip !gzip-only-text/html
重启测试
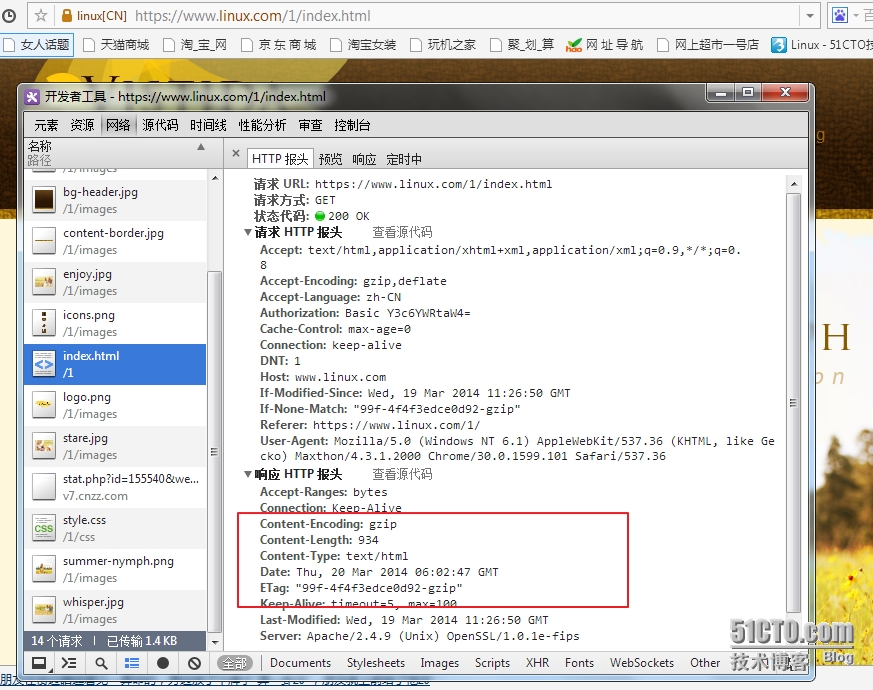
从上图看出了通过gzip压缩传输,从而提高了传输速度