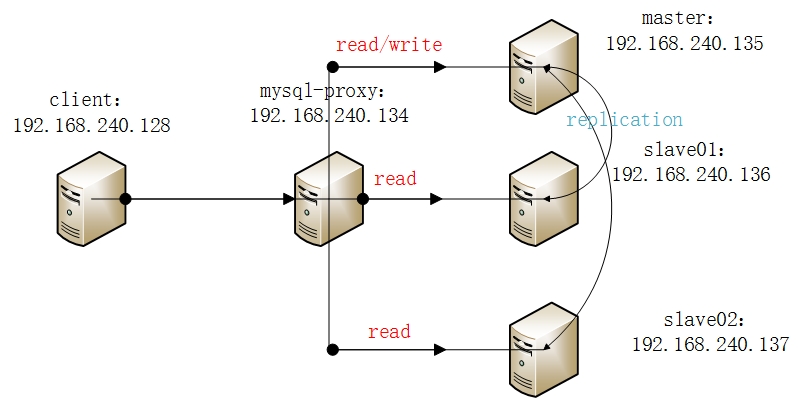
mysql-proxy 读写分离
【实验环境】
服务器名称 |
IP |
mysql proxy |
192.168.240.134 |
mysql master |
192.168.240.135 |
mysql slave01 |
192.168.240.136 |
mysql slave02 |
192.168.240.137 |
client |
192.168.240.128 |
【拓扑】

一、安装mysql proxy
前提:
・libevent 1.x 或更高
・glib2 2.6.0 或更高
・lua 5.1.x 或更高
・pkg-config
・libtool 1.5 或更高
・MySQL 5.0.x 或更高的开发库
1.为了加速安装进度,可以先用yum安装必须的库,同时解决pkg-config、libtool和MySQL开发库,由于mysql-proxy并不需要在本机上运行mysql实例,所以这里用yum安装:
[root@proxy local]# yum install -y gccgcc-c++ autoconf mysql-devel libtool pkgconfig ncurses ncurses-devel wget make gettext
2.安装libevent-2.0.20版本
[root@proxy src]# wget https://github.com/downloads/libevent/libevent/libevent-2.0.20-stable.tar.gz
[root@proxy src]# tar -xflibevent-2.0.21-stable.tar.gz -C /usr/local/
[root@proxy libevent-2.0.21-stable]#./configure
[root@proxy libevent-2.0.21-stable]# make&& make install
3.安装glib2
[root@proxy src]# wget ftp://ftp.gnome.org/pub/gnome/sources/glib/2.18/glib-2.18.4.tar.gz
[root@proxy src]# tar -xf glib-2.18.4.tar.gz
[root@proxy glib-2.18.4]# ./configure
[root@proxy glib-2.18.4]# make &&make install
4.安装lua-5.1.4版本,安装之前需要先安装readline-6.1,不然会报错缺少头文件.
[root@proxy src]# wget ftp://ftp.cwru.edu/pub/bash/readline-6.1.tar.gz
[root@proxy readline-6.1]# tar -xfreadline-6.1.tar.gz
[root@proxy readline-6.1]# ./configure
……
install: you may need to run ldconfig
make[1]: Leaving directory`/usr/local/src/readline-6.1/shlib'
为了动态链接库为系统所共享,运行ldconfig命令:
[root@proxy readline-6.1]# ldconfig -v
用此选项时,ldconfig将显示正在扫描的目录及搜索到的动态链接库,还有它所创建的连接的名字。
安装lua-5.1.4
[root@proxy src]# wget http://www.lua.org/ftp/lua-5.1.4.tar.gz
[root@proxy src]# tar -xf lua-5.1.4.tar.gz
#64位系统需要在CFLAGS里加上 -fPIC,我们用vim编辑src/Makefile文件,修改代码如下:
CFLAGS= -O2 -Wall -fPIC $(MYCFLAGS)
安装:
[root@proxy lua-5.1.4]# make linux
[root@proxy lua-5.1.4]# make install
5.配置pkg-config环境变量:
[root@proxy lua-5.1.4]# cp etc/lua.pc /usr/local/lib/pkgconfig/
[root@proxy lua-5.1.4]# exportPKG_CONFIG_PATH=$PKG_CONFIG_PATH:/usr/local/lib/pkgconfig
6.以上操作完成了基础文件的安装,接下来是MySQL Proxy 0.8.4安装:
[root@proxy src]# wget http://dev.mysql.com/get/Downloads/MySQL-Proxy/mysql-proxy-0.8.4.tar.gz
[root@proxy mysql-proxy-0.8.4]#./configure --prefix=/usr/local/mysql-proxy
[root@proxy mysql-proxy-0.8.4]# make&& make install
确保存在以下脚本:
[root@proxy mysql-proxy-0.8.4]# cplib/rw-splitting.lua /usr/local/lib/
[root@proxy mysql-proxy-0.8.4]# cplib/admin.lua /usr/local/lib/
7.测试mysql-proxy
[root@proxy mysql-proxy-0.8.4]#/usr/local/mysql-proxy/bin/mysql-proxy --help-all
Usage:
mysql-proxy [OPTION...] - MySQL Proxy
Help Options:
-?, --help Show help options
--help-all Show all help options
--help-proxy Show options for the proxy-module
proxy-module
-P, --proxy-address=<host:port> listening address:portof the proxy-server (default: :4040)
-r, --proxy-read-only-backend-addresses=<host:port> address:port of the remote slave-server(default: not set)
-b, --proxy-backend-addresses=<host:port> address:port of the remote backend-servers(default: 127.0.0.1:3306)
--proxy-skip-profiling disablesprofiling of queries (default: enabled)
--proxy-fix-bug-25371 fix bug#25371 (mysqld > 5.1.12) for older libmysql versions
-s, --proxy-lua-script=<file> filename of the luascript (default: not set)
--no-proxy don't start the proxy-module (default: enabled)
--proxy-pool-no-change-user don't useCHANGE_USER to reset the connection coming from the pool (default: enabled)
--proxy-connect-timeout connecttimeout in seconds (default: 2.0 seconds)
--proxy-read-timeout readtimeout in seconds (default: 8 hours)
--proxy-write-timeout writetimeout in seconds (default: 8 hours)
Application Options:
-V, --version Show version
--defaults-file=<file> configurationfile
--verbose-shutdown Alwayslog the exit code when shutting down
--daemon Start in daemon-mode
--user=<user> Runmysql-proxy as user
--basedir=<absolute path> Base directoryto prepend to relative paths in the config
--pid-file=<file> PID file in casewe are started as daemon
--plugin-dir=<path> path tothe plugins
--plugins=<name> pluginsto load
--log-level=(error|warning|info|message|debug) log all messages of level ... orhigher
--log-file=<file> log allmessages in a file
--log-use-syslog log allmessages to syslog
--log-backtrace-on-crash try to invokedebugger on crash
--keepalive try to restart the proxy if it crashed
--max-open-files maximumnumber of open files (ulimit -n)
--event-threads numberof event-handling threads (default: 1)
--lua-path=<...> set theLUA_PATH
--lua-cpath=<...> set theLUA_CPATH
为了方便使用,可以修改/etc/profile文件:

二、配置mysql主从
1.给用户授权
在master/slave 建立一个测试用户,因为以后客户端发送的SQL都是通过mysql-proxy服务器来转发,所以要确保可以从mysql-proxy服务器上登录mysql主从库,分别在主和从mysql机器上进行授权:
(需要先创建用户)
mysql>grant all privileges on *.* to 'proxy'@'192.168.240.134' identified '123456';
mysql>flush privileges;
2.进行测试
做完上面的步骤就可以在mysql proxy上进行测试:
[root@proxy~]# mysql-proxy --proxy-backend-addresses=192.168.240.135:3306--proxy-read-only-backend-addresses=192.168.240.136:3306--proxy-read-only-backend-addresses=192.168.240.137:3306--proxy-lua-script=/usr/local/lib/rw-splitting.lua &
[1] 1299
[root@proxy~]# 2014-03-27 18:56:03: (critical) plugin proxy 0.8.4 started
建议使用配置文件的形式启动,注意配置文件必须是660权限,否则无法启动.如果有多个slave的话,proxy-read-only-backend-addresses参数可以配置多个以都好分割的IP:PORT 从库列表.
[root@proxy~]# netstat -nutpl |grep mysql
tcp 0 0 0.0.0.0:4040 0.0.0.0:* LISTEN 1263/mysql-proxy
可以看到,mysql-proxy是以4040端口运行的。
在mysql主从服务器上,分别测试连接mysql-proxy(前提要设置防火墙允许4040端口访问,或者关闭iptables)
[root@mysql_master~]# mysql -uproxy -p123456 -P4040 -h192.168.240.134
[root@mysql_slave~]# mysql -uproxy -p123456 -P4040 -h192.168.240.134
3.mysql主从复制配置
然后根据上面拓扑,搭建mysql主从(可以参考上一篇博客)
不过为了更好的验证读写分离的效果,我们暂时关闭mysql主从复制
mysql>stop slave;
Query OK, 0rows affected (0.05 sec)
三、测试
1.测试读写分离,前提要保证主从数据一致。
mysql>select * from rep.test1;
+-------+------+---------+
| name | num | class |
+-------+------+---------+
| zhang| 24 | network |
+-------+------+---------+
1 row in set(0.31 sec)
找一台client机器
mysql>grant all on *.* to 'proxy'@'192.168.240.134' identified by '123456';
Query OK, 0rows affected (0.07 sec)
mysql>flush privileges;
Query OK, 0rows affected (0.03 sec)
[root@Nginx~]# mysql -uproxy -p123456 -P4040 -h192.168.240.134
mysql>show databases;
+--------------------+
|Database |
+--------------------+
|information_schema |
| mysql |
|performance_schema |
| rep |
| test |
+--------------------+
5 rows in set(0.16 sec)
mysql>select * from rep.test1;
+-------+------+---------+
| name | num | class |
+-------+------+---------+
| zhang| 24 | network |
+-------+------+---------+
1 row in set(0.00 sec)
可见,使用客户端访问数据库的时候,数据是一致的。
现在我们尝试插入数据:
mysql>insert into rep.test1 values('min',20,'net');
Query OK, 1row affected (0.10 sec)
客户端显示:
mysql>select * from rep.test1;
+-------+------+---------+
| name | num | class |
+-------+------+---------+
| zhang| 24 | network |
| min | 20| net |
+-------+------+---------+
2 rows in set(0.00 sec)
主服务器显示:
mysql>select * from rep.test1;
+-------+------+---------+
| name | num | class |
+-------+------+---------+
| zhang| 24 | network |
| min | 20| net |
+-------+------+---------+
2 rows in set(0.00 sec)
两个从服务器显示:
slave01
mysql>select * from rep.test1;
+-------+------+---------+
| name | num | class |
+-------+------+---------+
| zhang| 24 | network |
+-------+------+---------+
1 row in set(0.24 sec)
slave02
mysql> select* from rep.test1;
+-------+------+---------+
| name | num | class |
+-------+------+---------+
| zhang| 24 | network |
+-------+------+---------+
1 row in set(0.11 sec)
现在把数据库还原,然后开启主从复制,测试:
在主数据库上创建了一个表:
mysql>create table test2( id int, num int);
Query OK, 0rows affected (0.55 sec)
mysql>show tables;
+---------------+
|Tables_in_rep |
+---------------+
| test1 |
| test2 |
+---------------+
2 rows in set(0.00 sec)
来看从数据库:
slave01
mysql>show tables;
+---------------+
|Tables_in_rep |
+---------------+
| test1 |
| test2 |
+---------------+
2 rows in set(0.00 sec)
slave02
mysql>show tables;
+---------------+
|Tables_in_rep |
+---------------+
| test1 |
| test2 |
+---------------+
2 rows in set(0.00 sec)
在client端,插入数据:
mysql>insert into rep.test2 values(1,20);
Query OK, 1row affected (0.31 sec)
mysql>select * from rep.test2;
+------+------+
| id | num |
+------+------+
| 1 | 20 |
+------+------+
1 row in set(2.11 sec)
master:
mysql>select * from rep.test2;
+------+------+
| id | num |
+------+------+
| 1 | 20 |
+------+------+
1 row in set(0.00 sec)
slave01:
mysql>select * from rep.test2;
+------+------+
| id | num |
+------+------+
| 1 | 20 |
+------+------+
1 row in set(0.66 sec)
slave02:
mysql>select * from rep.test2;
+------+------+
| id | num |
+------+------+
| 1 | 20 |
+------+------+
1 row in set(0.04 sec)
至此,mysql读写分离和主从复制的配置就到此结束了。
小结:
1.如果主从复制需要重新配置,那么关掉slave,然后重新配置
change masterto
master_host='192.168.240.135',
master_user='username',
master_password='123456',
master_log_file='mysql-bin.000005',
master_log_pos=***;
然后在启动slave,查看状态Slave_IO_Running、Slave_SQL_Running是否两个都为yes,就行了。
2.无论做读写分离还是主从复制,都要保证数据库的一致性。
3.MySQL-Proxy实际上非常不稳定,在高并发或有错误连接的情况下,进程很容易自动关闭,因此打开�Ckeepalive参数让进程自动恢复是个比较好的办法,但还是不能从根本上解决问题,因此通常最稳妥的做法是在每个从服务器上安装一个MySQL-Proxy供自身使用,虽然比较低效但却能保证稳定性;