搭建HTTP网站环境
实验环境:
一台linux server ip:192.168.1.254 一台linux client ip:192.168.1.2 一台win7 client ip:192.168.1.170
实验需求:
1:基本HTTP配置要求:Web服务器域名:www.tarena.com,默认首页:index.html、index.php,开启保持连接
2:访问控制:只允许192.168.1.2访问,允许所有人访问/var/www/html/authdir
客户端访问http://www.tarena.com/authdir需要输入用户名
3:简单优化:访问http://www.tarena.com/sina时可以访问/var/www/html/sina.com/bbs下的网页
更改默认进程管理方式为worker模式
注:实验中/var/www/html/authdir和/var/www/html/sina.com/bbs已通过mkdir创建,并且域名可通过/etc/host解析
实现步骤:
1:安装apache程序
[root@server ~]# rpm -ivh httpd-2.2.3-74.el5.rpm
2:启动服务
[root@server conf]# service httpd start
3:设置为开机启动
[root@server conf]# chkconfig httpd on
4:备份主配置文件
[root@server conf]# cp /etc/httpd/conf/{httpd.conf,httpd.conf.bak}
5:配置主配置文件
[root@server conf]# vim /etc/httpd/conf/httpd.conf
...
74 KeepAlive on//保持连接开启
...
116 <IfModule worker.c>//worker模式参数
117 StartServers         2//初始进程数
118 MaxClients         150//最大客户端书
119 MinSpareThreads     25//最小空闲线程数
120 MaxSpareThreads     75//最大空闲线程数
121 ThreadsPerChild     25//每进程可提供的线程数
122 MaxRequestsPerChild  0//每进程最多可处理的请求数,默认不限制
123 </IfModule>
...
265 ServerName www.tarena.com:80//设置网站域名
...
281 DocumentRoot "/var/www/html"//设置网站根目录
...
306 <Directory "/var/www/html">//网站根目录的权限控制
...
332     Order allow,deny
333     Allow from 192.168.1.2
334 </Directory>
336 <Directory "/var/www/html/authdir">//authdir目录的单独权限控制和开启用户名登陆
337         Order allow,deny
338         Allow from all
339         AuthName "auth password"
340         AuthType "Basic"
341         AuthUserFile "/etc/httpd/.htmlpasswd"
342         require valid-user
343 </Directory>
...
398 DirectoryIndex index.html index.html.var index.php//定义默认首页名
...
999 alias /sina "/var/www/html/sina.com/bbs"//定义目录别名
6:更改http进程模式
[root@server conf]# mv /usr/sbin/httpd /usr/sbin/httpd.prefork//默认为prefork模式
[root@server conf]# mv /usr/sbin/httpd.worker /usr/sbin/httpd//更改为worker模式
7:添加http后台登陆用户
[root@server conf]# htpasswd -c /etc/httpd/.htmlpasswd admin //第一次添加用户并创建密码文件
New password: ***
Re-type new password:***
Adding password for user admin
[root@server conf]# htpasswd -b /etc/httpd/.htmlpasswd htmluser 123//在密码文件中继续添加用户和密码
Adding password for user htmluser
[root@server conf]# tail /etc/httpd/.htmlpasswd
admin:m5NP3XY1tFyhc
htmluser:vCeq5o2IVMr1o
8:重启服务
[root@server conf]# service httpd restart
9:创建测试首页文件
[root@server conf]# echo “http is ok”> /var/www/html/index.html
[root@server conf]# echo “auth all”> /var/www/html/authdir/index.html
[root@server conf]# echo “sina”> /var/www/html/sina.com/bbs/index.html
10:客户端测试
linux

验证只可192.168.1.2访问 验证所有ip都可通过用户名密码来访问后台 验证目录别名和根目录权限继承
win7

总结:通过本实验可以了解搭建apache服务器过程,并且实现常用的功能:基于网络的访问控制,用用户名密码登陆网站后台,网站目录别名设置,更改http进程模式实现大并发需求等。
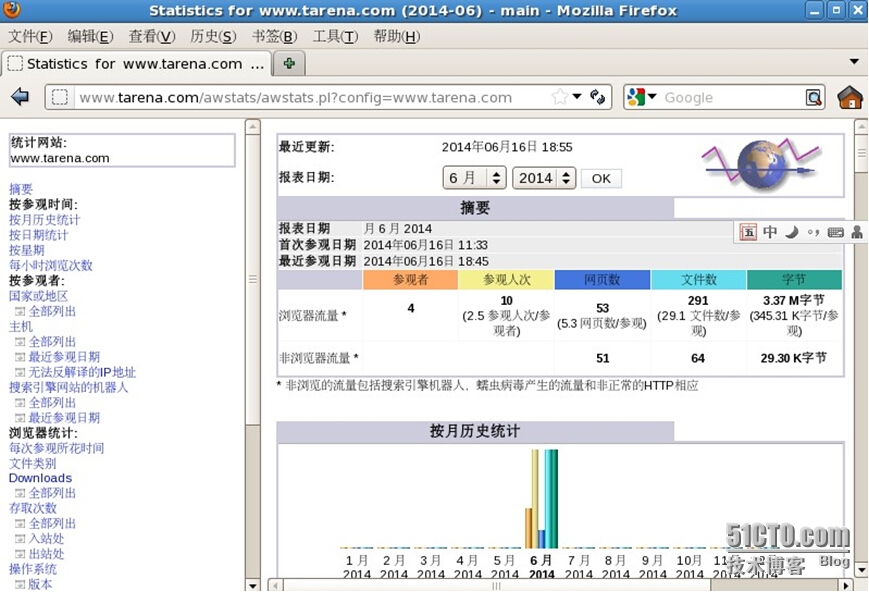
扩展:部署Awstats软件来以网页图形化界面统计Http访问日志
1:安装软件
[root@server ~]# cd /usr/src/
[root@server src]# tar -zxvf awstats-7.1.tar.gz -C /usr/local/
[root@server src]# cd /usr/local/
[root@server local]# mv awstats-7.1/ awstats
[root@server local]# cd awstats/tools/
[root@server tools]# ./awstats_configure.pl
...
Config file path ('none' to skip web server setup):
> /etc/httpd/conf/httpd.conf    //输入apache的主配置文件位置
...
file (required if first install) [y/N] ? y   //生成awstats的配置文件
...
Your web site, virtual server or profile name:
> www.tarena.com            //输入web服务器名
...
Press ENTER to finish...
2:修改主配置文件
[root@localhost tools]# vim /etc/awstats/awstats.www.tarena.com.conf
...
51 LogFile="/var/log/httpd/access_log"//指定要统计的log文件位置
...
[root@localhost tools]# mkdir /var/lib/awstats
3:设置计划任务将日志文件导入Awstats
[root@localhost tools]# crontab -e
5 * * * * /usr/local/awstats/tools/awstats_updateall.pl now
[root@localhost tools]# service crond restart
[root@localhost tools]# chkconfig crond on
4:效果:
