Centos6.5系统安装kvm虚拟机之克隆、拷贝文件安装新虚拟机
Centos 6.5 x86_64系统安装kvm虚拟机―克隆、拷贝xml文件安装新虚拟机
一、通过模板虚拟机克隆新虚拟机
IP规划:
宿主机:10.0.1.149
模板虚拟机:10.0.1.228
克隆虚拟机:10.0.1.100
关闭或者暂停模板虚拟机,再进行克隆安装新虚拟机。
[root@taokey ~]# virt-clone -o kvm_mode_5566 -n mysql-server -f /data/kvmdisk/mysql-server.qcow2
ERROR    Domain with devices to clone must be paused or shutoff.
报错原因:由于没有关闭模板主机,我们关闭模板主机再试下。
解决kvm环境下可以使用shutdown命令让虚拟机关机,但不生效。
[root@taokey ~]# yum install -y acpid
[root@taokey ~]# virsh
Welcome to virsh, the virtualization interactive terminal.

Type:  'help' for help with commands
       'quit' to quit

virsh # list --all
 Id    Name                           State
----------------------------------------------------
 1     kvm_mode_5566                  running

virsh # shutdown kvm_mode_5566
Domain kvm_mode_5566 is being shutdown

virsh # list --all
 Id    Name                           State
----------------------------------------------------
 -     kvm_mode_5566                  shut off
2.通过virt-clone命令克隆虚拟机。
[root@taokey ~]# virt-clone -o kvm_mode_5566 -n mysql-server -f /data/kvmdisk/mysql-server.qcow2
Cloning kvm_mode.img                                                                                         |  10 GB     03:43

Clone 'mysql-server' created successfully.

3.手动更改xml配置文件中VNC端口,然后重启libvirtd服务。
[root@taokey ~]# more /etc/libvirt/qemu/mysql-server.xml | grep vnc
    <graphics type='vnc' port='7789' autoport='no' listen='0.0.0.0'>
[root@taokey ~]# /etc/init.d/libvirtd restart
Stopping libvirtd daemon:                                  [  OK  ]
Starting libvirtd daemon: 2014-08-16 02:08:44.921+0000: 3112: info : libvirt version: 0.10.2, package: 29.el6_5.11 (CentOS BuildSystem <http://bugs.centos.org>, 2014-07-31-18:52:08, c6b8.bsys.dev.centos.org)
2014-08-16 02:08:44.921+0000: 3112: warning : virGetHostname:2294 : getaddrinfo failed for 'taokey': Name or service not known
                                                           [  OK  ]
4.启动新克隆成功的虚拟机。
[root@taokey ~]# virsh start mysql-server
Domain mysql-server started
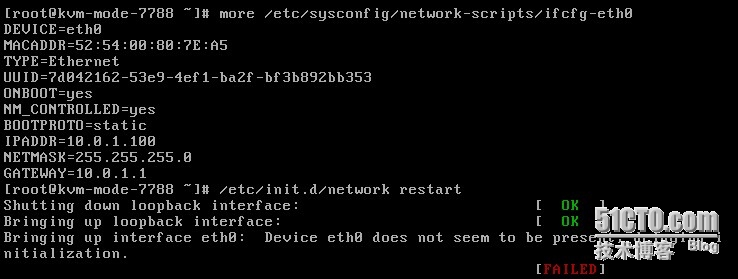
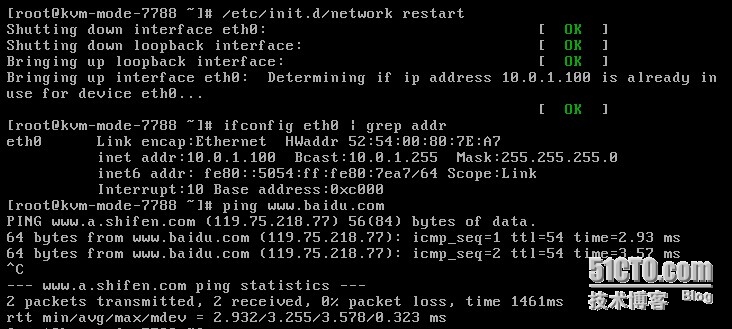
5.通过VNC客户端链接,配置eth0网卡。
 解决办法:
解决办法:
rm -rf /etc/udev/rules.d/70-persistent-net.rules
修改下MAC地址和UUID 如图所示:

然后reboot新虚拟机。

二、通过拷贝xml文件方式安装新虚拟机
制作虚拟机镜像。
[root@taokey ~]# cd /data/kvmdisk/
[root@taokey kvmdisk]# cp mysql-server.qcow2 cache-server.qcow2
[root@taokey kvmdisk]# ll
total 1878560
-rwxr-xr-x 1 root root 10739318784 Aug 15 22:24 cache-server.qcow2
-rwxr-xr-x 1 qemu qemu 10739318784 Aug 15 22:25 mysql-server.qcow2
2.创建xml文件。
[root@taokey kvmdisk]# cd /etc/libvirt/qemu
[root@taokey qemu]# ls
autostart  kvm_mode_5566.xml  mysql-server.xml  networks
[root@taokey qemu]# cp mysql-server.xml cache-server.xml
3.修改相应的参数。
uuid mac vnc 硬盘文件位置 虚拟机的主机名
uuid和mac:可以随意更改,但是格式一致
vnc:指定端口,不能跟其它虚拟机冲突
虚拟磁盘文件位置:/data/kvmdisk/cache-server.qcow2
[root@taokey qemu]# vim cache-server.xml
<uuid>d779256d-b82d-0ce6-520f-c4dda1596da9</uuid>
<mac address='52:54:00:9c:b8:0a'/>
<source file='/data/kvmdisk/cache-server.qcow2'/>
<graphics type='vnc' port='7790' autoport='no' listen='0.0.0.0'>
4.创建虚拟机。
[root@taokey qemu]# virsh define cache-server.xml
Domain cache-server defined from cache-server.xml
5.启动虚拟机。
[root@taokey qemu]# virsh start cache-server
Domain cache-server started
6.设置虚拟机自动重启。
[root@taokey qemu]# virsh autostart cache-server
Domain cache-server marked as autostarted
7.查看下所有的虚拟机。
[root@taokey ~]# virsh
Welcome to virsh, the virtualization interactive terminal.

Type:  'help' for help with commands
       'quit' to quit

virsh # list --all
 Id    Name                           State
----------------------------------------------------
 1     kvm_mode_5566                  running
 2     mysql-server                   running
 3     cache-server                   running
到此为止,实验结束。
本文出自 “岁月在流逝,光辉依然在” 博客,转载请与作者联系!