Zabbix监控Nginx状态,zabbix获取监控项graph图,zabbix监控磁盘I/O ,一键自动化安装zabbix
nginx需要支持 http_stub_status_module 编译的时候需要使用--with-http_stub_status_module
yum默认支持此选项

1. 配置nginx stuats
源码: vim nginx.conf
yum: vim /etc/nginx/conf.d/default.conf
#and add the following to your server block
location /nginx_status {
stub_status on;
access_log off;
allow 127.0.0.1;
allow 172.16.7.70; #Put your servers IPaddress instead of 172.16.7.70
deny all;
}

# 检测配置文件 nginx -t
# 重新加载配置文件 nginx -s reload
2.查看Nginx状态信息
curl localhost/nginx_status

Active connections: 1 当前活动的连接数
server accepts handled requests
3721 3721 3714
3721 从启动到现在一共处理的连接数
3721 从启动到现在成功创建的握手的次数
3714 总共处理的请求数(requests)
请求的丢失数=(握手-连接)
connection 连接数,tcp连接
request http请求,GET/POST/DELETE
Reading: 0 Writing: 1 Waiting: 0
Reading: 0 读取客户端Header的信息数 请求头
Writing: 1 返回给客户端的header的信息数 响应头
Waiting: 0 等待的请求数
3. zabbix客户端配置
#创建检测脚本
mkdir /usr/local/zabbix/scripts
vi /usr/local/zabbix/scripts/nginx_status.sh
#!/bin/bash
# Script to fetch nginx statuses for tribily monitoring systems
# Author: krish@toonheart.com

# License: GPLv2
# Set Variables
#BKUP_DATE=`/bin/date +%Y%m%d`
#LOG="/etc/zabbix/nginx_status.log"
HOST=`/sbin/ifconfig eth0 | sed -n '/inet /{s/.*addr://;s/ .*//;p}'`
PORT="80"
# Functions to return nginx stats
function active {
/usr/bin/curl "http://$HOST:$PORT/nginx_status" 2>/dev/null| grep 'Active' | awk '{print $NF}'
}
function reading {
/usr/bin/curl "http://$HOST:$PORT/nginx_status" 2>/dev/null| grep 'Reading' | awk '{print $2}'
}
function writing {
/usr/bin/curl "http://$HOST:$PORT/nginx_status" 2>/dev/null| grep 'Writing' | awk '{print $4}'
}
function waiting {
/usr/bin/curl "http://$HOST:$PORT/nginx_status" 2>/dev/null| grep 'Waiting' | awk '{print $6}'
}
function accepts {
/usr/bin/curl "http://$HOST:$PORT/nginx_status" 2>/dev/null| awk NR==3 | awk '{print $1}'
}
function handled {
/usr/bin/curl "http://$HOST:$PORT/nginx_status" 2>/dev/null| awk NR==3 | awk '{print $2}'
}
function requests {
/usr/bin/curl "http://$HOST:$PORT/nginx_status" 2>/dev/null| awk NR==3 | awk '{print $3}'
}
# Run the requested function
$1
# 对脚本赋予执行权限
chmod +x /usr/local/zabbix/scripts/nginx_status.sh
# 修改agent 配置文件
vim /usr/local/zabbix/etc/zabbix_agentd.conf
#开启自定义KEY功能
UnsafeUserParameters=1
UserParameter=nginx.accepts,/usr/local/zabbix/scripts/nginx_status.sh accepts
UserParameter=nginx.handled,/usr/local/zabbix/scripts/nginx_status.sh handled
UserParameter=nginx.requests,/usr/local/zabbix/scripts/nginx_status.sh requests
UserParameter=nginx.connections.active,/usr/local/zabbix/scripts/nginx_status.sh active
UserParameter=nginx.connections.reading,/usr/local/zabbix/scripts/nginx_status.sh reading
UserParameter=nginx.connections.writing,/usr/local/zabbix/scripts/nginx_status.sh writing
UserParameter=nginx.connections.waiting,/usr/local/zabbix/scripts/nginx_status.sh waiting
#重启zabbix_agentd /etc/init.d/zabbix_agentd restart
4.服务端测试
# /usr/local/zabbix/bin/zabbix_get -s 172.16.99.25 -knginx.accepts
12877
# 有信息返回说明配置正常


#模板 http://pan.baidu.com/s/1c00Aqcg
FAQ : 若果是无返回信息则说明agent端配置错误这是查看zabbix_agentd.log 的输出日志,排查错误

参考:http://oceanszf.blog.51cto.com/all/6268931
zabbix应用之获取监控项的一段时间graph曲线图
使用zabbix的过程中,我们经常有这样的需求:查看CPU或内存等监控项在某一时间段内的graph曲线图。通常的做法是进入"Latest data"界面,找到主机的监控项,点击右侧的"Graph",然后拖动时间条来寻找自己想要查看的时间段。这样做太麻烦了!
因此我写了一个脚本,来获取监控项在任意时间段的graph,并保存到本地(png格式)。此脚本可以跟Email告警脚本结合起来,实现在告警邮件里附上监控项的graph图片。
一、效果图
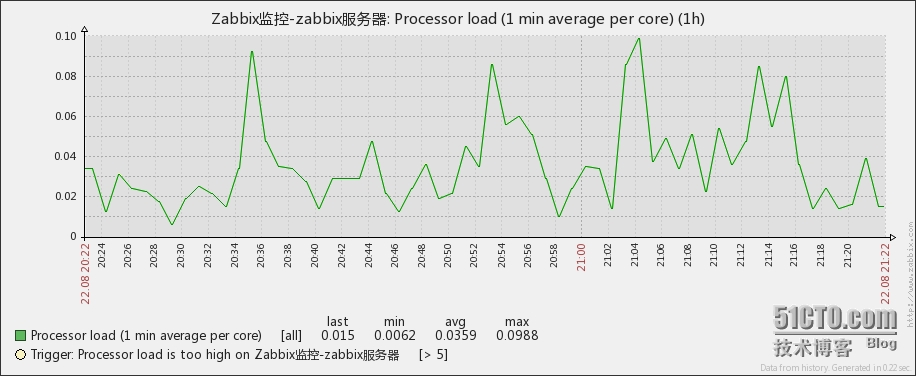
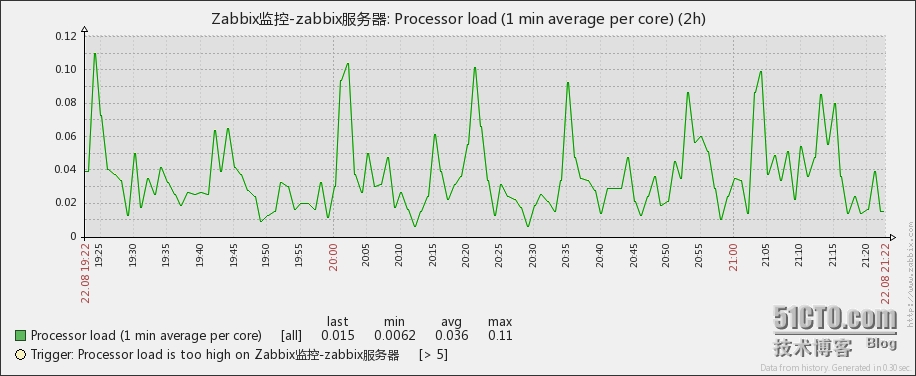
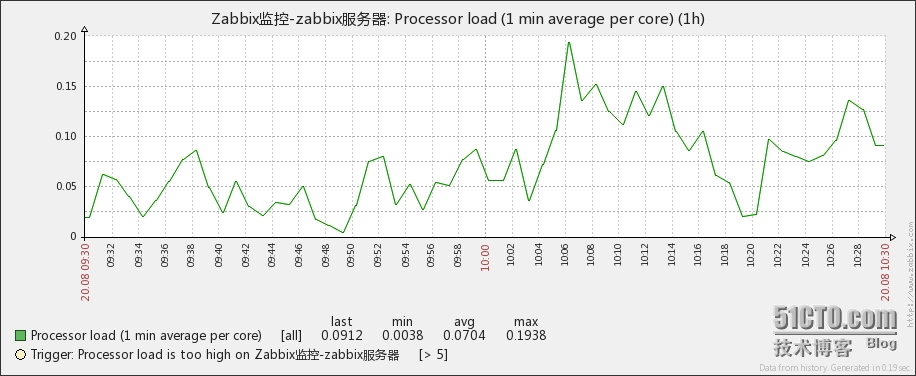
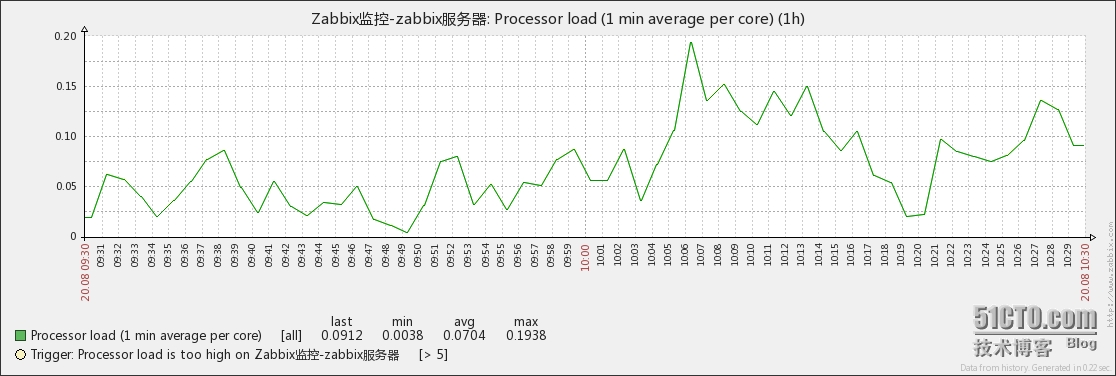
假如某一设备CPU load的监控项ID为25222。下面是获取25222在不同时间段的graph。
1、CPU load当前一个小时内的graph,图形宽度800

2、CPU load当前2个小时内的graph,图形宽度800


3、CPU load在2014-08-20 09:30:00到10:30:00的graph,图形宽度800


4、CPU load在2014-08-20 09:30:00到10:30:00的graph,图形宽度1000


二、getItemGraph.sh脚本
1、脚本功能
获取某一个监控项在某个时间段的graph,默认时间段为当前时间一个小时以内,可根据传入参数而改变。graph以png格式保存在/tmp/graph目录。
2、脚本命令行参数

脚本共有3个必需参数,3个可选参数,一个help参数:
-U USERNAME zabbix登录用户名,必需参数
-P PASSWORD zabbix登录密码,必需参数
-I ITEMID 监控项ID,必需参数
-s STIME graph起始时间start time,可选参数,格式:年月日时分秒
如果不传入此参数,则stop time默认为当前时间。
-p PERIOD graph持续时长,可选参数,默认为一个小时
一般情况下:stop time = start time + period
-w WIDTH graph图形宽度,默认为800
-h 输出帮助信息然后退出
执行脚本前,需要先修改脚本内的ZBX_URL变量:
# 自行修改ZBX_URL变量,改为你的zabbix的web访问地址,其他变量不需要改变
ZBX_URL=
"http://zabbix-frontend-hostname/zabbix"
3、脚本执行实例
获取当前一个小时内的graph
shell# ./getItemGraph.sh -U Admin -P xxxx -I xxxx
获取当前两个小时内的graph
shell# ./getItemGraph.sh -U Admin -P xxxx -I xxxx -p 7200
获取自定义时间段内的graph,比如:2014-08-20 09:30:00到11:30:00
shell# ./getItemGraph.sh -U Admin -P xxxx -I xxxx -s 20140820093000 -p 7200
获取自定义时间段内的graph,且图形宽度为1000,比如:2014-08-20 09:30:00到11:30:00
shell# ./getItemGraph.sh -U Admin -P xxxx -I xxxx -s 20140820093000 -p 7200 -w 1000
4、脚本代码
#!/bin/bash
# Filename:    getItemGraph.sh
# Description: 获取某一个监控项在某个时间段的graph
# Notes:       默认时间段为当前时间一个小时以内,可根据传入参数而改变
#              graph以png格式保存在/tmp/graph目录

# 自行修改ZBX_URL变量,改为你的zabbix的web访问地址,其他变量不需要改变
ZBX_URL="http://zabbix-frontend-hostname/zabbix"

USERNAME=""
PASSWORD=""
ITEMID=""
STIME=""
PERIOD=3600
WIDTH=800
GRAPH_DIR="/tmp/graph"
COOKIE="/tmp/zabbix_cookie"
CURL="/usr/bin/curl"
INDEX_URL="$ZBX_URL/index.php"
CHART_URL="$ZBX_URL/chart.php"

function help()
{
    cat << HELP
Usage:
    $0 -U <username> -P <password> -I <itemid> [-s <stime>] [-p <period>] [-w <width>] [-h]
Options:
    -U USERNAME     zabbix login username, required parameter
    -P PASSWORD     zabbix login password, required parameter
    -I ITEMID       itemid, integer, required parameter
    -s STIME        graph start time, integer
                    Example: 20140820093000
    -p PERIOD       period in seconds, integer
                    Default: $PERIOD
    -w WIDTH        graph width, integer
                    Default: $WIDTH
    -h              show this help and exit
HELP
        exit 1
}

function check_integer()
{
    # 判断参数,如果不是整数返回1
    local ret=`echo "$*" | sed 's/[0-9]//g'`
    [ -n "$ret" ] && return 1
    return 0
}

if [ $# == 0 ]; then
    help
fi

while getopts U:P:I:s:p:w:h OPTION;do
    case $OPTION in
        U) USERNAME=$OPTARG
        ;;
        P) PASSWORD=$OPTARG
        ;;
        I) ITEMID=$OPTARG
        check_integer "$ITEMID" || { echo "ERROR: Field 'ITEMID' is not integer."; exit 1;}
        ;;
        s) STIME=$OPTARG
        check_integer "$STIME" || { echo "ERROR: Field 'STIME' is not integer."; exit 1;}
        ;;
        p) PERIOD=$OPTARG
        check_integer "$PERIOD" || { echo "ERROR: Field 'PERIOD' is not integer."; exit 1;}
        [ $PERIOD -lt 3600 -o $PERIOD -gt 63072000 ] && { echo "ERROR: Incorrect value $PERIOD for PERIOD field: must be between 3600 and 63072000."; exit 1;}
        ;;
        w) WIDTH=$OPTARG
        check_integer "$WIDTH" || { echo "ERROR: Field 'WIDTH' is not integer."; exit 1;}
        ;;
        h|\?) help
        ;;
    esac
done

# USERNAME、PASSWORD、ITEMID为必需参数
[ -z "$USERNAME" -o -z "$PASSWORD" -o -z "$ITEMID" ] && help
# 如果没有传入STIME参数,STIME的值为当前时间减去PERIOD
[ "$STIME" == "" ] && STIME=`date -d "now -${PERIOD} second" +%Y%m%d%H%M%S`

echo USERNAME=$USERNAME PASSWORD=$PASSWORD ITEMID=$ITEMID STIME=$STIME PERIOD=$PERIOD WIDTH=$WIDTH

if [ ! -s "$COOKIE" ];then
    # 如果cookie文件不存在或者为空,则重新登录zabbix,并保存cookie文件
    ${CURL} -c ${COOKIE} -b ${COOKIE} -d "name=${USERNAME}&password=${PASSWORD}&autologin=1&enter=Sign+in" $INDEX_URL | egrep -o "(Login name or password is incorrect|Account is blocked.*seconds)"
    # 如果登录失败则退出脚本,并清空cookie文件
    [ ${PIPESTATUS[1]} -eq 0 ] && { :>"$COOKIE"; exit 1;}
fi

[ -d "$GRAPH_DIR" ] || mkdir -p "$GRAPH_DIR"
PNG_PATH="$GRAPH_DIR/$ITEMID.$STIME.$PERIOD.${WIDTH}.png"
# 获取item的graph,保存为png图片
${CURL} -b ${COOKIE} -d "itemid=${ITEMID}&period=${PERIOD}&stime=${STIME}&width=${WIDTH}" $CHART_URL > "$PNG_PATH"
[ -s "$PNG_PATH" ] && echo "Saved the graph as $PNG_PATH" || echo "Failed to get the graph."
echo "If the graph is not correct, please check whether the parameters are correct or clean $COOKIE file."
http://qicheng0211.blog.51cto.com/3958621/1539101
利用zabbix动态监控磁盘I/O http://john88wang.blog.51cto.com/2165294/1545834
一键自动化安装zabbix服务
OS:CentOS 6.2
zabbix版本:2.2.4
#!/bin/bash
# 脚本名称:一键自动化安装zabbix服务
# 作者:昨夜星辰
# 创建时间:2014-07-30
# 注意事项:
# 1.该脚本仅在CentOS最小化安装环境中测试成功,不一定适用于其他环境。
# 2.如需修改mysql数据库的root和zabbix用户的密码,请注意修改下面这两个变量!
mysql_user_root_password="redhat"
mysql_user_zabbix_password="zabbix"

echo -n "正在关闭SELinux……"
setenforce 0 > /dev/null 2>&1
sed -i '/^SELINUX=/s/=.*/=disabled/' /etc/selinux/config && echo "OK"

echo -n "正在配置iptables防火墙……"
iptables -F
iptables -X
iptables -A INPUT -m state --state RELATED,ESTABLISHED -j ACCEPT
iptables -A INPUT -m state --state NEW -m tcp -p tcp --dport 22 -j ACCEPT
iptables -A INPUT -m state --state NEW -m tcp -p tcp --dport 80 -j ACCEPT
iptables -A INPUT -p icmp -j ACCEPT
iptables -A INPUT -i lo -j ACCEPT
iptables -P INPUT DROP
iptables -P FORWARD DROP
service iptables save > /dev/null 2>&1 && echo "OK"

echo -n "正在安装zabbix的相关软件……"
yum -y install make gcc httpd mysql-server mysql-devel net-snmp-devel libcurl-devel php php-mysql php-bcmath php-mbstring php-gd php-xml wget > /dev/null 2>&1 && echo "OK"

echo -n "正在添加zabbix用户……"
useradd -M -s /sbin/nologin zabbix && echo "OK"

echo -n "正在启动mysqld服务……"
service mysqld start > /dev/null 2>&1 && echo "OK"

echo -n "正在为mysql的root用户设置密码……"
mysqladmin -uroot password $mysql_user_root_password && echo "OK"

echo "正在执行mysql语句……"
mysql -uroot -p$mysql_user_root_password -e "create database zabbix character set utf8" && echo "已执行1/2"
mysql -uroot -p$mysql_user_root_password -e "grant all privileges on zabbix.* to zabbix@localhost identified by '$mysql_user_zabbix_password'" && echo "已执行2/2"

echo -n "正在下载zabbix源码包……"
wget http://jaist.dl.sourceforge.net/project/zabbix/ZABBIX%20Latest%20Stable/2.2.4/zabbix-2.2.4.tar.gz > /dev/null 2>&1 && echo "OK"

echo -n "正在解压……"
tar zxf zabbix-2.2.4.tar.gz > /dev/null 2>&1 && echo "OK"

echo -n "正在安装……"
cd zabbix-2.2.4 &&
./configure --prefix=/usr/local/zabbix --enable-server --enable-agent --with-mysql --with-net-snmp --with-libcurl > /dev/null 2>&1 &&
make install > /dev/null 2>&1 && echo "OK"

echo "正在导入数据库……"
mysql -uzabbix -p$mysql_user_zabbix_password zabbix < $PWD/database/mysql/schema.sql && echo "已完成1/3"
mysql -uzabbix -p$mysql_user_zabbix_password zabbix < $PWD/database/mysql/images.sql && echo "已完成2/3"
mysql -uzabbix -p$mysql_user_zabbix_password zabbix < $PWD/database/mysql/data.sql && echo "已完成3/3"

echo -n "正在复制zabbix_server和zabbix_agentd服务到/etc/init.d/目录……"
cp $PWD/misc/init.d/fedora/core/zabbix_* /etc/init.d/ && echo "OK"

echo -n "正在复制php网页数据到/var/www/html/zabbix目录……"
cp -R $PWD/frontends/php/ /var/www/html/zabbix && echo "OK"

echo -n "正在修改/usr/local/zabbix/etc/zabbix_server.conf文件……"
sed -i '/^DBUser=/s/=.*/=zabbix/;/DBPassword=/s/$/\n\nDBPassword=zabbix/' /usr/local/zabbix/etc/zabbix_server.conf && echo "OK"

echo -n "正在修改/etc/init.d/zabbix_server和/etc/init.d/zabbix_agentd文件……"
sed -i '/BASEDIR=/s/$/\/zabbix/' /etc/init.d/zabbix_* && echo "OK"

echo -n "正在修改/etc/httpd/conf/httpd.conf文件……"
sed -i '/^DirectoryIndex/s/$/ index.php/' /etc/httpd/conf/httpd.conf && echo "OK"

echo -n "正在修改/etc/php.ini文件……"
sed -i '/^post_max_size/s/= .*/= 16M/;/^max_execution_time/s/= .*/= 300/;/^max_input_time/s/= .*/= 300/;/^;date.timezone/{s/;//;s/$/ Asia\/Shanghai/}' /etc/php.ini && echo "OK"

echo -n "正在修改/var/www/html/zabbix/conf/zabbix.conf.php文件……"
cp /var/www/html/zabbix/conf/zabbix.conf.php.example /var/www/html/zabbix/conf/zabbix.conf.php
sed -i 's/zabbix_password/'$mysql_user_zabbix_password'/' /var/www/html/zabbix/conf/zabbix.conf.php
echo "OK"

echo "正在添加服务到自动启动……"
chkconfig --add mysqld && chkconfig mysqld on && echo "mysqld服务已添加到自动启动"
chkconfig httpd on && echo "httpd服务已添加到自动启动"
chkconfig --add zabbix_server && chkconfig zabbix_server on && echo "zabbix_server服务已添加到自动启动"
chkconfig --add zabbix_agentd && chkconfig zabbix_agentd on && echo "zabbix_agentd服务已添加到自动启动"

echo "正在启动服务……"
service httpd start > /dev/null 2>&1 && echo "httpd服务已启动"
service zabbix_server start > /dev/null 2>&1 && echo "zabbix_server服务已启动"
service zabbix_agentd start > /dev/null 2>&1 && echo "zabbix_agentd服务已启动"
参考:http://yestreenstars.blog.51cto.com/1836303/1532665