Docker 入门
Docker是什么
Docker is an open platform for developers and sysadmins to build, ship, and run distributed applications. Consisting of Docker Engine, a portable, lightweight runtime and packaging tool, and Docker Hub, a cloud service for sharing applications and automating workflows, Docker enables apps to be quickly assembled from components and eliminates the friction between development, QA, and production environments. As a result, IT can ship faster and run the same app, unchanged, on laptops, data center VMs, and any cloud.(官方给出的定义)
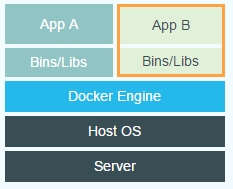
Docker和Virtual Machine区别
![P3V6M(8FP]06}MLJGRCFN_X.png wKiom1RA1dzSD2BeAABtDdplgB0796.jpg](http://s3.51cto.com/wyfs02/M00/4C/99/wKiom1RA1dzSD2BeAABtDdplgB0796.jpg)

(virtual machine) (docker)
有图有真相,少了hypervisor这层,难怪性能好多了!
Docker组成
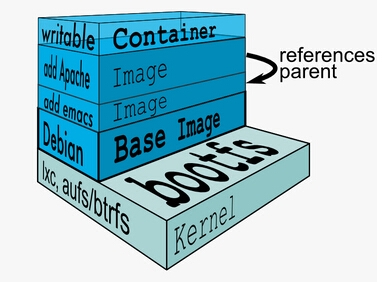
先来看下docker构成图

Docker主要由container(容器)和image(映像)组成。
Docker使用了一种称为aufs(需要kernel支持)的文件系统,这种文件文件系统可以层层叠加修改文件,最底下的文件系统是只读的,如果需要修改文件,aufs会增加一个可写的层,这个层就是container。不同的container可以共享底层的只读文件系统。
container是可写的层,通过dock commit 就可以将你的container变成一个新的只读的image。
Docker安装
环境:centos 6.5 x86_64 (centos7默认源自带docker软件包)
[root@compute1 ~]# rpm -Uvh http://mirrors.ustc.edu.cn/fedora/epel/6/x86_64/epel  # 安装epel源
[root@compute1 ~]# yum install docker-io    # 安装docker软件包
[root@compute1 ~]# service docker start      # 启动docker服务
[root@compute1 ~]# chkconfig docker on    # docker服务开机自启动
制作Docker映像
制作docker映像有好多种,可以看官方介绍 https://docs.docker.com/articles/baseimages/
这里我使用febootstrap(在epel源)来制作一个可以ssh的centos 6.5的docker映像
yum install febootstrap # 安装febootstrap软件包
febootstrap -i bash -i wget -i yum -i iputils -i iproute -i man -i vim-minimal -i openssh-server -i openssh-clients centos6.5 centos6.5-image https://mirrors.ustc.edu.cn/centos/6.5/os/x86_64/  # 安装需要的软件包,centos6.5-image是centos映像文件夹,有玩过chroot的童鞋应该都懂这个
cd centos6.5-image/ &&  tar -c . | docker import - centos6.5-base    # 创建docker 映像
[root@compute1 ~]# docker images  # 查看docker映像
REPOSITORY          TAG                 IMAGE ID            CREATED             VIRTUAL SIZE
centos6.5-base      latest              3f9c6605aa3b        6 days ago          311.2 MB
# 制作可以ssh的docker映像,推荐安装软件包使用Dockfile来定义
[root@compute1 ~]# vim Dockerfile   # 编写Dockfile
#Dockerfile
FROM centos6.5-base                                                                  # 定义基础映像
MAINTAINER ice <[email protected]>                            # 作者
RUN ssh-keygen -q -N "" -t dsa -f /etc/ssh/ssh_host_dsa_key         # RUN 可以执行shell命令
RUN ssh-keygen -q -N "" -t rsa -f /etc/ssh/ssh_host_rsa_key
RUN sed -ir 's/(.*pam_loginuid.so)/#\1/g' /etc/pam.d/sshd
RUN mkdir -p /root/.ssh && chown root.root /root && chmod 700 /root/.ssh
EXPOSE 22                                                           # 对外暴露22端口
RUN echo 'root:99cloud' | chpasswd                   # 配置root密码
ENV LANG en_US.UTF-8                                        # 配置环境变量
ENV LC_ALL en_US.UTF-8
CMD /usr/sbin/sshd -D                                          # CMD 表示构建映像时不会运行后面跟的命令,在实例化时才运行
#End
[root@compute1 ~]# ls /root/Dockerfile     # 这里看清楚Dockfile的路径,
/root/Dockerfile
[root@compute1 ~]# docker build -t centos6.5-ssh /root/    # 后面跟Dockfile的上一级目录
[root@compute1 ~]# docker images   # 查看docker映像
REPOSITORY          TAG                 IMAGE ID            CREATED             VIRTUAL SIZE
centos6.5-ssh       latest              5009964eb87d        6 days ago          311.3 MB
centos6.5-base      latest              3f9c6605aa3b        6 days ago          311.2 MB
[root@compute1 ~]# docker run -d -p 127.0.0.1:2222:22 centos6.5-ssh   # -p 映射docker实例的22端口到本地的2222端口,如果不加-p选项,会随机选择一个端口做映射
[root@compute1 ~]# ssh [email protected] -p 2222         # 登录到容器
[email protected]'s password:
Last login: Fri Oct 17 03:22:26 2014 from 172.17.42.1
-bash-4.1#
[root@compute1 ~]# docker help run # 后面还可以跟 --cpuset="" ,-m="" 来限制容器的cpu使用率和内存使
更详细的Dockerfile介绍 https://docs.docker.com/reference/builder/
自定义桥接网络
[root@compute1 ~]# service docker stop
[root@compute1 ~]# ifconfig docker0 down
[root@compute1 ~]# brctl delbr docker0
[root@compute1 ~]# brctl addbr bridge0
[root@compute1 ~]# ip addr add 192.168.5.1/24 dev bridge0
[root@compute1 ~]# ip link set dev bridge0 up
[root@compute1 ~]# vim /etc/sysconfig/docker
other_args="-b=bridge0"                            # docker宿主机的ip作为默认网关
[root@compute1 ~]# service docker start
参考链接
http://my.oschina.net/feedao/blog/223795
http://failshell.io/docker/building-a-centos-docker-base-image/
http://www.oschina.net/translate/docker-network-configuration