Microsoft ADFS+Shibboleth配置联合身份认证+单点登录服务
前段时间因为客户需要搭建了一个单点登录(SSO)系统,使用Shibboleth实现的,能够在访问特定Web资源时将AD中的用户名和密码作为登录凭据,其中shibboleth作为SP,ADFS作为IdP。
基础测试服务器至少需要两个,一个(服务器a)安装Windows Server 2012用来实现ADCS、ADDS、ADFS和SQL Server,另一个(服务器b)安装CentOS 6.6用来实现Web服务器、shibboleth SP。
关键几个步骤如下:配置各个服务器组件、配置服务器证书、配置shibboleth的配置文件(shibboleth2.xml)、配置adfs添加“信赖方信任”。下面详细说明一下。
配置服务器a
1.安装Windows Server 2012
2.安装Microsoft SQL Server 2012
3.添加新的管理员账户(不是Administrator)并添加到管理员组(Administrators),以后用此用户来登录并管理此服务器,不再使用Administrator。
4.添加一个服务账户并添加到IIS_IUSERS组中,之前可能需要安装“IIS”服务
5.调整电源管理策略以取消屏幕锁定,在“电源选项”中去掉“唤醒时的密码保护”―>“不需要密码”
6.调整计算机名称,将其改短,如ds,ad等,此处视情况而定
7.安装adds功能,将服务器提升为域控制器,合理设置NETBIOSYUMING,不使用dns委派。
8.安装合适的浏览器如Chrome,并取消IE增强的安全配置,安装合适的输入法并设为默认输入法,安装解压缩程序,如winrar等。
9.安装ad cs并配置安装好根证书,起好记又容易区分的名字,根证书(CA证书)一般命名为“主机名+二级域名+CA”,如一个域为ds.com,ADCS所在的计算机名为ds的CA名称一般为“ds-DS-CA”。
10.安装adfs,在此之前将先前(可以在步骤7完成)创建的管理员账户添加到“Domian Adminis”容器(用户组)中。
11.将第4步创建的服务账户加入SQL Server的登录许可中,即“指定的服务账户对数据库具有登录访问权限”,可不指定数据库实例名称,如果不指定名称则默认会创建“AdfsArtifactStore”和“AdfsConfiguration”两个数据库。
12.在安装adfs的过程中adcs会为adfs自己创建需要的证书,颁发给“主机名+主DNS后缀”,如一个域为ds.com,ADCS所在的计算机名为ds的证书名称一般为“ds.ds.com”,此域名用于adfs的联合身份验证名称和联合身份验证服务标识符,而且完整的联合身份验证服务标识符会被shibboleth用到。
配置服务器b,服务器选择CentOS6.6 64位
1.编译安装httpd,还可以选装最新的openssl
2.编译安装Shibboleth
wget http://shibboleth.net/downloads/log4shib/latest/log4shib-1.0.8.tar.gz
wget http://shibboleth.net/downloads/c++-opensaml/latest/xmltooling-1.5.3.tar.gz
wget http://shibboleth.net/downloads/c++-opensaml/latest/opensaml-2.5.3.tar.gz
wget http://www.apache.org/dyn/closer.cgi?path=/santuario/c-library/xml-security-c-1.7.2.tar.gz
wget http://mirrors.cnnic.cn/apache/santuario/c-library/xml-security-c-1.7.2.tar.gz
wget http://shibboleth.net/downloads/service-provider/latest/shibboleth-sp-2.5.3.tar.gz
tar zxf log4shib-1.0.8.tar.gz
cd log4shib-1.0.8
./configure --disable-static --disable-doxygen --prefix=/opt/shibboleth-sp
cd ..
tar zxf xerces-c-3.1.1.tar.gz
cd xerces-c-3.1.1
./configure --prefix=/opt/shibboleth-sp --disable-netaccessor-libcurl
cd ..
cd log4shib-1.0.8
make
make install
cd ..
cd xerces-c-3.1.1
make
make install
cd ..
tar zxf xml-security-c-1.7.2.tar.gz
cd xml-security-c-1.7.2
./configure --without-xalan --disable-static --prefix=/opt/shibboleth-sp --with-xerces=/opt/shibboleth-sp
make
make install
cd ..
tar zxf xmltooling-1.5.3.tar.gz
cd xmltooling-1.5.3
./configure --with-log4shib=/opt/shibboleth-sp --prefix=/opt/shibboleth-sp -C
make
make install
cd ..
tar zxf opensaml-2.5.3.tar.gz
cd opensaml-2.5.3
./configure --with-log4shib=/opt/shibboleth-sp --prefix=/opt/shibboleth-sp -C
make
make install
cd ..
wget http://shibboleth.net/downloads/service-provider/latest/shibboleth-sp-2.5.3.tar.gz
tar zxf shibboleth-sp-2.5.3.tar.gz
cd shibboleth-sp-2.5.3
./configure --with-log4shib=/opt/shibboleth-sp --enable-apache-24 --with-apxs24=/usr/local/httpd/bin/apxs --prefix=/opt/shibboleth-sp --with-apr1=/usr/local/apr-httpd/bin/apr-1-config --with-apu1=/usr/local/apr-util-httpd/bin/apu-1-config
make
make install
3.配置shibboleth的配置文件(shibboleth2.xml),可以借助shibd -t检查文件的合法性。
<SPConfig xmlns="urn:mace:shibboleth:2.0:native:sp:config"
xmlns:conf="urn:mace:shibboleth:2.0:native:sp:config"
xmlns:saml="urn:oasis:names:tc:SAML:2.0:assertion"
xmlns:samlp="urn:oasis:names:tc:SAML:2.0:protocol"
xmlns:md="urn:oasis:names:tc:SAML:2.0:metadata"
clockSkew="180">
<OutOfProcess>
<Extensions>
<Library path="/opt/shibboleth-sp/lib/shibboleth/adfs.so" fatal="true"/>
</Extensions>
</OutOfProcess>
<InProcess logger="native.logger">
<Extensions>
<Library path="/opt/shibboleth-sp/lib/shibboleth/adfs-lite.so" fatal="true"/>
</Extensions>
</InProcess>
<RequestMapper type="Native">
<RequestMap>
<Host scheme="https" name="ssl.ds.cn">
<Path name="/admin" authType="shibboleth" requireSession="true"/>
</Host>
</RequestMap>
</RequestMapper>
<ApplicationDefaults entityID="https://ssl.ds.cn/shibboleth" homeURL="https://ssl.ds.cn"
REMOTE_USER="eppn persistent-id targeted-id" signing="false" encryption="false" attributePrefix="AJP_">
<Sessions lifetime="28800" timeout="3600" relayState="ss:mem"
checkAddress="false" handlerSSL="true" cookieProps="https">
<SSO entityID="http://ds.ds.cn/adfs/services/trust"
discoveryProtocol="SAMLDS" discoveryURL="https://ds.example.org/DS/WAYF">
SAML2 SAML1
</SSO>
<Logout>SAML2 Local</Logout>
<Handler type="MetadataGenerator" Location="/Metadata" signing="false"/>
<Handler type="Status" Location="/Status" acl="127.0.0.1 ::1 172.16.179.3 172.16.172.33"/>
<Handler type="Session" Location="/Session" showAttributeValues="false"/>
<Handler type="DiscoveryFeed" Location="/DiscoFeed"/>
</Sessions>
<Errors supportContact="[email protected]"
helpLocation="/about.html"
styleSheet="/shibboleth-sp/main.css"/>
<MetadataProvider type="XML" file="ds.ds.cn-metadata.xml"/>
<AttributeExtractor type="XML" validate="true" reloadChanges="false" path="attribute-map.xml"/>
<AttributeResolver type="Query" subjectMatch="true"/>
<AttributeFilter type="XML" validate="true" path="attribute-policy.xml"/>
<CredentialResolver type="File" key="ssl.ds.cn.key" certificate="ssl.ds.cn.cer" password="xxxxx"/>
</ApplicationDefaults>
<SecurityPolicyProvider type="XML" validate="true" path="security-policy.xml"/>
<ProtocolProvider type="XML" validate="true" reloadChanges="false" path="protocols.xml"/>
</SPConfig>
4.配置httpd服务器,包括ssl访问,shibboleth模块
在配置ssl时需要向Windows ADCS申请证书,相关命令如下:
openssl genrsa -des3 -out ssl.ds.cn.key
openssl req -new -days 365 -key ssl.ds.cn.key -out ssl.ds.cn.req.pem
将此文件上传到服务器a上,此时可以通过ssl.ds.cn.req.pem文件向ADCS递交申请,方法是“certsrv”―>“证书颁发机构”-->在颁发机构名称上右键单击-->选择“所有任务”-->“提交一个新的申请”-->浏览文件“”--> 在“挂起的申请”中“颁发”证书-->“颁发的证书”中导出“二进制证书”,格式为cer。
注意,在Windows系统上导出cer证书时,务必选择“Base64 编码 X.509(.CER)”格式,可以通过文本编辑程序打开该文件,如果能阅读而不是二进制则可以在Linux系统上使用。例如,正确的格式为:
[root@chris ~]# cat /usr/local/httpd/conf/ssl/ssl.ds.cn.cer
-----BEGIN CERTIFICATE-----
MIIEsDCCApigAwIBAgITNAAAAAXejq4F/FazEQAAAAAABTANBgkqhkiG9w0BAQUF
……
-----END CERTIFICATE-----
[root@chris ~]# cat /usr/local/httpd/conf/ssl/ssl.ds.cn.key
-----BEGIN RSA PRIVATE KEY-----
Proc-Type: 4,ENCRYPTED
DEK-Info: DES-EDE3-CBC,153EEBA6AC815504
3CkVVP3qa1a569awfJJJJcJGpSOMuO7txQNPAUUjN5Ph55EaqHAbBHpWQp9m8m6+
……
-----END RSA PRIVATE KEY-----
[root@chris ~]#
配置shibboleth模块
[root@chris ~]# cat /usr/local/httpd/conf/extra/shibboleth.conf
#https://wiki.shibboleth.net/confluence/display/SHIB2/NativeSPLinuxSourceBuild
UseCanonicalName On
配置ssl虚拟主机
[root@chris ~]# delsc /usr/local/httpd/conf/extra/httpd-ssl.conf
Listen 443
SSLCipherSuite HIGH:MEDIUM:!aNULL:!MD5
SSLPassPhraseDialog builtin
SSLSessionCache "shmcb:/usr/local/httpd/logs/ssl_scache(512000)"
SSLSessionCacheTimeout 300
<VirtualHost ssl.ds.cn:443>
DocumentRoot "/usr/local/httpd/htdocs"
ServerName ssl.ds.cn:443
ServerAdmin [email protected]
ErrorLog "/usr/local/httpd/logs/ssl.ds.cn_error_log"
TransferLog "/usr/local/httpd/logs/ssl.ds.cn_access_log"
SSLEngine on
SSLCertificateFile "/usr/local/httpd/conf/ssl/ssl.ds.cn.cer"
SSLCertificateKeyFile "/usr/local/httpd/conf/ssl/ssl.ds.cn.key"
SSLCertificateChainFile "/usr/local/httpd/conf/ssl/ds-DS-CA.cer"
Include /opt/shibboleth-sp/etc/shibboleth/apache24.config
<Location /admin>
AuthType shibboleth
ShibRequestSetting requireSession 1
Require valid-user
ShibRequireSession on
ShibUseHeaders On
</Location>
<FilesMatch "\.(cgi|shtml|phtml|php)$">
SSLOptions +StdEnvVars
</FilesMatch>
<Directory "/usr/local/httpd/cgi-bin">
SSLOptions +StdEnvVars
</Directory>
BrowserMatch "MSIE [2-5]" \
nokeepalive ssl-unclean-shutdown \
downgrade-1.0 force-response-1.0
CustomLog "/usr/local/httpd/logs/ssl_request_log" \
"%t %h %{SSL_PROTOCOL}x %{SSL_CIPHER}x \"%r\" %b"
</VirtualHost>
[root@chris ~]#
4.启动shibd,/opt/shibboleth-sp/sbin/shibd
配置服务器a,添加信任方信赖即可。
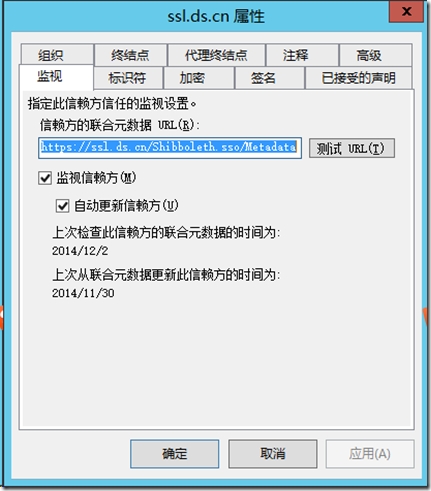
关键就是上图所示的“信赖方的联合元数据”这个url必须正确,而且测试能通过。
创建一个声明规则
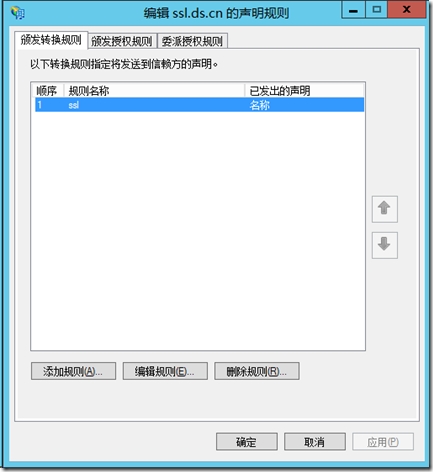
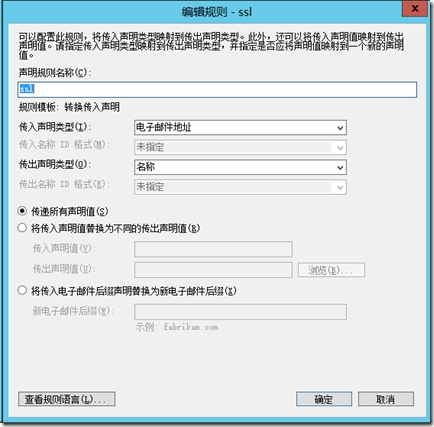
其中上图的“传入声明类型”可以任意指定。
配置服务器b
1.启动shibd
2.启动httpd
3.测试验证
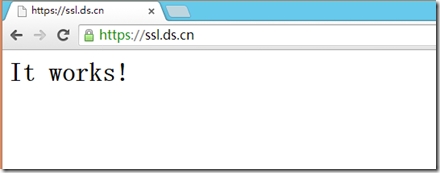
1)访问根(即https://ssl.ds.cn/),不需要验证,如下图所示
2)访问特定的目录(即https://ssl.ds.cn/admin/)则需要验证,输入域用户的用户名和密码即可通过验证,如下图所示
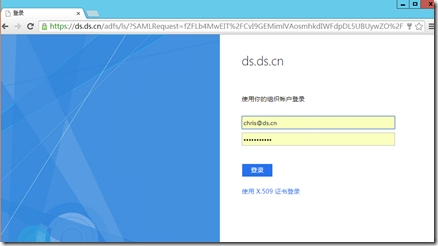
3)验证通过后出现正确的页面显示,如下图所示
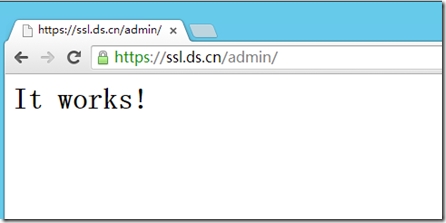
至此已经配置完成,可以根据shibboleth手册开发相关应用了。