AngularJS中自定义指令
AngularJS中除了内置指令,还可以自定义指令。自定义指令和自定义过滤器一样,有两种方法:
第一种,在module中配置:$compileProvider.directive('directiveName', function(){ });
代码模版为:
    $compileProvider.directive('', ['', function(){
    // Runs during compile
    return {
        // name: '',
        // priority: 1,
        // terminal: true,
        // scope: {}, // {} = isolate, true = child, false/undefined = no change
        // controller: function($scope, $element, $attrs, $transclude) {},
        // require: 'ngModel', // Array = multiple requires, ? = optional, ^ = check parent elements
        // restrict: 'A', // E = Element, A = Attribute, C = Class, M = Comment
        // template: '',
        // templateUrl: '',
        // replace: true,
        // transclude: true,
        // compile: function(tElement, tAttrs, function transclude(function(scope, cloneLinkingFn){ return function linking(scope, elm, attrs){}})),
        link: function($scope, iElm, iAttrs, controller) {

        }
    };
第二种,.directive('directiveName', function(){ });
代码模版为:
        .directive('', ['', function(){
            // Runs during compile
            return {
                // name: '',
                // priority: 1,
                // terminal: true,
                // scope: {}, // {} = isolate, true = child, false/undefined = no change
                // controller: function($scope, $element, $attrs, $transclude) {},
                // require: 'ngModel', // Array = multiple requires, ? = optional, ^ = check parent elements
                // restrict: 'A', // E = Element, A = Attribute, C = Class, M = Comment
                // template: '',
                // templateUrl: '',
                // replace: true,
                // transclude: true,
                // compile: function(tElement, tAttrs, function transclude(function(scope, cloneLinkingFn){ return function linking(scope, elm, attrs){}})),
                link: function($scope, iElm, iAttrs, controller) {

                }
            };
        }]);
可以看到,定义指令会返回一个对象,这个对象里面包含了各个属性(选项),这些属性(选项)就是用来定义指令的。
指令的名字不要和内置指令冲突,如果指令的名字为xxx-yyy,那么设置指令的名字时应为xxxYyy,即驼峰式的命名。
restrict: 描述指令在模版中的使用方式,包括:元素、样式类、属性、注释,或者以上几种方式的任意组合。
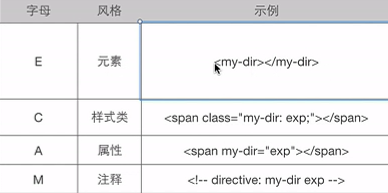
template: 以字符串的形式编写一个内联模板。
templateUrl: 加载模版所需要使用的url,如果已经指定了template,此属性会被忽略。
replace: 如果该属性为true,则替换指令所在的元素;如果为false或者不指定,则追加到元素内部。
例子:
<!DOCTYPE html>
<html ng-app="firstMoudule">

<head>
    <meta charset='utf-8'>
</head>

<body ng-controller="firstController">
    <!-- 使用自定义指令first-tag -->
    <div first-tag></div>

    <script src="http://cdn.bootcss.com/angular.js/1.4.0-rc.2/angular.min.js"></script>
    <script type="text/javascript">
    angular.module('firstMoudule', [], function($compileProvider, $controllerProvider) {
        $compileProvider.directive('firstTag', function() {
            return {
                restrict: 'A', // E = Element, A = Attribute, C = Class, M = Comment
                template: '<div>hello pomelo!</div>',
                replace: true
            };
        });
        $controllerProvider.register('firstController', function() {});
    });
    </script>
</body>

</html>
transclude: 当此属性为true时,把指令元素中原来的子节点移动到一个新模板的内部。
例子:
<!DOCTYPE html>
<html ng-app="firstMoudule">

<head>
    <meta charset='utf-8'>
</head>

<body ng-controller="firstController">
    <div first-tag>
        old data
    </div>
    <script src="http://cdn.bootcss.com/angular.js/1.4.0-rc.2/angular.min.js"></script>
    <script type="text/javascript">
    angular.module('firstMoudule', [], function($compileProvider, $controllerProvider) {
        $compileProvider.directive('firstTag', function() {
            return {
                restrict: 'A', // E = Element, A = Attribute, C = Class, M = Comment
                /*transclude为true时,old data会被放到具有ng-transclude属性的地方,也就是下面的span*/
                template: '<div>new data <span ng-transclude></span> </div>',
                replace: true,
                transclude: true
            };
        });
        $controllerProvider.register('firstController', function() {});
    });
    </script>
</body>

</html>
输出

priority: 设置指令在模板中的优先级,用整数来表示,数字大的优先级高,先执行。执行顺序是相对于元素上的其它指令而言的。如果两个指令的该值相同,则先定义的先执行。比如内置的ng-repeat该值为1000。
terminal: 和priority配合使用。如果此属性为true,那么priority比它小的都不会再执行。
例子:
<!DOCTYPE html>
<html ng-app="firstMoudule">

<head>
    <meta charset='utf-8'>
</head>

<body ng-controller="firstController">

    <!-- 同时使用两个指令 -->
    <div first-tag second-tag></div>

    <script src="http://cdn.bootcss.com/angular.js/1.4.0-rc.2/angular.min.js"></script>
    <script type="text/javascript">
    angular.module('firstMoudule', [], function($compileProvider, $controllerProvider) {
        $compileProvider.directive('firstTag', function() {
            return {
                restrict: 'A',
                priority: 10
            };
        });
        $compileProvider.directive('secondTag', function() {
            return {
                template: '<div>data</div>',
                replace: true,
                transclude: true,
                priority: 20,
                terminal: true
            };
        });
        $controllerProvider.register('firstController', function() {});
    });
    </script>
</body>

</html>
注意,这里同时使用两个指令,只能有一个里面template有内容,否则将出错。second-tag优先级较高,先执行,并且terminal为true,first-tag不会执行。
complie、link:虽然template的方式很有用,但对于指令来说,真正有趣的发生在complie和link函数中。这两个函数是根据Angular创建动态视图的两个处理阶段来命名的。Angular的初始化过程为:
1.加载脚本 加载Angular库,查找ng-app指令,从而找到应用的边界。
2.编译阶段 遍历DOM结构,标识出模版中注册的所有指令。对于每一条指令,如果存在complie函数,则调用complie函数得到一个编译好的template函数,template函数又会调用从所有指令收集来的link函数。编译阶段就是负责模板的转换。
3.链接阶段 为了让视图变成动态的,Angular会对每一条指令运行一个link函数。link函数负责在model和view之间进行动态关联。
complie函数仅仅在编译阶段运行一次,而link函数对于指令的每一个实例,都会执行一次。
对于我们会编写的大多数指令来说,并不需要对模板转换,只有编写link函数即可。有complie函数就不用再定义link函数了。
complie函数的语法为:
这里返回的相当于link函数。
compile: function(tElement, tAttrs,transclude) {
         return {
           pre: function preLink() { },
           post: function postLink() { }
          };
}
tElement是当前指令所在的jQuery对象。tAttrs是指令上定义的参数,比如指令fisrt-tag="123",则tAttrs为123 。这里transclude是一个函数,如果需要对内容进行变换,而简单的基于模板的变换并没有提供这种功能,那么可以自己写这个函数。
如果直接返回,则返回的是postLink,如下:
compile: function(tElement, tAttrs,transclude) {
         return function() { };
}
preLink在编译阶段之后,指令链接子元素之前运行。postLink在所有的子元素指令都链接后才运行。如果需要修改DOM结构,应该在postLink里面做这件事情,如果在preLink里面做则会破坏绑定过程,并导致错误。
例子
<!DOCTYPE html>
<html>

<head>
    <meta charset="utf-8">
</head>

<body ng-app="app">
    <div ng-controller="Controller1">
        <div tag1 tag2></div>
    </div>
    <script src="http://cdn.bootcss.com/angular.js/1.4.0-rc.2/angular.min.js"></script>
    <script type="text/javascript">
    angular.module('app', [], function($compileProvider) {
            $compileProvider.directive('tag1', function() {
                return {
                    restrict: 'A',
                    template: '<div>hello pomelo!</div>',
                    replace: true,
                    compile: function(tElement, tAttrs, transclude) {
                        console.log('tag1 complie...');
                        return {
                            pre: function preLink() {
                                console.log('tag1 preLink...');
                            },
                            post: function postLink() {
                                console.log('tag1 postLink...');
                            }
                        };
                    }
                };
            });
            $compileProvider.directive('tag2', function() {
                return {
                    restrict: 'A',
                    replace: false,
                    compile: function(tElement, tAttrs, transclude) {
                        console.log('tag2 complie...');
                        return {
                            pre: function preLink() {
                                console.log('tag2 preLink...');
                            },
                            post: function postLink() {
                                console.log('tag2 postLink...');
                            }
                        };
                    }
                };
            });
        })
        .controller('Controller1', function() {});
    </script>
</body>

</html>
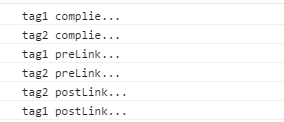
controller、controllerAs、require:controller会暴露一个API,通过这个API可以在多个指令之间通过依赖注入进行通信。controllerAs是给controller起一个别名,方便使用。require可以将其它指令传递给自己。
例子:
<!DOCTYPE html>
<html>

<head>
    <meta charset="utf-8">
</head>

<body ng-app="app">
    <div ng-controller="Controller1">
        <div tag1></div>
    </div>
    <script src="http://cdn.bootcss.com/angular.js/1.4.0-rc.2/angular.min.js"></script>
    <script type="text/javascript">
    angular.module('app', [], function($compileProvider) {
            $compileProvider.directive('tag1', function() {
                return {
                    restrict: 'A',
                    controller: function($scope) {
                        $scope.data = 'this is the data in controller';
                        this.Data = 'some Data';
                    },
                    controllerlAs: 'Controller',
                    link: function($scope, iElm, iAttrs, Controller) {
                        console.log($scope.data);
                        console.log(Controller.Data);
                    }
                };
            });
        })
        .controller('Controller1', function() {});
    </script>
</body>

</html>
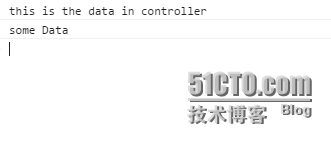
在多个指令间通信还需要require方法。
![030 - 自定义指令 req[00_01_00][20150702-094620-1].BMP wKioL1WUmf7DWC2TAARVnCycsyg274.bmp](http://s3.51cto.com/wyfs02/M01/6F/2F/wKioL1WUmf7DWC2TAARVnCycsyg274.bmp)
例子:
<!DOCTYPE html>
<html>

<head>
    <meta charset="utf-8">
</head>

<body ng-app="app">
    <div ng-controller="Controller1">
        <div parent-tag></div>
    </div>
    <script src="http://cdn.bootcss.com/angular.js/1.4.0-rc.2/angular.min.js"></script>
    <script type="text/javascript">
    angular.module('app', [])
        .directive('parentTag', function() {
            return {
                restrict: 'ECMA',
                template: '<div><ul><li ng-repeat="i in players">{{i.name}} {{i.number}}</li></ul><child-tag></child-tag></div>',
                replace: true,
                controller: function($scope) {
                    $scope.players = [{
                        name: 'Mertersacker',
                        number: 4
                    }, {
                        name: 'Koscielny',
                        number: 6
                    }, {
                        name: 'Gabriel',
                        number: 5
                    }];
                    this.addPlayer = function() {
                        $scope.$apply(function() {
                            $scope.players.push({
                                name: 'Chambers',
                                number: 21
                            });
                        });
                    }
                },
                controllerAs: 'parentController'
            };
        })
        .directive('childTag', function() {
            return {
                restrict: 'ECMA',
                require: '^parentTag',
                template: '<button>add player Chambers</button>',
                replace: true,
                link: function($scope, iElm, iAttrs, parentController) {
                    iElm.on('click', parentController.addPlayer);
                }

            }
        })
        .controller('Controller1', function() {});
    </script>
</body>

</html>

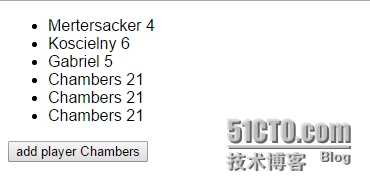
scope:指明指令所操控数据的作用域。
如果不指定,scope为false,会使用指令对应的DOM元素上存在的scope对象;
如果scope为true,则会创建一个scope,它继承了外层控制器中的scope,在继承树中,位于当前scope对象上方的所有scope对象的值都可以被读取。
如果scope为{attributeName:'bindingStratry',... ...}即一个对象时,会创建一个独立的对象。
对于scope是一个object的情况,有点复杂。此时scope的结构为:
scope:{
attributeName1:'&bindingStratry1',
attributeName2:'=bindingStratry2',
attributeName3:'@bindingStratry3'
}
当为&bindingStratry时,表示传递一个来自父scope的函数,稍后调用。
例子:
<!DOCTYPE html>
<html>

<head>
    <meta charset="utf-8">
</head>

<body ng-app="app">
    <div ng-controller="Controller1">


        <div my-tag obj="players"></div>


    </div>
    <script src="http://cdn.bootcss.com/angular.js/1.4.0-rc.2/angular.min.js"></script>
    <script type="text/javascript">
    angular.module('app', [])
        .directive('myTag', function() {
            return {
                restrict: 'ECMA',
                controller: function($scope) {
                    console.log($scope.myScopeFn());//myScopeFn必须以函数方法使用
                },
                scope: {
                    myScopeFn: '&obj'
                }
            }
        })
        .controller('Controller1', function($scope) {
            $scope.players = [{
                name: 'Mertersacker',
                number: 4
            }, {
                name: 'Koscielny',
                number: 6
            }, {
                name: 'Gabriel',
                number: 5
            }];
        });
    </script>
</body>

</html>
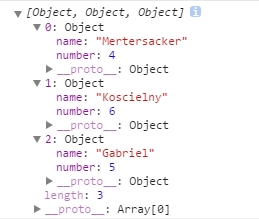
当为=bindingStratry时,表示传递一个来自父scope的属性,并且是和父scope中对应属性双向绑定的。
例子:
<!DOCTYPE html>
<html>

<head>
    <meta charset="utf-8">
</head>

<body ng-app="app">
    <div ng-controller="Controller1">

        <div my-tag obj="players"></div>

    </div>
    <script src="http://cdn.bootcss.com/angular.js/1.4.0-rc.2/angular.min.js"></script>
    <script type="text/javascript">
    angular.module('app', [])
        .directive('myTag', function() {
            return {
                restrict: 'ECMA',
                controller: function($scope) {
                    <!-- 双向数据绑定,可以操纵父scope的数据,这里添加一个元素进去 -->
                    $scope.myScopeAttr.push({
                        name: 'Ozil',
                        number: 11
                    });
                },
                scope: {
                    myScopeAttr: '=obj'
                }
            }
        })
        .controller('Controller1', function($scope) {
            $scope.players = [{
                name: 'Mertersacker',
                number: 4
            }, {
                name: 'Koscielny',
                number: 6
            }, {
                name: 'Gabriel',
                number: 5
            }];
            console.log($scope.players);
        });
    </script>
</body>

</html>
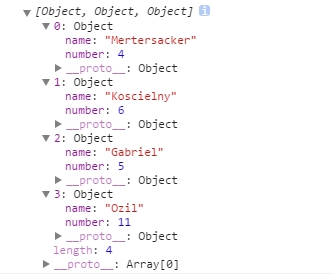
可以看到,父scope中players的数据改变了。=bindingStratry能双向数据绑定。
当为@bindingStratry时,表示读取一个来自父scope的属性,这个属性只读,无法改变。
例子:
<!DOCTYPE html>
<html>

<head>
    <meta charset="utf-8">
</head>

<body ng-app="app">
    <div ng-controller="Controller1">

        <!-- 这里要特别注意,要放在{{ }}里 -->
        <div my-tag obj="{{players}}"></div>


    </div>
    <script src="http://cdn.bootcss.com/angular.js/1.4.0-rc.2/angular.min.js"></script>
    <script type="text/javascript">
    angular.module('app', [])
        .directive('myTag', function() {
            return {
                restrict: 'ECMA',
                controller: function($scope) {
                    console.log($scope.myScopeAttr);
                },
                scope: {
                    myScopeAttr: '@obj'
                }
            }
        })
        .controller('Controller1', function($scope) {
            $scope.players = [{
                name: 'Mertersacker',
                number: 4
            }, {
                name: 'Koscielny',
                number: 6
            }, {
                name: 'Gabriel',
                number: 5
            }];
        });
    </script>
</body>

</html>

值得一提的是,@bindingStratry是把当前属性作为一个字符串传递,所以对象等引用类型传过来会变成字符串,最好还是传字符串类型的数据过来。