半自动化安装企业级邮件服务器
声明
作者:昨夜星辰
博客:http://yestreenstars.blog.51cto.com/
本文由本人创作,如需转载,请注明出处,谢谢合作!
目的
半自动化安装企业级邮件服务器。
主要软件介绍
操作系统:CentOS 6.6 32位系统(最小化安装)
postfix:用于发送邮件
dovecot:用于接收邮件和SMTP验证
mysql:用于存储虚拟邮件域、账号、邮箱等
postfixadmin:用于管理虚拟邮件域、账号、邮箱等
roundcube:提供webmail界面
脚本
#!/bin/bash
# 脚本名称:一键自动化安装企业邮件服务器
# 作者:昨夜星辰
# 创建时间:2015-02-05
# 修改时间:2015-02-10

MYSQL_USER_ROOT_PASSWORD='redhat'
MYSQL_USER_POSTFIX_PASSWORD='postfixadmin'
MYSQL_USER_ROUNDCUBE_PASSWORD='roundcube'
HOSTNAME='mail.test.com'

echo -n '正在关闭iptables和SELinux...'
(
service iptables stop
chkconfig iptables off
setenforce 0
[ -f /etc/selinux/config ] && sed -i '/^SELINUX=/s/=.*/=disabled/' /etc/selinux/config
) &> /dev/null && echo '完成' || exit

echo -n '正在安装并配置postfixadmin...'
(
yum -y install httpd mysql-server php php-mysql php-mbstring php-imap
sed -i '/^#ServerName/{s/#//;s/ .*/ '$HOSTNAME':80/};
/^DirectoryIndex/s/$/ index.php/;
/^AddType application\/x-gzip .gz .tgz$/aAddType application\/x-httpd-php .php' /etc/httpd/conf/httpd.conf
sed -i '/^;date.timezone/{s/;//;s/$/Asia\/Shanghai/}' /etc/php.ini
service mysqld start
chkconfig mysqld on
mysqladmin -uroot password $MYSQL_USER_ROOT_PASSWORD
mysql -uroot -p$MYSQL_USER_ROOT_PASSWORD << EOF
create database postfix;
grant all privileges on postfix.* to postfix@localhost identified by '$MYSQL_USER_POSTFIX_PASSWORD';
flush privileges;
EOF
tar xzf /tmp/mail/postfixadmin-2.92.tar.gz -C /var/www/html/
mv /var/www/html/postfixadmin-2.92 /var/www/html/postfixadmin
chown -R apache:apache /var/www/html/postfixadmin
sed -i '/^\$CONF/{
/configured/s/false/true/;
/default_language/s/en/cn/;
/database_password/s/postfixadmin/'$MYSQL_USER_POSTFIX_PASSWORD'/
}' /var/www/html/postfixadmin/config.inc.php
) &> /dev/null && echo '完成' || exit

echo -n '正在配置postfix...'
(
groupadd vmail -g 5000
useradd vmail -u 5000 -g 5000 -d /var/vmail -s /sbin/nologin
sed -i '/^#inet_interfaces = all$/s/#//;
/^inet_interfaces = localhost$/s/^/#/;
/^mydestination/{s/^/#/;n;s/#//}' /etc/postfix/main.cf
cat > /etc/postfix/mysql_virtual_alias_maps.cf << EOF
user = postfix
password = $MYSQL_USER_POSTFIX_PASSWORD
hosts = localhost
dbname = postfix
table = alias
select_field = goto
where_field = address
EOF
cat > /etc/postfix/mysql_virtual_domains_maps.cf << EOF
user = postfix
password = $MYSQL_USER_POSTFIX_PASSWORD
hosts = localhost
dbname = postfix
table = domain
select_field = domain
where_field = domain
#additional_conditions == and backupmx == '0' and active = '1'
EOF
cat > /etc/postfix/mysql_virtual_mailbox_maps.cf << EOF
user = postfix
password = $MYSQL_USER_POSTFIX_PASSWORD
hosts = localhost
dbname = postfix
table = mailbox
select_field = maildir
where_field = username
#additional_conditions == and active == '1'
EOF
chgrp postfix /etc/postfix/mysql_virtual_*
chmod 640 /etc/postfix/mysql_virtual_*
yum -y install cyrus-sasl*
cat >> /etc/postfix/main.cf << EOF

# Virtual Mailbox Domain Settings
#
virtual_alias_maps = mysql:/etc/postfix/mysql_virtual_alias_maps.cf
virtual_mailbox_domains = mysql:/etc/postfix/mysql_virtual_domains_maps.cf
virtual_mailbox_maps = mysql:/etc/postfix/mysql_virtual_mailbox_maps.cf
virtual_minimum_uid = 5000
virtual_uid_maps = static:5000
virtual_gid_maps = static:5000
virtual_mailbox_base = /var/vmail

# smtp auth
#
smtpd_sasl_auth_enable = yes
smtpd_sasl_type = dovecot
smtpd_sasl_path = private/auth
broken_sasl_auth_clients = yes
smtpd_recipient_restrictions = permit_mynetworks, permit_sasl_authenticated, reject_unauth_destination
EOF
) &> /dev/null && echo '完成' || exit

echo -n '正在安装并配置dovecot...'
(
yum -y install dovecot dovecot-mysql
sed -i '/^#disable_plaintext_auth/{s/#//;s/yes/no/};
/^!include auth-system.conf.ext$/s/^/#/;
/^#!include auth-sql.conf.ext$/s/#//' /etc/dovecot/conf.d/10-auth.conf
sed -i '/^#log_path = syslog$/{s/#//;s#syslog#/tmp/dovecot.log#}' /etc/dovecot/conf.d/10-logging.conf
sed -i '/^#mail_location/{s/#//;s#$#maildir:/var/vmail/%d/%n#};
/^#mail_.id/{s/#//;s/$/ 5000/}' /etc/dovecot/conf.d/10-mail.conf
sed -i '/Postfix smtp-auth/{
n;s/#//;
n;s/#//;s/$/\n    user = postfix\n    group = postfix/;
n;s/#//}' /etc/dovecot/conf.d/10-master.conf
cat > /etc/dovecot/dovecot-sql.conf.ext << EOF
driver = mysql
connect = host=localhost dbname=postfix user=postfix password=$MYSQL_USER_POSTFIX_PASSWORD
password_query = select password from mailbox where username = '%u' and active = 1
user_query = select maildir from mailbox where username = '%u' and active = 1
EOF
) &> /dev/null && echo '完成' || exit

echo -n '正在安装并配置roundcube...'
(
tar xzf /tmp/mail/roundcubemail-1.0.4.tar.gz -C /var/www/html/
mv /var/www/html/roundcubemail-1.0.4 /var/www/html/roundcubemail
chown -R apache:apache /var/www/html/roundcubemail/
yum -y install php-intl php-dom
rpm -ivh /tmp/mail/libmcrypt-2.5.8-9.el6.i686.rpm
rpm -ivh /tmp/mail/php-mcrypt-5.3.3-3.el6.i686.rpm
mysql -uroot -p$MYSQL_USER_ROOT_PASSWORD << EOF
create database roundcubemail;
grant all privileges on roundcubemail.* to roundcube@localhost identified by '$MYSQL_USER_ROUNDCUBE_PASSWORD';
flush privileges;
EOF
) &> /dev/null && echo '完成' || exit

echo -n '正在启动各种服务...'
(
service saslauthd start
chkconfig saslauthd on
service httpd start
chkconfig httpd on
service postfix restart
service dovecot start
chkconfig dovecot on
) &> /dev/null && echo '完成' || exit
配置postfixadmin
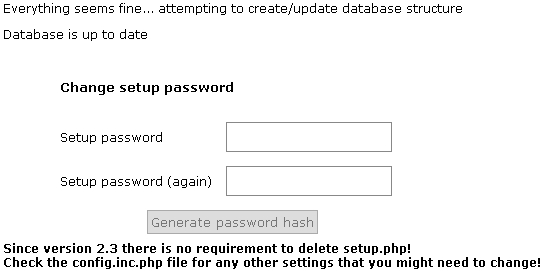
1.在浏览器中打开http://服务器IP/postfixadmin/setup.php,首次打开它会要求你设置setup的密码,如下图:
2.设置好密码后将新页面中出现的加密过的字符串(如下图红框里的字符串)复制一下,编辑服务器上的/var/www/html/postfixadmin/config.inc.php文件,找到$CONF['setup_password'] = 'changeme';这一行,将changeme改为刚才的字符串,然后回到页面,输入setup的密码,管理员的邮件地址和密码。
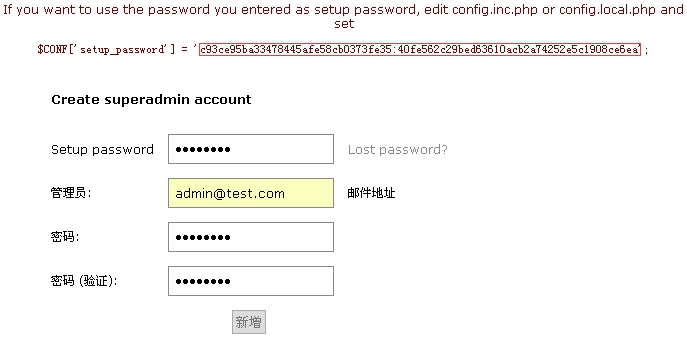
3.如果新增成功它会提示“新增管理员成功!”。
4.在浏览器中打开http://服务器IP/postfixadmin/login.php,输入刚才创建的管理员账号和密码就可以进入管理界面了,中文界面,使用方法我就不介绍了,很简单,自己研究吧,邮箱限额目前可能实现不了,我到时会再补充一篇文章实现该功能。
配置roundcube
1.在浏览器中打开http://服务器IP/roundcubemail/installer/,如果环境配置好的话,在网页的最下方会出现NEXT按钮,否则你需要根据页面提示的错误去调整了,一般情况下,按照我脚本安装的都不会出现问题。
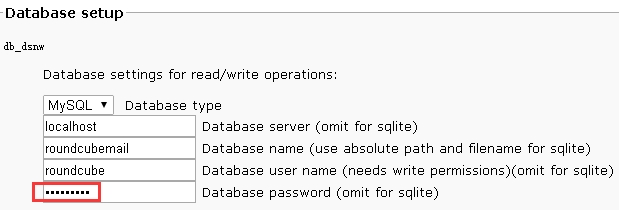
2.进入第二步,很多参数都不用修改,数据库密码需要自己填写,要与脚本中的密码对应上,如下图红框所示:
3.在“IMAP Settings”中有个“username_domain”可以根据自己的需要设置,比如我这里可以将它设为“test.com”,这样做的好处是用户在登录填写用户名时无需加上后缀域名。
4.在“Display settings & user prefs”中有个“language”,roundcube支持中文,所以你可以将它设为“zh_CN”。
5.最后单击最下方的“CREATE CONFIG”按钮。
6.它会提示你“The config file was saved successfully into RCMAIL_CONFIG_DIR directory of your Roundcube installation.”,然后单击“CONTINUE”继续。
7.在新的页面中你会看到如下图所示的内容:

8.单击“Initialize database”初始化数据库。
9.最后可以测试一下SMTP和IMAP是否正常,如下图所示:
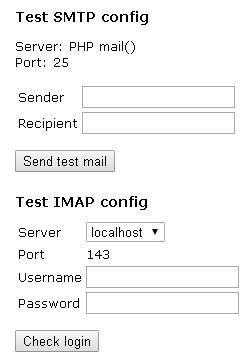
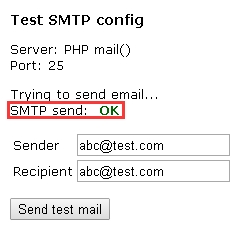
10.如果SMTP正常,测试结果应该如下图所示:
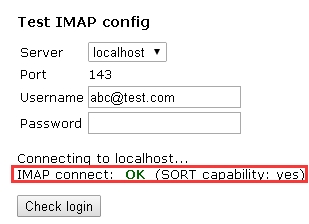
11.如果IMAP正常,测试结果应该如下图所示:
12.测试完成后应该在服务器上删除/var/www/html/roundcubemail/installer目录。
13.最后,可以打开http://服务器IP/roundcubemail/来登录邮箱了。
14.登录后你会发现只有一个邮箱――收件箱,如果你需要其他的邮箱,那就可以在服务器上创建一个脚本,插入以下内容:
#!/bin/bash
# 脚本名称:自动创建IMAP邮箱目录
# 作者:昨夜星辰
# 创建时间:2015-02-10
# 修改时间:2015-02-10

USER=${1%@*}
DOMAIN=${1#*@}

if [ ! $1 ]; then
	echo "你忘记输入邮箱名了,加上邮箱名后再试一遍吧^_^"
	exit 1
elif echo $1 | grep -vE '^[^@]+@[^@]+$' > /dev/null; then
	echo "你输入的邮箱格式有误,请检查后再试试^_^"
	exit 2
elif [ -d /var/vmail/$DOMAIN/$USER/ ]; then
	mkdir -p /var/vmail/$DOMAIN/$USER/{Sent,Trash,Drafts,Junk}
	chown -R vmail:vmail /var/vmail
	echo "邮箱已经创建好了^_^"
else
	echo "该邮箱不存在,请在后台创建好之后再试试^_^"
	exit 3
fi
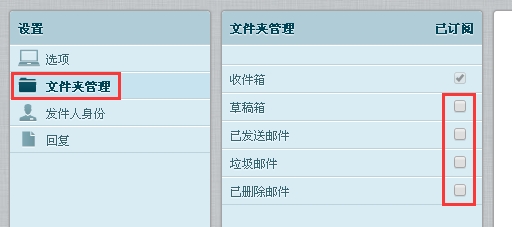
15.创建好邮箱后重新登录后还需要设置一下才能显示出来,打开http://服务器IP/roundcubemail/,输入用户名和密码进入邮箱后单击右上角的设置,出现如下图所示的设置,将需要的邮箱勾上即可。
整套系统到此就部署完毕了,如有疑问请留言,我有空会上来看看。